Forms and Responses
When we covered HTML a few chapters ago, we only covered the presentation part of HTML. The second part of HTML, and in many ways the part that starts to move us from web sites to web applications is forms.
HTML forms are sets of user interface controls that allow a user to enter data, and have that data transmitted to the web server. All of the user controls you are used to seeing on the web - text boxes, numeric inputs, drop downs, check boxes, and more - they are all HTML form controls - or input controls.
We'll examine each kind of control in this chapter. We'll see the default rendering of those controls, and later on we'll see how to use CSS to customize their appearance. Before reviewing all the different types of controls however, it's really important that we understand the basics.
A simple form
A form is just a <form> element on a standard HTML web page, with one or more controls in side of it. The form element is rendered by the browser as a block element, without any additional special styling. The form element has unique functionality, however. Based on attributes defined on the form element, HTML authors can command the web browser to initiate new HTTP requests to specified URLs, with data the user has input. The browser will then render the response it receives from the web server, just like if a user had clicked on a link or typed in a new URL in the address bar. HTML Forms initiate a normal request/response cycle, just like a click of a hyperlink - the difference is that the request can contain additional data found within the form, and the request may be either an HTTP GET or POST.
Let's take a look at the most simple form:
<!DOCTYPE html>
<html>
  <head>
    <title>This is a page with a form</title>
  </head>
  <body>
    <div>
        <p>Here's our first form!</p>
    </div>
    <form action="/destination", method="post">
        <input name="first" type="text"/>
        <br/>
        <input name="last" type="text"/>
        <br/>
        <button type="submit">Submit</button>
    </form>
  </body>
</html>
First, let's establish what this page looks like. Let's assume it is hosted on http://www.form-examples.com, at the root (/) page. The user has either arrived at this page by clicking on a link, or typing it directly into the address bar. It will look something like this:
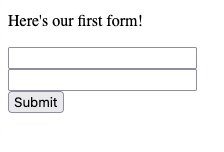
We'll see how to add labels and all sorts of nice things soon enough - let's just focus on what we see. The form element itself is just a block element, it doesn't have any specific appearance. There are three child elements within it (aside from the new line br elements) that are critical to the form. These are two input elements - which are rendered as empty text boxes, and one button of type submit.
First, understand that when the page is loaded, users can type into the two input fields. Typing into the fields do not cause the browser to take any action at all. Input elements can also be pre-initialized, but setting the value attribute directly:
<input name="first" value="John"/>
When the input field above is rendered, the text "John" will be pre-filled in the control, but remains editable by the user.
input elements are empty elements. They are self-closing. They must be written as one opening and self closing tag. <input ... /> not <input>...</input>.
In the form above, the button element is what will drive browser action. When the user clicks the button, the web browser responds by following the commands specified within the attributes of the form element the button is contained within:
<form action="/destination", method="post">
The method attribute tells the browser to create a POST request. The action attribute provides the relative URL to make the POST request to. In this case, since we established that this page was at http://www.form-examples.com, a POST request will be sent to http://www.form-examples.com/destination.
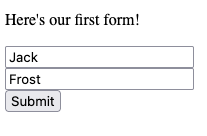
We saw what POSt requests looked like in the HTTP chapter. Given the data that was filled in above, let's look at what this particular HTTP request will look like:
POST /destination HTTP/1.1
Host: www.form-examples.com

Content-Length: 21
Content-Type: application/x-www-form-urlencoded

first=Jack&last=Frost
Let's examine first the header the browser will set when sending this request - Content-Type. The default format for an HTTP request body initiated by a form is application/x-www-form-urlencoded. It's a mouthful, but it's simply the MIME extension for form data, which are name / value pairs separated by ampersands - basically exactly like query strings.
The request body has the actual name/value pairs. The name attribute of each input element within the form is included, along with whatever value the input control currently has. In this case, we have two input elements, with name attributes first and last, which result in the request body above.
What happens to the request?
The HTTP request that the browser constructs arrives at the web server just like any other request. Now that we know more about JavaScript from the last chapter, let's take a look at a sample Node.js web server capable of serving the initial form, and handling the POST request sent when it is submitted.
The heading and footing functions below are just some helper functions to build the html boilerplate. send_page calls them, along with writing the HTTP header value to specify the type as HTML. Combined, send_page, heading and footing are just utilities for generating HTML responses.
const http = require('http');

const heading = () => {
    const html = `
        <!doctype html><html>
            <head><title>Form Example</title></head>
            <body>`;
    return html;
}

const footing = () => {
    return `</body></html>`;
}

const send_page = (res, body) => {
    res.writeHead(200, { 'Content-Type': 'text/html' });
    res.write(heading() + body + footing());
    res.end();
}
The next function we'll use is parse_form_data. We will receive a request body when we receive the HTTP POST request, and this function parses the form-encoded string (name value pairs, separated by &). It will return an object (form) representing the name value pairs found in the http request body. As written, this parsing is extremely unsophisticated. It isn't handling any of the HTTP character encodings (special characters, etc), and it's not robust to malformed request bodies. Remember, any program can send HTTP requests, so all code that handles requests needs to be extremely carefully written - otherwise your program could crash, or commit security infractions, as a result of malformed or cleverly (and maliciously) formed HTTP requests. We are going to replace this parsing with something far better shortly. For now, it's useful to see it's simplicity.
// This is a really unsophisticated way of parsing
// form data, we will replace it with something better
// very soon.
const parse_form_data = (data) => {
    const form = {};
    const fields = data.split('&');
    for (const f of fields) {
        const pair = f.split('=');
        form[pair[0].trim()] = pair[1].trim();
    }
    return form;
}
Now let's take a look at the code that is actually handling the HTTP requests. The handle_request function accepts a req object representing the request, and a res object representing the response. The handle_request function is registered as the function that called by the http server. You can see this happening at the very bottom -
http.createServer(handle_request).
The handle_request function is a first look at the type of branching we ultimately need to do in response to a request. Our web servers will do different things, based on if the request is GET or POST, and based on which URL it is to.
The easiest to understand is how a GET to / is handled. We simply send an HTML page, containing the form (the same form we saw earlier). The browser will render the form.
const handle_request = (req, res) => {
    if (req.method.toUpperCase() === 'GET' && req.url === '/') {
        // This a GET request for the root page - which is the HTML that
        // contains the form.
        send_page(res, `<form action="/destination", method="post">
                            <input name="first" type="text"/>
                            <br/>
                            <input name="last" type="text"/>
                            <br/>
                            <button type="submit">Submit</button>
                        </form>`);
    }
    else if (req.method.toUpperCase() === 'POST' && req.url === '/destination') {
        // The request body is streamed to our code, we need to register
        // a handler for the data.
        let body = "";
        req.on('data', (chunk) => {
            // This function gets called as chunks of data arrive.
            // In our case, it's probably just one chunk since
            // we have such little data, but we still need
            // to handle it using a callback like this (for now).
            body += chunk;
        });

        // Eventually, the stream of data arriving from the browser (the
        // request body) will end.  We register a function to be called
        // when that event occurs.
        req.on('end', () => {
            console.log(body);
            // The request body will look like this:
            // first=something&last=something
            body = parse_form_data(body);
            // We need to respond with an HTML page, let's just make
            // it have the data posted.
            send_page(res, `<p>Welcome ${body.first} ${body.last}</p>`);
        });
    }
    else {
        res.writeHead(404, { 'Content-Type': 'text/html' });
        res.write(heading() + `<p>Sorry, page not found</p>` + footing());
        res.end();
    }
}

http.createServer(handle_request).listen(8080);
The more complicated path is when the request is a POST for /destination. Here we need to process the incoming request a little more carefully. By default the http library will parse the HTTP request start line, and all header fields, and it makes them available on the req object. That's where we get the req.method and req.url properties from. The request body however is handled differently. Since HTTP request bodies can be arbitrary length, the http library exposes the body as a data stream. It's mimicking how the underlying socket works, where the request body is being read from the socket as as stream of characters.
To accomplish request body processing, we must tap into this stream. The req.on function allows us to register function handlers for when data arrives, and also when the stream has ended. The underlying http library will handle the detection of stream end - usually using the Content-Length header, but potentially using HTTP 1.1 chunking, etc.
Review the code above carefully. Notice that when we receive the POST to /destination, we actually do not send the page response right away at all. We register a small little function to append each chunk of the request body to a body variable. We register a function to be called when the request body stream has ended, and that function parses the request body, and builds a page to send to the browser at that time.
Note that we wrote the HTML form such that it posts to /destination. We could have just as easily had it post to /. This would not have created a conflict, as the POST is differentiated from the GET. In fact, it might be quite natural for the webserver to server the HTML containing the form in response to GET / and handle the form submission at POST /. It's totally up to you!
You can download the code above - form-server-1.js. It doesn't require any dependencies, you can download it and run it using node form-server-1.js command from your terminal. Then visit the page by typing http://localhost:8080 into your web browser.
Now go ahead and submit the form, buy clicking the "Submit" button. You'll notice the print out by the server (look at the terminal where you are running node form-server-1.js). It's showing the raw request body that was received. The request body is parsed, and an HTML page is generated.
Go ahead and add some more printouts. Experiment with it!
Alternative: Redirect
Note that sometimes web application developers prefer to process the incoming data and redirect to another page. After clicking submit, click the browser's "Refresh" button. You'll notice the browser throws up a warning message, something like this:
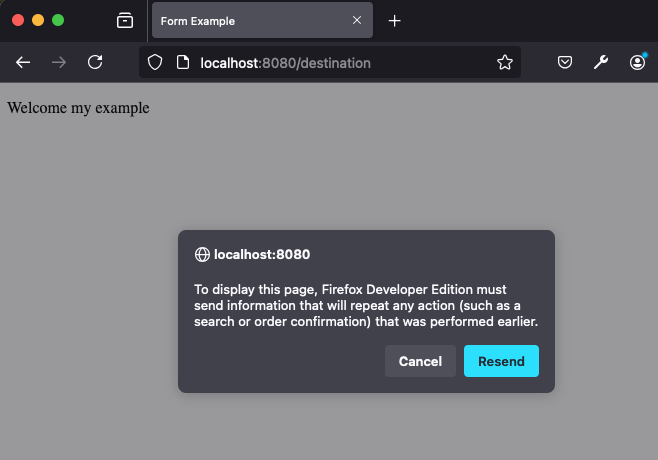
This message is indicating that clicking "Refresh" will result in the POST request being re-issued. This warrants a warning, because POST often has a some sort of side effect on the server. In our example, it doesn't - we just render a page - however often time a POST might be used to store data in a database, login, or something else. Contrast this with GET requests, which are supposed to be read-only. They should never alter the state of anything. GET requests are supposed to be idempotent - they can be repeated over and over again without any additonal effect. The browser is warning the user - it's being asked to repeat a POST request, which unlike a GET request, may actually change the server's state.
Sometimes, instead of rendering a page in response to a form submission, the web server instead issues a redirect to a landing page. Redirects (300 level responses) cause the browser to issue a GET request to the new location (set by the location header in the 300 response). The advantage is that now a browser "Refresh" is just repeating a GET. The disadvantage is that the redirect loses context. Unlike our result page above that contains the form data that was posted, a redirect will issue a brand new GET request, and the server will need to respond by creating an HTML page - but it no longer has the HTTP request body from the previous POST. There are solutions to this (for example, the POST may have stored data to a database, which can be retrieved when rendering the response to the new redirected GET), but we'll wait to see them for a bit.
POST or GET
HTML forms are often configured to result in HTTP POST messages. In the example above, we set methodequal to post to specify this. We learned in the HTTP chapter that there are other HTTP methods - GET, PATCH, PUT, DELETE. PATCH, PUT, and DELETE are not supported by HTML forms, however, GET certainly is.
Recall that an HTTP POST message may contain a message body, while a GET request cannot. So how would we have a form element that uses GET to submit it's data?
<form action="/destination", method="get">
    <input name="first"  type="text"/>
    <br/>
    <input name="last"  type="text"/>
    <br/>
    <button type="submit">Submit</button>
</form>
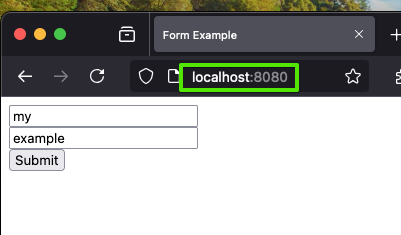
The form above will look identical to the form we had before, however when "Submit" is clicked, the web browser will generate a GET request to /destination instead of a POST. In addition, the form data (the name value pairs) will be appended as a query string. The resulting URL that the GET request will specify is as follows - assuming the user entered in "A" as the first name, and "B" as the last name:
http://localhost:8080/destination?first=A&last=B
Note that this means the form data is in the URL address bar of the browser. It also means that that URL is bookmarkable, it is linkable. We discussed query string when discussing HTTP requests.
Here's how we might handle the request in Node.js
const handle_request = (req, res) => {
if (req.method.toUpperCase() === 'GET' && req.url === '/') {
// This a GET request for the root page - which is the HTML that
// contains the form. NOTE we set method to GET now
send_page(res, `<form action="/destination", method="get">
<input name="first" type="text"/>
<br/>
<input name="last" type="text"/>
<br/>
<button type="submit">Submit</button>
</form>`);
}
else if (req.method.toUpperCase() === 'GET' && req.url.startsWith('/destination')) {
// The url is going to be /destination?first=A&last=B, so we need to compare
// with startsWith, rather than an exact match
console.log(req.url);
if (req.url.indexOf('?')) {
// Give parse_form_data the part of the url AFTER the ? symbol.
// Form data in the POST request body is formatted the same way
// as a query string in a GET message is, so we can reuse the same
// code.
body = parse_form_data(req.url.split('?')[1]);
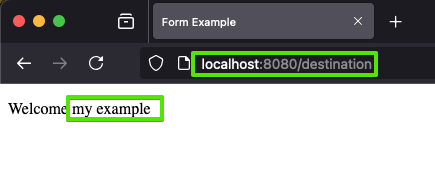
send_page(res, `<p>Welcome ${body.first} ${body.last}</p>`);
}
else {
send_page(res, `<p>No form data was sent!</p>`);
}
}
else if (req.method.toUpperCase() === 'POST' && req.url === '/destination') {
// we could still have processing code for POST too..
....
}
else {
res.writeHead(404, { 'Content-Type': 'text/html' });
res.write(heading() + `<p>Sorry, page not found</p>` + footing());
res.end();
}
}
You can simulate form submission by simply entering the http://localhost:8080/destination?first=A&last=B URL into the browser's address bar too - the web server cannot tell why it is receiving the HTTP GET message with a query string - it simply responds to it! If you type http://localhost:8080/destination without the query string, you'll see the message indicating that the query string was not present.
BTW - if you are wondering why forms don't support PATCH, PUT and DELETE. There are lots of reasons, but perhaps the most definitive is - legacy. Original specifications of HTML simply decided only GET and POST were to be supported by forms. There are too many legacy pages, legacy browsers, and legacy servers on the world wide web to effectively move on from those decisions. Unsatisfying - but it's the truth!
GET or POST for Form Data?
We've seen how to use GET or POST, and how that data will be processed server side. So, the question is - which should we use?
There's no one right answer. POST is the right approach when one or more of the following hold:
- You do not want the submitted data to appear in the address bar of the browser. This might be for privacy reasons, for example. Note, request body in a
POSTmessage is not secure (unless sent over https), but it is somewhat hidden from casual observers. Note also,POSTdata does not appear in web history. You would always usePOSTfor something like submitting login credentials, for example. - The data being submitted by the form is large. We will see more form controls soon (even file uploading), which never make sense as
GETrequests. GenerallyGETrequests are subject to query string lengths of a few thousand characters, if that. Request bodies associated withPOSTcan be many megabytes and gigabytes in length.
If you answer "yes" to the following, however - then GET might be the best option for your form:
- You do want the form data to be bookmarkable and shareable, so you do want the query string to be where the data is specified. This allows the the data in the form to be part of a web browsers page history, copyable, and easy to share.
http://localhost:8080/destination?first=A&last=Bcan be sent to anyone, and if they visit that page, with that query string, they will see exactly what you saw when you submitted the same form. This makes perfect sense for things like search results - where the search string is is submitted as a form. Users can share they URL, and it has the search string embedded with in it. Same for a web site that lets you get traffic directions - the form that the user enters the beginning and destination address can be submitted withGET, so the directions results are shareable.
Most forms are submitted with POST, but you should always make the decision consciously - don't just default to using POST or GET exclusively!
Buttons
You might be wondering, why do we need to put type="submit" in the button element. The reason is actually a bit more complicated than it should be.
button elements are controls, and they do not necessarily always need to cause a form submission. When we learn more about JavaScript (on the client), we will learn how to execute JavaScript code when buttons are clicked. This JavaScript may or may not need to interact with the web server at all - we don't want the web browser to take any action on our behalf, we just want our JavaScript code to run. For those kinds of buttons, we will use type="button" instead of type="submit".
According to the HTML standard, type attribute is required on the button element - but web browsers generally accept that if you leave the attribute off, it will treat the button as if it is of type "button". This feels like a good approach - this way, if the author of the web page doesn't add a type attribute, the button click results in no action by the web browser. This feels like a good approach today, but in the earlier years of web development - when buttons almost always were for form submission - browser made other assumptions. For example, most versions of Internet Explorer treated a button without a type as having type="submit"! This led to web pages potentially working very differently on different browsers - which is always bad news!
The bottom line - always specify - either submit or button (or a couple of others, which we will see in the next section).
Another interesting features of the button element is that it can optionally* accept a name attribute. When placing a name attribute on a button, it doubles as an input control that is encoded in the form data submitted.
<form action="/destination", method="post">
    <input name="first" type="text"/>
    <br/>
    <input name="last" type="text"/>
    <br/>
    <button type="submit" name="foo">Submit 1</button>
    <button type="submit" name="bar">Submit 2</button>
</form>
In the HTML form above, if the user clicks the "Submit 1" button, along with the first and last data, the parameter foo= will be placed in the request body. If the user clicks "Submit 2", then bar= will be in the body. Although there is no value, the presence of those parameters in the request body can be understood by the server - allowing the server to know which submit button was clicked. There are many situations where this can be helpful.
The name attribute
Explain how the name attribute should be a valid identifier What happens if two controls of the same name appear What happens if name is left out Name is not ID
Pro Tip💡 One of the most common mistakes new students make is forgetting the form element. The form element is not visible to the user (at least, not unless there is styling). Often, students will focus on what they see, and create HTML pages with input elements outside of form elements. The page looks just fine, but when the user clicks submit buttons, nothing happens. Worse yet, sometimes students do create a form element, but they put the input elements outside the form element! When you do this, your form element might very well submit (provided you've correctly set the action and method attributes, and included a button of type submit) - but the form data associated with elements outside the form aren't going to be submitted with the request! Make sure you understand this concept - form elements are the container of any input data you need to send in the form submission request. User control data only gets submitted with the HTTP request if the user control is within the form being submitted!